Apache Ignite AWS basics
Introduction
Cloud computing is on the rise for a couple of reasons: it is flexible, relatively cheap compared to supporting in-house infrastructure, and it allows excellent automation of resource allocation, which cuts costs even more.
Cloud computing also allows horizontal scalability, which is crucial for many businesses in today’s digital age. When the amount of data to be processed grows year-to-year, one cannot rely on old-fashioned vertical scalability models. In this era of distributed computing, data should be spread across multiple cheaper systems, where data can be stored reliably, processed, and returned to the user when needed.
Building such systems isn't an easy task, but luckily, there are solutions that fit perfectly into cloud architecture. I'm talking about Apache Ignite.
Getting the Environment Ready
I'm going to use the AWS cloud to deploy an Ignite cluster. So, let's talk a little bit about environment settings.
Here, for learning purposes, the smallest free tier machines are enough. I've chosen Ubuntu 18.04 image, but it doesn't make a huge difference.
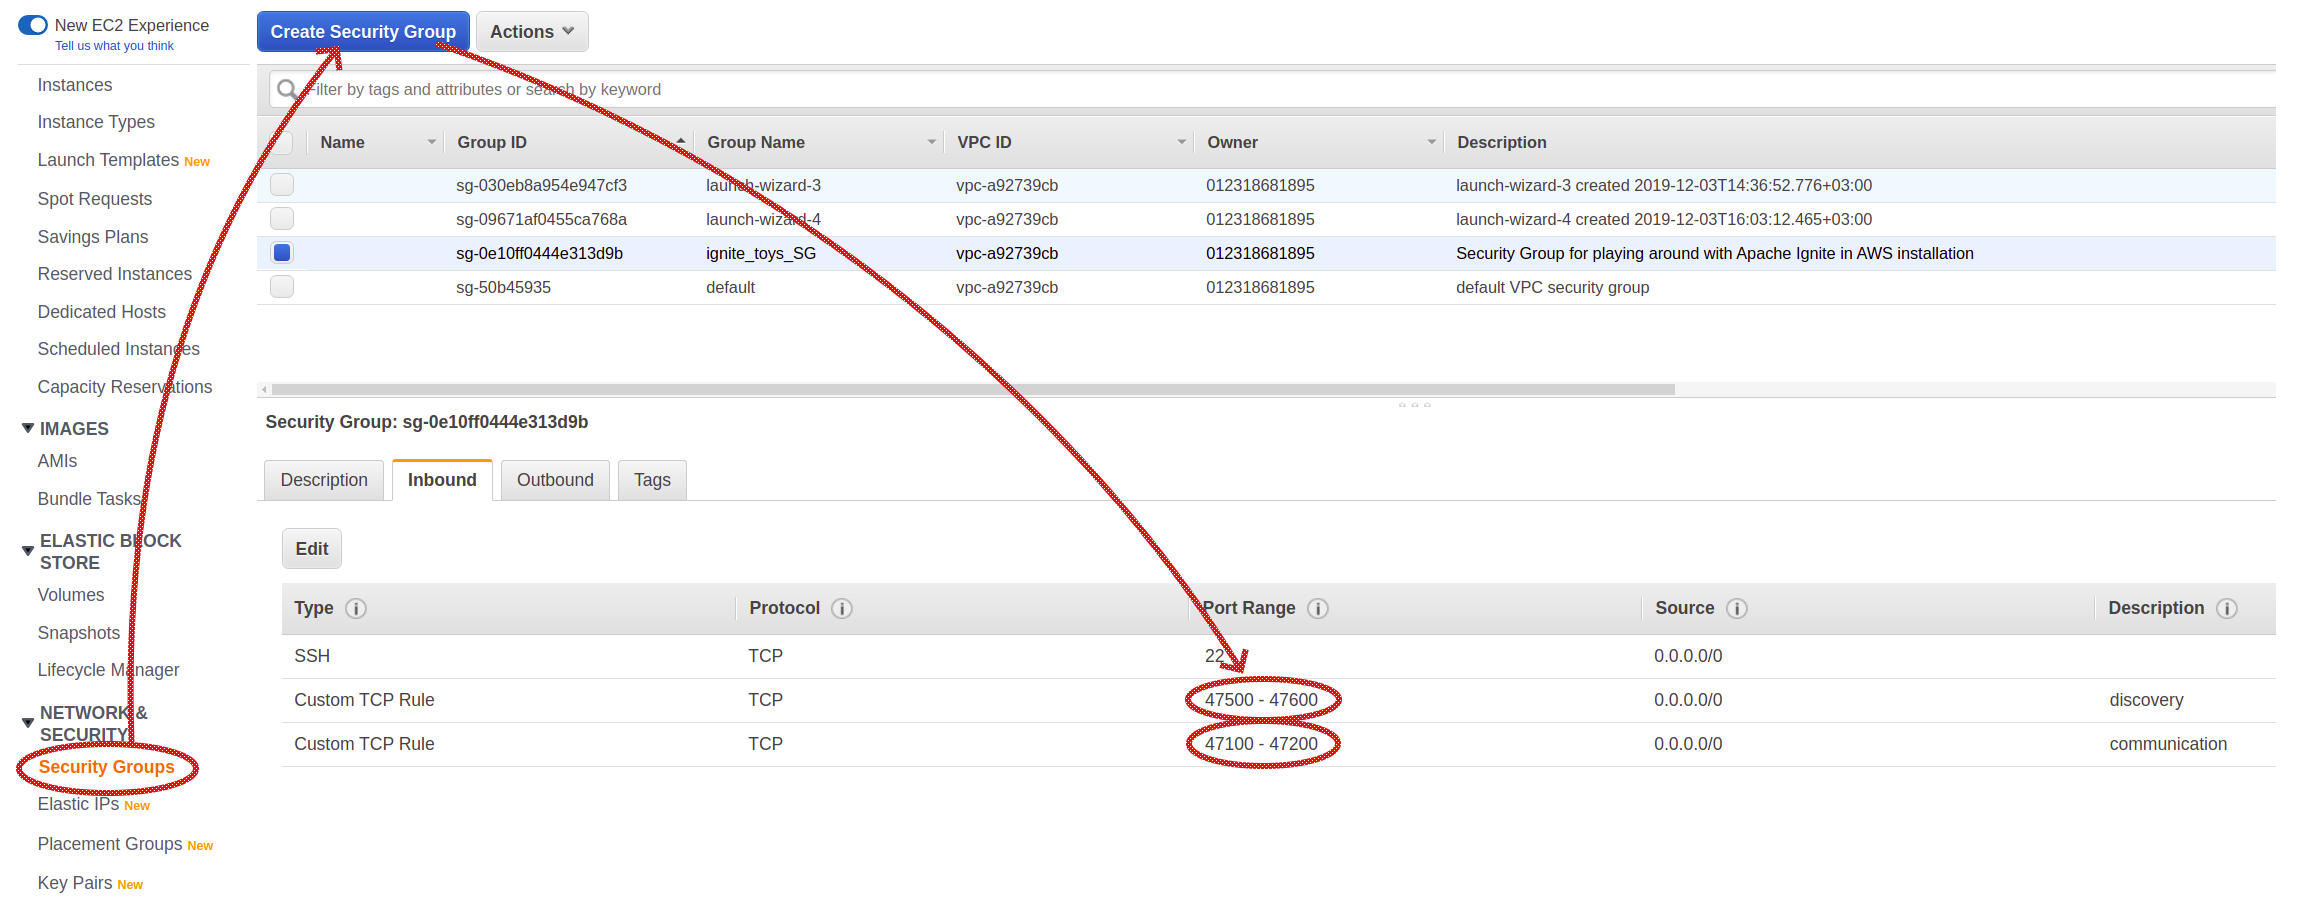
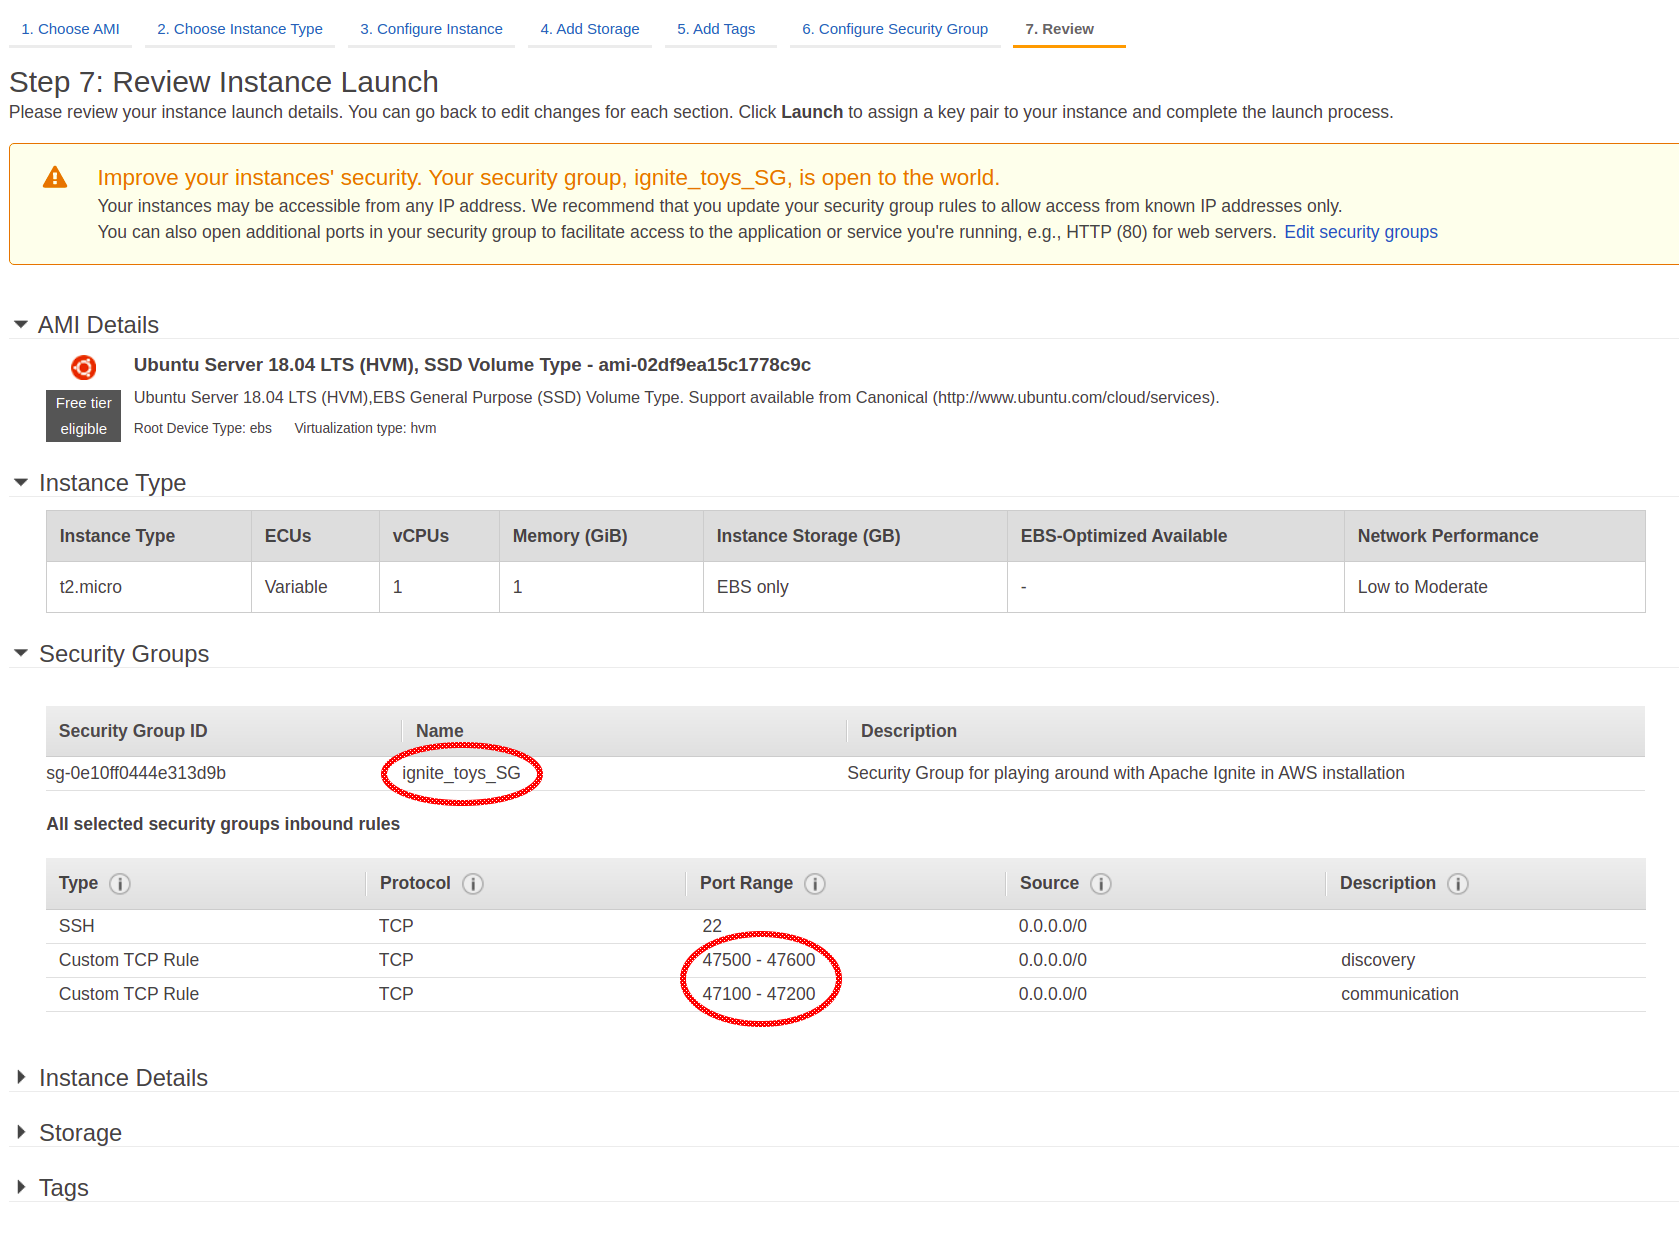
Before deploying our first machines, we need to configure the so-called Security Group. Here, the network rules for ports necessary for Ignite instances should be defined.

Two port ranges were explicitly configured. Port range 47500-47600 is used by discovery mechanism (the one that allows nodes to find each other and form a cluster), and 47100-47200 is used by communication subsystem that enables nodes to send each other direct messages.
Now, after configuring the Security Group, it's time to start and set up our machines.

The machines are started, but they lack an essential piece of software: Java. Not a problem; just use the following command to install Java:
xxxxxxxxxx
~/sudo apt install openjdk-8-jdk
For RedHat/Centos distributions command looks slightly different:
xxxxxxxxxx
~/sudo yum install java-1.8.0-openjdk.x86_64
Great! We are just one step from having our first Ignite instance up and running in the cloud!
I downloaded the latest binary distribution from the official site and unzipped it:
xxxxxxxxxx
~/ignite$ wget http://mirror.linux-ia64.org/apache//ignite/2.7.6/apache-ignite-2.7.6-bin.zip
~/ignite$ unzip apache-ignite-2.7.6-bin.zip
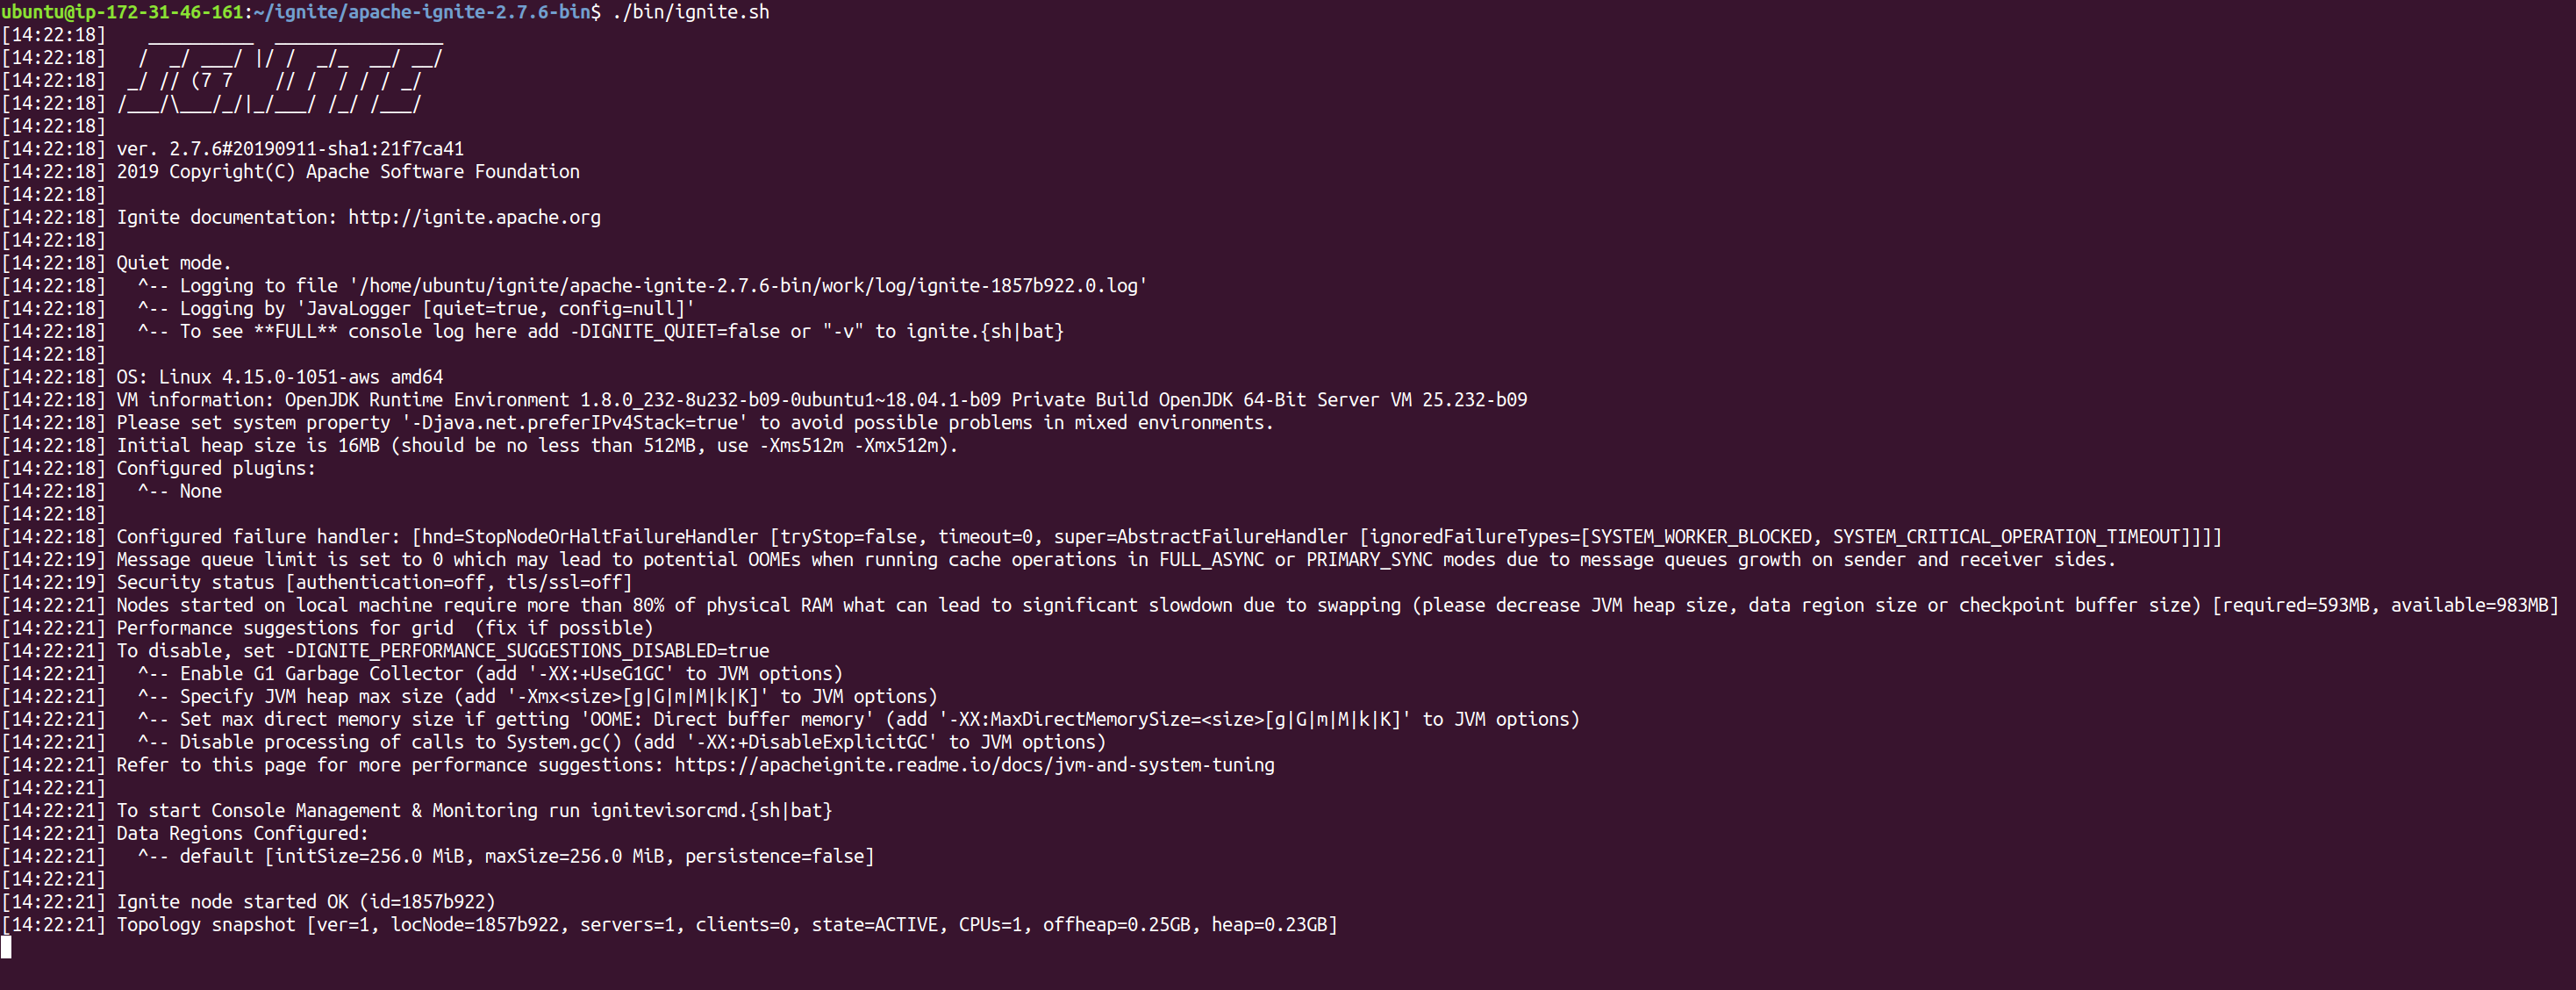
And now let's start it:
xxxxxxxxxx
~/ignite/apache-ignite-2.7.6-bin$ ./bin/ignite.sh

We’ve made great progress already. We prepared the environment, figured out where to get binaries and how to start Ignite node using these binaries.
However, to have a truly distributed system, we need another node. Just repeat all these steps (create and configure an AWS instance, download and unzip binaries) and start one more Ignite instance.
And now it’s time to assemble a cluster from the nodes we have. Yep, starting a bunch of nodes isn’t enough to build a cluster, and it becomes evident from the logs: each node has the following line in the logs.

This message means that two nodes have formed two independent clusters instead of discovering each other and forming a single one.
In order to set up a truly clustered environment, we need to deepen our understanding of how a cluster is assembled.
A special service called Discovery plays a crucial role in this process. It allows nodes to find each other and form a cluster. When a node starts, it requests its instance of Discovery to find an existing cluster and tries to join it instead of creating a new one.
Configuring DiscoverySPI to be able to locate a cluster is the responsibility of the end-user and is extremely simple. All we need to do is configure and supply it to Discovery; let’s do it, and fix our isolated nodes.
Open the configuration file in your favorite text editor...
xxxxxxxxxx
~/ignite/apache-ignite-2.7.6-bin$ vim config/default-config.xml
... add the following block:
xxxxxxxxxx
<property name="discoverySpi">
<bean class="org.apache.ignite.spi.discovery.tcp.TcpDiscoverySpi">
<property name="ipFinder">
<bean class="org.apache.ignite.spi.discovery.tcp.ipfinder.vm.TcpDiscoveryVmIpFinder">
<property name="addresses">
<list>
<value>172.31.3.57</value>
</list>
</property>
</bean>
</property>
</bean>
</property>
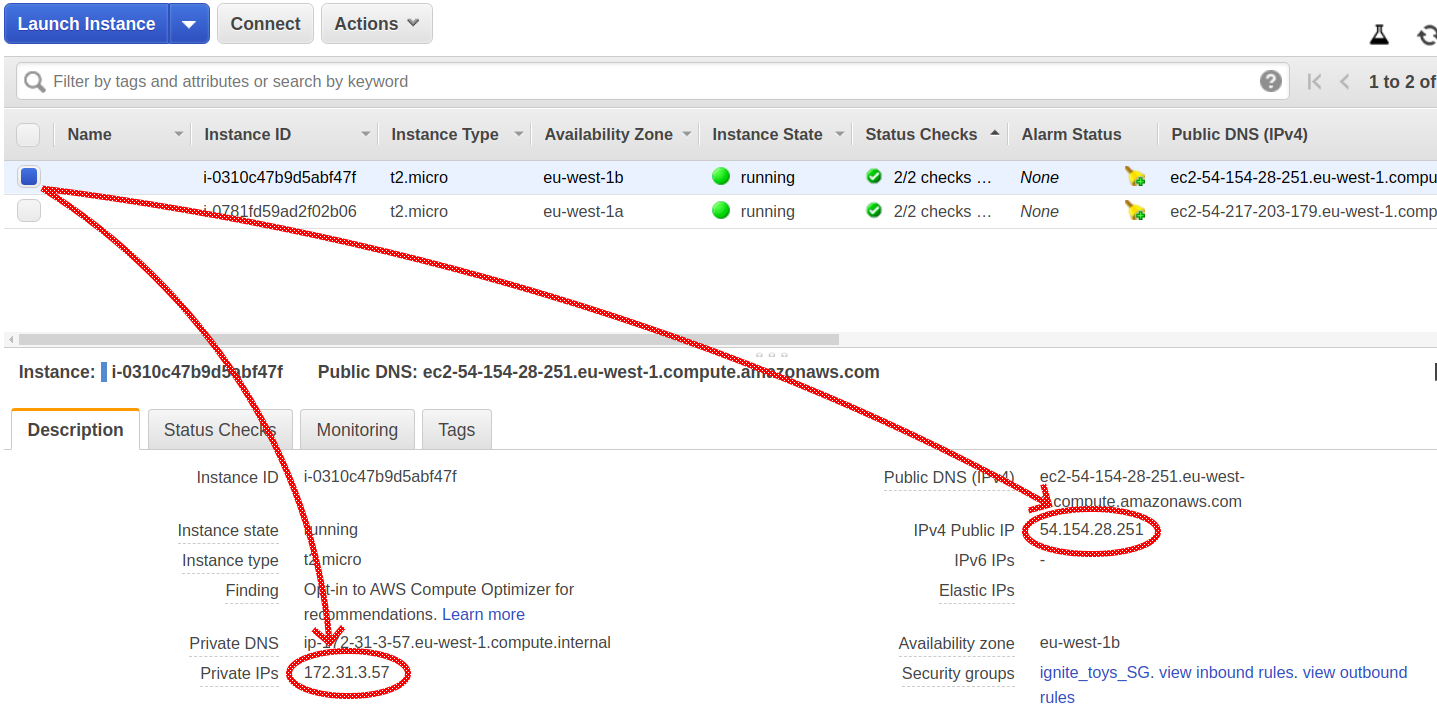
This block should be placed right under the root element of the configuration file. The most important thing here is the value passed in the addresses property. For each server, it should be either a private address or a public IP address of the other server.
The Description tab of each node contains information about public and private IP addresses of our AWS nodes:

Making the Cluster Usable: Connecting a Remote Client
So far, we’ve set up a cloud environment from scratch, deployed, configured, and assembled an Ignite cluster. We've also expanded our understanding of distributed systems along the way. Now, it’s time to make something useful with our brand-new cluster: connect to it with a remote client, load some data, and make sure it is there.
Ignite provides multiple ways to connect to the cluster: thin clients, JDBC/ODBC interfaces, etc. But I’m going to use a thick client connectivity, which is really simple. In fact, the thick client is almost a regular Ignite server node, except it doesn’t store cache data locally (and some more technical details, but we won’t dive into them right now), so its configuration is very similar.
I start with my favorite IDE and create the simplest Java project: command line project. I add to the classpath of the project three jar files from the same binary distribution I’ve already seen. (It is the same package we used to deploy our Ignite servers into the cloud.) These jar files are: ignite-core-2.7.6.jar, cache-api-1.0.0.jar and annotations-13.0.jar.
Here is the configuration in Java for my client:
xxxxxxxxxx
IgniteConfiguration cfg = new IgniteConfiguration();
cfg.setClientMode(true);
TcpDiscoveryVmIpFinder ipFinder = new TcpDiscoveryVmIpFinder();
ipFinder.setAddresses(Arrays.asList("54.154.28.251"));
TcpDiscoverySpi spi = new TcpDiscoverySpi();
spi.setIpFinder(ipFinder);
cfg.setDiscoverySpi(spi);
We see here the same properties we’ve already configured for server nodes: DiscoverySPI, IpFinder, and so on. A lot of similarities here except for the highlighted boolean flag that turns a regular Ignite node into a client.
Using this configuration, I start my client node and request it to create a cache, put a simple string into it, and then read that value back:
xxxxxxxxxx
try (Ignite client = Ignition.start(cfg)) {
IgniteCache cache = client
.getOrCreateCache(
new CacheConfiguration("clientCache")
.setBackups(1)
.setAffinity(new RendezvousAffinityFunction(false, 4)
)
);
cache.put(1, "myString");
System.out.println("-->>-->> value of key ‘1’: " + cache.get(1));
}
Hmm, I see that something is not right. My simple program starts, but it does not print any results. At the same time, I see in the server logs that servers have added the client node into topology:

So what could be wrong? The answer is that in cloud environments, there is one more thing that must be configured on the server-side: an AddressResolver.
As our servers are running in AWS, there is some kind of NAT between them and the outside world. Servers know their internal (behind the NAT) IP addresses but have no idea of what public IP addresses they are assigned to. To provide servers with information of this mapping and thus allow them to communicate with remote clients, we need to configure address resolvers on the server-side.
First, stop both server nodes. Next, add the following block into each server configuration, again right under the root element of config XML. Here, private and public IPs are addresses of the same server where the configuration is modified:
xxxxxxxxxx
<property name="addressResolver">
<bean class="org.apache.ignite.configuration.BasicAddressResolver">
<constructor-arg>
<map>
<entry key="<private IP>" value="<public IP>"/>
</map>
</constructor-arg>
</bean>
</property>
Restart the servers to apply the changes and re-run the program. Be aware that the public IP address may change after the virtual machine restarts, so the configuration of our first cluster isn’t very robust.
Now we see the expected outcome: program finishes and retrieves from cache the value that was just put there.
Conclusion
Deploying an Ignite cluster into the AWS cloud requires some simple tricks. And when first steps are made, we can do more interesting things, like streaming data into the cluster with data streamers, executing queries, or using other interfaces such as JDBC/ODBC connectivity to connect to the cluster.
However, it is good to remember that developing more useful applications requires more resources and free AWS instances run out of their capacity very quickly. Whether Ignite is used as a primary database or as an in-memory caching layer, more memory means better performance, and for prod-like environments, powerful instances from x1 tier are the best.

