Json Web Token: How to Secure a Spring Boot REST API
In this post, I will show how to secure your spring boot based REST API. It has been more of a trend to secure REST APIs to avoid any unnecessary calls to public APIs. We will be using some Spring Boot features for Spring Security, along with JSON WebTokens for authorization.
User flow in this case is
- User logs in.
- We validate user credentials.
- A token is sent back to user agent.
- User tries to access a protected resource.
- User sends JWT when accessing the protected resource. We validate JWT.
- If JWT is valid, we allow the user to access the resource.
JSON Web Tokens, known as JWTs are used for forming authorization for users. This helps us to build secure APIs and it is also easy to scale. During authentication, a JWT is returned. Whenever the user wants to access a protected resource, the browser must send JWTs in the Authorization header along with the request. One thing to understand here is that it is a good security practice to secure REST API.
Basically, we will show how to:
- Verify JSON WebToken
- Validate the signature
- Check the client permissions
What You Will Need?
- Java 8.
- MySQL Database.
- IntelliJ Editor.
- Gradle.
Note – This won’t be a full-fledged app, but REST APIs based on Spring boot, Spring security.
Spring Boot Based REST API
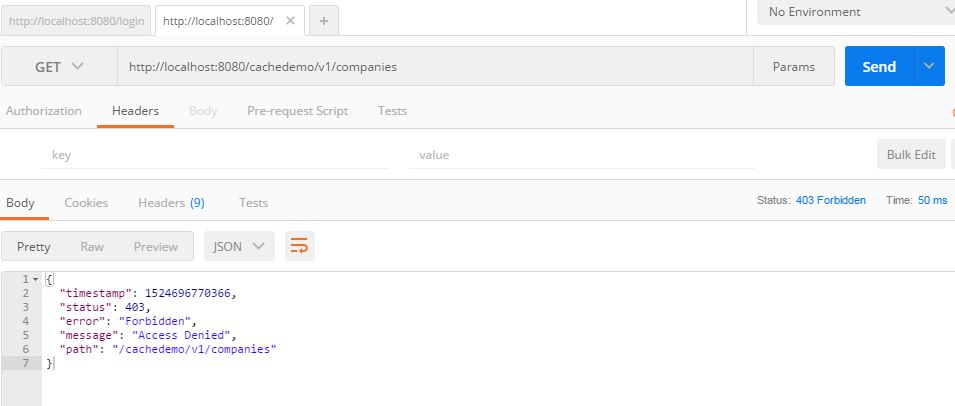
I will be securing REST API for company that I created in this blog post on REST APIs. This API also includes caching. A user will try to access /cachedemo/v1/companies/ and since APIs are protected, the user will get a response like below:

Now we will implement how to protect this API and how to access it when it is protected.
Adding User and User Registration
Since we want to add authorization for APIs, we will need to know where the user is able to log in and send credentials. These credentials will be validated, and a token will be generated. This token then will be transmitted in a request to an API call. The token will be validated in the Spring Security authorization filter that we will add. If the token is valid, the user will be able to access the API.
Create a User Model
package com.betterjavacode.models;
import javax.persistence.*;
import java.io.Serializable;
(name = "User")
(name = "user")
public class User implements Serializable
{
public User()
{
}
(strategy = GenerationType.IDENTITY)
private long id;
(name = "username")
private String username;
(name = "password")
private String password;
public long getId()
{
return id;
}
public void setId(long id)
{
this.id = id;
}
public String getUsername()
{
return username;
}
public void setUsername(String username)
{
this.username = username;
}
public String getPassword()
{
return password;
}
public void setPassword(String password)
{
this.password = password;
}
}
We will add a controller where a user can register with its details for username and password.
xxxxxxxxxx
package com.betterjavacode.resources;
import com.betterjavacode.models.User;
import com.betterjavacode.repositories.UserRepository;
import org.springframework.security.crypto.bcrypt.BCryptPasswordEncoder;
import org.springframework.web.bind.annotation.PostMapping;
import org.springframework.web.bind.annotation.RequestBody;
import org.springframework.web.bind.annotation.RequestMapping;
import org.springframework.web.bind.annotation.RestController;
(value = "/cachedemo/v1/users")
public class UserController
{
private UserRepository userRepository;
private BCryptPasswordEncoder bCryptPasswordEncoder;
public UserController(UserRepository userRepository, BCryptPasswordEncoder bCryptPasswordEncoder)
{
this.userRepository = userRepository;
this.bCryptPasswordEncoder = bCryptPasswordEncoder;
}
("/signup")
public void signUp( User user)
{
user.setPassword(bCryptPasswordEncoder.encode(user.getPassword()));
userRepository.save(user);
}
}
Now, when we POST a request to /cachedemo/v1/users/signup is sent, a user will be saved in the database. Passwords for the user will be saved in an encrypted format, as we are using BCryptPasswordEncoder. Now, we will show how a user can log in to create a token.
User Login
To handle user login, we will add an AuthenticationFilter, which will get added in FilterChain, and Spring boot will handle the execution of it appropriately. This filter will look like the following:
xxxxxxxxxx
package com.betterjavacode.SpringAppCache;
import com.fasterxml.jackson.databind.ObjectMapper;
import io.jsonwebtoken.Jwts;
import io.jsonwebtoken.SignatureAlgorithm;
import org.springframework.security.authentication.AuthenticationManager;
import org.springframework.security.authentication.UsernamePasswordAuthenticationToken;
import org.springframework.security.core.Authentication;
import org.springframework.security.core.AuthenticationException;
import org.springframework.security.core.userdetails.User;
import org.springframework.security.web.authentication.UsernamePasswordAuthenticationFilter;
import javax.servlet.FilterChain;
import javax.servlet.http.HttpServletRequest;
import javax.servlet.http.HttpServletResponse;
import java.io.IOException;
import java.util.ArrayList;
import java.util.Date;
public class AuthenticationFilter extends UsernamePasswordAuthenticationFilter
{
private AuthenticationManager authenticationManager;
public AuthenticationFilter(AuthenticationManager authenticationManager)
{
this.authenticationManager = authenticationManager;
setFilterProcessesUrl("/login");
}
public Authentication attemptAuthentication(HttpServletRequest request, HttpServletResponse response) throws AuthenticationException
{
try
{
com.betterjavacode.models.User creds = new ObjectMapper().readValue(request.getInputStream(), com.betterjavacode .models.User.class);
return authenticationManager.authenticate(new UsernamePasswordAuthenticationToken(creds.getUsername(), creds.getPassword(),new ArrayList<>()));
}
catch(IOException e)
{
throw new RuntimeException("Could not read request" + e);
}
}
protected void successfulAuthentication(HttpServletRequest request, HttpServletResponse response, FilterChain filterChain, Authentication authentication)
{
String token = Jwts.builder()
.setSubject(((User) authentication.getPrincipal()).getUsername())
.setExpiration(new Date(System.currentTimeMillis() + 864_000_000))
.signWith(SignatureAlgorithm.HS512, "SecretKeyToGenJWTs".getBytes())
.compact();
response.addHeader("Authorization","Bearer " + token);
}
}
Basically, a user will send credentials in a request to the URL ending with /login . This filter will help to authenticate the user. If there is successful authentication, a token will be added in response header with the key Authorization.
Token Validation and Authorization
We add another filter AuthorizationFilter to validate the token that we passed through AuthenticationFilter earlier. This filter will look like below:
xxxxxxxxxx
package com.betterjavacode.SpringAppCache;
import io.jsonwebtoken.Jwts;
import org.springframework.security.authentication.AuthenticationManager;
import org.springframework.security.authentication.UsernamePasswordAuthenticationToken;
import org.springframework.security.core.context.SecurityContextHolder;
import org.springframework.security.web.authentication.www.BasicAuthenticationFilter;
import javax.servlet.FilterChain;
import javax.servlet.ServletException;
import javax.servlet.http.HttpServletRequest;
import javax.servlet.http.HttpServletResponse;
import java.io.IOException;
import java.util.ArrayList;
public class AuthorizationFilter extends BasicAuthenticationFilter
{
public AuthorizationFilter(AuthenticationManager authenticationManager)
{
super(authenticationManager);
}
protected void doFilterInternal(HttpServletRequest request, HttpServletResponse response, FilterChain filterChain)
throws IOException, ServletException
{
String header = request.getHeader("Authorization");
if(header == null || !header.startsWith("Bearer"))
{
filterChain.doFilter(request,response);
return;
}
UsernamePasswordAuthenticationToken authenticationToken = getAuthentication(request);
SecurityContextHolder.getContext().setAuthentication(authenticationToken);
filterChain.doFilter(request,response);
}
private UsernamePasswordAuthenticationToken getAuthentication(HttpServletRequest request)
{
String token = request.getHeader("Authorization");
if(token != null)
{
String user = Jwts.parser().setSigningKey("SecretKeyToGenJWTs".getBytes())
.parseClaimsJws(token.replace("Bearer",""))
.getBody()
.getSubject();
if(user != null)
{
return new UsernamePasswordAuthenticationToken(user, null, new ArrayList<>());
}
return null;
}
return null;
}
}
If the validation of the token is successful, a user is returned and assigned to a security context.
To enable Spring security, we will add a new class WebSecurityConfiguration with the annotation, @EnableWebSecurity. This class will extend the standard WebSecurityConfigurerAdapter. In this class, we will restrict our APIs and also add some whitelisted URLs that we will need access without any authorization token. This will look like below:
xxxxxxxxxx
package com.betterjavacode.SpringAppCache;
import org.springframework.context.annotation.Bean;
import org.springframework.http.HttpMethod;
import org.springframework.security.config.annotation.authentication.builders.AuthenticationManagerBuilder;
import org.springframework.security.config.annotation.web.builders.HttpSecurity;
import org.springframework.security.config.annotation.web.builders.WebSecurity;
import org.springframework.security.config.annotation.web.configuration.EnableWebSecurity;
import org.springframework.security.config.annotation.web.configuration.WebSecurityConfigurerAdapter;
import org.springframework.security.config.http.SessionCreationPolicy;
import org.springframework.security.core.userdetails.UserDetailsService;
import org.springframework.security.crypto.bcrypt.BCryptPasswordEncoder;
import org.springframework.web.cors.CorsConfiguration;
import org.springframework.web.cors.CorsConfigurationSource;
import org.springframework.web.cors.UrlBasedCorsConfigurationSource;
public class WebSecurityConfiguration extends WebSecurityConfigurerAdapter
{
private BCryptPasswordEncoder bCryptPasswordEncoder;
private UserDetailsService userDetailsService;
private static final String[] AUTH_WHITELIST = {
"/v2/api-docs",
"/swagger-resources",
"/swagger-resources/**",
"/configuration/ui",
"/configuration/security",
"/swagger-ui.html",
"/webjars/**"
};
public WebSecurityConfiguration(UserDetailsService userDetailsService, BCryptPasswordEncoder bCryptPasswordEncoder)
{
this.bCryptPasswordEncoder = bCryptPasswordEncoder;
this.userDetailsService = userDetailsService;
}
protected void configure(HttpSecurity httpSecurity) throws Exception
{
httpSecurity.cors().and().csrf().disable().authorizeRequests()
.antMatchers(AUTH_WHITELIST).permitAll()
.antMatchers(HttpMethod.POST, "/cachedemo/v1/users/signup").permitAll()
.anyRequest().authenticated()
.and().addFilter(new AuthenticationFilter(authenticationManager()))
.addFilter(new AuthorizationFilter(authenticationManager()))
.sessionManagement().sessionCreationPolicy(SessionCreationPolicy.STATELESS);
}
public void configure(AuthenticationManagerBuilder authenticationManagerBuilder) throws Exception
{
authenticationManagerBuilder.userDetailsService(userDetailsService).passwordEncoder(bCryptPasswordEncoder);
}
CorsConfigurationSource corsConfigurationSource()
{
final UrlBasedCorsConfigurationSource source = new UrlBasedCorsConfigurationSource();
source.registerCorsConfiguration("/**",new CorsConfiguration().applyPermitDefaultValues());
return source;
}
}
In the method, configure, we have restricted most APIs, only allowing Swagger URLs and signup URL. We also add filters to HttpSecurity. We will add our own UserDetailsServiceImpl class to validate user credentials.
xxxxxxxxxx
package com.betterjavacode.services;
import com.betterjavacode.models.User;
import com.betterjavacode.repositories.UserRepository;
import org.springframework.security.core.userdetails.UserDetails;
import org.springframework.security.core.userdetails.UserDetailsService;
import org.springframework.security.core.userdetails.UsernameNotFoundException;
import org.springframework.stereotype.Component;
import java.util.Collections;
public class UserDetailsServiceImpl implements UserDetailsService
{
private UserRepository userRepository;
public UserDetailsServiceImpl(UserRepository userRepository)
{
this.userRepository = userRepository;
}
public UserDetails loadUserByUsername(String username) throws UsernameNotFoundException
{
User user = userRepository.findByUsername(username);
if(user == null)
{
throw new UsernameNotFoundException(username);
}
return new org.springframework.security.core.userdetails.User(user.getUsername(), user.getPassword(), Collections.emptyList());
}
}
Demo
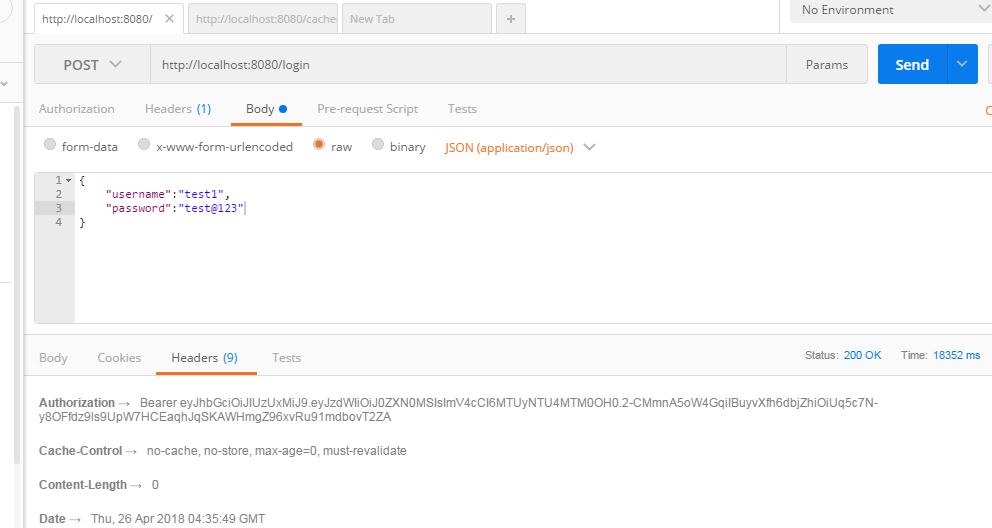
With the all the code changes, now we are ready to create a user, login and access secured REST APIs. From the image above, a user gets Access Denied error for accessing secured APIs. To demo this, I have already registered a user with username test1 and password test@123.

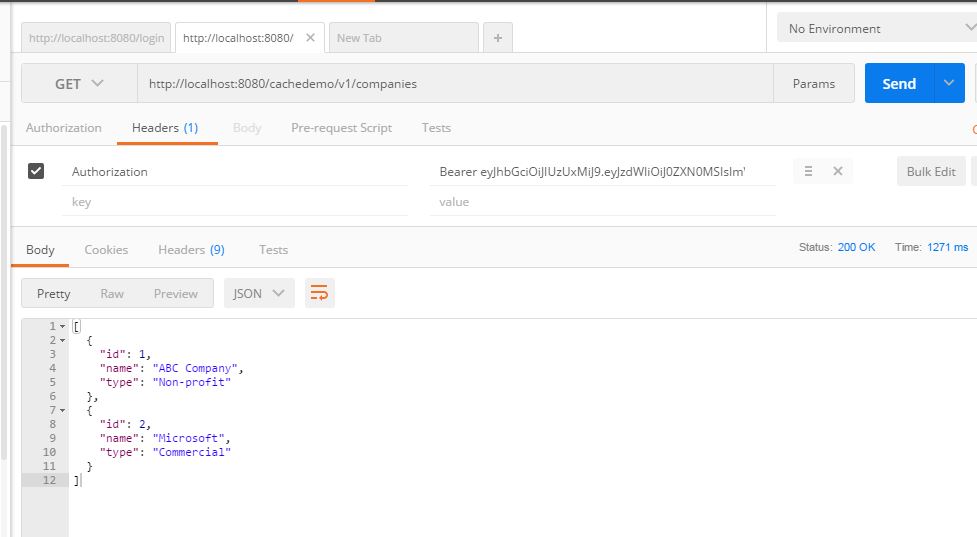
This POST request will give us Authorization token in response as shown above. Now using this token in our GET request to retrieve companies data. This GET request will look like below:

In this way, we showed how to secure REST API using JSON web token.

