Data Ingestion From RDBMS: Leveraging Confluent's JDBC Kafka Connector
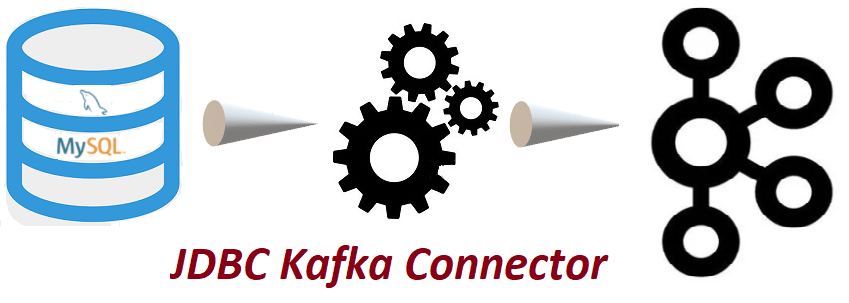
Kafka Connect assumes a significant part for streaming data between Apache Kafka and other data systems. As a tool, it holds the responsibility of a scalable and reliable way to move the data in and out of Apache Kafka. Importing data from the Database set to Apache Kafka is surely perhaps the most well-known use instance of JDBC Connector (Source and Sink) that belongs to Kafka Connect.
This article aims to elaborate the steps and procedure to integrate the Confluent’s JDBC Kafka connector with an operational multi-broker Apache Kafka Cluster for ingesting data from the functioning MySQL Database to Kafka topic. Since we are not going to export/pull out data from the topic via consumer and pass through any subsequent data pipeline, the Schema Registry has not clubbed/configured with the existing multi-broker Kafka cluster to support schema evolution, compatibility, etc. The Schema Registry is not mandatory to integrate or run any Kafka Connector like JDBC, File, etc but it supports to use easily Avro, Protobuf, and JSON Schema as common data formats for the Kafka records that Kafka Connectors read from and write to. The Confluent Platform includes the Apache Kafka, additional tools, and services including Schema Registry but comes under community and commercial license.
Article Structure
This article has structured in seven parts:
- Assumptions regarding environment details about the Kafka Cluster.
- Build/Download Confluent's JDBC Source connector and installation.
- Allow remote access to functioning MySQL Database.
- Configurations changes/updates on the Kafka Cluster as well as JDBC Connector.
- Execution/Running the JDBC connector.
- Data Verification in Messages.
- Final Note.
Environment Details and Assumptions
Here we are considering the operational Kafka cluster having four nodes and each one is already installed and running Kafka of version 2.6.0 with Zookeeper (V 3.5.6) on top of OS Ubuntu 14.04 LTS and java version '1.8.0_101.' As mentioned, there won't be any operation on the post ingested data, the Confluent's Schema Registry won’t be running or included in this exercise. The transported data from the MySQL database would be in a raw JSON document. But It is advisable to integrate and run the Schema Registry in real-time scenarios or in the production environment so that compatible data format can be maintained across the data sources (RDBMS) and multiple consumers along with enforced compatibility rules. You can read here how to integrate Confluent Schema Registry with a multi-node Kafka cluster.
Build/Download Confluent's JDBC Source Connector and Installation
Using the Confluent Hub client, the JDBC connectors can be installed. But we downloaded manually confluentinc-kafka-connect-jdbc-10.0.2.zip file from here and extracted on a healthy node in the cluster. The version is 10.0.2 and the license is free to use.
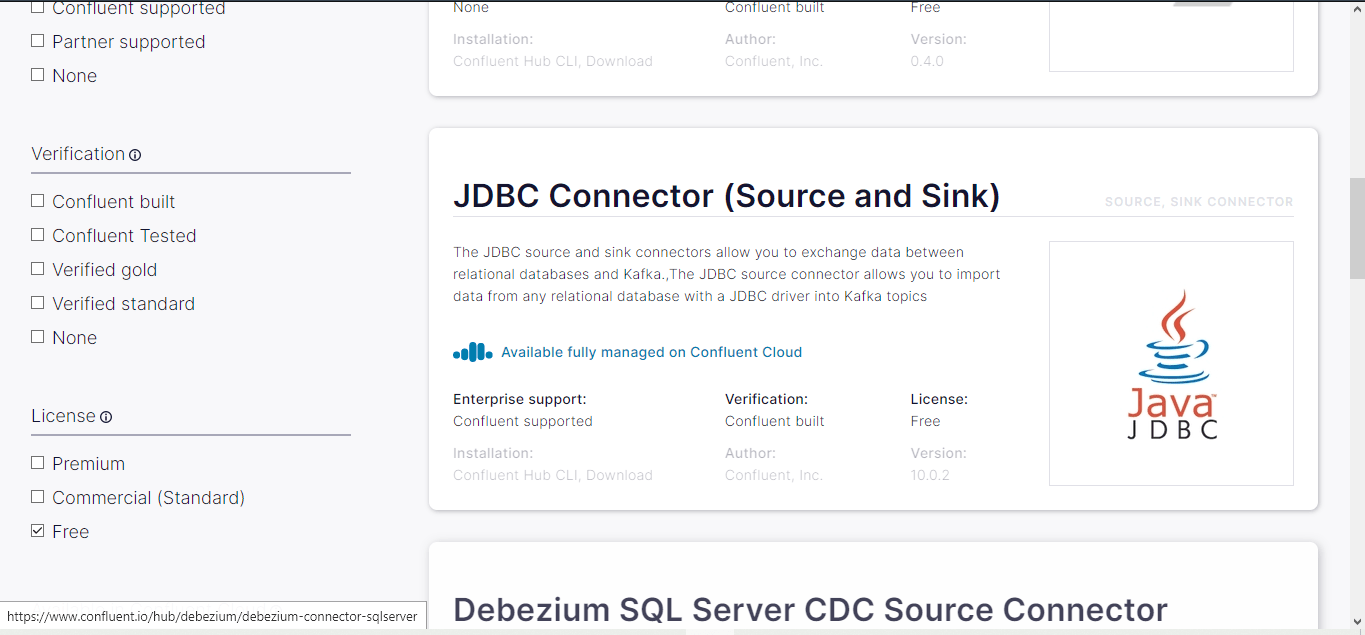
You can manually build the development version by downloading the source code available at https://github.com/confluentinc/kafka-connect-jdbc.
Downloaded confluentinc-kafka-connect-jdbc-10.0.1.zip, copied to the node, extracted, and eventually copied to the location. The location should be under /usr/share/java and to make it more specific from other connectors, created one subfolder named 'kafka-connect-jdbc' with sudo privileges.

Not mandatory to copy all the jar files available inside the extracted folder, only kafka-connect-jdbc-10.0.1.jar should be copied to /usr/share/java/kafka-connect-jdbcas the rest of the jars are already available inside Apache Kafka’s lib folder.

As we are importing data from the MySQL database, MySQL java Connector is required by the Kafka JDBC source connector to establish the JDBC connection. The jar file 'mysql-connector-java-5.1.48.jar' too should be copied under /usr/share/java/kafka-connect-jdbc. This MySQL-specific driver class can be downloaded from here.

Allow Remote Access to Functioning MySQL Database
We have changed the configurations of the MySQL database server instance that runs on a separate node in the cluster in order to make it accessible from another node with the root user. Normally, the MySQL database server can be accessed using a separate database user but decided not to create a separate user. By default, the MySQL server instance is only configured to listen for local connections. To enable the order to listen for an external IP address, we need to modify my.cnf file where the MySQL server is running.
>sudo vi /etc/mysql/my.cnf

By default, this value is set to 127.0.0.1 for the key bind-address that means the MySQL server will only look for local connections. To avoid this, we replaced 127.0.0.1 with the IP address of the node which is 192.168.10.130.
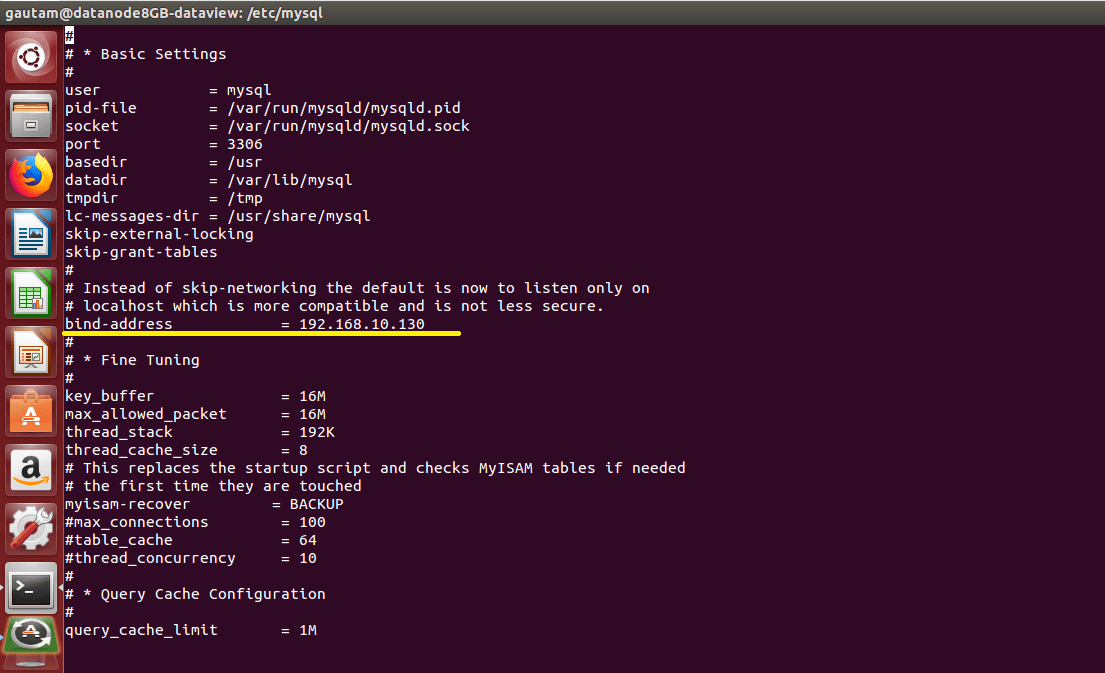
After changing this line, save and close the file then restart the MySQL service to put the changes we made to my.cnf into effect.
> sudo systemctl restart mysql
To grants the root user with full access to the database on the remote host that is 192.168.10.110 (in this node Kafka JDBC Connector would be running); login to MySQL server which is running at node 192.168.10.130 in the cluster and connect to the MySQL database as the root user. After opening the MySQL client, execute the following SQL statements to grant all.
GRANT ALL ON <local database name>.* TO <remote username>@<remote node IP address> IDENTIFIED BY '<database user password>';
In our scenario, it was:
GRANT ALL ON Order_Streaming.* TO root@192.168.10.110 IDENTIFIED BY ‘mypassword’;
then flush privileges and exit from the MySQL client.
Configurations changes/updates on the Kafka Cluster as well as JDBC Connector.
connect-standalone.properties
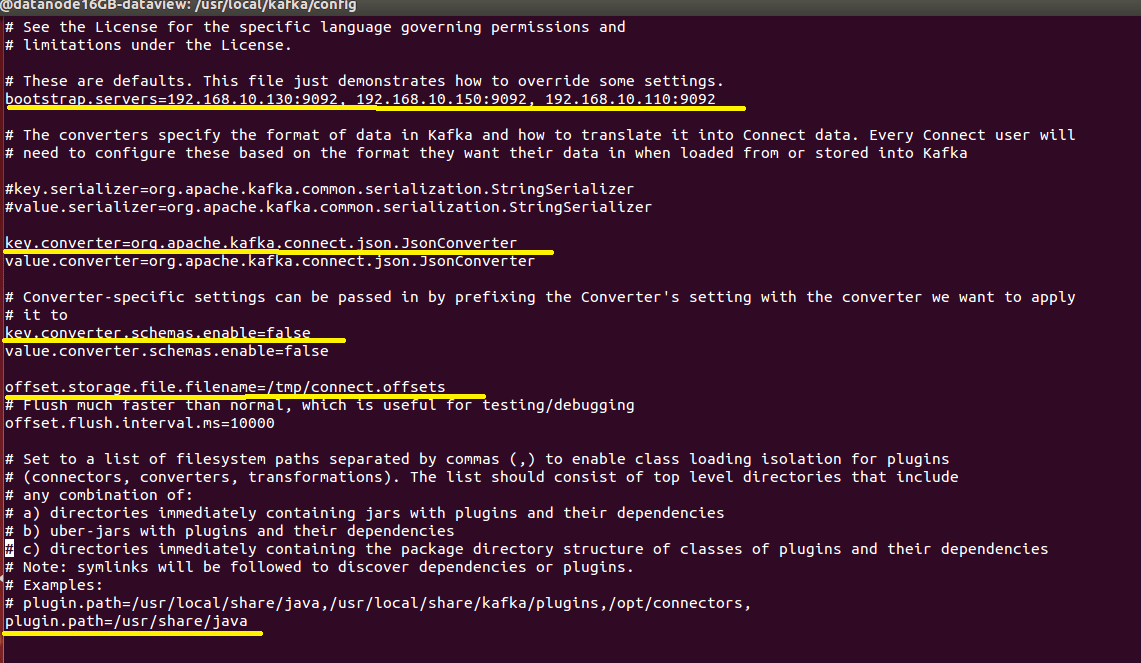
As we are going to run the JDBC connector on the standalone mode in one of the nodes of the multi-broker Kafka cluster, the connect-standalone.properties file should be updated available under the config directory of Apache Kafka. In Standalone mode, a single process executes all connectors and their associated tasks.
- By default, the key '
bootstrap.servers' in the properties file available with value 'localhost:9092' but the JDBC connectors would run in a multi-node/multi-broker cluster so it has to be updated with the IP address of each node and port separated by a comma (,).
bootstrap.servers=192.168.10.130:9092, 192.168.10.150:9092, 192.168.10.110:9092
- Since, we won’t be preserving the versioned history of schemas while streaming data from the MySQL database to Kafka Topic, Schema Registry is not used or coupled with the cluster. Because of this reason, the following keys need to set the value as '
false.' By default values are as 'true.'
key.converter.schemas.enable=false
value.converter.schemas.enable=false
- Similarly, the values of '
key.converter' and 'value.converter' should not be updated, as JDBC Kafka Connect won't use with Schema Registry and continue with the default 'JsonConverter' that serializes the message keys and values into JSON documents.
key.converter=org.apache.kafka.connect.json.JsonConverter
value.converter=org.apache.kafka.connect.json.JsonConverter
offset.storage.file.filenameis the most important setting when running Connect in standalone mode. It defines where JDBC Connect should store its offset data. We updated as:
offset.storage.file.filename=/tmp/connect.offsets
offset.flush.interval.msdefines the interval at which the worker tries to commit offsets for tasks. We kept the default value:
offset.flush.interval.ms=10000
The value of the key 'plugin.path' should be updated as '/usr/share/java' as mentioned above in the installation section where the jar files kafka-connect-jdbc-10.0.1.jar and mysql-connector-java-5.1.48.jar are available.
plugin.path=/usr/share/java
connect-jdbc-mysql-source.properties
In the same node where the JDBC connector would run, created another configuration file with the name 'connect-jdbc-myql-source.properties' under the config directory of Apache Kafka. Update the 'connect-jdbc-myql-source.properties' file with below properties:
name= local-mysql-source
nameis a user-specified name for the connector instance.
connector.class=io.confluent.connect.jdbc.JdbcSourcceConnector
connector.classspecifies the implementing class, basically the kind of connector that is available in kafka-connect-jdbc-10.0.1.jar.
tax.max=1
tasks.maxspecifies how many instances of our source connector should run in parallel
connection.url=jdbc:mysql://192.168.10.130:3306/order_streaming
connection.urlspecifies MySQL database server running on a different node in the cluster with the name of the database.
connection.user=root
connection.userspecifies the user name of the MySQL database server.
connection.password=XXXX
connection.passwordspecifies the password to login into MySQL.
mode=bulk
mode=bulkperforms a bulk load of the entire table each time it is polled. In bulk mode, the connector will load all the selected tables in each iteration. It can be useful if a periodical backup or dumping the entire database.
topic.prefix=connect-test
- Prefix to prepend to table names to generate the name of the Apache Kafka topic to publish data to.
Already created one topic named connect-test with replication factor 3 and partitions 5:

Execution/Running the JDBC Connector
There is no complexity for running the JDBC Kafka connector on a multi-node Apache Kafka cluster. The connector can be run from the same node where it installed and configured, make sure the MySQL database server should be accessible that running on another node in the cluster.
If the multi-node Kafka cluster is up and running with a topic named in connect-jdbc-myql-source.properties, open a new terminal on the installed JDBC connector node, and run the following command inside the bin directory.
/kafka/bin $ ./connect-standalone.sh ../config/connect-standalone.properties ../config/connect-jdbc-myql-source.properties

After running the above command, if all the settings, configurations correct then the following log would occur in the same terminal:
[2021-03-08 04:22:04,818] INFO Using JDBC dialect MySql (io.confluent.connect.jdbc.source.JdbcSourceTask:102)
[2021-03-08 04:22:04,819] INFO Attempting to open connection #1 to MySql (io.confluent.connect.jdbc.util.CachedConnectionProvider:82)
[2021-03-08 04:22:04,887] INFO Started JDBC source task (io.confluent.connect.jdbc.source.JdbcSourceTask:261)
Besides, using the built-in Kafka Connect REST API that runs on default port 8083 we can check the status of the JDBC connector. This is useful for getting status information, adding and removing connectors without stopping the process. Open another terminal and type the following command.
$ curl -X GET http://[IP of node the connector is running]:8083/connectors/{name of the connector}/status
$ curl -X GET http://192.168.10.110:8083/connectors/{local-mysql-source}/status
And above would returns
{"name":"local-mysql-source","connector":{"state":"RUNNING","worker_id":"192.168.10.110:8083"},"tasks":[{"id":0,"state":"RUNNING","worker_id":"192.168.10.110:8083"}],"type":"source"}
Open another terminal to execute a built-in console consumer script so that ingested data from the MySQL database can be viewed immediately in raw JSON format.

Data Verification in Messages
In this exercise, we have imported a very small sample of dummy data from a database 'order_streaming,' having only one table named 'order_details' with 3 rows.
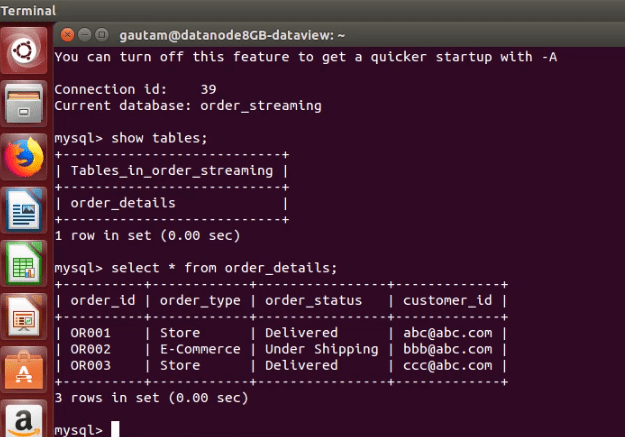
As mentioned at the beginning, we have not clubbed or executed any data pipeline via consumer once data arrived on the topic, so verified or displayed the messages on the console only by running Apache Kafka’s built-in console consumer script. Due to the absence of the Schema Registry and designed schema definition in it, the data in the messages are displaying in a raw JSON document.
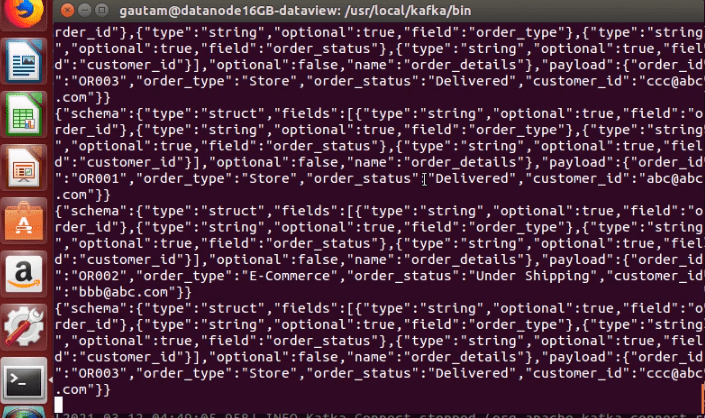
In real-time implementations, if we are continuously ingesting data from the databases to Apache Kafka and subsequently passing through multiple data pipelines into other data systems, it is advisable to integrate the Schema Registry to reduce operational complexity. Click here to know more about Confluent Schema Registry.
Final Note
Ingesting data from RDBMS to Apache Kafka by leveraging JDBC Kafka Connector is a good way to go even though having some downsides. Without writing a single line of code, we can start shipping data continuously from tables and subsequently sink to other data systems. However, can’t be utilized completely for event streaming from the database tables. This connector is limited only to detecting new rows on incrementing columns. To assume the column is updated with a new row, the table should have an additional timestamp column. By using incrementing + timestamp columns, the JDBC connector detect and ingest the newly added raw data to the Kafka topic. Besides, JDBC Connector also lags to listen to DELETE events on the rows of tables as it uses only SELECT queries to retrieve data. Hope you have enjoyed this read.

