Service Stubbing With JMeter and Docker
In this article series about Docker (with JMeter, Distributed, IBM MQ and Cloud) I described how Docker adoption simplifies the performance testing process with Apache JMeter™ and makes it more reliable. These advantages are obtained thanks to the flexibility of container virtualization, that is a key feature of Docker.
In this article, I will present another Docker applicability to performance testing: service stubbing with Docker containers. By replicating dependencies through stubbed services, testers can overcome the challenges dependency systems create to their test procedure: fragility, instability, and more. In this article I will show how to do this with Docker, and with JMeter to replicate the service. Then, you can use JMeter as the testing tool.
You might be surprised how stubbing can be mixed with Docker, but in the article I will introduce the necessary concepts and some practical examples. Let's get started.
Service Stubbing for Performance Testing: An Introduction
With the increasing complexity of testing projects, more and more testing flows of the System Under Test are impacted by dependency system(s). When I say "dependency system" I am referring to:
- A legacy system not affected by current development
- A third party service that belongs to another organization
- A system developed by your organization with an unclear roadmap
The presence of dependency systems brings every manual or automatic testing project in a situation like the one described in the picture below.
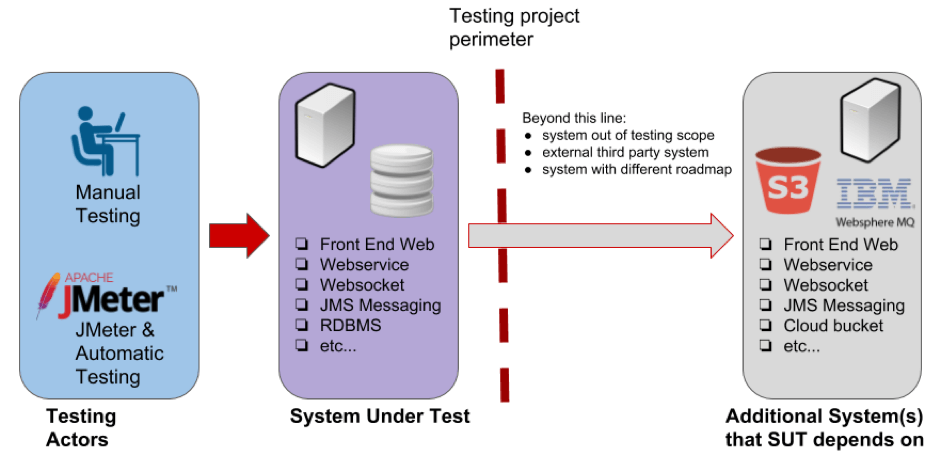
- Testing Actors - in the diagram I'm showing a testing project that stress tests the System Under Test to validate its quality in different ways, both manually and with automation.
- System Under Test (SUT) - a complex architecture composed of heterogeneous services and infrastructure that implement a business requirement.
- Additional Systems - these services collaborate with the final application but are out of the project management scope. Possibly, some of their requirements are unclear. These are the dependencies.
In the picture above it is important to focus on the arrows too. These arrows describe the systems' perimeters and the interfaces used to exchange messages/information:
- The red arrow symbolizes the test specification that is run in the testing tool (JMeter in this case).
- The grey arrow symbolizes that there is a relationship of functionality that the tester knows little about. This could potentially waste your time, if you understand too late that dependencies broke your test logic. So, plan in advance, find out about the dependencies, stub them, develop your plan and proceed with the test.
The presence of dependency systems can produce a series of unpleasant effects throughout the testing project (both for manual and automatic testing):
- Fragility - the test becomes more fragile with the increasing number of uncontrolled dependencies, because you might get a failed test when the problem is with the dependency and not the SUT, rendering the test unreliable.
- Instability - dependencies can bring the system down when the SUT is up, affecting the test result without a clear correlation to the SUT.
- Time consuming - setting up test data may take days/weeks and it's potentially error-prone.
- Unavailability - the testing team may spend time waiting for the availability of dependencies systems.
- Frustration - the human aspect of the matter:
- Testers - you might feel frustrated because you cannot do your job effectively
- Managers - you might feel frustrated because your team wastes time because its work is blocked
To eliminate, or highly reduce, these effects, one solution is to decouple the test procedure executed on the SUT from the uncontrolled dependencies. One way to decouple is adopting stubbed interfaces, with the goal of replicating the behaviour of dependencies. In this manner, the testing procedure does not encounter unpredictable behaviour as it would with the original dependencies system. Thus, the test perimeter will now include the stub services because they are part of testing process. So, we will add a new endpoint to the testing perimeter in our diagram.
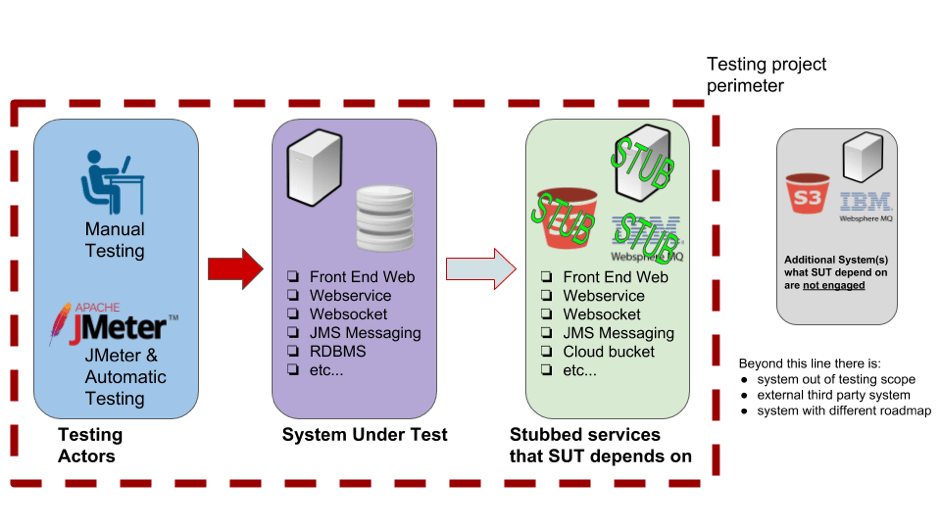
To create stubbed interfaces in out test plan we need to:
- Add a new system called a stub service that replicates the interface to be stubbed
- Define which calls must be stubbed according to the planned test procedure
- Understand that the stub is part of the test suite and is included in the test perimeter
In the picture above I added a new entity, a stub service, into the testing perimeter. The stub service acts like the original dependency when queried, only it answers with specific messages coherent to the testing scopes. A stub can reproduce both functional characteristics, as well as non-functional characteristics, such as response times or slow connections.
Let's understand the flow of the message/information exchange:
- The red arrow has a similar function to the previous picture with a little difference: the testing team has produced a precondition with the stub and the SUT
- The green arrow - is the stubbed interface that reproduces a subset of all possible requests/responses from the real dependencies system. How do you decide which requests/responses you should stub? This depends on two factors:
- Testing coverage - the testing team must assure the quality of the SUT. This goal is achieved via test coverage. More test coverage requires more complex stubbing.
- Stub setup effort - The testing team is responsible for setting up stubbed interfaces and maintaining them. So, resources must be allocated accordingly. This is important to understand because some stubs can be complicated to maintain and the effort can become hugely unexpected compared to the original testing plan.
Concluding this section: stubbing might be the key to the success of a complex testing project.
Virtualization as a Shortcut for Service Stubbing
Developing a stub service require significant planning and implementation efforts. Sometimes, project members adopt quick and dirty solutions to speed up the software lifecycle activities. They assume they will need a short period of stub usage (e.g. developing one feature, testing one feature). A quick and dirty solution is attractive but it tends to:
- Have a short lifecycle without any guarantee of reproducibility over time.
- Be used by only one environment, typically the one where it is developed.
Simple stub solutions are based on hard coded and/or parameterized data. There are more complex stub services, based on a data model solution. A setup of stub services becomes more complex and sometimes requires proper training, but obtaining stubbed services is more recommended for a project with a wider ambition.
In this article, we will describe how to implement a stub service using a virtualization service. Obtaining a virtual stub service grants stub isolation from the rest of the environment. Moreover, a virtual stub service enables migrating the stub service over networks in cases when:
- Departments require sharing stubs so they can collaborate and work with the same references during subsystem development.
- It's required to improve the stub service infrastructure (e.g. computational load and bandwidth) during testing (e.g. performance testing).
The virtual stub service can be created using a virtualization layer. We will use a virtualization based on Docker, because Docker makes it possible to execute a stub in an isolated context that reproduces only the required features.
Docker-based Stub Services
Docker offers the possibility to setup a stub service easily and with a high level of reliability. As we described in previous articles, the possibility to reproduce previously configured behaviour is quite instantaneous in Docker. Moreover, the virtualization layer creates an isolation that executes the stubbed interfaces as an external service.
Now it's time for some examples that will teach us how to do it. I will present two containers, and a stub specific service interface for each one. The proposed examples are my own: they use self assigned requirements without any correlation to a commercial situation.
SUT: Big Data, Stub: Data Source Based on S3 (Example 1)
In this example, we are required to set up a stub for a data source based on an S3 bucket that generates continuous data. This data can be characterized according to velocity, variety, and volume. A potential SUT target for this stub is a Big Data application.
Our test requirements for this example stub are:
- The stub generates the defined kB size of random chars as a S3 object
- The stub uploads a new S3 object periodically
- The stub sends the generated S3 object to assigned bucket
By analyzing these requirements we can extract parameters that we add to the stub implementation to customize our stub behavior at boot time:
- kbSize - the kB size of every object generated
- sheetAtMinute - the indication of how many objects are uploaded each time
- bucket - describes the target bucket name
With the defined interface parameters and the expected output behaviour, we can proceed with the stub architecture definition. We will adopt Docker as stub resource manager and split our stub into three sub-systems:
- A Minio server container to expose the S3 interface to the SUT
- A JMeter container that runs in non-GUI mode to generate a data stream
- A network configured via Docker so containers can communicate and the SUT can see the bucket externally.
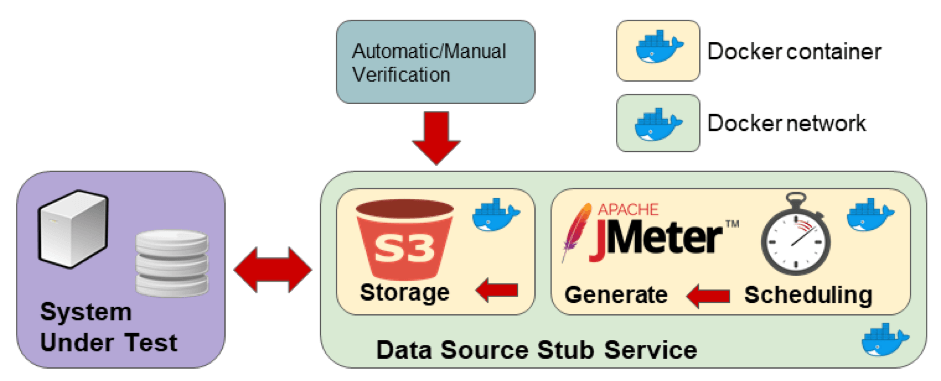
The final stub design is presented in the picture above. This design assumes that the stub is queried by the testing procedure to verify testing goals (e.g. check a report file in the bucket).
Stub Code
As always, here is the code of the described application. You can also find it on GitHub. For this stub see the example code located in the "s3-stub" folder.
$DO_TOKEN="your-digitalocean-token"
$MACHINE_NAME="my-machine"

docker-machine create `
--driver=digitalocean `
--digitalocean-access-token=$DO_TOKEN `
--digitalocean-size=1gb `
--digitalocean-region=ams3 `
--digitalocean-private-networking=true `
--digitalocean-image=ubuntu-16-04-x64 `
    $MACHINE_NAME

$MACHINE_IP = ((docker-machine ip $MACHINE_NAME) | Out-String).trim()

& docker-machine env $MACHINE_NAME --shell powershell | Invoke-Expression
This PowerShell code creates a Docker machine while taking into account hardware requirements and the machine location (this can be another requirement for our stub). In the end, the code extracts the real machine IP address and configures its current shell to execute the next Docker command on the newly created Docker machine.
Please note: Service stubbing often requires simulating a service located over a network (e.g. local network, corporate network, worldwide), so we must be prepared for a situation where the stub location can be "rented" on the Cloud.
$SUB_NET="172.18.0.0/16"
$STUB_NET="mydummynet"

docker network create `
--subnet=$SUB_NET $STUB_NET
This code creates a custom Docker network where the containers our stub is composed of will be placed. Please note: the entire network and the related containers are invoked on the local machine, but executed on a remote machine thanks to the "env" command.
$accessKey="AKIAIOSFODNN7EXAMPLE"
$secretKey="wJalrXUtnFEMI/K7MDENG/bPxRfiCYEXAMPLEKEY"

docker volume create s3data
docker volume create s3conf

docker run `
  -p 9000:9000 `
  --detach `
  --name minio `
  --env "MINIO_ACCESS_KEY=$accessKey" `
  --env "MINIO_SECRET_KEY=$secretKey" `
  --net $STUB_NET `
  -v s3data:/data `
  -v s3conf:/root/.minio `
  minio/minio server /data
This code sets up a Minio server container, which takes the role of the S3 interface for our stub. The code steps are executed in the following order:
- Defining access/secret keys as required to interact with the S3 bucket.
- Creating two Docker volumes that backup the Minio server configuration and the data, in case of a container crash. It is useful to post crash analyses.
- Creating a container in detached mode with the defined configuration.
$MACHINE_KEY="${env:HOMEPATH}/.docker/machine/machines/$MACHINE_NAME/id_rsa"

# this command provides necessary jar for Minio
scp -o StrictHostKeyChecking=accept-new `
    -i $MACHINE_KEY `
    ../../minio-4.0.2-all.jar root@${MACHINE_IP}:~

scp -o StrictHostKeyChecking=accept-new `
    -i $MACHINE_KEY `
    ./script.jmx root@${MACHINE_IP}:~

docker run `
  --detach `
  --name jmeter `
  --env "JMETER_USER_CLASSPATH=/root/" `
  --env "MINIO_ACCESS_KEY=$accessKey" `
  --env "MINIO_SECRET_KEY=$secretKey" `
  --volume /root/:/root/ `
  --net $STUB_NET `
  vmarrazzo/jmeter `
  -n -t /root/script.jmx
In the last part of the PowerShell code, we launch a JMeter container in detached mode. This container executes the logic of periodically uploading a new S3 object to the bucket. Before container execution it's necessary to upload the following on the Docker machine via the scp command:
- minio-4.0.2-all.jar - a necessary library for executing Groovy code in a JMeter script
- script.jmx - the JMeter script with the stub logic (e.g. scheduling and object creation)

The picture above shows the test plan structure of the JMeter script used for stub. This script
- Takes stub arguments from the Docker run command.
- Establishes a connection with the Minio server via its Java API.
- Periodically iterates the generation of a random S3 object and its upload on a defined bucket.
For implementation details, see the Groovy code committed on GitHub. When stub containers are running, it is possible to navigate over the bucket via the web by using the Docker machine IP address at port 9000.
You can now create your JMeter script for load testing the application.
SUT: Application, Stub: IBM MQ Endpoint (Example 2)
This example covers messaging-oriented middleware by showing how to stub an IBM MQ based application. The key features that characterize this middleware are asynchronicity, routing, and transformation. Applications like IBM MQ are highly adopted where it is mandatory to facilitate message exchange with a standard API.
The final stub can simulate a remote endpoint that the SUT occasionally queries during the test project. This situation creates a complicated test and stubbing can be a good solution in a reasonable amount of time.
As already seen in the previous example, we have test requirements that define how the stub works:
- IBM MQ version and its configuration
- Sample message request received by the SUT
- Sample message response to be sent to the SUT
Analyzing these requirements, we need to involve additional colleagues to resolve the knowledge gap necessary to setup our stub. In particular:
- sysadmin - to identify the software version and its configuration (e.g. TLS config)
- developer - to obtain a sample version of messages, like these:
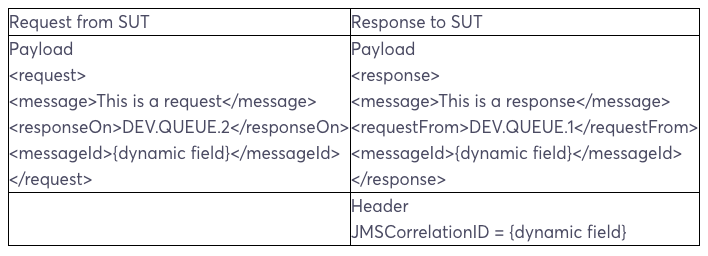
After an inquiry session and a series of "Elementary, my dear Watson" we can adopt a stub architecture that has three subsystems (again):
- IBM MQ container to expose MQ interfaces to SUT
- Consumer/Producer request/response logic into ad hoc container based on custom Java code
- Network configured via Docker, so the containers can communicate and the SUT can see the bucket externally
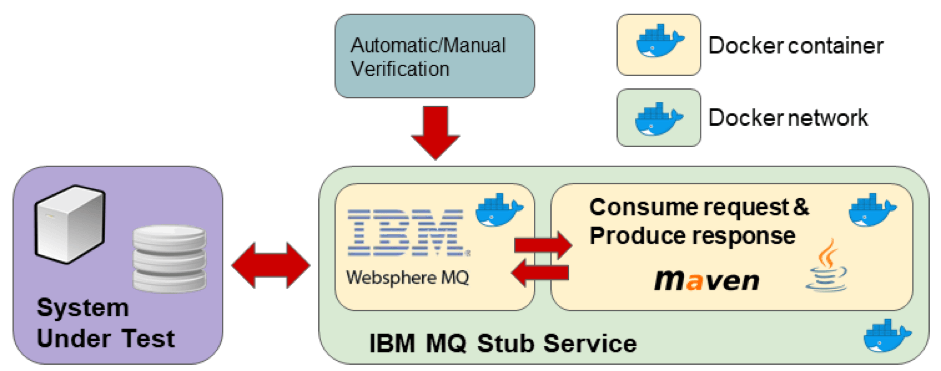
The final stub design is presented in the picture above. This design assumes that the stub is probably queried by the testing procedure to verify the testing goals (e.g. check queue stats).
Stub Code
Before describing the code it's necessary to provide a technical description of the stub and its containers. In detail:
- IBM MQ container is based on the image "vmarrazzo/wmq" already seen in the previous article. It is an IBM MQ V9 with two queue managers that differ to channel encryption with/without TLS security. In this example we suppose that the SUT communicates with TLS security and we have the encryption key.
- The "java-stub" is a custom project developed in Java, which interacts IBM MQ to the stubs expected MQ behavior. This project uses Apache Maven as a build toolchain so it is useful to reuse Maven for our Docker container. The Maven image is useful for executing Maven goals in the isolated environment based on the Docker container.
Here is the code of the described application. The code described in this paper is available on GitHub. For this stub see the example code located in the folder "ibmmq-stub".
$MACHINE_KEY="${env:HOMEPATH}/.docker/machine/machines/$MACHINE_NAME/id_rsa"

# this command uploads necessary TLS for IBM MQ
scp -o StrictHostKeyChecking=accept-new `
    -i $MACHINE_KEY `
    ./my-cert.pfx root@${MACHINE_IP}:~

# this command uploads necessary TLS for Java Stub
scp -o StrictHostKeyChecking=accept-new `
    -i $MACHINE_KEY `
    ./my-cert.jks root@${MACHINE_IP}:~

# this command uploads Java Stub source code
scp -o StrictHostKeyChecking=accept-new `
    -i $MACHINE_KEY `
    -r ./java-stub root@${MACHINE_IP}:~

$destPath="~/java-stub/localrepository/com/ibm/com.ibm.mq.allclient/9.0.4.0"

# this command provides jar for IBM MQ
scp -o StrictHostKeyChecking=accept-new `
    -i $MACHINE_KEY `
    <your_path>/com.ibm.mq.allclient-9.0.4.0.jar `
    root@${MACHINE_IP}: $destPath
The above code is a mandatory precondition for container execution and it includes:
- A keystore in PKCS #12 archive format (pfx) for a TLS channel on IBM MQ
- Java keystore (jks) required by Java stub to handle IBM MQ messages
- The "java-stub" source code project that implements stub logic
- The Java driver for the IBM MQ required by "java-stub" code
$QM_VOLUME_NAME="qm1data"

$ks_file="my-cert.pfx"
$ks_pass="changeit"

docker volume create $QM_VOLUME_NAME

docker run `
  --env MQ_TLS_KEYSTORE=/var/ks/$ks_file `
  --env MQ_TLS_PASSPHRASE=$ks_pass `
  --publish 1415:1415 `
  --publish 9443:9443 `
  --name wmq `
  --detach `
  --net $STUB_NET `
  --volume ${QM_VOLUME_NAME}:/mnt/mqm `
  --volume /root/:/var/ks `
  vmarrazzo/wmq
This code section is quite similar to the one already seen in IBM MQ in the previous Docker article. So after this Docker runs the command, a container is run with an IBM MQ instance inside with a TLS channel on the 1415 socket.
docker volume create --name maven-repo

docker run `
  -it --rm `
  --net $STUB_NET `
  -v /root/:/opt/maven `
  -v maven-repo:/root/.m2 `
  -w /opt/maven `
  maven:3.5-jdk-10 `
  mvn clean compile exec:java -DIBMMQ_HOST=wmq
This is the last PowerShell section and it is related to the execution of a Maven container. This Docker runs a command that executes the stub main class by using a project file descriptor called a pom file. In addition:
- The container is executed in a created network where IBM MQ is running
- The container receives the IBM MQ container name as input, so the Docker network resolves this name with the IP address container
After the execution of Docker run commands, the resulting stub is ready to be engaged by the SUT by producing the following actions:
- Listening for incoming messages on the IBM MQ queue to be parsed
- After correctly receiving the message, it generates the answer message using the data carried to the request message.
Based on this current article and a previous one, the reader can implement a load script to test the final stub behavior.
Conclusion
In this article, I showed another way to use Docker in a performance project, by using service stubbing based on Docker virtualization. I also described examples that used various Docker containers we started working with in previous articles. These obtained stub services demonstrate container flexibility in different contexts (e.g. Maven container is for developing purpose).
After setting up your system, you can run performance tests on it with BlazeMeter. Create your JMeter script, scale it in BlazeMeter, share your tests with colleagues and managers, and analyze results.
To try out BlazeMeter, request a live demo from one of our performance engineers.

