Reactive Microservices With Spring WebFlux and Spring Cloud
I have already described Spring reactive support about one year ago in the article Reactive microservices with Spring 5. At that time, the project Spring WebFlux has been under active development, and now, after the official release of Spring 5, it is worth it to take a look at the current version. Moreover, we will try to put our reactive microservices inside the Spring Cloud ecosystem, which contains such elements as service discovery with Eureka, load balancing with Spring Cloud Commons @LoadBalanced, and API gateways using Spring Cloud Gateway (also based on WebFlux and Netty). We will also check out Spring reactive support for NoSQL databases with the example of a Spring Data Reactive Mongo project.
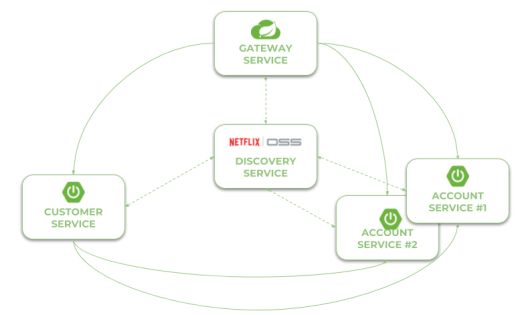
Here's a figure that illustrates the architecture of our sample system, consisting of two microservices, a discovery server, a gateway, and MongoDB databases. The source code is as usual available on GitHub in the sample-spring-cloud-webflux repository.

Let's describe the further steps on the way to creating the system illustrated above.
Step 1: Building Reactive Application Using Spring WebFlux
To enable library Spring WebFlux for the project we should include the starter spring-boot-starter-webflux to the dependencies. It includes some dependent libraries like Reactor or Netty server.
<dependency>
<groupId>org.springframework.boot</groupId>
<artifactId>spring-boot-starter-webflux</artifactId>
</dependency>
REST controller looks pretty similar to the controller defined for synchronous web services. The only difference is in the type of returned objects. Instead of a single object, we return an instance of the class Mono, and instead of a list, we return an instance of the class Flux. Thanks to Spring Data Reactive Mongo, we don't have to do anything more than call the needed method on the repository bean.
@RestController
public class AccountController {

 private static final Logger LOGGER = LoggerFactory.getLogger(AccountController.class);

 @Autowired
 private AccountRepository repository;

 @GetMapping("/customer/{customer}")
 public Flux findByCustomer(@PathVariable("customer") String customerId) {
  LOGGER.info("findByCustomer: customerId={}", customerId);
  return repository.findByCustomerId(customerId);
 }

 @GetMapping
 public Flux findAll() {
  LOGGER.info("findAll");
  return repository.findAll();
 }

 @GetMapping("/{id}")
 public Mono findById(@PathVariable("id") String id) {
  LOGGER.info("findById: id={}", id);
  return repository.findById(id);
 }

 @PostMapping
 public Mono create(@RequestBody Account account) {
  LOGGER.info("create: {}", account);
  return repository.save(account);
 }

}
Step 2: Integrate an Application With the Database Using Spring Data Reactive Mongo
The implementation of integration between an application and database is also very simple. First, we need to include the starter spring-boot-starter-data-mongodb-reactive in the project dependencies.
<dependency>
<groupId>org.springframework.boot</groupId>
<artifactId>spring-boot-starter-data-mongodb-reactive</artifactId>
</dependency>
The support for reactive Mongo repositories is automatically enabled after including the starter. The next step is to declare an entity with ORM mappings. The following class is also returned as a reponse by AccountController.
@Document
public class Account {

 @Id
 private String id;
 private String number;
 private String customerId;
 private int amount;

 ...

}
Finally, we may create a repository interface that extends ReactiveCrudRepository. It follows the patterns implemented by Spring Data JPA and provides some basic methods for CRUD operations. It also allows us to define methods with names, which are automatically mapped to queries. The only difference in comparison with standard Spring Data JPA repositories is in method signatures. The objects are wrapped by Mono and Flux.
public interface AccountRepository extends ReactiveCrudRepository {

 Flux findByCustomerId(String customerId);

}
In this example, I used a Docker container to run MongoDB locally. Because I run Docker on Windows using Docker Toolkit, the default address of the Docker machine is 192.168.99.100. Here's the configuration of the data source in application.yml file.
spring:
  data:
    mongodb:
      uri: mongodb://192.168.99.100/test
Step 3: Enabling Service Discovery Using Eureka
Integration with Spring Cloud Eureka is pretty much the same as for synchronous REST microservices. To enable the discovery client, we should first include the starter spring-cloud-starter-netflix-eureka-client to the project dependencies.
<dependency>
<groupId>org.springframework.cloud</groupId>
<artifactId>spring-cloud-starter-netflix-eureka-client</artifactId>
</dependency>
Then we have to enable it using the @EnableDiscoveryClient annotation.
@SpringBootApplication
@EnableDiscoveryClient
public class AccountApplication {

 public static void main(String[] args) {
  SpringApplication.run(AccountApplication.class, args);
 }

}
The microservice will automatically register itself in Eureka. Of course, we may run more than one instance of every service. Here's the screen illustrating Eureka Dashboard (http://localhost:8761) after running two instances of account-service and a single instance of customer-service. I would not like to go into the details of running an application with an embedded Eureka server. You may refer to my previous article, Quick Guide to Microservices with Spring Boot 2.0, Eureka and Spring Cloud, for details. Eureka server is available as adiscovery-service module.

Step 4: Inter-Service Communication Between Reactive Microservices With WebClient
An inter-service communication is realized by the WebClient from the Spring WebFlux project. The same as for RestTemplate you should annotate it with Spring Cloud Commons @LoadBalanced . It enables integration with service discovery and load balancing using the Netflix OSS Ribbon client. So, the first step is to declare a client builder bean with the @LoadBalanced annotation.
@Bean
@LoadBalanced
public WebClient.Builder loadBalancedWebClientBuilder() {
 return WebClient.builder();
}
Then we may inject WebClientBuilder into the REST controller. Communication with account-service is implemented inside GET /{id}/with-accounts , where first we are searching for a customer entity using a reactive Spring Data repository. It returns the object Mono , while the WebClient returns Flux . Now, our main goal is to merge those to publishers and return a single Mono object with the list of accounts taken from Flux without blocking the stream. The following fragment of code illustrates how I used WebClient to communicate with another microservice, and then merge the response and result from the repository to a single Mono object. This merge may probably be done in more "elegant" way, so feel free to create a push request with your proposal.
@Autowired
private WebClient.Builder webClientBuilder;

@GetMapping("/{id}/with-accounts")
public Mono findByIdWithAccounts(@PathVariable("id") String id) {
 LOGGER.info("findByIdWithAccounts: id={}", id);
 Flux accounts = webClientBuilder.build().get().uri("http://account-service/customer/{customer}", id).retrieve().bodyToFlux(Account.class);
 return accounts
  .collectList()
  .map(a -> new Customer(a))
  .mergeWith(repository.findById(id))
  .collectList()
  .map(CustomerMapper::map);
}
Step 5: Building an API Gateway Using Spring Cloud Gateway
Spring Cloud Gateway is one of the newest Spring Cloud projects. It is built on top of Spring WebFlux, and thanks to that, we may use it as a gateway to our sample system based on reactive microservices. Similar to Spring WebFlux applications, it is run on an embedded Netty server. To enable it for Spring Boot applications, just include the following dependency in your project.
<dependency>
<groupId>org.springframework.cloud</groupId>
<artifactId>spring-cloud-starter-gateway</artifactId>
</dependency>
We should also enable the discovery client in order to allow the gateway to fetch the list of registered microservices. However, there is no need to register the gateway's application in Eureka. To disable registration, you may set the property eureka.client.registerWithEureka to false in the application.yml file.
@SpringBootApplication
@EnableDiscoveryClient
public class GatewayApplication {

 public static void main(String[] args) {
  SpringApplication.run(GatewayApplication.class, args);
 }

}
By default, Spring Cloud Gateway does not enable integration with service discovery. To enable it, we should set the property spring.cloud.gateway.discovery.locator.enabled to true. Now, the last thing that should be done is the configuration of the routes. Spring Cloud Gateway provides two types of components that may be configured inside routes: filters and predicates. Predicates are used for matching HTTP requests with a route, while filters can be used to modify requests and responses before or after sending the downstream request. Here's the full configuration of the gateway. It enables service discovery location and defines two routes based on entries in the service registry. We use the Path Route Predicate factory for matching the incoming requests, and the RewritePath GatewayFilter factory for modifying the requested path to adapt it to the format exposed by the downstream services (endpoints are exposed under the path /, while gateways expose them under the paths /account and /customer).
spring:
  cloud:
    gateway:
      discovery:
        locator:
          enabled: true
      routes:
      - id: account-service
        uri: lb://account-service
        predicates:
        - Path=/account/**
        filters:
        - RewritePath=/account/(?.*), /$\{path}
      - id: customer-service
        uri: lb://customer-service
        predicates:
        - Path=/customer/**
        filters:
        - RewritePath=/customer/(?.*), /$\{path}
Step 6: Testing the Sample System
Before doing some tests, let's just recap our sample system. We have two microservices - account-service, customer-service - that use MongoDB as a database. The microservice customer-service calls the endpoint GET /customer/{customer} exposed by account-service. The URL of account-service is taken from Eureka. The whole sample system is hidden behind a gateway, which is available under the address localhost:8090.
Now, the first step is to run MongoDB on a Docker container. After executing the following command, Mongo is available under the address 192.168.99.100:27017.
$ docker run -d --name mongo -p 27017:27017 mongoThen we may proceed to run discovery-service. Eureka is available under its default address, localhost:8761. You may run it using your IDE or just by executing the command java -jar target/discovery-service-1.0-SNAPHOT.jar. The same rule applies to our sample microservices. However, account-service needs to be multiplied in two instances, so you need to override the default HTTP port when running the second instance using the -Dserver.port VM argument, for example, java -jar -Dserver.port=2223 target/account-service-1.0-SNAPSHOT.jar. Finally, after running gateway-service, we may add some test data.
$ curl --header "Content-Type: application/json" --request POST --data '{"firstName": "John","lastName": "Scott","age": 30}' http://localhost:8090/customer
{"id": "5aec1debfa656c0b38b952b4","firstName": "John","lastName": "Scott","age": 30,"accounts": null}
$ curl --header "Content-Type: application/json" --request POST --data '{"number": "1234567890","amount": 5000,"customerId": "5aec1debfa656c0b38b952b4"}' http://localhost:8090/account
{"id": "5aec1e86fa656c11d4c655fb","number": "1234567892","customerId": "5aec1debfa656c0b38b952b4","amount": 5000}
$ curl --header "Content-Type: application/json" --request POST --data '{"number": "1234567891","amount": 12000,"customerId": "5aec1debfa656c0b38b952b4"}' http://localhost:8090/account
{"id": "5aec1e91fa656c11d4c655fc","number": "1234567892","customerId": "5aec1debfa656c0b38b952b4","amount": 12000}
$ curl --header "Content-Type: application/json" --request POST --data '{"number": "1234567892","amount": 2000,"customerId": "5aec1debfa656c0b38b952b4"}' http://localhost:8090/account
{"id": "5aec1e99fa656c11d4c655fd","number": "1234567892","customerId": "5aec1debfa656c0b38b952b4","amount": 2000}
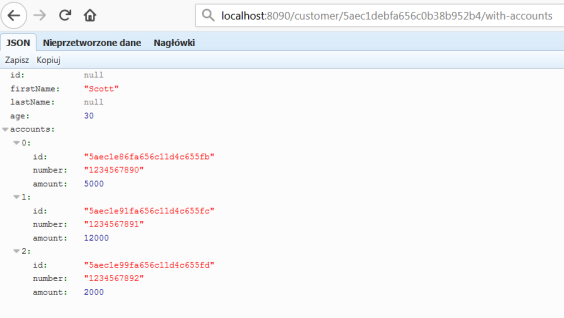
To test inter-service communication, just call the endpoint GET /customer/{id}/with-accounts on gateway-service. It forwards the request to customer-service, and then customer-service calls the endpoint exposed by account-service using reactive WebClient. The result is visible below.

Conclusion
Since Spring 5 and Spring Boot 2.0, there is a full range of available ways to build microservices-based architecture. We can build a standard synchronous system using one-to-one communication with the Spring Cloud Netflix project, messaging microservices based on a message broker, and a publish/subscribe communication model with Spring Cloud Stream, and finally, asynchronous, reactive microservices with Spring WebFlux. The main goal of this article is to show you how to use Spring WebFlux together with Spring Cloud projects in order to provide such mechanisms as service discovery, load balancing, or API gateways for reactive microservices built on top of Spring Boot. Before Spring 5, the lack of support for reactive microservices was one of the drawbacks of the Spring framework, but now, with Spring WebFlux, it is no longer the case. Not only that - we may leverage Spring reactive support for the most popular NoSQL databases, like MongoDB or Cassandra, and easily place our reactive microservices inside one system together with synchronous REST microservices.

