Why you Should and How to Archive your Kafka Data to Amazon S3

Over the last decade, the volume and variety of data and data storage technologies have been soaring. Businesses in every industry have been looking for cost-effective ways to store it, and storage has been one of the main requirements for data retention. With a change to [near] real-time data pipelines and growing adoption of Apache Kafka, companies must find ways to reduce the Total Cost of Ownership (TCO) of their data platform.
Currently, Kafka is configured with a shorter, and typically three days, retention period. Data, older than the retention period, is copied, via streaming data pipelines, to scalable external storage for long-term use like AWS S3 or Hadoop Distributed File System (HDFS).
When it comes to moving data out of Apache Kafka, the most successful option is to let Apache Kafka Connect do the work. The Kafka Connect AWS S3 sink used is open source, and can be found on GitHub - the repository hosts a collection of open-source Kafka Connect sinks sources.
Why Different Long-Term Storage?
Using Kafka as your source of long-term storage can lead to significant costs. When work on vanilla Kafka distribution for tiered storage is completed, it will improve cost. However, migrating to the latest version might not be an immediate option for all businesses.
Tiered storage might not always be the best solution; it all depends on the data access pattern. If you deploy your ML-driven processes in production daily, and the historical data is read a lot, this can impact the Kafka brokers' cache and introduce slowness into your cluster.
How to Use It
Here’s how to stream Kafka data to AWS S3. If a Connect cluster is not already running, and the Kafka version is not at least 2.3, follow the Kafka documentation here.
This exercise uses AVRO payloads, and therefore, the presence of a Schema Registry is required. Alternatively, rely on JSON and store the data in AWS S3 as JSON.
Have the AWS access keys and S3 bucket available.
If you already have them, you can jump to the next step. To obtain the access keys follow AWS secret keys documentation, and for the S3 bucket setup follow this documentation. Ensure you use sensible selections for security and access options.
Download and install the S3 sink connector
This step is required on all Connect cluster workers.
wget https://github.com/lensesio/stream-reactor/releases/download/2.1.0/kafka-connect-aws-s3-2.1.0-2.5.0-all.tar.gz
mkdir /opt/kafka-connect-aws-s3
tar xvf kafka-connect-aws-s3-2.1.0-2.5.0-all.tar.gz -C /opt/kafka-connect-aws-s3
This will unpack the code to /opt/kafka-connect-aws-s3 folder. There are two options. The first is to copy this folder to your Connect worker plugin.path; the second one is to change the worker configuration for plugin path to include the S3 sink (this requires the Connect workers to be restarted)
xxxxxxxxxx
plugin.path=/usr/share/connectors,/opt/kafka-connect-aws-s3
Validate the connector is ready to be used
To make sure the connector is ready to be configured run this curl command (do update the endpoint to match your Connect cluster endpoint[-s]).
xxxxxxxxxx
curl -sS localhost:8083/connector-plugins | jq .[].class | grep S3SinkConnector
The output should read:io.lenses.streamreactor.connect.aws.s3.sink.S3SinkConnector
Create a topic named orders
The command line utility is provided with any Kafka distribution, and you can find it in the installation folder.
xxxxxxxxxx
bin/kafka-topics.sh --create --topic orders --bootstrap-server localhost:9092
Create the S3 sink configuration file
Using an editor of your choice, paste the following content to a file named s3.json, and apply the changes for your S3 bucket and AWS secret keys and the schema registry endpoint.
x
{
"name": "lenses-s3-sink",
"config": {
"connector.class": "io.lenses.streamreactor.connect.aws.s3.sink.S3SinkConnector",
"tasks.max": "1",
"topics": "orders",
"connect.s3.kcql": "INSERT INTO ${BUCKET_NAME}:${PREFIX_NAME} SELECT * FROM orders STOREAS `AVRO` WITH_FLUSH_COUNT = 5000",
"aws.region": "eu-west-1",
"aws.access.key": "${YOUR_ACCESS_KEY}",
"aws.secret.key": "${YOUR_SECRET_KEY}",
"aws.auth.mode": "Credentials",
"value.converter": "io.confluent.connect.avro.AvroConverter",
"value.converter.schema.registry.url": "http://localhost:8081"
}
}
Run the S3 sink
With the configuration file created, the following curl command will instruct Connect to create and run the S3 sink:
xxxxxxxxxx
curl -s -X POST -H 'Content-Type: application/json' --data @s3.json http://localhost:8083/connectors
Push data to orders topic
With the sink running, you can insert data in the orders topic using the AVRO producer command line:
xxxxxxxxxx
bin/kafka-avro-console-producer \
--broker-list localhost:9092 --topic orders \
--property \
value.schema='{"type":"record","name":"myrecord","fields":[{"name":"id","type":"int"},{"name":"created","type":"string"},{"name":"product","type":"string"},{"name":"price","type":"double"}, {"name":"qty", "type":"int"}]}'
The console is now waiting for your input. Paste this content and hit enter:
xxxxxxxxxx
{"id": 1, "created": "2016-05-06 13:53:00", "product": "OP-DAX-P-20150201-95.7", "price": 94.2, "qty":100}
Check the S3 bucket
You can use the AWS console for that or the command line if you have it installed.
aws ls s3://mybucket/mykey --recursive
Exactly Once
Moving data from Kafka to AWS S3 should follow the principle of avoiding as few surprises as possible. As a data engineer setting the connector up and then querying the data in S3, you should not expect the same record to appear more than once. When the Connect framework re-balances the tasks, the underlying Kafka consumer group is re-balanced. Therefore, there is a chance of the same Kafka record being given to the connector more than once. Thus a mechanism to ensure a record is written exactly once is required.
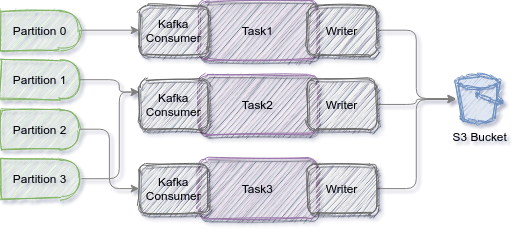
When the Connect framework reads a source topic, each of the topic partitions is handled by only one of the sink running tasks. This benefit comes from the Kafka Consumer group semantics; each sink task has a Kafka consumer who joins a Kafka consumer group unique to the connector (connector name is the group identifier).
When a topic has four partitions, and the sink has been configured with three tasks, the following can be a workload distribution:

Being able to allocate an S3 writer per input topic-partition avoids a lot of complexity. The complexity would have resulted from a distributed write, where at least two tasks were writing records for the same partition.
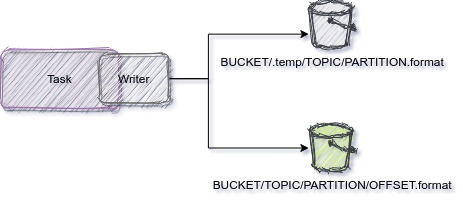
Records received by the sink are first stored into a temporary file. Only once the commit policy is met, the file is moved to the desired location, and therefore, the records are considered committed.

Writing the file to the desired location is done in such a way to keep the latest Kafka record offset written for a given partition. Having the last written offset is essential in case of failures or stop-start actions.
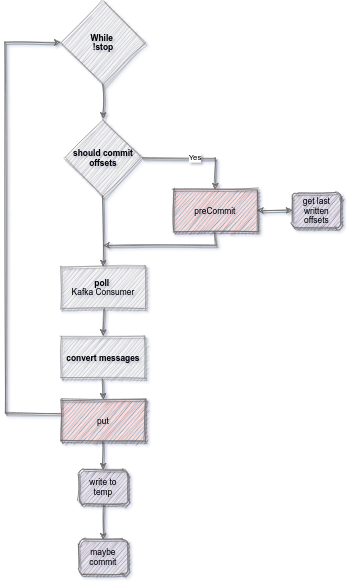
The Connect framework gives the sink task the option to overwrite the underlying Kafka consumer offsets about to be committed to Kafka. While the temporary file accumulates records, the sink returns to the framework the last offset written for the partition. Doing so avoid having records dropped or written more than once.
A simplified version of the Connect flow is illustrated below:

The same rules apply when using the custom data partitioner. In this case, the temporary and the target file names follow this pattern:
xxxxxxxxxx
${BUCKET+PREFIX}/[field1=]value1[/[field2]=value2]/${TOPIC}/${PARTITION}/temp.${FORMAT}
${BUCKET+PREFIX}/[field1=]value1[/[field2]=value2]/${TOPIC}(${PARTITION}_${OFFSET}).${FORMAT}
Connector Configuration
The connector provides a set of configuration flags to allow different setups. The full details are available following the code repository on GitHub. Here are the full configuration settings specific to the connector:
Name |
Description |
Type |
Values Set |
connect.s3.kcql |
SQL like syntax to describe the connector behaviour |
string |
|
aws.region |
Region |
string |
|
aws.access.key |
Access Key |
string |
|
aws.secret.key |
Secret Key |
string |
|
aws.auth.mode |
Auth Mode |
string |
Credentials, EC2, ECS, Env |
aws.custom.endpoint |
Custom Endpoint |
string |
|
aws.vhost.bucket |
Enable Vhost Buckets |
boolean |
true, false |
To simplify the connector configuration, the connector relies on a SQL like syntax (KCQL), to drive the behavior. You can have multiple statements to support reading from multiple [and different] topics within the same connector.
The generic syntax supported is this (keywords order is important):
xxxxxxxxxx
INSERT INTO bucketAddress:pathPrefix
SELECT *
FROM kafka-topic
[PARTITIONBY (partition[, partition] ...)]
[STOREAS storage_format]
[WITHPARTITIONER partitioner]
[WITH_FLUSH_SIZE flush_size]
[WITH_FLUSH_INTERVAL flush_interval]
[WITH_FLUSH_COUNT flush_count]
Here are a few examples:
xxxxxxxxxx
INSERT INTO testS3Bucket:pathToWriteTo
SELECT * FROMtopicA
INSERT INTO testS3Bucket:pathToWriteTo
SELECT *
FROM topicA
STOREAS `AVRO`WITH_FLUSH_COUNT = 5000
INSERT INTO kafka-connect-aws-s3-test:headerpartitioningdem
SELECT *
FROM topic-with-headers
PARTITIONBY _header.facilityCountryCode,_header.facilityNum
STOREAS `TEXT`
WITH_FLUSH_COUNT=100
Output format
Depending on requirements and input topic[-s] format the connector can store these data formats:
- AVRO
- JSON
- Parquet
- Text
- CSV (With or without header)
- Binary (Key and Value, or Key only, or Value only)
Flushing data
A critical aspect of writing to S3 is avoiding small files. The connector supports three configuration options to control how often the data is written to the target location. All of them can be used at once, and they are not mutually exclusive.
Using FLUSH_COUNT ensures the resulting files do not contain more records than the value provided. This strategy might still lead to small files being stored;it all depends on records size.
FLUSH_SIZE gives better control over the output file size. As soon as the file size exceeds the provided value, it will be written to the target location. It is not a hard limit though.
FLUSH_INTERVAL is always the fallback. After the given time interval, the files will be rolled over even if any of the other two strategies have not yet been met. or even worse, maybe there won’t ever be a record added to the topic - hypothetically speaking. Without this strategy, the records accumulated already will never be flushed.
Data Partition
The default behavior is to store the data for each topic-partition tuple. It means the target bucket will have entries for each partition for each topic processed. Here is how your S3 bucket structure will look.
xxxxxxxxxx
bucket/prefix/topic/partition/offset.ext
There is another way to partition the data in S3, and this is driven by the data content. PARTITIONBY statement controls the behavior. You can partition the data by
- Record Value field[-s]:
PARTITIONBY fieldA[,fieldB] - Record Key:
PARTITIONBY _key - Record Key field[-s]:
PARTITIONBY _key.fieldA[,_key.fieldB] - Record Header[-s]:
PARTITIONBY _header.<header_key1>[,_header.<header_key2>] - A combination of all the above:
PARTITIONBY fieldA, _key.fieldB, _headers.fieldC
WITHPARTITIONER=KeysAndValues. In this case both the column(field) and the value contribute to the path:
xxxxxxxxxx
bucket/prefix/field1=value1[/field2=value2]/topic(partition_offset).ext
Default behavior, which can be defined via WITHPARTITIONER=Values, does not retain the column(or key) names in the output path:
xxxxxxxxxx
bucket/prefix/value1[/value2]/topic(partition_offset).ext
Conclusion
Using Open Source S3 Kafka Connector can help you meet cost reduction targets your project [or company] needs.
Storing data in S3 is only part of the story. Sometimes, S3 data needs to be replayed too. In my next article I’ll cover the benefits of having a full circle Kafka-S3-Kafka.

