Create an Azure-Ready GitHub Repository Using Pulumi
Creating an application and deploying it to Azure is not complicated. You write some code on your machine, do some clicks in the Azure portal, or run some Azure CLI commands from your terminal and that's it: your application is up and running in Azure.
Yet, that's not real life, at least not what you will do when working on a professional project. Your code needs to be versioned and pushed to a location where your colleagues can work on it. The provisioning of Azure resources and deployment to Azure should be carried out using a properly configured CI/CD pipeline with the necessary authorization.
That's a lot of work that would need to be done each time you start a new project. So let's automate that using Pulumi to simplify the process and create an "Azure-Ready GitHub repository".
What's an Azure-Ready GitHub Repository?
"Azure-Ready GitHub repository" is not an official term or concept; it's just something I've come up with to describe a Github repository that has everything correctly configured to provision Azure resources or deploy applications to Azure from a GitHub Actions CI/CD pipeline.
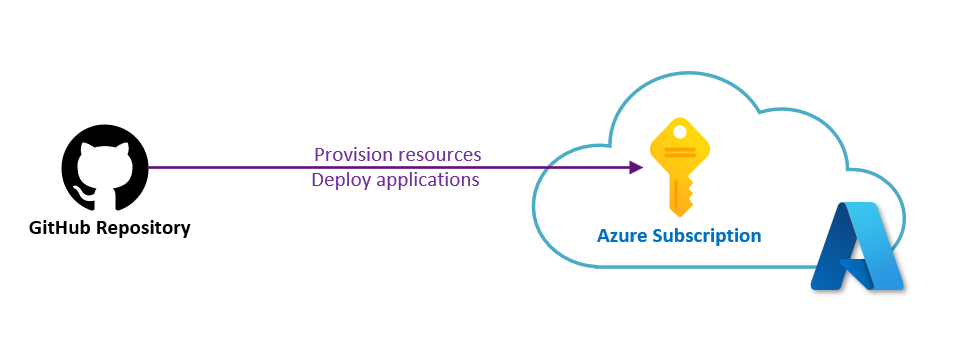
The GitHub Part
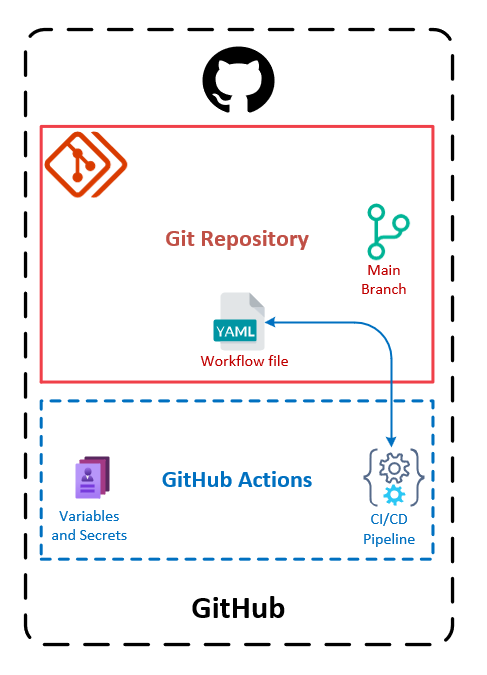
On the GitHub side, to have an Azure-Ready GitHub repository, we need:
- The GitHub repository itself (already initialized with a
mainbranch). - The necessary GitHub Actions variables/secrets to authenticate to the correct Azure subscription.
- A YAML file located in the
.github/workflows/folder that contains the CI/CD pipeline that provisions resources in Azure.
The Azure Part
On the Azure side, to have an Azure-Ready GitHub repository, we need:
- The existing Azure subscription to which resources are deployed.
- An identity in the Azure Active Directory of the desired tenant so that the GitHub CI/CD pipeline can authenticate to Azure and interact with the subscription.
- An Azure AD application that represents the GitHub Actions pipeline identity.
- A Service Principal (related to the Azure AD application) that has the contributor role on the Azure subscription.
- Credentials for the CI/CD pipeline to authenticate to Azure on behalf of this Azure AD application.
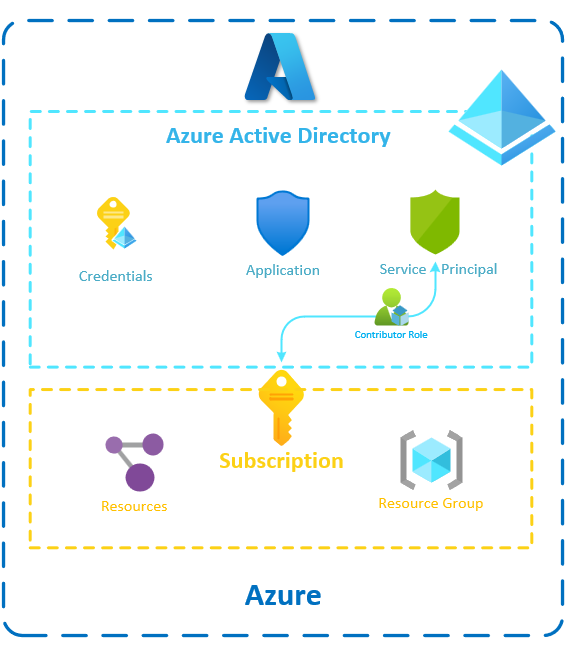
Azure Active Directory has recently been renamed Microsoft Entra ID (as of the time of writing). However, I will continue to use the term Azure Active Directory throughout the rest of the article. Please note that both terms refer to the same service.
The Problem With Secret Credentials
People tend to use secret credentials to authenticate their pipeline to Azure, and that's not the best thing to do.
From a security standpoint, depending on secrets always poses a security risk. Even if, in that case, the secret would be safely stored in a GitHub secret and never exposed publicly, it's still better to avoid secrets when we can.
That's precisely why, when hosting applications in Azure, we use Managed Identities and IAM roles instead of relying on secrets. Yet, here, we can't use Managed Identities for GitHub Actions pipelines.
From a practical standpoint, depending on secrets can quickly become problematic as they expire and thus require rotation. Of course, you can set up alerting or automate secret rotation, but that's something you would prefer to avoid managing.
I recently encountered a situation in Azure DevOps where a deployment failed due to the expiration of an Azure AD Application secret associated with the Service Connection used in the pipeline, and we were not alerted about it. That's the kind of scenario that can easily happen with secrets and that you want to avoid.
So what can we do about that?
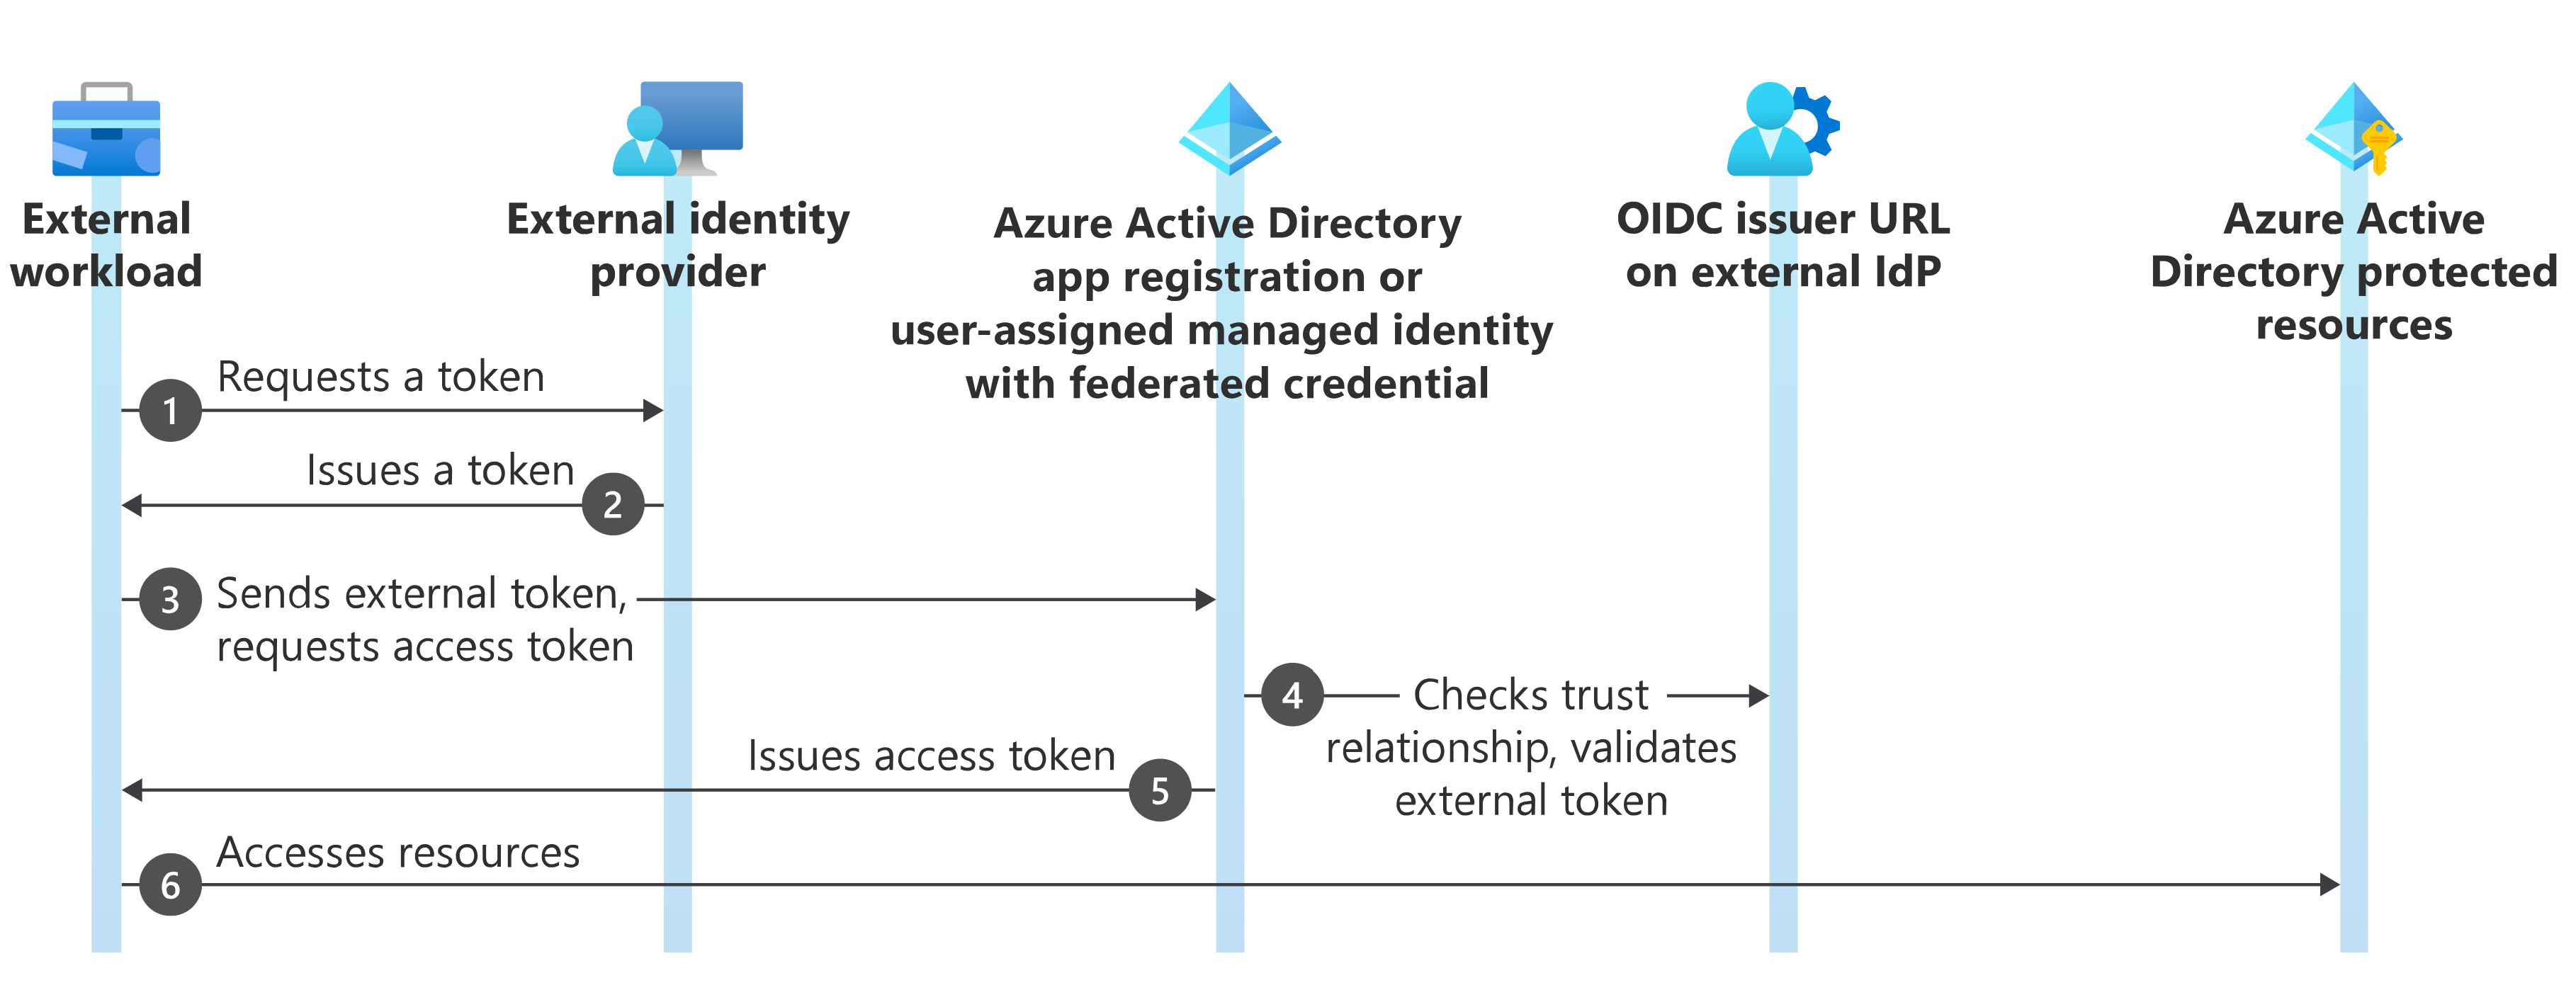
We can stop using secret credentials and use Workload Identity federation instead. I suggest you have a look at this GitHub documentation page as well to better understand how it works, but basically, you can remember the following:
- This mechanism relies on Open ID Connect and trust between Azure and GitHub.
- The GitHub pipeline does not need an Azure AD application secret anymore to authenticate to Azure.
- It's not an Azure thing only; it's an open standard that also works with other cloud providers and other platforms than Github.
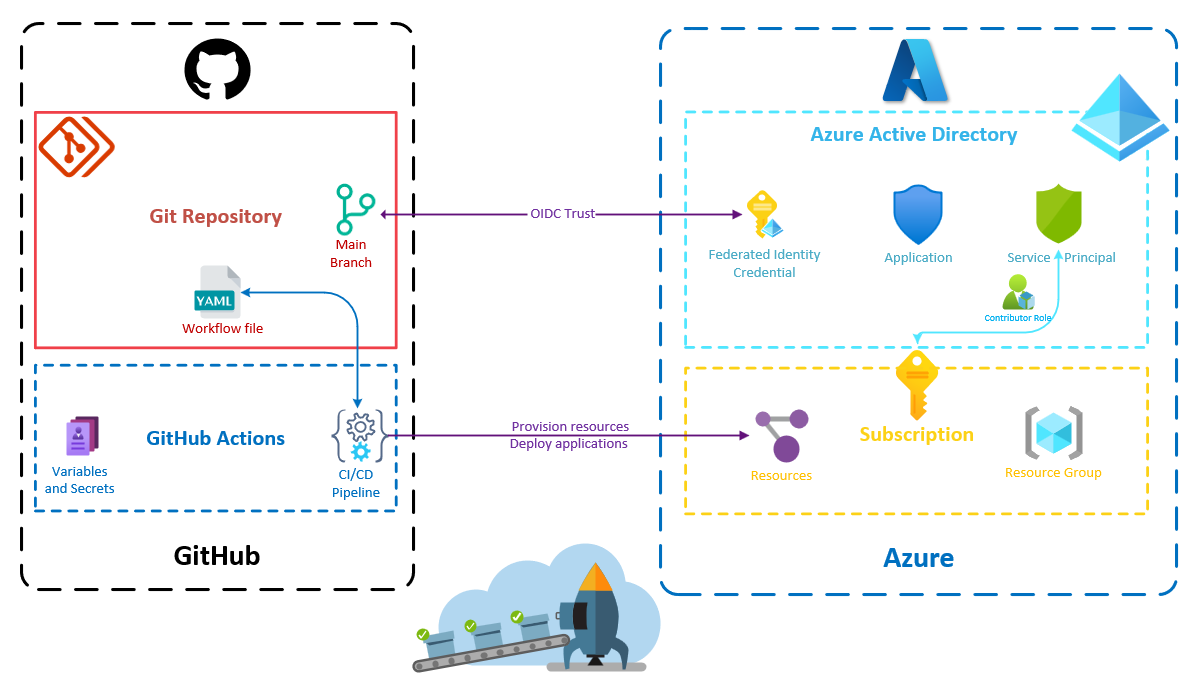
To establish the trust relationship between the Azure AD application and the GitHub repository, a Federated Identity Credential must be created in the Azure Active Directory. You can find how to do that manually from the portal in the documentation, but we are going to directly automate that.
The Complete Solution to Implement
Why Use Pulumi in That Context?
You might wonder why I chose to automate this process using Pulumi instead of writing a Bash or PowerShell script that would execute commands from the GitHub CLI and the Azure CLI.
By the way, you should check GitHub CLI if you have not done it yet; it's very handy. And if you have read my article about Azure CLI, you know it's a very convenient tool as well.
I think Pulumi is a better choice here because:
- A script is imperative by nature, but declarative infrastructure seems more suitable to avoid dealing with idempotency.
- Pulumi can interact with both GitHub and Azure using its providers.
- The code will be easier to write and maintain.
- The code could be integrated into any application (including a future self-service infrastructure portal) using Pulumi Automation API.
In this article, the Pulumi code will be in TypeScript, but it will work in any language supported by Pulumi.
Automate the Creation of the Azure-Ready GitHub Repository
Create the Pulumi Project
Let's start by scaffolding a new Pulumi project using TypeScript:
pulumi new typescript -n AzureOIDC -s dev -d "A program to set up an Azure-Ready GitHub repository"
This command creates a new pulumi project and stack from the TypeScript template:
- The name of the project, "AzureOIDC," is specified using the
-noption. - The description of the project, "A program to set up an Azure-Ready GitHub repository," is specified using the
-doption. - The stack of the project "dev" is specified using the
-soption.
By default, the pulumi new command installs the dependencies when creating the project. You can prevent this by specifying the -g option, which is useful when you want to use another package manager than the default one (pnpm instead of npm, for instance).
This project will need three different providers:
- The Azure Native provider
- The Azure Active Directory provider
- The GitHub provider
So we can add the following packages to our package.json file:
- @pulumi/azure-native
- @pulumi/azuread
- @pulumi/github
Create the Repository on GitHub
To use the GitHub provider, we have to provide GitHub credentials. For that, we can create a personal access token (I prefer to create a fine-grained personal access token, although a classic personal access token would also work). Next, we simply set the GitHub token in our Pulumi configuration, and the GitHub provider will automatically use it:
pulumi config set github:token XXXXXXXXXXXXXX --secretDon't forget to include the --secret option when setting sensitive configurations, as this ensures that Pulumi encrypts the information. By doing so, we can safely commit the configuration files without creating security risks.
Now, it's time to create our GitHub repository!
import * as github from "@pulumi/github";

const repository = new github.Repository("azure-ready-repository", {  name: "azure-ready-repository",  visibility: "public",  autoInit: true
});

export const repositoryCloneUrl = repository.httpCloneUrl;
Pulumi has an auto-naming capability that is very convenient to prevent name collisions or to ensure zero-downtime resource updates. Yet, in this context, I prefer to avoid a random suffix in my GitHub repository name, that's why I am specifying the name property to override the auto-naming behavior.
The last line creates a stack output named repositoryCloneUrl so that we can easily get the URL to clone our newly created repository.
I wanted the repository to be initialized; that's why I set the autoInit property to true, but you should set it to false if you have an existing local git repository that you want to push on this GitHub repository.
Create the identity in Azure Active Directory for the GitHub Actions Workflow.
Creating an Azure AD application and its service principal is not very complicated:
import * as azuread from "@pulumi/azuread";

const aadApplication = new azuread.Application("AzureReadyApp", { displayName: "Azure Ready App" });
const servicePrincipal = new azuread.ServicePrincipal("AzureReadServicePrincipal", {  applicationId: aadApplication.applicationId,
});
The OIDC trust thing is a bit more complex. Fortunately, Microsoft's documentation has a detailed page, Configuring an app to trust an external identity provider that explains everything and shows how to add a federated identity for GitHub Actions using the Azure Portal, Azure CLI, or Azure PowerShell.
Let's do the same thing using TypeScript and Pulumi Azure AD provider:
new azuread.ApplicationFederatedIdentityCredential("AzureReadyAppFederatedIdentityCredential", {  applicationObjectId: aadApplication.objectId,  displayName: "AzureReadyDeploys",  description: "Deployments for azure-ready-repository",  audiences: ["api://AzureADTokenExchange"],  issuer: "https://token.actions.githubusercontent.com",  subject: pulumi.interpolate`repo:${repository.fullName}:ref:refs/heads/main`,
});
The subject property is what identifies the repository where the GitHub Actions workflow will be authorized to exchange its GitHub token for an Azure access token. It's worth noting that it will only work if the GitHub Actions workflow is run on the git reference (branch or tag) or the environment you specify in the subject. You can also specify that only workflows triggered by a pull request should be authorized. Here, I have used the main branch but I could create multiple Federated Identity Credentials with different subjects if needed.
With this configuration, the GitHub Actions workflow we create next will be able to obtain a valid Azure access token.
If you want to understand better how all this works, you can refer to this diagram from Microsoft's documentation (with GitHub serving as the external identity provider in our case).
Authorize the Service Principal to Provision Resources on the Subscription
We have created everything we need to get a valid Azure access token, but we still have not authorized the application to provision resources on our subscription.
We can do that by giving the Contributor role to our service principal.
import * as authorization from "@pulumi/azure-native/authorization";
import { azureBuiltInRoles } from "./builtInRoles";

new authorization.RoleAssignment("contributor", {  principalId: servicePrincipal.id,  principalType: authorization.PrincipalType.ServicePrincipal,  roleDefinitionId: azureBuiltInRoles.contributor,  scope: pulumi.interpolate`/subscriptions/${subscriptionId}`,
});
I intentionally did not declare the variable subscriptionId in the code above. It's because it's up to you to choose how you will provide it. You may want to set it in the configuration and retrieve it from it :
const config = new pulumi.Config();
const subscriptionId = config.get("subscriptionId");
Or you might want to retrieve it from the current configuration of the Azure native provider :
const azureConfig = pulumi.output(authorization.getClientConfig());
const subscriptionId = azureConfig.subscriptionId;
Concerning, the contributor role definition identifier, I could have dynamically retrieved it using Azure APIs (like here). But honestly, as these identifiers don't change it's much easier to hardcode it in a dedicated builtInRoles.ts file.
export const azureBuiltInRoles = {  contributor : "/providers/Microsoft.Authorization/roleDefinitions/b24988ac-6180-42a0-ab88-20f7382dd24c"
};
Please note that you don't have to work on the subscription scope. If you prefer to assign the contributor role (or any other role) to an existing resource group rather than the entire subscription, you can certainly do that as well.
Add the Configuration for the GitHub Actions Workflow
The next step is to correctly set the configuration for the GitHub Actions of our Azure-Ready GitHub repository.
The workflow requires three pieces of information for the OIDC authentication to function properly:
- The identifier of the Azure tenant.
- The identifier of the Azure subscription.
- The application identifier (also known as client ID) of the previously created Azure AD application.
These identifiers are not secrets, they are just identifiers so we could directly set them as GitHub Actions variables like this:
new github.ActionsVariable("tenantId", {  repository: repository.name,  variableName: "ARM_TENANT_ID",  value: azureConfig.tenantId,
});
However, I like to keep my tenant id and my subscription id private, so we will store them in GitHub secrets, but that's not mandatory at all.
const azureConfig = pulumi.output(authorization.getClientConfig());

new github.ActionsSecret("tenantId", {  repository: repository.name,  secretName: "ARM_TENANT_ID",  plaintextValue: azureConfig.tenantId,
});

new github.ActionsSecret("subscriptionId", {  repository: repository.name,  secretName: "ARM_SUBSCRIPTION_ID",  plaintextValue: azureConfig.subscriptionId,
});

new github.ActionsSecret("clientId", {  repository: repository.name,  secretName: "ARM_CLIENT_ID",  plaintextValue: aadApplication.applicationId,
});
Please note that could also use environments for deployment and their associated secrets and variables.
Create the GitHub Actions Workflow
Everything seems to be properly configured to provision Azure resources from a GitHub Actions workflow in this new repository, except for the workflow itself. The goal here is to have a properly configured pipeline in the repository to get started provisioning Azure infrastructure.
Here is such a pipeline:
name: infra
on:  workflow_dispatch:

permissions:      id-token: write      contents: read
jobs:  provision-infra:    runs-on: ubuntu-latest    steps:      - name: 'Az CLI login'        uses: azure/login@v1        with:          client-id: ${{ secrets.AZURE_CLIENT_ID }}          tenant-id: ${{ secrets.AZURE_TENANT_ID }}          subscription-id: ${{ secrets.AZURE_SUBSCRIPTION_ID }}
      - name: 'Run az commands'        run: |          az account show          az group list
This workflow first authenticates to Azure using OIDC with the azure/login action and then performs some Azure CLI commands to interact with Azure resources. That's fine and probably enough to get you started but you surely want to provision your infrastructure using a more declarative solution than an Azure CLI script. So let's see a more interesting pipeline still authenticating via Azure OIDC but using Pulumi to provision the Azure resources.
name: infra
on:  workflow_dispatch:

permissions:  id-token: write   # required for OIDC auth  contents: read    # required to perform a checkout

jobs:  provision-infra:    runs-on: ubuntu-latest    steps:      - uses: actions/checkout@v3       - name: Install pnpm        uses: pnpm/action-setup@v2        with:          version: latest       - name: Set node version to 18        uses: actions/setup-node@v3        with:          node-version: 18          cache: 'pnpm'            - name: Install dependencies        run: pnpm install            - name: Provision infrastructure        uses: pulumi/actions@v4.4.0        id: pulumi        with:          command: up          stack-name: dev        env:          ARM_USE_OIDC: true          PULUMI_ACCESS_TOKEN: ${{ secrets.PULUMI_ACCESS_TOKEN }}          ARM_CLIENT_ID: ${{ secrets.ARM_CLIENT_ID }}          ARM_TENANT_ID: ${{ secrets.ARM_TENANT_ID }}          ARM_SUBSCRIPTION_ID: ${{ secrets.ARM_SUBSCRIPTION_ID }}
A permission section is required with two settings (more details here):
id-token: writeneeded to request the OIDC token.contents: readneeded to perform checkout action.
When you start to specify specific permissions, you have to specify all the permissions you need for the job because the default permissions won't apply anymore.
The three steps following the checkout step are actions to specify the Node.js version to use, install and correctly configure pnpm. We assume here the infrastructure will be provisioned using TypeScript (and Pulumi of course) but there would have been similar steps with other runtimes/languages (a setup-dotnet and a dotnet retore action for .NET for instance).
The last action is the Pulumi action to provision the infrastructure by running the pulumi up on the dev stack. We can see that this action uses environment variables whose values are based on the GitHub Actions secrets we defined earlier. To tell Pulumi to use OIDC, we just have to set the ARM_USE_OIDC environment variable to true.
env: ARM_USE_OIDC: true PULUMI_ACCESS_TOKEN: ${{ secrets.PULUMI_ACCESS_TOKEN }} ARM_CLIENT_ID: ${{ secrets.ARM_CLIENT_ID }} ARM_TENANT_ID: ${{ secrets.ARM_TENANT_ID }} ARM_SUBSCRIPTION_ID: ${{ secrets.ARM_SUBSCRIPTION_ID }}
A GitHub Actions secret we did not talk about is PULUMI_ACCESS_TOKEN that is a Pulumi access token to use Pulumi Cloud as our backend to store the infrastructure state and encrypt secrets. This token should be:
- Created from Pulumi Cloud (following the documentation here.)
- Stored in the stack configuration using the following command
pulumi config set pulumiTokenForRepository ******* --secret - Stored in a GitHub Actions secret using this code.
new github.ActionsSecret("pulumiAccessToken", {  repository: repository.name,  secretName: "PULUMI_ACCESS_TOKEN",  plaintextValue: config.requireSecret("pulumiTokenForRepository"),
});
The last thing to do is to add this workflow file to the GitHub repository:
import { readFileSync } from "fs";

const pipelineContent = readFileSync("main.yml", "utf-8");
new github.RepositoryFile("pipelineRepositoryFile", {  repository: repository.name,  branch: "main",  file: ".github/workflows/main.yml",  content: pipelineContent,  commitMessage: "Add preconfigured pipeline file",  commitAuthor: "Alexandre Nédélec",  commitEmail: "15186176+TechWatching@users.noreply.github.com",  overwriteOnCreate: true,
});
This code:
- Reads the
main.ymlfile that contains the workflow we saw previously. - Creates a file with this content in the repository in the
.github/workflows/folder for the GitHub Actions workflows. - Makes a commit when creating the file (or modifying it.)
To read the YAML file, I use the readFileSync method from the File System API fs. That's one of the things I love about Pulumi: you use the things you already know and that already exist in your ecosystem. No need to look for a module or wait for someone to write one, there is probably something standard or a popular community library you can use.
Test the Azure-Ready GitHub Repository
Now that the infrastructure code to provision the Azure-Ready GitHub repository is written, let's run it with the pulumi up command and see if it works!
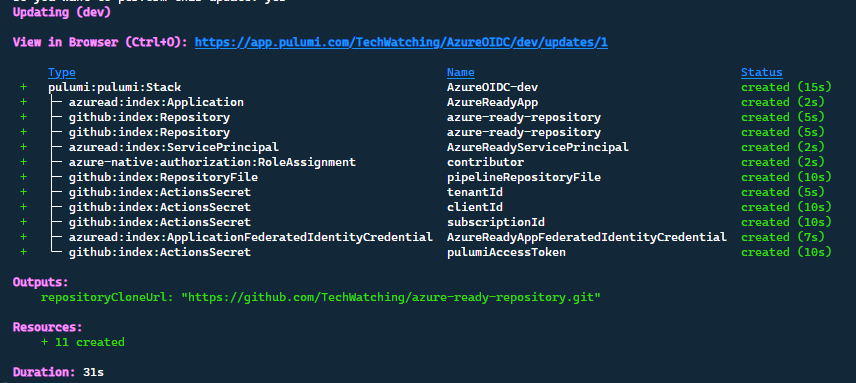
All the resources are correctly created and our new GitHub repository is ready to be used.
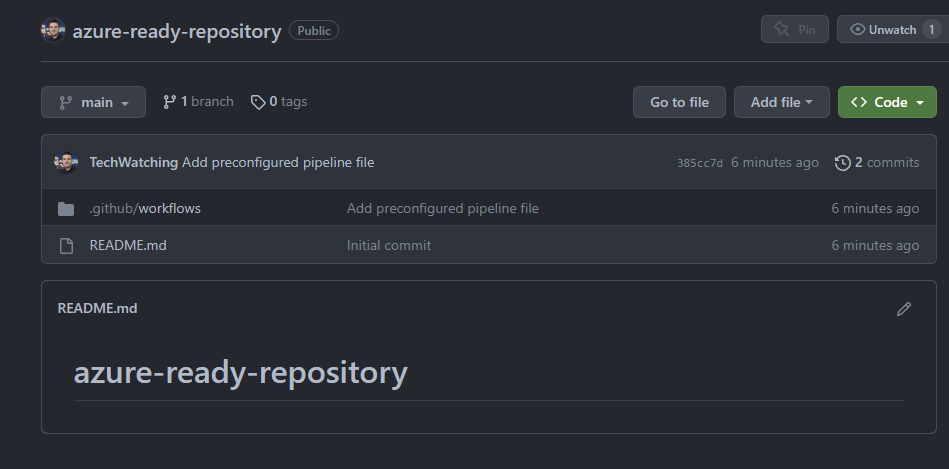
Let's clone it.
git clone https://github.com/TechWatching/azure-ready-repository; cd azure-ready-repository
We want to verify that the GitHub project is properly configured and can provision Azure resources from its GitHub Actions workflow.
Let's add some infrastructure code that provisions a few Azure resources to check that:
pulumi new azure-typescript -n "AzureReadyGitHuRepository" -y --force
The --force option allows us to create the code within a non-empty directory.
I used the azure-typescript template that creates a storage account and outputs retrieve its primary access key.
In the SDK, the function outputs that list the storage access keys are not currently marked as secrets. There is currently an open issue to change that but in the meantime, I have just modified the code to label the stack output as secret ensuring its encryption.
Let's run a pnpm install to install the dependencies and generate the pnpm-lock.yaml file. Then, we can push the code to GitHub and run the pipeline to see how it goes.
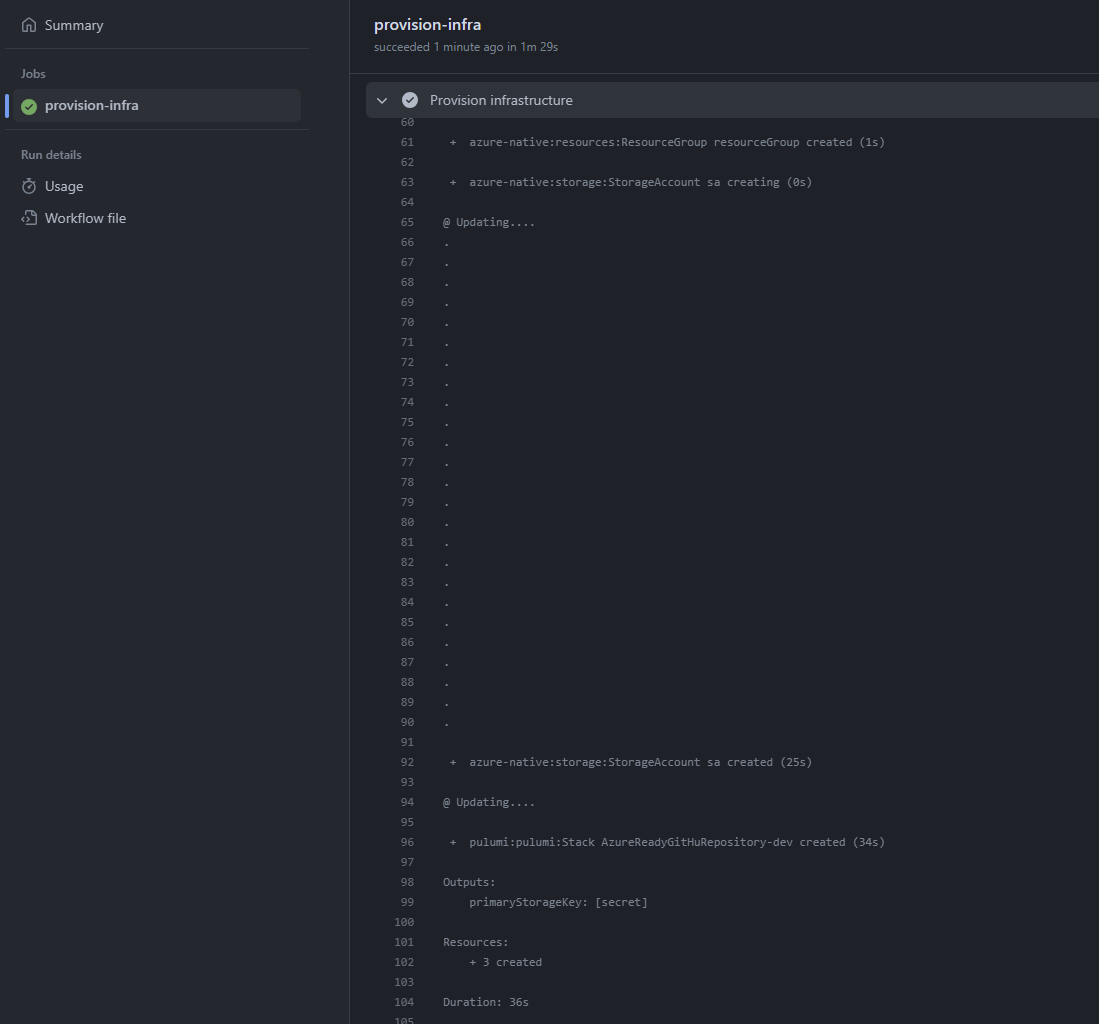
That's it, we succeeded in provisioning a storage account from our new GitHub repository, whose creation and configuration were entirely automated using Pulumi.
To Conclude
Additional Information
There are different platforms you can use to host your Git repositories: GitHub, GitLab, and Azure DevOps, to name a few. We use GitHub in this article, but you can easily apply the same logic with other platforms (Pulumi has providers for GitLab and Azure DevOps as well).
Even though the Azure-Ready GitHub repository is provisioned using Pulumi, there's nothing stopping you from using another Infrastructure as Code solution that supports Azure OIDC (such as Azure CLI, which was mentioned in the article, Azure Bicep, or even Terraform) in the GitHub Actions workflow of the created repository. You don't even have to provision infrastructure; you can use this workflow to simply deploy an application to an existing Azure resource.
Potential Enhancements
There are many aspects that could be improved in the infrastructure code provisioning the Azure-Ready GitHub repository, but I believe the current solution serves as a good starting point. Nevertheless, here are some ideas for potential enhancements:
- Make additional items, such as the commit author, configurable.
- Authorize an environment and not only a branch to retrieve an Azure token.
- Use environment variables/secrets instead of variable/secrets at the repository scope.
I think it would be interesting as well to put that code behind an API or a Web application using Pulumi Automation API to have a self-service solution to create an Azure-Ready GitHub repository on the fly.
Complete Code Solution
In this article, I aimed to provide a step-by-step explanation of how to automate the creation of a GitHub repository with a properly configured workflow to interact with Azure using OpenID Connect. Consequently, the article turned out to be quite lengthy. I apologize for that, but I didn't want to present the code without adequate explanation.
Anyway, now that we've covered everything, here is the complete code, which is just 75 lines long:
import * as pulumi from "@pulumi/pulumi";
import * as github from "@pulumi/github";
import * as azuread from "@pulumi/azuread";
import * as authorization from "@pulumi/azure-native/authorization";
import { azureBuiltInRoles } from "./builtInRoles";
import { readFileSync } from "fs";

const config = new pulumi.Config();

const repository = new github.Repository("azure-ready-repository", {  name: "azure-ready-repository",  visibility: "public",  autoInit: true
});

export const repositoryCloneUrl = repository.httpCloneUrl;

const aadApplication = new azuread.Application("AzureReadyApp", { displayName: "Azure Ready App" });
const servicePrincipal = new azuread.ServicePrincipal("AzureReadyServicePrincipal", {  applicationId: aadApplication.applicationId,
});
new azuread.ApplicationFederatedIdentityCredential("AzureReadyAppFederatedIdentityCredential", {  applicationObjectId: aadApplication.objectId,  displayName: "AzureReadyDeploys",  description: "Deployments for azure-ready-repository",  audiences: ["api://AzureADTokenExchange"],  issuer: "https://token.actions.githubusercontent.com",  subject: pulumi.interpolate`repo:${repository.fullName}:ref:refs/heads/main`,
});

const azureConfig = pulumi.output(authorization.getClientConfig());
const subscriptionId = azureConfig.subscriptionId;

new authorization.RoleAssignment("contributor", {  principalId: servicePrincipal.id,  principalType: authorization.PrincipalType.ServicePrincipal,  roleDefinitionId: azureBuiltInRoles.contributor,  scope: pulumi.interpolate`/subscriptions/${subscriptionId}`,
});

new github.ActionsSecret("tenantId", {  repository: repository.name,  secretName: "ARM_TENANT_ID",  plaintextValue: azureConfig.tenantId,
});

new github.ActionsSecret("subscriptionId", {  repository: repository.name,  secretName: "ARM_SUBSCRIPTION_ID",  plaintextValue: azureConfig.subscriptionId,
});

new github.ActionsSecret("clientId", {  repository: repository.name,  secretName: "ARM_CLIENT_ID",  plaintextValue: aadApplication.applicationId,
});

new github.ActionsSecret("pulumiAccessToken", {  repository: repository.name,  secretName: "PULUMI_ACCESS_TOKEN",  plaintextValue: config.requireSecret("pulumiTokenForRepository"),
});

const pipelineContent = readFileSync("main.yml", "utf-8");
new github.RepositoryFile("pipelineRepositoryFile", {  repository: repository.name,  branch: "main",  file: ".github/workflows/main.yml",  content: pipelineContent,  commitMessage: "Add preconfigured pipeline file",  commitAuthor: "Alexandre Nédélec",  commitEmail: "15186176+TechWatching@users.noreply.github.com",  overwriteOnCreate: true,
});
You can find the complete source code used for this article in this GitHub repository.
I hope you enjoyed this article. Please feel free to share your thoughts in the comments, ask questions, or make suggestions. Keep learning.

