RedHat 3-Scale API Management for Beginners
What Is an API?
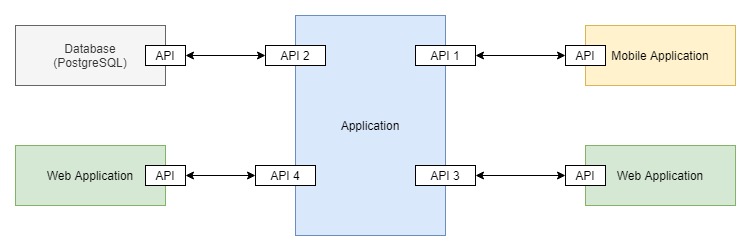
API stands for Application Programming Interface.
API essentially are extensions of a software module exposed for other software components, from within the same environment or external environment, to interact with.

Application Programming Interface
API Management
API management can be explained with the help of the following points:
- Creation: publishing the API so that other applications can utilize the services provided.
- Documentation: API usage is defined and made available to the others so that they can study the expected request and response details from the API they are about to interact with.
- Security: Ensuring that the API usage policies are adhered to in order to avoid any security compromises while various systems interact with each other through these APIs.
- Monitoring: Data related to API usage and data load can be collected and analyzed so that it helps in auditing and reporting.
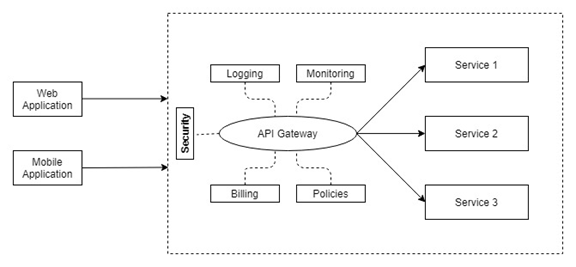
API Gateway
An API Gateway is the server that acts like the frontend for APIs. This is where we can enforce different restrictions to all the incoming requests, manage API security, put the configurable policies in place to manage logging, request header data, enable collection, and analysis of data into reports as required. From here, API documentation can be published.

API Gateway
RedHat 3-Scale API Management
RedHat 3-scale API Management is an API infrastructure that makes it easy to manage your APIs. It allows users to share, secure, distribute, control, and monetize APIs on an infrastructure platform built for performance, customer control, and future growth. (Source: www.redhat.com)
Prerequisites
To start with any API onboarding, we must have a few things in place for a smooth onboard.
- Openshift setup is completed.
- The 3scale API Management service should be available on the same Openshift instance.
- The API details as below should be available:
- Working service URL.
- Methods (POST/GET).
- REST/SOAP specification.
- Req-res for testing.
- Verify access availability to the service from the environment.
- Application plans decisions (application plans should be decided at a global level i.e. 3scale level).
Example Used in This Document
URL: http://10.2.3.4:80/app/apiname
METHOD: POST
Create API Gateway Staging and Prod Routes
We need to have a few default API gateways, namely for staging and production.
These gateways are nothing but the APICAST routes, which we will use to manage traffic to your API hosted on the specific APICAST.
You can learn more about APICAST from https://access.redhat.com/documentation/en-us/red_hat_3scale_api_management/2.3/html/deployment_options/apicast-overview.
Set Up a Backend
- Create a backend.
- The backend is the domain and port of the API, which can be common for two or more products.
- This is the URL that will be masked and a 3scale URL will be available post onboarding to access this API
For the example, we are considering the base URL as: http://10.2.3.4:80/app.
Set Up a Product
A product is an exact path that specifies which API service we are intending to onboard and monitor.
Once the product is created, you can navigate to integration -> settings to see where all the deployment, authentication, and gateway response details are configured.
The staging and production URLs are the URLs indicating the service route names.
Note: The staging and production-base URLs are configurable only if the subdomain name remains the same.
Authentication
API authentication in 3scale can be achieved in three ways, as listed below:
- API Key (user_key) The application is identified & authenticated via a single string.
- App_ID and App_Key Pair The application is identified via the App_ID and authenticated via the App_Key.
- OpenID Connect Use OpenID Connect for any OAuth 2.0 flow.
We can understand more about the authentication mechanism from the following link: https://access.redhat.com/documentation/en-us/red_hat_3scale_api_management/2.1/html-single/api_authentication/index
Credentials Location
In this section, we can define where we want the credentials required for authentication to be sent in the incoming request.
Configure a Method
The methods of this API get data on their individual usage. Method calls trigger the built-in Hits-metric. Usage limits and pricing rules for individual methods are defined from within each Application Plan.
There are various other metrics that can be linked to each method and different analytics that can be set up. For example: data transfer metrics
Navigate to PRODUCT -> Integration -> Method and metrics - > New Method.
A method needs to be mapped to one or more URL patterns in the Mapping Rules section of the integration page so specific calls to your API up the count of specific methods.
Configure Metrics
Hits are built-in metrics to which all methods report. Additional top-level metrics can be added here in order to track usage that shouldn't increase the hit count. A metric is mapped to one or more URL patterns in the Mapping Rules section of the integration page so specific calls to your API up the count of specific metrics.
Navigate to PRODUCT -> Integration -> Method and metrics - > New Metrics.
Setting Up Mapping Rules
The mapping rules are for operations, and they can be mapped to previously-defined methods/metrics. They can be mapped against the pre-defined hits metrics to increase the count on API hits.
Configure an Application Plan for a Product
Application Plans establish the rules (limits, pricing, features) for using your API; every developer's application accessing your API will be accessing it within the constraints of an Application Plan. From a business perspective, Application Plans allow you to target different audiences by using multiple plans (i.e. 'basic', 'pro', 'premium') with different sets of rules.
The product configured requires an application plan mapped to it in order to manage the subscriptions of the accounts and their applications hitting the API.
Understanding the Difference Between Method and Metrics
Method
Methods are for specific URLs. The increment of hits happens for path matching methods by invoking Service Management API of 3scale.
Metrics
We can measure anything numerical to be incremented for an API application by defining a custom metric. Any client (not just the API gateways) can increment a custom metric using the Service Management API.
This metric needn’t mandatorily be plugged with an URL — just the String-based name is fine.
Promoting the API
Once all the configuration is complete, we must promote the API to staging and production environments
Navigate to Product -> Integration -> Configuration -> APIcast Configuration -> Promote to Staging. (Check all the configuration in this section before you promote it)
Once you promote the API from Staging to Production, the below screen will display the endpoints that are exposed by 3scale to access these APIs.

Configuring the Account
The consumer of your API will be setup as an account.
For example, we have set up the following account:

There is a user added while setting up the account and more users can be added from the below screen using invitations sent via mails.

( Note: this requires SMTP setup to be done in Openshift for the 3scale project)
User management can be done from the following screen:

The APIs available on 3scale will be made available to an account as applications
The application setup is as follows, we can observe a section as “API Credentials”, the key provided will be used as a part of the incoming request in order to authenticate the account and allow the request to go through.

Each account to the application set will have a unique key.
The applications an account can access can be managed under the subscriptions tab as below; this is where an API management admin can make any changes related to the plans and subscriptions.
(Note: If the account is consuming a default plan, it cannot be unsubscribed as the API has made that plan as default for any consumer)
Developer Portal
This is the portal where we provide the interface for the API consumers to get on-boarded and subscribe to the plan they are interested in. The portal is configurable with the help of CSS and JavaScript scripts.
The REST API can publish the Swagger documentation on this portal such that the subscriber can refer to the documentation in order to understand the consuming API in a better way.

