Dynamic Data Processing Using Serverless Java With Quarkus on AWS Lambda by Enabling SnapStart (Part 2)
This is the second article to teach developers how to make serverless Java for dynamic data processing with a NoSQL database. In the previous article, you learned how to design an entity class and implement abstract services to bind the DynamoDB client for the REST APIs locally. In case, you haven’t already read it, find the first tutorial here. You can also find the piggybank project in the GitHub repository.
Let’s go into the outer loop practices in production using AWS Lambda and DynamoDB.
Creating a Serverless Database Using Amazon DynamoDB
Note that you’ll create multiple AWS services to go through in the following tutorial. In case you already haven’t an AWS account, proceed with this documentation and configure an AWS credential on your local environment.
Use the AWS DynamoDB API command to create a new table and entry in AWS DynamoDB as your production. Find more information about Setting Up DynamoDB (Web Service).
Run the following AWS command in the AWS CloudShell or your local terminal.
aws dynamodb create-table \
    --table-name entry \
    --attribute-definitions \
        AttributeName=accountID,AttributeType=S \
        AttributeName=timestamp,AttributeType=N \
    --key-schema \
        AttributeName=accountID,KeyType=HASH \
        AttributeName=timestamp,KeyType=RANGE \
    --provisioned-throughput \
        ReadCapacityUnits=5,WriteCapacityUnits=5 \
    --table-class STANDARD
The output should look like this.
{
    "TableDescription": {
        "AttributeDefinitions": [
            {
                "AttributeName": "accountID",
                "AttributeType": "S"
            },
            {
                "AttributeName": "timestamp",
                "AttributeType": "N"
            }
        ],
        "TableName": "entry",
        "KeySchema": [
            {
                "AttributeName": "accountID",
                "KeyType": "HASH"
            },
            {
                "AttributeName": "timestamp",
                "KeyType": "RANGE"
            }
        ],
        "TableStatus": "CREATING",
        "CreationDateTime": "2023-04-28T11:51:51.656000-07:00",
        "ProvisionedThroughput": {
        {
    "TableDescription": {
        "AttributeDefinitions": [
            {
                "AttributeName": "accountID",
                "AttributeType": "S"
            },
            {
                "AttributeName": "timestamp",
                "AttributeType": "N"
            }
        ],
        "TableName": "entry11",
        "KeySchema": [
            {
                "AttributeName": "accountID",
                "KeyType": "HASH"
            },
            {
                "AttributeName": "timestamp",
                "KeyType": "RANGE"
            }
        ],
        "TableStatus": "CREATING",
        "CreationDateTime": "2023-04-28T11:51:51.656000-07:00",
        "ProvisionedThroughput": {
            "NumberOfDecreasesToday": 0,
            "ReadCapacityUnits": 5,
            "WriteCapacityUnits": 5
        },
        "TableSizeBytes": 0,
        "ItemCount": 0,
        "TableArn": "arn:aws:dynamodb:us-east-1:649770145326:table/entry11",
        "TableId": "32be22b2-33d4-4132-81f4-dfc18a402847",
        "TableClassSummary": {
            "TableClass": "STANDARD"
        }
    }
}
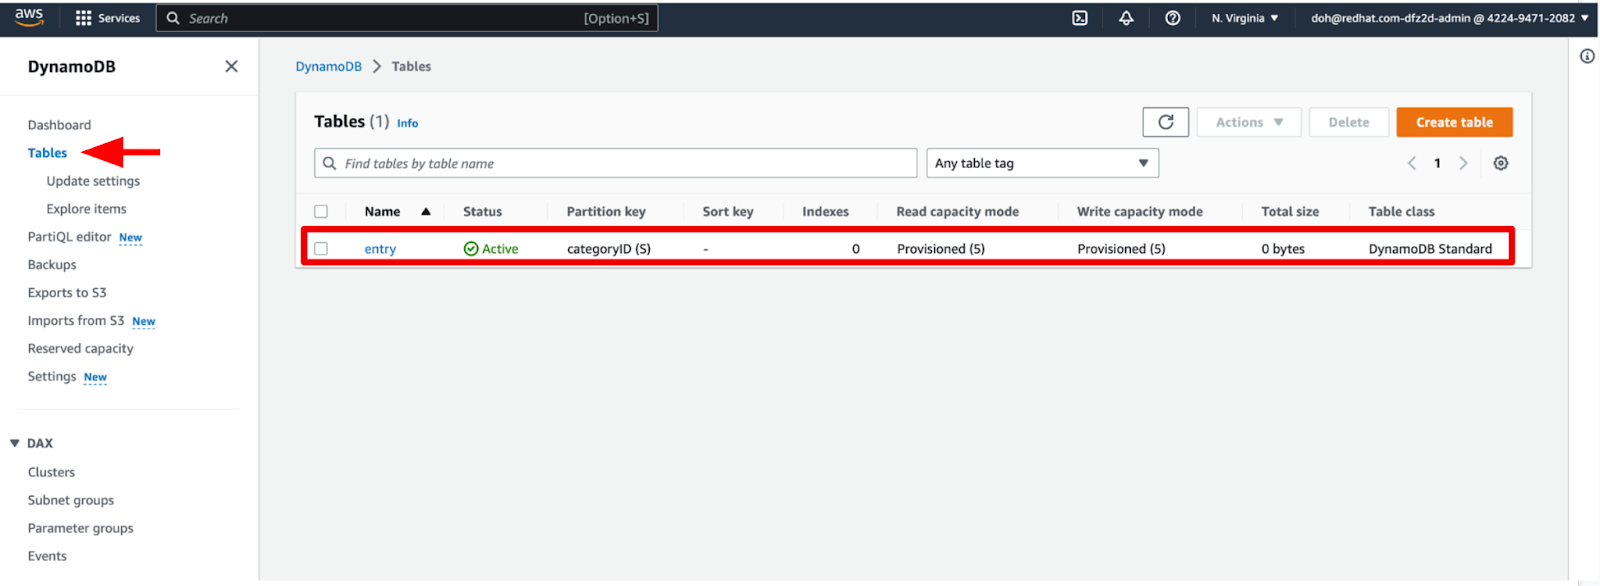
Go to DynamoDB > Tables in the AWS web console. Then, verify if the new Entry table was created properly, as below in Figure 1.

Figure 1: A table in DynamoDB
Build Your Data Processing Application as a Serverless Function
If you have already experienced deploying applications to AWS Lambda, you should have learned how to build and deploy the application using AWS Serverless Application Model (SAM). A big challenge for you, the developer, is to learn and memorize a variety of AWS commands for those tasks.
Don’t worry about them anymore since Quarkus enables you to build, package, and deploy your Java applications to AWS Lambda without the steep learning curve.
Add the following Quarkus AWS extension using the Quarkus command.
quarkus ext add amazon-lambda-httpThe output should look like this.
[SUCCESS] Extension io.quarkus:quarkus-amazon-lambda-http has been installedBuild the application using the following Quarkus command.
quarkus build --no-testsThe output should end with BUILD SUCCESS.
Inspect generated files in the target directory:
- function.zip - Lambda deployment file
- bootstrap-example.sh - Example bootstrap script for native deployments
- sam.jvm.yaml - (Optional) For use with SAM command and local testing only
- sam.native.yaml - (Optional) For use with SAM command and native local testing only
Creating a Deployment Template
To access the Amazon DynamoDB with an advanced security configuration, you need to create your own AWS SAM template before you deploy a new AWS Lambda function.
Create a new template.yml file in the root directory of the piggybank project. Add the following code to specify an AWS Lambda function.
AWSTemplateFormatVersion: '2010-09-09'
Transform: AWS::Serverless-2016-10-31
Description: >
  PiggyBank AWS SAM application

Resources:
  Piggybank:
    Type: AWS::Serverless::Function
    Properties:
      Handler: io.quarkus.amazon.lambda.runtime.QuarkusStreamHandler::handleRequest
      Runtime: java17
      CodeUri: target/function.zip
      MemorySize: 1024
      SnapStart:
        ApplyOn: PublishedVersions
      AutoPublishAlias: snap
      Policies:
        - DynamoDBCrudPolicy:
            TableName: entry
      Timeout: 15
      Environment:
        Variables:
          JAVA_TOOL_OPTIONS: "-XX:+TieredCompilation -XX:TieredStopAtLevel=1"
      Events:
        HttpApiEvent:
          Type: HttpApi
Outputs:
  PiggybankApi:
    Description: URL for application
    Value: !Sub 'https://${ServerlessHttpApi}.execute-api.${AWS::Region}.amazonaws.com/'
    Export:
      Name: PiggybankApi
Enabling SnapStart Optimizations
A big challenge comes to developers when serverless Java is adopted with even various benefits below:
- Improve scalability, performance, and security
- Reduce wasting of the allocating resources on-demand
- Reduce cost, even scaling down to zero
It’s too slow startup time along with a cold start strategy which usually takes a few seconds. GraalVM Native Image integration enables Java developers to overcome this challenge because the executable image contains the application code, required libraries, Java APIs, and reduced VMs. The smaller VM base improves the startup time of the application and produces a minimal disk footprint.
However, there’re tradeoffs to using the native executables such as the lack of debugging, monitoring, peak throughput, reduced max latency, and developer experience. What if you could still have fast startup time as much as the native image but you can keep using Java virtual machine (JVM) to run serverless functions?
AWS Lambda SnapStart is a snapshotting and restores mechanism reducing drastically the cold startup time of Java functions on AWS. You'll use the SnapStart to optimize our Java serverless function on AWS Lambda. Find more information on how to improve startup performance with Lambda SnapStart.
Quarkus Amazon Lambda extension enables the SnapStart feature automatically when you deploy the applications to AWS Lambda. By all means, you can easily turn it off in the application.properties.
quarkus.snapstart.enabled=true|falseDeploying the Function to AWS Lambda
Let’s deploy your function application to AWS Lambda using the SAM command:
sam deploy -gThe output should look like this. Make sure to key “y” in the “Piggybank may not have authorization defined, Is this okay?”.
Configuring SAM deploy
======================
    Looking for config file [samconfig.toml] :  Not found
    Setting default arguments for 'sam deploy'
    =========================================
    Stack Name [sam-app]:
    AWS Region [YOUR-REGION]:
    #Shows you resources changes to be deployed and require a 'Y' to initiate deploy
    Confirm changes before deploy [y/N]:
    #SAM needs permission to be able to create roles to connect to the resources in your template
    Allow SAM CLI IAM role creation [Y/n]:
    #Preserves the state of previously provisioned resources when an operation fails
    Disable rollback [y/N]:
    Piggybank may not have authorization defined, Is this okay? [y/N]: y
    Save arguments to configuration file [Y/n]:
    SAM configuration file [samconfig.toml]:
    SAM configuration environment [default]:
    Looking for resources needed for deployment:
    Creating the required resources...
...
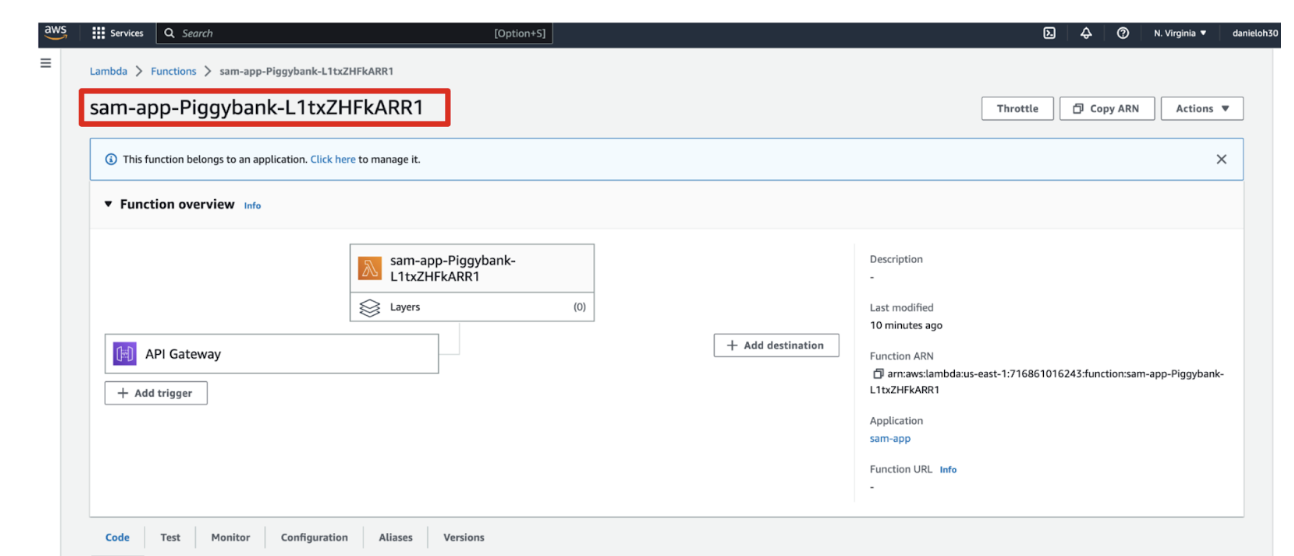
Once deployed, go to the AWS Lambda page in the AWS web console. Then, you will see the deployed new serverless function on AWS Lambda.

Figure 2: Quarkus function on AWS Lambda
You can retrieve an HTTP API endpoint that is generated automatically using the following AWS command:
export API_URL=$(aws cloudformation describe-stacks --query 'Stacks[0].Outputs[?OutputKey==`PiggybankApi`].OutputValue' --output text)
echo $API_URL
Add a few account data to the AWS DynamoDB (web service) using the CURL command:
curl -X POST ${API_URL}/entryResource -H 'Content-Type: application/json' -d '{"accountID" : "bofa","category": "Food", "description": "Shrimp", "amount": "-20", "balance": "0", "date": "2023-02-01+11:12"}'
curl -X POST ${API_URL}/entryResource -H 'Content-Type: application/json' -d '{"accountID" : "bofa","category": "Car", "description": "Flat tires", "amount": "-200", "balance": "0", "date": "2023-03-01+09:30"}'
curl -X POST ${API_URL}/entryResource -H 'Content-Type: application/json' -d '{"accountID" : "bofa","category": "Payslip", "description": "Income", "amount": "2000", "balance": "0", "date": "2023-04-01+23:00"}'
curl -X POST ${API_URL}/entryResource -H 'Content-Type: application/json' -d '{"accountID" : "bofa","category": "Utilities", "description": "Gas", "amount": "-400", "balance": "0", "date": "2023-05-01+01:01"}'
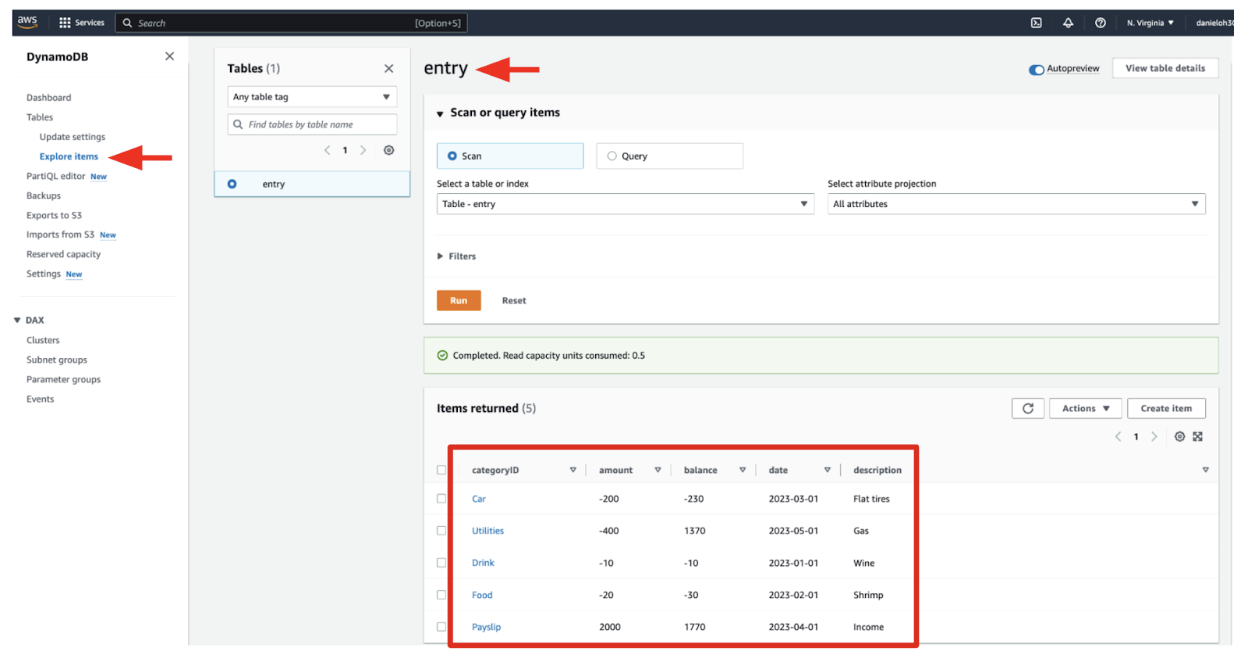
Go back to the AWS web console. Then, navigate to Amazon DynamoDB > Tables and select the entry table. Explore table items. It should look like this:

Figure 3: A table in AWS DynamoDB
Great Job! You just deployed new serverless Java functions on AWS Lambda!
Conclusion
You learned how Quarkus enables developers to deploy serverless functions on AWS Lambda that connect AWS DyanoDB to process dynamic data. Quarkus also enables AWS Lambda SnapStart automatically for faster startup time as fast as native executables based on GraalVM.
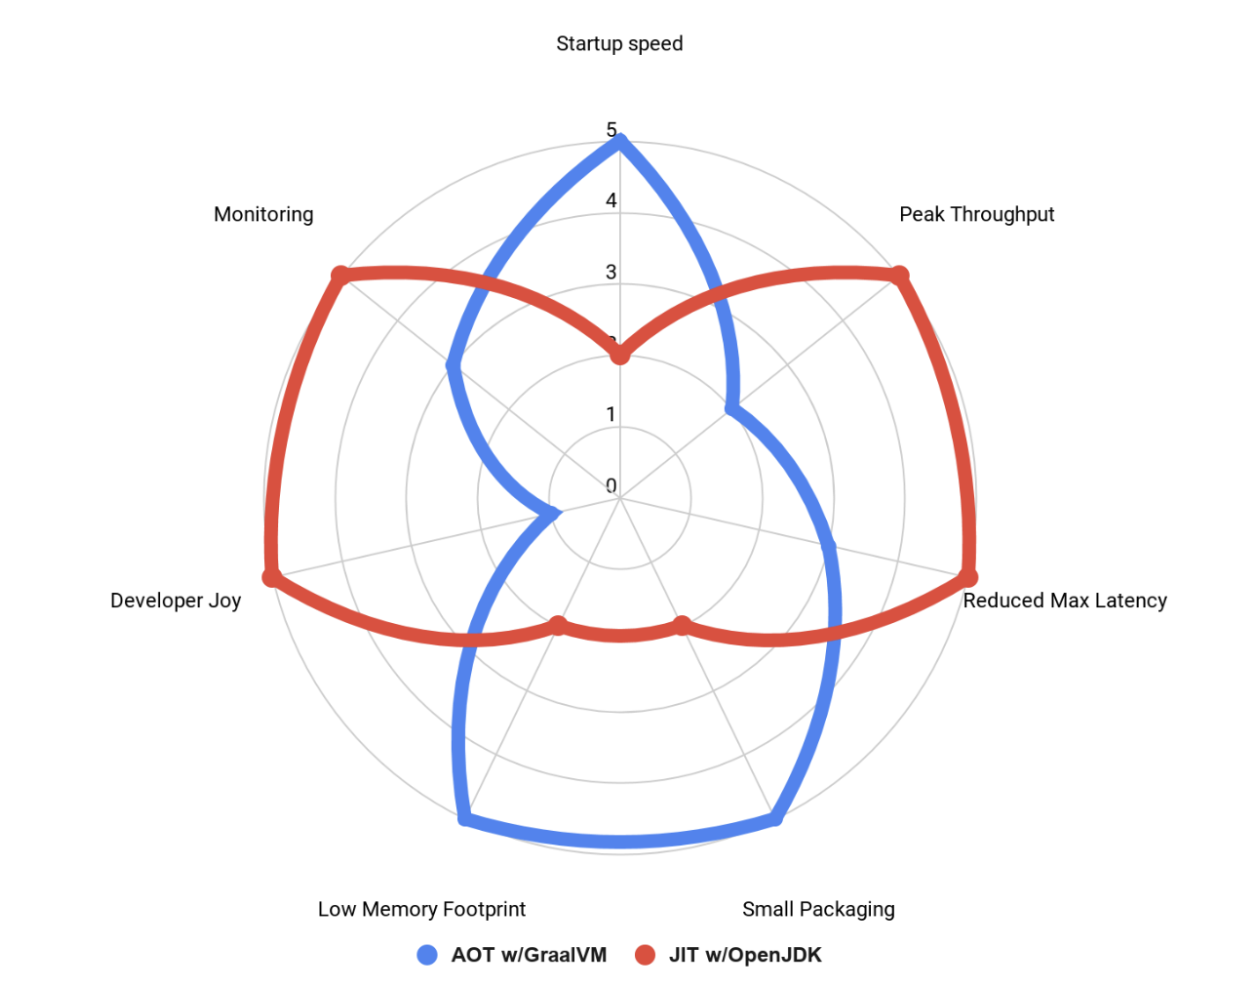
You might have one question when you need to use JVM with enabling the SnapStart or native binary with GraalVM integration. It depends on the goals you want to achieve with your Java applications regardless of serverless or not. Take a look at Figure 4!

Figure 4: Comparision of JVM and GraalVM
For example, if you want to more care about a low memory footprint and small package size, native binary on GraalVM is better for you. On the other hand, JVM should be better for peak throughput, monitoring, and debugging.

