Using Google reCaptcha With Spring Boot Application
reCaptcha by Google is a library used to prevent bots from submitting data to your public forms or accessing your public data.
In this post, we will look at how to integrate reCaptcha with a Spring Boot-based web application.
Setting Up Recaptcha
You should create an API key from admin panel. You have to create a sample app as shown below:

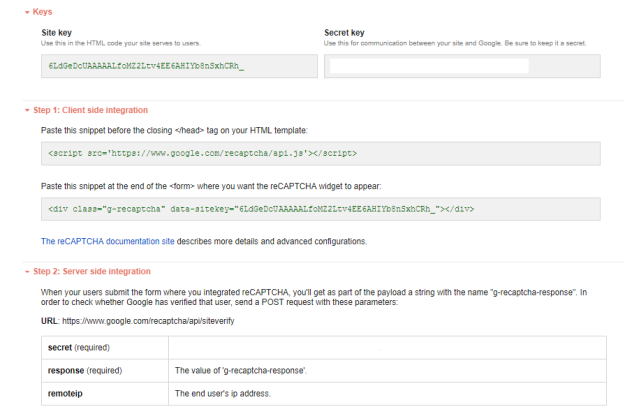
You should be able to see the key and secret, as well as a few instructions, which is good enough to get started, as shown below:

As usual, navigate to start.spring.io, fill in the boxes, and download the project:
Open in your favorite IDE and then run the RecaptchaDemoApplication and access the app from http://localhost:8080. As there are no controllers defined, you will see an error.
Creating a Public Page With a Form
We will make use of:
- Bootstrap-based theme
- jQuery
- jQuery form plugin
- jQuery validation plugin
- toastr for notifications
- Fontawesome for icons
- Recaptcha JS
The HTML for the form with reCaptcha enabled is:
<form id="signup-form" class="form-horizontal" method="POST"
  th:action="@{/api/signup}" th:object="${user}">
  <div class="form-group">
    <label class="control-label required">First Name</label>
    <input type="text" th:field="*{firstName}"
      class="form-control required" />
  </div>
  <div class="form-group">
    <label class="control-label required">Last Name</label>
    <input type="text" th:field="*{lastName}"
      class="form-control required" />
  </div>
  <div class="form-group">
    <label class="control-label required">Email</label>
    <input type="text" th:field="*{email}"
      class="form-control required" />
  </div>
  <div class="form-group">
    <label class="control-label required">Password</label>
    <input type="password" th:field="*{password}"
      class="form-control required" />
  </div>
  <div class="form-group">
    <label class="control-label required">Confirm Password</label>
    <input type="password" th:field="*{confirmPassword}"
      class="form-control required" />
  </div>
  <div class="g-recaptcha"
    data-sitekey="6LdGeDcUAAAAALfoMZ2Ltv4EE6AHIYb8nSxhCRh_">
  </div>
  <button type="submit" class="btn btn-primary">Submit</button>
</form>
The important piece in the above code is the div with the g-recaptcha class, which has the public site key. The other secret key should be secure on your server. You will use it to validate the captcha from the Google server. Also, make sure the reCaptcha JS is just before the ".
Loading the URL http://localhost:8080/ renders the form:

Creating the API for Form Handling
Next up is to verify the Captcha while processing the Add User API. Google provides an endpoint to which we will POST to verify the Captcha. Below is the code that verifies the Captcha:
@Slf4j
@Service
public class RecaptchaService {

  @Value("${google.recaptcha.secret}")
  String recaptchaSecret;

  private static final String GOOGLE_RECAPTCHA_VERIFY_URL =
    "https://www.google.com/recaptcha/api/siteverify";

  @Autowired
  RestTemplateBuilder restTemplateBuilder;

  public String verifyRecaptcha(String ip,
    String recaptchaResponse){
    Map<String, String> body = new HashMap<>();
    body.put("secret", recaptchaSecret);
    body.put("response", recaptchaResponse);
    body.put("remoteip", ip);
    log.debug("Request body for recaptcha: {}", body);
    ResponseEntity<Map> recaptchaResponseEntity =
      restTemplateBuilder.build()
        .postForEntity(GOOGLE_RECAPTCHA_VERIFY_URL+
          "?secret={secret}&response={response}&remoteip={remoteip}",
          body, Map.class, body);

    log.debug("Response from recaptcha: {}",
      recaptchaResponseEntity);
    Map<String, Object> responseBody =
      recaptchaResponseEntity.getBody();

    boolean recaptchaSucess = (Boolean)responseBody.get("success");
    if ( !recaptchaSucess) {
      List<String> errorCodes =
        (List)responseBody.get("error-codes");

      String errorMessage = errorCodes.stream()
          .map(s -> RecaptchaUtil.RECAPTCHA_ERROR_CODE.get(s))
          .collect(Collectors.joining(", "));

      return errorMessage;
    }else {
      return StringUtils.EMPTY;
    }
  }
 }
We have created a map to map the response code with the response message provided by Google, as shown below:
public class RecaptchaUtil {

  public static final Map<String, String>
    RECAPTCHA_ERROR_CODE = new HashMap<>();

  static {
    RECAPTCHA_ERROR_CODE.put("missing-input-secret",
        "The secret parameter is missing");
    RECAPTCHA_ERROR_CODE.put("invalid-input-secret",
        "The secret parameter is invalid or malformed");
    RECAPTCHA_ERROR_CODE.put("missing-input-response",
        "The response parameter is missing");
    RECAPTCHA_ERROR_CODE.put("invalid-input-response",
        "The response parameter is invalid or malformed");
    RECAPTCHA_ERROR_CODE.put("bad-request",
        "The request is invalid or malformed");
  }
}
Let's use the RecaptchaService in the Form API, as shown below:
@PostMapping("/signup")
public ResponseEntity<?> signup(@Valid User user,
  @RequestParam(name="g-recaptcha-response") String recaptchaResponse,
  HttpServletRequest request
){

  String ip = request.getRemoteAddr();
  String captchaVerifyMessage =
      captchaService.verifyRecaptcha(ip, recaptchaResponse);

  if ( StringUtils.isNotEmpty(captchaVerifyMessage)) {
    Map<String, Object> response = new HashMap<>();
    response.put("message", captchaVerifyMessage);
    return ResponseEntity.badRequest()
      .body(response);
  }
  userRepository.save(user);
  return ResponseEntity.ok().build();
}
The captcha on the UI is passed in the response as a request param with key g-recaptcha-response. So, we invoke the Captcha verify service with this response key and the optional IP address. The result of the verification is either a success or a failure. We capture the message if it is a failure and return it to the client.
The complete code for this sample can be found here.

