OTP (One Time Password) Using Spring Boot and Guava
In this article, I have explained the way to handle One Time Password (OTP) in a Spring Boot web application using Google's Guava library.
One Time Password (OTP) is a password to validate a user during a secure transaction. Mostly, this concept is used in banking systems and other secure websites.
The most important advantage that is addressed by OTPs is that, in contrast to static passwords, they are not vulnerable to replay attacks. This means that a potential intruder who manages to record an OTP that was already used to log into a service or to conduct a transaction will not be able to abuse it since it will no longer be valid. A second major advantage is that a user who uses the same (or similar) password for multiple systems, is not made vulnerable on all of them if the password for one of these is acquired by an attacker.
OTP passwords are generated using a mathematical algorithm; I have used Random number concepts in this example.
Method of Delivering OTP in a Web Application.
1. Mobile Device (SMS)
2. Email
I have shown the steps to configure an OTP via email. I used Google's Guava library to cache the OTP number to validate and set the timer to the cached OTP expiry.
Note: This Sample is for a non-cluster server configuration application.
Google's Guava library caches the OTP number in server memory and validates the OTP in the same server. If we want to configure it in a cluster environment or a load balancer, we can use Memcached .
Quick Steps to Configure OTP Concepts in Spring Boot
Tools used :
- Spring Boot 1.5.3.RELEASE
- Spring 4.3.8.RELEASE
- Spring Security 4.2.2
- Thymeleaf 2.1.5.RELEASE
- Thymeleaf extras Spring Security4 2.1.3
- Guava
- MySQL
- jQuery
- Bootstrap 3
- Maven 3
- Java 8
Project Source Code:SpringBoot-OTP
The source code has been validated using SonorQube (code quality analyzer). Please refer to my DZone SonorQube article.
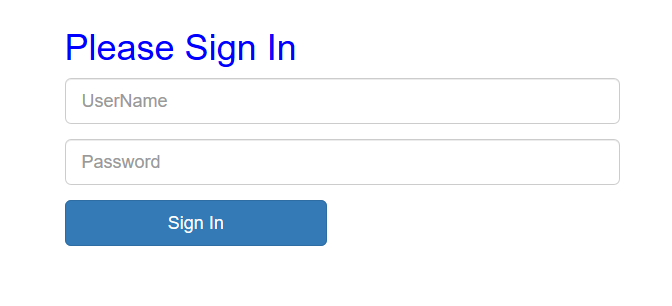
Sample screen:
Screen 1: Login Screen
Screen 2:
I have passed the admin credentials in the login screen and been redirected to the admin dashboard.

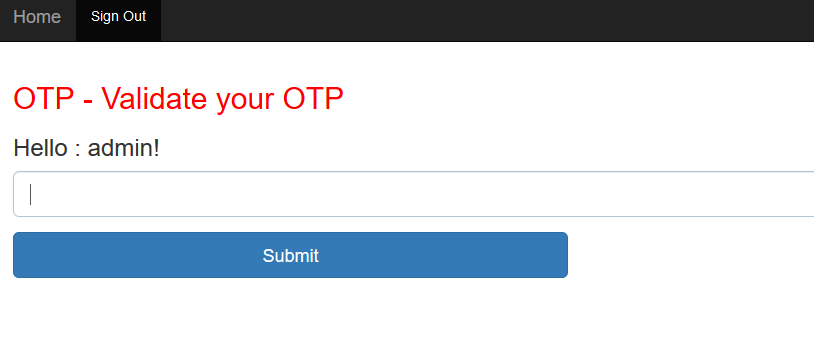
Screen 3:
OTP Screen
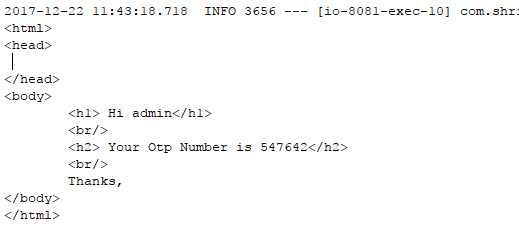
OTP Mail
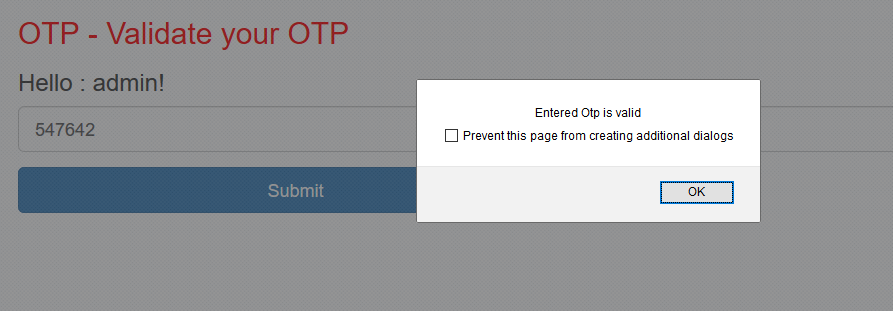
Validate OTP
1. Successful OTP (after every successful validation within the time limit, the server clears the cache).
2. Failed OTP 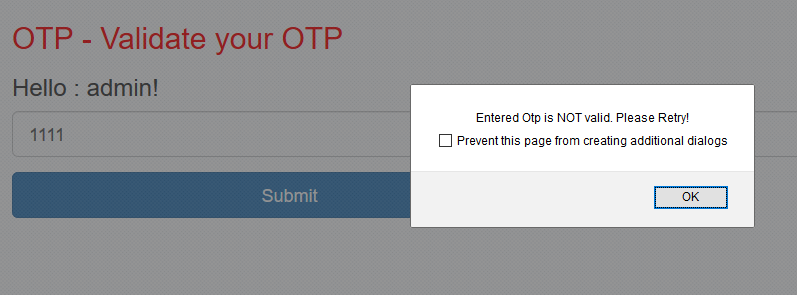
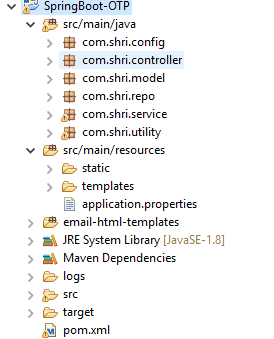
Project Structure
Step1: Pom.xml
<?xml version="1.0" encoding="UTF-8"?>
<project xmlns="http://maven.apache.org/POM/4.0.0" xmlns:xsi="http://www.w3.org/2001/XMLSchema-instance"
         xsi:schemaLocation="http://maven.apache.org/POM/4.0.0 http://maven.apache.org/xsd/maven-4.0.0.xsd">
    <modelVersion>4.0.0</modelVersion>

    <groupId>com.shri</groupId>
    <artifactId>SpringBoot-OTP</artifactId>
    <version>0.0.1-SNAPSHOT</version>
    <packaging>jar</packaging>

    <name>SpringBoot-OTP</name>
    <description>Demo project for Spring Boot</description>

    <parent>
        <groupId>org.springframework.boot</groupId>
        <artifactId>spring-boot-starter-parent</artifactId>
        <version>1.5.8.RELEASE</version>
        <relativePath/> <!-- lookup parent from repository -->
    </parent>

    <properties>
        <project.build.sourceEncoding>UTF-8</project.build.sourceEncoding>
        <project.reporting.outputEncoding>UTF-8</project.reporting.outputEncoding>
        <java.version>1.8</java.version>
        <mysql.version>5.1.17</mysql.version>
    </properties>

    <dependencies>

        <dependency>
            <groupId>org.springframework.boot</groupId>
            <artifactId>spring-boot-devtools</artifactId>
            <optional>true</optional>
        </dependency>

        <dependency>
            <groupId>org.springframework.boot</groupId>
            <artifactId>spring-boot-starter</artifactId>
        </dependency>

        <dependency>
            <groupId>org.springframework.boot</groupId>
            <artifactId>spring-boot-starter-test</artifactId>
            <scope>test</scope>
        </dependency>

        <dependency>
            <groupId>org.springframework.boot</groupId>
            <artifactId>spring-boot-starter-web</artifactId>
        </dependency>

        <dependency>
            <groupId>org.springframework.boot</groupId>
            <artifactId>spring-boot-starter-data-jpa</artifactId>
        </dependency>

         <!-- Spring Security -->
        <dependency>
            <groupId>org.springframework.boot</groupId>
            <artifactId>spring-boot-starter-security</artifactId>
        </dependency>

        <dependency>
             <groupId>mysql</groupId>
    <artifactId>mysql-connector-java</artifactId>
     <version>${mysql.version}</version>
        </dependency>

        <dependency>
            <groupId>org.springframework.boot</groupId>
            <artifactId>spring-boot-starter-thymeleaf</artifactId>
        </dependency>

       <dependency>
    <groupId>org.springframework.boot</groupId>
    <artifactId>spring-boot-starter-mail</artifactId>
</dependency>

        <dependency>
       <groupId>org.thymeleaf.extras</groupId>
        <artifactId>thymeleaf-extras-springsecurity4</artifactId>
   </dependency>

        <!-- Optional, for bootstrap -->
<dependency>
<groupId>org.webjars</groupId>
<artifactId>bootstrap</artifactId>
<version>3.3.7</version>
</dependency>

          <!-- Optional, for jquery -->
         <dependency>
            <groupId>org.webjars</groupId>
            <artifactId>jquery</artifactId>
            <version>2.2.4</version>
        </dependency>
       <!-- Google Guava -->
        <dependency>
    <groupId>com.google.guava</groupId>
    <artifactId>guava</artifactId>
    <version>19.0</version>
</dependency>
    </dependencies>

    <build>
        <plugins>
            <plugin>
                <groupId>org.springframework.boot</groupId>
                <artifactId>spring-boot-maven-plugin</artifactId>
            </plugin>
        </plugins>
    </build>
</project>
Step2: Application.properties file
server.port=8081
spring.thymeleaf.cache=false
spring.thymeleaf.enabled=true
spring.thymeleaf.prefix=classpath:/templates/
spring.thymeleaf.suffix=.html

spring.application.name=Spring Boot OTP

#spring.datasource.driver-class-name=com.mysql.jdbc.Driver
spring.datasource.url=jdbc:mysql://localhost:3306/test
spring.datasource.username=root
spring.datasource.password=

spring.jpa.properties.hibernate.dialect = org.hibernate.dialect.MySQLDialect
spring.jpa.properties.hibernate.id.new_generator_mappings = false
spring.jpa.properties.hibernate.format_sql = true
#spring.jpa.hibernate.ddl-auto=create

logging.level.org.hibernate.SQL=DEBUG
logging.level.org.hibernate.type.descriptor.sql.BasicBinder=TRACE
logging.level.org.springframework.web=INFO
logging.file=logs/spring-otp.log
log4j.logger.org.thymeleaf=DEBUG

#Http Authentication
#security.user.name=test
#security.user.password=test

spring.mail.host=smtp.gmail.com
spring.mail.port=587
spring.mail.username=
spring.mail.password=
spring.mail.properties.mail.smtp.auth=true
spring.mail.properties.mail.smtp.starttls.enable=true
Step 3: Spring Boot Main application
Spring Boot, by default, secures all your pages with basic authentication.
To enable Spring-boot Basic Authentication, uncomment security.user.name and security.user.password in the application properties file
To disable Spring-Boot Basic Authentication.
Use@EnableAutoConfiguration(exclude = {SecurityAutoConfiguration.class}) and comment security.user.name and security.password.name in the application properties file.
package com.shri.config;

import org.springframework.boot.SpringApplication;
import org.springframework.boot.autoconfigure.EnableAutoConfiguration;
import org.springframework.boot.autoconfigure.SpringBootApplication;
import org.springframework.boot.autoconfigure.domain.EntityScan;
import org.springframework.boot.autoconfigure.security.SecurityAutoConfiguration;
import org.springframework.data.jpa.repository.config.EnableJpaRepositories;

@EnableJpaRepositories("com.shri.repo")
@EntityScan("com.shri.model")
@EnableAutoConfiguration(exclude = {SecurityAutoConfiguration.class})//bypass this spring boot security mechanism.
@SpringBootApplication(scanBasePackages = {"com.shri"})
public class Application {

    public static void main(String[] args) {
        SpringApplication.run(Application.class, args);
    }
}
Step4: SpringSecurityConfig.java
I have used a database to validate the user credentials(MySQL DB).
package com.shri.config;

import org.springframework.beans.factory.annotation.Autowired;
import org.springframework.context.annotation.Configuration;
import org.springframework.security.config.annotation.authentication.builders.AuthenticationManagerBuilder;
import org.springframework.security.config.annotation.web.builders.HttpSecurity;
import org.springframework.security.config.annotation.web.configuration.EnableWebSecurity;
import org.springframework.security.config.annotation.web.configuration.WebSecurityConfigurerAdapter;
import org.springframework.security.crypto.bcrypt.BCryptPasswordEncoder;
import org.springframework.security.web.access.AccessDeniedHandler;
import com.shri.service.MyUserDetailsService;
/**
 * @author shrisowdhaman
 * Dec 12, 2017
 */
@Configuration
@EnableWebSecurity
public class SpringSecurityConfig extends WebSecurityConfigurerAdapter {

@Autowired
private AccessDeniedHandler accessDeniedHandler;

@Autowired
private MyUserDetailsService myUserDetailsService;

@Override
protected void configure(HttpSecurity http) throws Exception {

http.csrf().disable().authorizeRequests()
.antMatchers("/","/aboutus").permitAll()  //dashboard , Aboutus page will be permit to all user
.antMatchers("/admin/**").hasAnyRole("ADMIN") //Only admin user can login
.antMatchers("/user/**").hasAnyRole("USER") //Only normal user can login
.anyRequest().authenticated() //Rest of all request need authentication
        .and()
        .formLogin()
.loginPage("/login")  //Loginform all can access ..
.defaultSuccessUrl("/dashboard")
.failureUrl("/login?error")
.permitAll()
.and()
        .logout()
.permitAll()
.and()
        .exceptionHandling().accessDeniedHandler(accessDeniedHandler);
}

@Autowired
public void configureGlobal(AuthenticationManagerBuilder auth) throws Exception {

BCryptPasswordEncoder passwordEncoder = new BCryptPasswordEncoder();
auth.userDetailsService(myUserDetailsService).passwordEncoder(passwordEncoder);;
    }
}
Step5: HomeController.java used for rooting
package com.shri.controller;

import javax.servlet.http.HttpServletRequest;
import javax.servlet.http.HttpServletResponse;

import org.slf4j.Logger;
import org.slf4j.LoggerFactory;
import org.springframework.beans.factory.annotation.Autowired;
import org.springframework.beans.factory.annotation.Value;
import org.springframework.security.core.Authentication;
import org.springframework.security.core.context.SecurityContextHolder;
import org.springframework.security.web.authentication.logout.SecurityContextLogoutHandler;
import org.springframework.stereotype.Controller;
import org.springframework.ui.Model;
import org.springframework.web.bind.annotation.GetMapping;
import org.springframework.web.bind.annotation.RequestMapping;
import org.springframework.web.bind.annotation.RequestMethod;
import org.springframework.web.bind.annotation.ResponseBody;

import com.shri.repo.BookRepository;
import com.shri.service.OtpService;


@Controller
public class HomeController {

private final Logger logger = LoggerFactory.getLogger(this.getClass());

    @Value("${spring.application.name}")
    String appName;

    @Autowired
    BookRepository repo;

    @Autowired
public OtpService otpService;

    @GetMapping("/")
    public String homePage(Model model) {

    String message = " Welcome to my Page";

        model.addAttribute("appName", appName);
        model.addAttribute("message", message);

    Authentication auth = SecurityContextHolder.getContext().getAuthentication();
        logger.info("username: " + auth.getName());

        return "signin";
    }

    @GetMapping("/dashboard")
    public String dashboard(){
    Authentication auth = SecurityContextHolder.getContext().getAuthentication();
        logger.info("username: " + auth.getName());

    return "dashboard";
    }

    @GetMapping("/login")
    public String login() {
        return "signin";
    }

    @GetMapping("/admin")
    public String admin() {
        return "admin";
    }

    @GetMapping("/user")
    public String user() {
        return "user";
    }

    @GetMapping("/aboutus")
    public String about() {
        return "aboutus";
    }

    @GetMapping("/403")
    public String error403() {
        return "error/403";
    }

    @RequestMapping(value="/logout", method = RequestMethod.GET)
    public @ResponseBody String logout(HttpServletRequest request, HttpServletResponse response){

       Authentication auth = SecurityContextHolder.getContext().getAuthentication();
       if (auth != null){
       String username = auth.getName();

       //Remove the recently used OTP from server.
       otpService.clearOTP(username);

       new SecurityContextLogoutHandler().logout(request, response, auth);
       }

   return "redirect:/login?logout";
    }

}
Step6: OtpController.java
The OTP controller used to validate the OTP and trigger the mail to the user with OTP. We can easily implement the SMS OTP using SMS API gateway.
package com.shri.controller;

import java.util.HashMap;
import java.util.Map;
import org.slf4j.Logger;
import org.slf4j.LoggerFactory;
import org.springframework.beans.factory.annotation.Autowired;
import org.springframework.security.core.Authentication;
import org.springframework.security.core.context.SecurityContextHolder;
import org.springframework.stereotype.Controller;
import org.springframework.web.bind.annotation.GetMapping;
import org.springframework.web.bind.annotation.RequestMapping;
import org.springframework.web.bind.annotation.RequestMethod;
import org.springframework.web.bind.annotation.RequestParam;
import org.springframework.web.bind.annotation.ResponseBody;

import com.shri.service.MyEmailService;
import com.shri.service.OtpService;
import com.shri.utility.EmailTemplate;

/**
 * @author shrisowdhaman
 * Dec 15, 2017
 */
@Controller
public class OtpController {

private final Logger logger = LoggerFactory.getLogger(this.getClass());

@Autowired
public OtpService otpService;

@Autowired
public MyEmailService myEmailService;

@GetMapping("/generateOtp")
public String generateOtp(){

Authentication auth = SecurityContextHolder.getContext().getAuthentication();
String username = auth.getName();

int otp = otpService.generateOTP(username);

logger.info("OTP : "+otp);

//Generate The Template to send OTP
EmailTemplate template = new EmailTemplate("SendOtp.html");

Map<String,String> replacements = new HashMap<String,String>();
replacements.put("user", username);
replacements.put("otpnum", String.valueOf(otp));

String message = template.getTemplate(replacements);

myEmailService.sendOtpMessage("shrisowdhaman@gmail.com", "OTP -SpringBoot", message);

return "otppage";
}

@RequestMapping(value ="/validateOtp", method = RequestMethod.GET)
public @ResponseBody String validateOtp(@RequestParam("otpnum") int otpnum){

final String SUCCESS = "Entered Otp is valid";

final String FAIL = "Entered Otp is NOT valid. Please Retry!";

Authentication auth = SecurityContextHolder.getContext().getAuthentication();
String username = auth.getName();

logger.info(" Otp Number : "+otpnum);

//Validate the Otp
if(otpnum >= 0){
int serverOtp = otpService.getOtp(username);

if(serverOtp > 0){
if(otpnum == serverOtp){
otpService.clearOTP(username);
return ("Entered Otp is valid");
}else{
return SUCCESS;
}
}else {
return FAIL;
}
}else {
return FAIL;
}
}
}
Step7: OTP Service.java
I have set the expiry time for 5 minutes.
package com.shri.service;

import java.util.Random;
import java.util.concurrent.TimeUnit;

import org.springframework.stereotype.Service;

import com.google.common.cache.LoadingCache;
import com.google.common.cache.CacheBuilder;
import com.google.common.cache.CacheLoader;

/**
 * @author shrisowdhaman
 * Dec 15, 2017
 */
@Service
public class OtpService {

//cache based on username and OPT MAX 8
 private static final Integer EXPIRE_MINS = 5;

 private LoadingCache<String, Integer> otpCache;

 public OtpService(){
 super();
 otpCache = CacheBuilder.newBuilder().
     expireAfterWrite(EXPIRE_MINS, TimeUnit.MINUTES).build(new CacheLoader<String, Integer>() {
      public Integer load(String key) {
             return 0;
       }
   });
 }

//This method is used to push the opt number against Key. Rewrite the OTP if it exists
 //Using user id  as key
 public int generateOTP(String key){

Random random = new Random();
int otp = 100000 + random.nextInt(900000);
otpCache.put(key, otp);
return otp;
 }

 //This method is used to return the OPT number against Key->Key values is username
 public int getOtp(String key){
try{
 return otpCache.get(key);
}catch (Exception e){
 return 0;
}
 }

//This method is used to clear the OTP catched already
public void clearOTP(String key){
 otpCache.invalidate(key);
 }
}
Step 6: MyEmailService.java
package com.shri.service;

import org.slf4j.Logger;
import org.slf4j.LoggerFactory;
import org.springframework.beans.factory.annotation.Autowired;
import org.springframework.mail.SimpleMailMessage;
import org.springframework.mail.javamail.JavaMailSender;
import org.springframework.stereotype.Service;

/**
 * @author shrisowdhaman
 * Dec 18, 2017
 */
@Service
public class MyEmailService  {

private final Logger logger = LoggerFactory.getLogger(this.getClass());

@Autowired
private JavaMailSender javaMailSender;

public void sendOtpMessage(String to, String subject, String message) {

 SimpleMailMessage simpleMailMessage = new SimpleMailMessage();
 simpleMailMessage.setTo(to);
 simpleMailMessage.setSubject(subject);
 simpleMailMessage.setText(message);

 logger.info(subject);
 logger.info(to);
 logger.info(message);

 //Uncomment to send mail
 //javaMailSender.send(simpleMailMessage);
}
}
Step 7: EmailTemplate.java (used to replace the Username and OTP in an HTML file.)
package com.shri.utility;

import java.io.File;
import java.io.IOException;
import java.nio.file.Files;
import java.util.Map;

/**
 * @author shrisowdhaman
 * Dec 18, 2017
 */
public class EmailTemplate {

private String templateId;

private String template;

private Map<String, String> replacementParams;

public EmailTemplate(String templateId) {
this.templateId = templateId;
try {
this.template = loadTemplate(templateId);
} catch (Exception e) {
this.template = "Empty";
}
}

private String loadTemplate(String templateId) throws Exception {
ClassLoader classLoader = getClass().getClassLoader();
File file = new File(classLoader.getResource(templateId).getFile());
String content = "Empty";
try {
content = new String(Files.readAllBytes(file.toPath()));
} catch (IOException e) {
throw new Exception("Could not read template with ID = " + templateId);
}
return content;
}

public String getTemplate(Map<String, String> replacements) {
String cTemplate = this.template;

//Replace the String
for (Map.Entry<String, String> entry : replacements.entrySet()) {
cTemplate = cTemplate.replace("{{" + entry.getKey() + "}}", entry.getValue());
}
return cTemplate;
}
}
Step 8: MyUserDetailsService.java
To achieve database level user login validation, we need to overwrite the UserDetailsService class.
package com.shri.service;

import java.util.Arrays;

import org.springframework.beans.factory.annotation.Autowired;
import org.springframework.security.core.GrantedAuthority;
import org.springframework.security.core.authority.SimpleGrantedAuthority;
import org.springframework.security.core.userdetails.UserDetails;
import org.springframework.security.core.userdetails.UserDetailsService;
import org.springframework.security.core.userdetails.UsernameNotFoundException;
import org.springframework.stereotype.Service;

import com.shri.model.User;
import com.shri.repo.UserRepository;

/**
 * @author shrisowdhaman
 * Dec 14, 2017
 */
@Service
public class MyUserDetailsService implements UserDetailsService {

@Autowired
    private UserRepository userRepository;

@Override
public UserDetails loadUserByUsername(String username) throws UsernameNotFoundException {

User user = userRepository.findByUsername(username);

GrantedAuthority authority = new SimpleGrantedAuthority(user.getRole());
UserDetails userDetails = (UserDetails) new org.springframework.security.core.userdetails.User(user.getUsername(),
user.getPassword(), Arrays.asList(authority));

return userDetails;
}

}
Step 9:
dashboard.html
<html xmlns="http://www.w3.org/1999/xhtml"
xmlns:th="http://www.thymeleaf.org"
xmlns:sec="http://www.thymeleaf.org/thymeleaf-extras-springsecurity4">
<head>
<div th:replace="header :: header-css" />
</head>
<body>

<div th:replace="header :: header" />

<div class="container">

<div class="starter-template">
<h1>Dashboard</h1>

<h1 th:inline="text">Hello :
[[${#httpServletRequest.remoteUser}]]!</h1>

</div>

<div sec:authorize="hasRole('ROLE_ADMIN')">
<a th:href="@{/admin}">Admin Screen</a>
</div>
<div sec:authorize="hasRole('ROLE_USER')">
<a th:href="@{/user}">User Screen</a>
</div>
</div>

<script type="text/javascript"
src="webjars/bootstrap/3.3.7/js/bootstrap.min.js"></script>
</body>
</html>
Step 10:
OtpPage.html
Ajax functionality implemented to validate the OTP.
<html xmlns="http://www.w3.org/1999/xhtml"
xmlns:th="http://www.thymeleaf.org"
xmlns:sec="http://www.thymeleaf.org/thymeleaf-extras-springsecurity4">

<head>
<div th:replace="header :: header-css" />

</head>
<body>
<div th:replace="header :: header" />
<div class="container">

<div class="starter-template">
<h2>OTP - Validate your OTP</h2>

<h3 th:inline="text">Hello :
[[${#httpServletRequest.remoteUser}]]!</h3>

 <form id="validateOtp" name="validateOtp" method="post">
                <fieldset>

                    <div th:if="${param.error}">
                        <div class="alert alert-danger">
                            Invalid Otp Try Again
                        </div>
                    </div>

                    <div class="form-group">
                        <input type="text" name="otpnum" id="otpnum" class="form-control input-lg"
                               required="true" autofocus="true"/>
                    </div>

                    <div class="row">
                        <div class="col-xs-6 col-sm-6 col-md-6">
                            <input type="submit" class="btn btn-lg btn-primary btn-block" value="Submit"/>
                        </div>
                        <div class="col-xs-6 col-sm-6 col-md-6">
                        </div>
                    </div>
                </fieldset>
            </form>
</div>
</div>

<script type="text/javascript"
src="webjars/bootstrap/3.3.7/js/bootstrap.min.js"></script>
<script type="text/javascript"
        src="webjars/jquery/2.2.4/jquery.min.js"></script>


<script type="text/javascript">
$(document).ready(function () {

    $("#validateOtp").submit(function (event) {

        //stop submit the form, we will post it manually.
        event.preventDefault();

        var data  = 'otpnum='+$("#otpnum").val();

        alert(data);

        $.ajax({
            type: "GET",
            url:  "/validateOtp",
            data: data,
            dataType: 'text',
            cache: false,
            timeout: 600000,
            success : function(response) {
                    alert( response );
                },
                error : function(xhr, status, error) {
                    alert(xhr.responseText);
                }
        });
    });
});
</script>
</body>
</html>
Step 11:
Email template
<!DOCTYPE html>
<html>
<head>

</head>
<body>
<h1> Hi {{user}}</h1>
<br/>
<h2> Your Otp Number is {{otpnum}}</h2>
<br/>
Thanks,
</body>
</html>
