The Path to Production: How And Where to Segregate Test Environments

Bringing a new tool into an organization is no small task. Adopting a CI/CD tool, or any other tool should follow a period of research, analysis, and alignment within your organization.
In my last post, I explained how the precursor to any successful tool adoption is about people: alignment on purpose, getting some “before” metrics to support your assessment, and setting expectations appropriately. I recommend you revisit that post to best prepare your team before you enact any tool change.
The next step is about analysis: deducing exactly what pipeline problem you most need to solve. By examining your development process (which I’ll refer to as your “path to production”) you can pinpoint where your biggest problems are coming from. Only when you know what problem you’re trying to focus on solving can you make a well-reasoned tooling decision. The goal in examining your path to production is creating clear stages which will serve as checkpoints. In order to pass from one stage to the next, a build has to pass through these quality gates. The gates will be separated using various kinds of tests. Once tests are passed, quality at that level has been assured, and the build can move on.
These pipeline stages, or build environments, are separated by the increasing scope of responsibility that the developer assumes, ranging from their local laptop to the team space to the application’s entire codebase. As the scope of responsibility grows, and the cost of mistakes is higher. That’s why we test incrementally before passing a build to each successive level.
What’s more, each stage requires different types of tests. As you move from staging toward production, the tests go from lighter weight to heavy-duty. The cost of resources increases with each stage as well. Heavy duty testing can only happen in more production-like environments, involving a full tech stack or external dependencies. In order to do these tests properly, there’s more to spin up, and they require more expensive machinery. Therefore, it’s beneficial if you can do as much testing as possible in earlier environments, which are much less costly.
To summarize before we move on, the benefits of a duty-segregated path to production are:
- Debugging faster and more easily by isolating development and testing into stages. You can detect problems earlier, and feedback loops are faster.
- Saving resources by keeping the number of production-like environments as low as possible (one or two is good).
I want to mention that if your process doesn’t look exactly like the one I describe below, that’s OK. It might not right now, or ever. You may have a different purpose requiring a different flow. The goal here is to give you an idea of what stages, tests, and quality gates your pipeline could contain. Seeing the possibilities should help surface what, if anything, is missing from your development and testing workflow. Additionally, your organization might use different nomenclature than I use here, and that is fine, too. What is important here is thinking about levels of responsibility and how you’re segregating those levels with tests.
Let’s talk about the different types of tests:

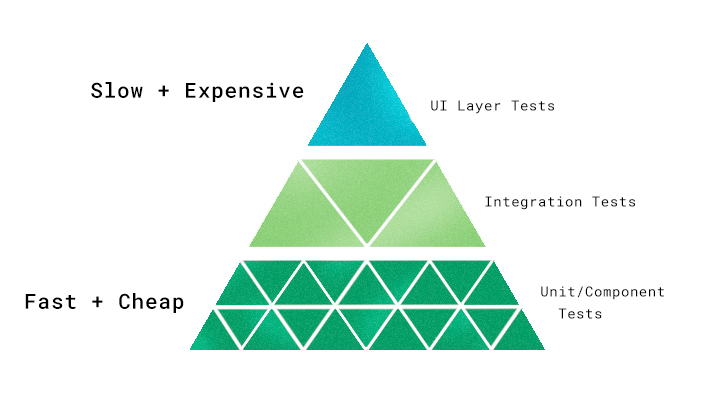
- Unit/component test: These cover the smallest possible components, units, or functionalities. They’re the cheapest and fastest tests to run since they don’t require a lot of dependencies or mocking. These should be done early to get them out of the way.
- Integration test: These check how well each unit from the previous stage works with the other components, units, and functionalities. In a broader sense, it can test how services (such as APIs) integrate with one another.
- UI layer testing: This is automated browser-based testing which tests basic user flow. It is expensive to set up and slow to run, so it should happen later in the pipeline.
Now let’s talk about how these tests fit into a software development pipeline. Each test has a specific role and place.

Note: This example uses a microservices application, which allows us to test and deploy each service separately.
Local Environment
This environment is private, limited to a single developer and their laptop. This environment is the easiest in which to make changes and test your own implementation.
The “local” we are talking about here is really just a “personal environment.” It could be on your laptop, but you could just as easily use a cloud environment if the application is too big to run on your local laptop. The key here is it’s a smaller scale instance, that it’s yours alone, in which you can test and debug your implementation while you’re developing, without interrupting other developers on your team. Because nothing in your local environment is visible to others, your team can agree to integrate a Git pre-push hook into your repo to ensure the local environment is used, and run automated tests before code gets pushed to a remote, or shared, repository.
Tests: The tests I recommend before moving out of a local environment are unit tests, integration testing with mocked components, and UI testing to the degree that it’s possible. The more tests you can do in this environment, the more room you’ll have to be successful in the integration environment.
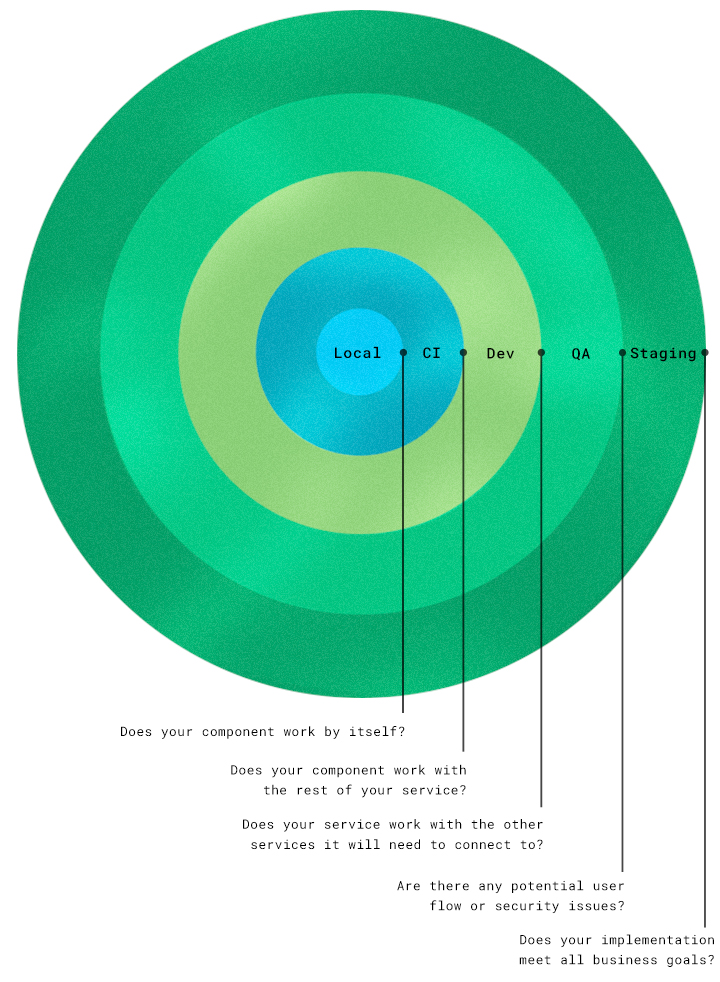
Scope of responsibility: The scope here covers just the implementation or functionality of what you’re building. Does your component work by itself? The surface area is relatively small. But, this is the last environment before you merge to a shared environment. Therefore, you’ll want to test responsibly so that you don’t break the shared environment later and block active development by others.
CI Environment
This is the shortest-lived environment; it lives with the build. It gets created when a build gets triggered and torn down once the build is done. It’s also the most unstable environment. As a developer, I check code into the CI environment. Since other developers could be deploying at the same time, the CI environment has a lot of deployment activities that are happening concurrently. As a result, the CI can, and often does, break. That’s ok — it’s meant to break. The key is fixing it when it does.
If you were unable to spin up your entire application in a local environment (which is highly likely), the CI environment will be the first environment in which you’ll be able to do browser-driven testing. You’ll also be able to do any UI testing that you weren’t able to do in your local environment.
In this environment, you should be using mock external services and databases to keep things running fast.
I recommend automating the lifetime of the CI environment like this: as soon as you merge the code, the CI environment automatically spins up, runs that code, tells you whether it’s safe or not, and then tears itself down. Using Docker to automatically spin up the environment will save time, and the whole process of automated builds and environment creation make it easier for team members to commit more often.
Maximum benefit from the CI environment is based on the speed at which you can spin it up, because that will determine the length of your feedback loop. If your entire application takes something like 30 minutes to spin up and deploy, you may want to consider doing a partial deployment instead. Since the CI environment spins up and down quickly, you should be mocking most of your external services. Keep in mind you’re only testing the integrations of the core components rather than any external services.
Tests: Unit tests, Integration testing with mocked components, UI testing with mocked data
Scope of responsibility: Here you are concerned with the shared codebase you’re merging your code into. Does your component work with the rest of your service?
Development Environment
The development environment is a shared environment with other developers. In this environment, every service within the application is getting deployed every time. These environments are very unstable because there are constant changes from different teams all the time. It’s important to note here that your integration and browser-based tests may now fail, even if they passed in the CI environment. That’s because they are now fully integrated with outside services and other services are also currently in development.
Whereas the CI environment is just for your team (or for one service of your product) and can be torn down between builds, this development environment is for your entire product codebase. If you choose to merge into a development environment for just your team, that will have a smaller scope of impact than merging into the full development environment shared by all teams. In the development environment, system health check monitoring is now required since it’s a fast moving environment with many differents components. Since it sits in the middle of the path to production, when this environment breaks, it has a detrimental effect on the environments that follow — a failure here blocks all changes and no code can move forward if the development environment breaks.
In the development environment, some external services are mocked and some are not, depending on how crucial each service is to what you’re testing, and also the cost of connecting to that external service. If you are using mocked data here, make sure that a decent amount of test data available.
Everyone in the organization has visibility into this environment; any developer can log in and run it as an application. This environment can be used by all the developers for testing and debugging.
Tests: Unit tests, Integration testing with mocked component, UI testing with mocked data and system health checks.
Scope of responsibility: The scope increases to integrations with other services. Does your service work with the other services it will need to connect to?
QA Environment
This is the first manually-deployed environment in this scenario. It is manually deployed because the QA team needs to decide which features are worth testing on their own, based on the structure of the changes. They might take a stacked change (Change A, B, and C) and test them each separately. In this scenario, they test Change A, and once they have assurance that it’s working as expected, they can move on and test Change B, and when it throws an error, they know that the issue is isolated to Change B. Otherwise, in the case of just testing Change C, if it were to throw an error, it would block progress on C, B, and A.
The QA environment is a controlled and integrated environment. Here, the QA team is controlling what change is coming in; in contrast, in the development environment, any change can happen at any time. The build is now integrated with the services it will interact within the application.
In this environment, we now have the same infrastructure and application as in production. We are using a representative subset of production data – close enough to production data to test. The QA engineers or testers understand what they should focus their tests on. I recommend manual deployment at this stage so that small changes can be tested in an isolated environment to help identify bugs.
If you don’t use production or production-like data in your testing, QA testing can miss a lot. Use real external services if possible, so that QA can catch the real problems that would occur. The closer the QA environment can get to production, the higher confidence you will have in the results of the tests. As always, you have to weigh this assurance with the cost. Depending on your application’s functionality, you can still mock some of the external services with no ill effects.
Tests: This phase is an appropriate time for open-ended exploratory testing, as well as security testing. At this stage, you are hoping to catch not just technical problems, but also potential user flow problems.
Now you’ve completed sufficient testing of all kinds. Are there any potential user flow or security issues? Is there anything else you need to address before moving to the staging environment?
Staging Environment
This is the last environment before production. The purpose of staging is to have an environment almost exactly the same as production. When you deploy something into staging, and it works, you can be reasonably assured that that version won’t fail in production and cause an outage. All environments help you catch potential issues; staging is the final check of confidence. Here it is important to have almost the same amount of data as you would in production. This enables you to do load testing, and test the scalability of the application in production.
Production-ready code should be deployed to this environment; again, almost the same as in production. Infrastructure, databases, and external service integration should be exactly the same as in production. It will be expensive to maintain and build – the only thing more expensive is not doing it, and breaking production. The scale can be smaller, but your setup and your configuration has to be the same.
This is the last gate before production to test the implementation, migration, configuration and business requirements. I want to strongly encourage you to get business signoff before you get to staging. Otherwise, it will be very expensive to make a change. While you’re doing development, please ensure that whoever owns the product or requested feature thoroughly understands what it is you’re building. Be on the same page the whole way through.
Tests: This environment can be used to do the most heavy-duty of all our testing so far: system testing, load testing, performance testing, and security testing.
Given the heft of the environment, it will be most beneficial if other core application functionality and internal integration testing has been done in previous environments.
At this point, the question to be asking is: Does your implementation meet all business goals?
How to Make the Most of Your Path to Production
- Make a path visible to everyone.
- Use build monitoring
- Give all developers access to pre-production environments
- Builds and environments can break. Fix it quickly, and keep the build green as much as possible.
- If you know how to fix the build, fix it.
- If a build fix will take a while due to debugging and implementation, revert the build to unblock other development first.
- When a build is broken in an earlier stage, do not promote it to a later environment.
- Write reliable, automated tests.
- If your tests fail for no reason, you can’t trust them, and this pipeline won’t work for you. This pipeline is trustworthy when it’s visible, and when test results are represented accurately. That’s how this provides value to the entire team.
Conclusion
I’ve just shared with you an ideal path to production. But what’s ideal here might not be ideal for you or your organization: you might be able to utilize a more lightweight process, depending on your organization and your application. But my intention in sharing this is to give you a new lens through which to look at your own path to production and testing practices. By comparing your quality gates to the ones I outline, you can see what you might be missing, so you can add necessary controls, deliver a quality product, and save costs.
A final note: your entire path to production, whatever it looks like, should be visible to everyone in the organization who is doing development. Every developer who is implementing code in their local environment should be able to have visibility into how it will be deployed into production. In my previous post, I talked about how DevOps means caring how your code goes through the pipeline and out to customers. Part of that means knowing the quality gates it’s going to pass through. Only by being aware of how their code is being deployed can developers make the greatest impact in reducing errors before they move onto the later stages.

