Deploying Databases Using Azure DevOps Pipelines
When it comes to websites, it's easy to build and deploy in an automated fashion: Check your code in, create the build process, run the website through your pipeline, transform the web.configs (or app.settings), and you are on your way.
It's only after the fact you realize you didn't deploy the database.
Darnit!
Databases have always been a problem when automating deploys. Back in the '90s, it took a little bit of effort to deploy a website with a database (mainly because it was all manual).
How do you automate the process of changing the structure of a database in a DevOps world? What if you need data as well as a schema change?
In today's post, I'll go through a process of how to deploy a database to a database server as well as send it through the Azure DevOps Pipeline.
It's All in the PACs
Before we move forward with a pipeline discussion, we need to understand the SQL Server world a bit.
There are two types of "snapshotting" you can do with a SQL Server database: DACPAC and BACPAC.
A DACPAC file is a snapshot of the database's structure and functionality (stored procedures, views, etc.)
A BACPAC file is a snapshot of the database's structure, functionality, AND data.
It's that simple.
When you create a database project in Visual Studio, it automatically generates a DACPAC for deployment. That's out-of-the-box functionality. You don't need to worry about it.
While I can appreciate how BACPACs work, for our specific project, I felt there wasn't a need for it.
Getting Started
As mentioned, you first need a database project. You can either add it to an existing solution (which we did) or make it a standalone project/solution.
- Create a New Project
- Under Installed, there should be a SQL Server category. Clicking on it shows the SQL Server Database Project on the right.
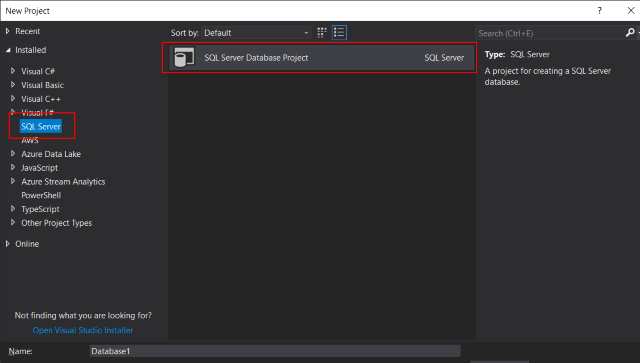
- Name your project and click OK.
Once your project is loaded, we need a schema. To import the schema into the project,
- Right-click on the project.
- In the context menu, select "Import..." and pick Database.
- Enter your connection details by pressing the "Select Connection..." button (usually, I just select the database and click Start).
- Click Start
- After showing the details of the import, click Finish.
You now have the entire database schema in your project. Not only that, but you also have a DACPAC.
When you build your database project, guess what? It generates it for you every time.
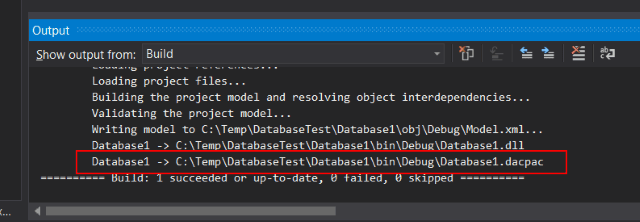
When you check your code into VSTS, the build server can build the project just like a solution and create the DACPAC for distribution to any of your database environments.
The database structure can be modified.
(How to) Release the Hounds!
Before we get into releasing the DACPAC into the wild, there is one issue we ran into while building our project.
We have an on-premise build server and when we check code in, it immediately starts a build. When completed, it deploys it to DEV. In our solution, we had a .NET Core (API) project and database project in one solution.
While running locally, we could open the solution and compile just fine. However, when we built the solution on the server, we ran into errors.
After a day or two trying to figure out the issue, we broke down and installed Visual Studio 2017 on the server.
As soon as it was done installing, we immediately started a build and it built the solution flawlessly.
Build
To perform the database build, you create the build just as you would your web project.
The only difference is when you finish building your project, you'll have an additional file (DACPAC) to place into a separate artifact folder.
Release
In the release section of the Azure DevOps Pipeline, add an Azure SQL Database Deployment task.
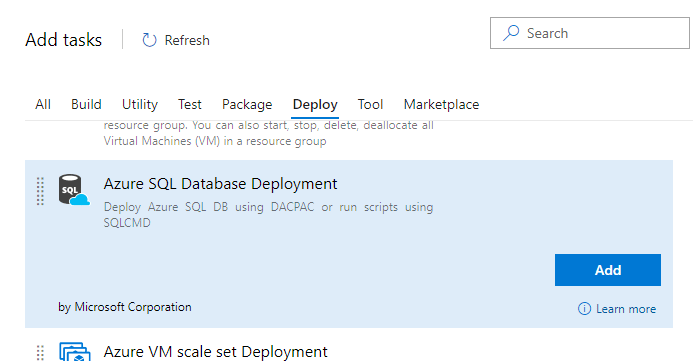
Add all of your connection details regarding the destination database into the task and perform the release to an environment.
It should modify the database when deployed.
Deploying Data (With a Script)
Now the hard part. How do you deploy data without ruining existing data?
With database projects, you get a Pre- and Post-Deployment Scripts.Sql that runs before and after the deployment of a DACPAC, respectively. If your database project doesn't have one, it's easy to add them.
- Right-click on your database project
- Click Add
- Click Script...
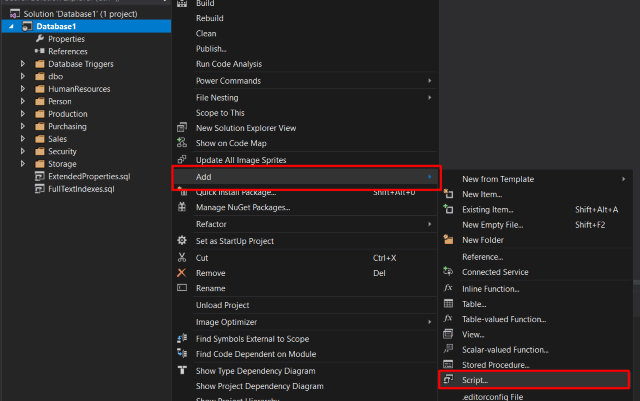
- An add dialog will appear. Select either a Pre- or Post Deployment Script.
- Name it (optionally) and click Add.
For now, I'm using a post-deployment script. After all of these tables are modified, they are in a state ready to be populated and I could run any script I want.
If you look at the script, you'll notice the comment. DON'T DELETE IT! It seems when deploying the DACPAC, it looks for this comment. If the comment is not there, it will not run.
NOTE: Another issue I ran into that I didn't realize: This Pre or Post Deployment Script HAS to run in SQLCMD mode. By default, this option is off. When editing this file, turn on SQLCMD mode.
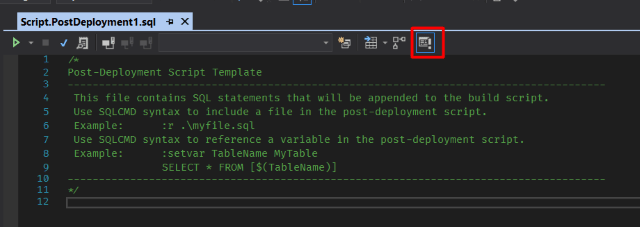
So, what script do we run after the DACPAC is deployed?
After thinking about this for a while, I came up with the following requirements.
- I want to add data to tables specifically meant for lookup purposes. I won't be touching data tables (unless I want to).
- If there is an issue with the lookup tables, I would like to run something to reset the table and refill it's appropriate data.
- I want to be able to add, modify, or delete data at a later time as well.
Since the DACPAC stores the structure and functionality of the database, I decided to build a stored procedure called CreateSeedData.
This has the following benefits:
- The DACPAC packages up everything BUT the data, so a stored procedure is bundled up with it.
- In the stored procedure, we can use a
T-SQL MERGEstatement, which guarantees the state of the table's data. If we are missing a record, theMERGEstatement would add it back. - If the lookup tables become corrupted or are missing data, we can run the stored procedure to automatically repopulate the tables without performing a complete deploy again.
- We can deploy as many times as we like and the structure and lookup tables will remain the same.
This allows all of our requirements to be met.
Create the MERGE Statements
The stored procedure contains all of our seed data, but how do we create it?
Referring back to 5 Methods of Generating Code, I'll be using a T4 template to create our MERGE statements.
<#@ template language="C#" debug="True" hostspecific="True" #>
<#@ output extension=".sql" #>
<#@ assembly name="System.Core" #>
<#@ assembly name="System.Data" #>
<#@ assembly name="System.xml" #>
<#@ import namespace="System.Linq" #>
<#@ import namespace="System.Collections.Generic" #>
<#@ import namespace="System.Data.SqlClient" #>
<#@ import namespace="System.Data" #>
<#@ import namespace="System.IO" #>
<#
    // VARIABLES
    var splitLimit = 1000;
    var templateDirectory = Path.GetDirectoryName(this.Host.ResolvePath("."));
    var outputDirectory = Path.Combine(templateDirectory, "");
    // ConnectionString
    var connection = new SqlConnectionStringBuilder(
        "Server=localhost;Initial Catalog=AdventureWorks2012;Integrated Security=true;");
    // Seed tables to generate a MERGE statement
    var tableList = new List<string>
    {
        "StateProvince"
    };
    var conn = new SqlConnection(connection.ConnectionString);
    var sqlSplits = new List<string>();
    foreach (var tableName in tableList)
    {
        sqlSplits.Clear();
        string command = $"select * FROM {tableName}";
        // Get the schema data for the table.
        conn.Open();
        var dbCommand = new SqlCommand(command, conn);
        var schemaReader = dbCommand.ExecuteReader(CommandBehavior.SchemaOnly | CommandBehavior.KeyInfo);
        var tableData = schemaReader.GetSchemaTable();        // Get Primary Keys
        var primaryKeys = GetPrimaryKeys(tableData);
        conn.Close();
        // Now get the records for the table.
        conn.Open();
        var reader = dbCommand.ExecuteReader();
        // Get the names of the columns.
        var columns = GetColumnNames(reader);
        // Get list of non-key fields.
        var noKeyColumns = GetNonPrimaryColumns(reader, primaryKeys);
        var bracketedColumns = GetColumnNames(reader, true);
        var fullFieldList = String.Join(",", bracketedColumns);
        var updateFields = String.Join("," + Environment.NewLine+" ".PadRight(4), noKeyColumns);
        // build key list
        var primaryKeyList = BuildKeywordList(primaryKeys);
        var rows = BuildRecords(reader, columns);
        // Fix for: The query processor ran out of internal resources and could not
        //            produce a query plan. This is a rare event and only expected for
        //            extremely complex queries or queries that reference a very large number of
        //            tables or partitions. Please simplify the query. If you believe
        //            you have received this message in error, contact Customer Support
        //            Services for more information.
        // https://blogs.technet.microsoft.com/mdegre/2012/03/13/8623-the-query-processor-ran-out-of-internal-resources-and-could-not-produce-a-query-plan/
        if (rows.Count > splitLimit)
        {
            var chunkRows = rows
                .Select((x, i) => new {Index = i, Value = x})
                .GroupBy(x => x.Index / splitLimit)
                .Select(x => x.Select(v => v.Value).ToList())
                .ToList();
            sqlSplits.AddRange(
                chunkRows.Select(chunkRow => String.Join("," + Environment.NewLine, chunkRow))
            );
        }
        else
        {
            sqlSplits.Add(String.Join("," + Environment.NewLine, rows));
        }
        conn.Close();
        var allowDelete = sqlSplits.Count == 1;
        for (int index = 0; index < sqlSplits.Count; index++)
        {
            var sqlSplit = sqlSplits[index];
            // Are we on the first record?
            if (sqlSplit == sqlSplits.First())
            {
                #>
-------- Seed <#= tableName #> ------
PRINT 'Starting Merge for <#= tableName #>...'
                <#
            }
#>
MERGE INTO <#= tableName #> AS Target
USING (VALUES
<#= sqlSplit #>
)
AS Source (<#= fullFieldList #>) ON
    <#= primaryKeyList #>
-- Update Matched Rows
WHEN MATCHED THEN
UPDATE SET
    <#= updateFields #>
-- Insert new Rows
WHEN NOT MATCHED BY TARGET THEN
INSERT (<#= fullFieldList #>)
VALUES (<#= fullFieldList #>)
<# if (allowDelete) { #>
-- Delete Rows that are in target, but not in source
WHEN NOT MATCHED BY SOURCE THEN
DELETE;
<# } else { #>
;
<# } #>
GO
<#
            // Are we on the last record?
            if (sqlSplit == sqlSplits.Last())
            {
                #>
PRINT 'Merging for <#= tableName #> is complete.'
PRINT ''
                <#
            }
        }
        // SaveOutput(Path.Combine(outputDirectory, tableName + ".sql"));
    }    #>
<#+
    private List<string> BuildRecords(SqlDataReader reader, List<string> columns)
    {
        // Build record rows.
        var rows = new List<string>();
        while (reader.Read())
        {
            var values = new List<string>();
            for (var i = 0; i < columns.Count; i++)
            {
                var fieldType = reader.GetFieldType(i);
                if (reader.IsDBNull(i))
                {
                    values.Add("NULL");
                    continue;
                }
                switch (fieldType.Name)
                {
                    case "Int32":
                        values.Add(reader.GetValue(reader.GetOrdinal(columns[i])).ToString());
                        break;
                    case "Boolean":
                        values.Add(reader.GetValue(reader.GetOrdinal(columns[i])).ToString() == "True" ? "1" : "0");
                        break;
                    default:
                        values.Add("'" +
                                   reader.GetValue(reader.GetOrdinal(columns[i]))
                                       .ToString()
                                       .Trim()
                                       .Replace("'", "''")
                                   + "'");
                        break;
                }
            }
            rows.Add("(" + String.Join(",", values) + ")");
        }
        return rows;
    }
    private string BuildKeywordList(List<string> primaryKeys)
    {
        // build key list
        for (var index = 0; index < primaryKeys.Count; index++)
        {
            var key = primaryKeys[index];
            primaryKeys[index] = "Target." + key + " = Source." + key;
        }
        return String.Join(" AND "+Environment.NewLine, primaryKeys);
    }
    private List<string> GetPrimaryKeys(DataTable tableData)
    {
        // Get Primary key(s)
        var primaryKeys = new List<string>();
        foreach (DataRow dataRow in tableData.Rows)
        {
            if (!dataRow.IsNull("IsKey") && dataRow["IsKey"].Equals(true))
            {
                primaryKeys.Add(dataRow["ColumnName"].ToString());
            }
        }
        return primaryKeys;
    }
    private List<string> GetColumnNames(SqlDataReader reader, bool addBrackets = false)
    {
        // Get the names of the columns.
        var columns = new List<string>();
        for (var i = 0; i < reader.FieldCount; i++)
        {
            var columnName = reader.GetName(i);
            if (addBrackets)
            {
                columnName = "[" + columnName + "]";
            }
            columns.Add(columnName);
        }
        return columns;
    }
    private List<string> GetNonPrimaryColumns(SqlDataReader reader, List<string> primaryKeys)
    {
        var noKeyColumns = new List<string>();
        for (var i = 0; i < reader.FieldCount; i++)
        {
            var columnName = reader.GetName(i);
            if (!primaryKeys.Contains(columnName))
            {
                noKeyColumns.Add("["+columnName + "] = Source." + "["+columnName+"]");
            }
        }
        return noKeyColumns;
    }
    private void SaveOutput(String filename)
    {
        /* "this" refers to the T4 TextTransformation instance that's producing the output.
            See https://msdn.microsoft.com/en-us/library/Microsoft.VisualStudio.TextTemplating.TextTransformation.aspx. */
        Directory.CreateDirectory(Path.GetDirectoryName(filename));
        File.Delete(filename);
        File.WriteAllText(filename, this.GenerationEnvironment.ToString());
        GenerationEnvironment.Clear();
    }
#>
It's a lot, but it essentially:
- Connects to a database,
- Read all of the records in a table,
- Write out the records as a
MERGEstatement. - If there are more than 1,000 records, it will split it into multiple
MERGEstatements - Performs the INSERT, UPDATE, or DELETE based on the keys
Once you enter the table names in your list (at the top called tableList), press Ctrl-S to save your template and view the .sql file generated underneath it.
I decided to use a table called StateProvince for demo data. My MERGE statement looks like this:
MERGE INTO StateProvince AS Target
    USING (VALUES
    (1,'AK','Alaska'),
    (2,'AL','Alabama'),
    (3,'AR','Arkansas'),
    (4,'AZ','Arizona'),
    (5,'CA','California'),
    (6,'CO','Colorado'),
    (7,'CT','Connecticut'),
    (8,'DC','District of Columbia'),
    (9,'DE','Delaware'),
    (10,'FL','Florida'),
    (11,'GA','Georgia'),
    (12,'HI','Hawaii'),
    (13,'IA','Iowa'),
    (14,'ID','Idaho'),
    (15,'IL','Illinois'),
    (16,'IN','Indiana'),
    (17,'KS','Kansas'),
    (18,'KY','Kentucky'),
    (19,'LA','Louisiana'),
    (20,'MA','Massachusetts'),
    (21,'MD','Maryland'),
    (22,'ME','Maine'),
    (23,'MI','Michigan'),
    (24,'MN','Minnesota'),
    (25,'MO','Missouri'),
    (26,'MS','Mississippi'),
    (27,'MT','Montana'),
    (28,'NC','North Carolina'),
    (29,'ND','North Dakota'),
    (30,'NE','Nebraska'),
    (31,'NH','New Hampshire'),
    (32,'NJ','New Jersey'),
    (33,'NM','New Mexico'),
    (34,'NY','New York'),
    (35,'NV','Nevada'),
    (36,'OH','Ohio'),
    (37,'OK','Oklahoma'),
    (38,'OR','Oregon'),
    (39,'PA','Pennsylvania'),
    (40,'RI','Rhode Island'),
    (41,'SC','South Carolina'),
    (42,'SD','South Dakota'),
    (43,'TN','Tennessee'),
    (44,'TX','Texas'),
    (45,'UT','Utah'),
    (46,'VA','Virginia'),
    (47,'VT','Vermont'),
    (48,'WA','Washington'),
    (49,'WI','Wisconsin'),
    (50,'WV','West Virginia'),
    (51,'WY','Wyoming'),
    (52,'PR','Puerto Rico'),
    (53,'VI','U.S. Virgin Islands'),
    (54,'AB','Alberta'),
    (55,'BC','British Columbia'),
    (56,'MB','Manitoba'),
    (57,'NB','New Brunswick'),
    (58,'NF','Newfoundland'),
    (59,'NT','Northwest Territories'),
    (60,'NS','Nova Scotia'),
    (61,'ON','Ontario'),
    (62,'PE','Prince Edward Island'),
    (63,'QC','Quebec'),
    (64,'SK','Saskatchewan'),
    (65,'YT','Yukon')
    )
    AS Source ([StateID],[StateAbbr],[StateText]) ON
        Target.StateID = Source.StateID
    -- Update Matched Rows
    WHEN MATCHED THEN
    UPDATE SET
        [StateAbbr] = Source.[StateAbbr],
        [StateText] = Source.[StateText]
    -- Insert new Rows
    WHEN NOT MATCHED BY TARGET THEN
    INSERT ([StateID],[StateAbbr],[StateText])
    VALUES ([StateID],[StateAbbr],[StateText])
    -- Delete Rows that are in target, but not in source
    WHEN NOT MATCHED BY SOURCE THEN
    DELETE;
Even though this is just one table, you can generate a number of MERGE statements based on the table list at the top.
Create the Stored Procedure
Once these are generated, add these statements to your CreateSeedData stored procedure.
SET ANSI_NULLS ON
GO
SET QUOTED_IDENTIFIER ON
GO
CREATE PROCEDURE [dbo].[CreateSeedData]
AS
BEGIN
  SET NOCOUNT ON
  MERGE INTO StateProvince AS Target
    USING (VALUES
    (1,'AK','Alaska'),
    (2,'AL','Alabama'),
    (3,'AR','Arkansas'),
    (4,'AZ','Arizona'),
    (5,'CA','California'),
    (6,'CO','Colorado'),
    (7,'CT','Connecticut'),
    (8,'DC','District of Columbia'),
    (9,'DE','Delaware'),
    (10,'FL','Florida'),
    (11,'GA','Georgia'),
    (12,'HI','Hawaii'),
    (13,'IA','Iowa'),
    (14,'ID','Idaho'),
    (15,'IL','Illinois'),
    (16,'IN','Indiana'),
    (17,'KS','Kansas'),
    (18,'KY','Kentucky'),
    (19,'LA','Louisiana'),
    (20,'MA','Massachusetts'),
    (21,'MD','Maryland'),
    (22,'ME','Maine'),
    (23,'MI','Michigan'),
    (24,'MN','Minnesota'),
    (25,'MO','Missouri'),
    (26,'MS','Mississippi'),
    (27,'MT','Montana'),
    (28,'NC','North Carolina'),
    (29,'ND','North Dakota'),
    (30,'NE','Nebraska'),
    (31,'NH','New Hampshire'),
    (32,'NJ','New Jersey'),
    (33,'NM','New Mexico'),
    (34,'NY','New York'),
    (35,'NV','Nevada'),
    (36,'OH','Ohio'),
    (37,'OK','Oklahoma'),
    (38,'OR','Oregon'),
    (39,'PA','Pennsylvania'),
    (40,'RI','Rhode Island'),
    (41,'SC','South Carolina'),
    (42,'SD','South Dakota'),
    (43,'TN','Tennessee'),
    (44,'TX','Texas'),
    (45,'UT','Utah'),
    (46,'VA','Virginia'),
    (47,'VT','Vermont'),
    (48,'WA','Washington'),
    (49,'WI','Wisconsin'),
    (50,'WV','West Virginia'),
    (51,'WY','Wyoming'),
    (52,'PR','Puerto Rico'),
    (53,'VI','U.S. Virgin Islands'),
    (54,'AB','Alberta'),
    (55,'BC','British Columbia'),
    (56,'MB','Manitoba'),
    (57,'NB','New Brunswick'),
    (58,'NF','Newfoundland'),
    (59,'NT','Northwest Territories'),
    (60,'NS','Nova Scotia'),
    (61,'ON','Ontario'),
    (62,'PE','Prince Edward Island'),
    (63,'QC','Quebec'),
    (64,'SK','Saskatchewan'),
    (65,'YT','Yukon')
    )
    AS Source ([StateID],[StateAbbr],[StateText]) ON
        Target.StateID = Source.StateID
    -- Update Matched Rows
    WHEN MATCHED THEN
    UPDATE SET
        [StateAbbr] = Source.[StateAbbr],
        [StateText] = Source.[StateText]
    -- Insert new Rows
    WHEN NOT MATCHED BY TARGET THEN
    INSERT ([StateID],[StateAbbr],[StateText])
    VALUES ([StateID],[StateAbbr],[StateText])
    -- Delete Rows that are in target, but not in source
    WHEN NOT MATCHED BY SOURCE THEN
    DELETE;
    -- ... and add more merges here.
END
Run this stored procedure so that you have it in your database when you perform a compare in the next step.
Import the Stored Procedure
If you make ANY changes to the database, perform a compare to reflect those changes in the database project.
Since we added a stored procedure just now, we'll perform the compare.
- Right-click on the database project
- Select Schema Compare...
- The dropdown on the left side is the Source. In the dropdown, Select "Select Source"
- Select a Database (primarily where you placed your Stored Procedure) and click OK
- The dropdown on the right side is the Destination. Again, in the dropdown, select "Select Source"
- This time, select your database project and click OK.
- The Compare button will become lit above the Source dropdown. Click the Compare button.
This will give you a comparison between the current state of the database and the current state of your database project.
If a checkbox is checked, it will create a script to include in your database project. If unchecked, it'll be ignored.
In this case, make sure the CreateSeedData is checked so it can be transferred over to the database project and included in your DACPAC on the build.
After you select all of your updates, click Update to update your database project.
Execute our PostDeployment Script
Since we now have a Stored Procedure after updating the database, we need a way to run it.
This is where the Script.PostDeployment1.sql comes in.
Again, since it's SQLCMD mode, it will only execute one line at a time.
Our Post-Deployment Script looks like this:
/*
Post-Deployment Script Template
--------------------------------------------------------------------------------------
 This file contains SQL statements that will be appended to the build script.
 Use SQLCMD syntax to include a file in the post-deployment script.
 Example:      :r .\myfile.sql
 Use SQLCMD syntax to reference a variable in the post-deployment script.
 Example:      :setvar TableName MyTable
               SELECT * FROM [$(TableName)]
--------------------------------------------------------------------------------------
*/
EXEC dbo.CreateSeedData
GO
I added the last two lines to finish it off.
Two Warnings and PRINTs
After going through a number of ways to deploy schema AND data, I've come across a lot of errors and how to fix them and want to help my readers by telling them how to avoid them.
Avoid VERY Large Data
We had two tables: one containing 54,000 records and another containing 42,000. I know, I know, some may think that's not large, but with SQL Server, shoving 54,000 records through a MERGE command can choke a SQL Server.
This is why I created a splitLimit variable. It counts up to 1,000 and then creates a new MERGE statement. We essentially added another stored procedure to seed the remaining records.
I originally started with 6,000 records and worked my way down. With 6,000, I was receiving out of memory errors (hence the comment in the T4 code starting with "Fix for:"). It's not every day you get a message saying to contact Microsoft. :-p
After getting to ~1,000-1,500, it started working properly, which makes sense. If you perform an "Export Data..." in SQL Server, you'll notice the script stops every 1,000 records to process them with a message. It never chokes on batching 1,000 records at a time.
If you have to deploy large data, it may make more sense to create a CSV file in your project, include it as content, and perform a BCP (Bulk Copy) to SQL Server on deploy. But keep in mind, this won't be mindful of the records you currently have in the table.
Confirm Your Script Is Pre- Or Post-Deploy
At one point, I was generating the Script.PostDeployment1.sql file with a T4. Snazzy, right?
The downside to that was when generated the Build Action was always set to "Compile," which generated errors on my local build machine.
But since we don't have to worry about that anymore, it's always a good idea to verify the script is set to the right Build Action before committing your changes and deploying.
- Left-click on the post-deployment script.
- Press F4 for the file properties
- Confirm the Build Action is set to PostDeploy or PreDeploy.
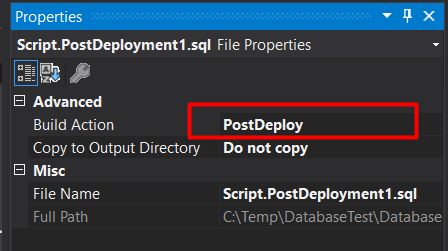
This is what gets compiled into the DACPAC when deployed and runs on Pre or Post Deployment.
Visible Debugging Using PRINTS
This last thing is an informational item.
You may notice in my T4 Script that I have PRINT statements throughout.
On deployment, thesePRINT statements are executed showing the progression of the script. So, if there's an issue on the deploy, you know exactly what statement bombs and where it fails.
It's a helpful hint when deploying through Azure.
Example Deployment of DACPAC
We have deployed using this technique a number of times and it's working quite well.
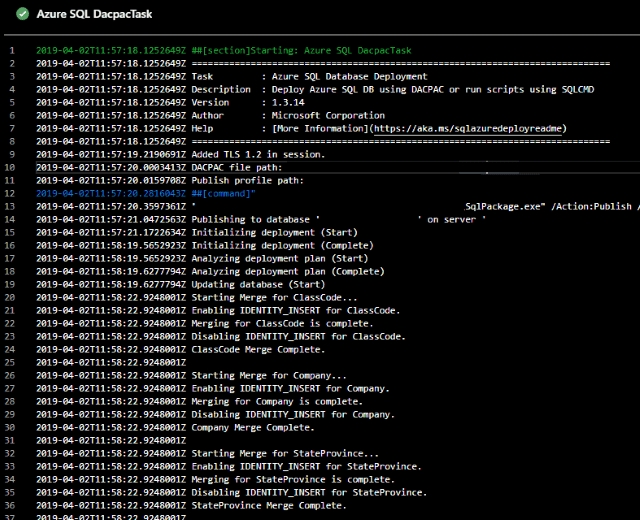
With larger data, we use the BCP command line for deploying the data.
Conclusion
Phew! That's a lot to cover, but it is sooooo worth it.
Pressing a button to deploy a web site, API, Database, AND Data.
Sooo worth it.
How are you deploying your databases and data? Big SQL file? BCP? Um...File Explorer? Post your comments below and let's discuss.
Reference Material
- Continuous Integration and Deployment for SQL Database using SSDT and VSTS
- Continuous Deployment SQL Server Database Changes using Visual Studio and VSTS
- Getting Started with SQL Server and DevOps
- sqlpackage.exe script options?
- SQL Server SQLCMD Basics?

