Implementing the Repository Pattern Using C# and Entity Developer in ASP.NET Core
Introduction
The Repository Pattern is one of the most popular design patterns used for abstracting how data is eventually persisted in the database or retrieved from the database. The basic objective of the Repository Pattern is to help you decouple the data access and business logic layers of an application. This article talks about how we can implement the repository pattern in C# and take advantage of Entity Developer to talk to the database.
Why Should We Use an ORM?
An ORM is an acronym for Object Relational Mapper - it is used to map your domain objects to the objects in the relational model. In other words, it is used to map data between incompatible type systems. Entity Developer from Devart is an ORM designer tool that lets you design your data access layer visually. It sits on top of ADO.NET and simplifies the way you work with data.
Entity Developer supports ADO.NET Entity Framework, Entity Framework Core, Hibernate, LinqConnect, Telerik Data Access, and LINQ to SQL. You can download a copy of Entity Developer and get started.
Prerequisites
To be able to work with the code examples demonstrated in this article, you should have the following installed in your system:
- Visual Studio 2019 Community Edition
- SQL Server 2019 Developer Edition
- Entity Developer
You can download Visual Studio 2019 from here: https://visualstudio.microsoft.com/downloads/
You can download SQL Server 2019 Developer Edition from here: https://www.microsoft.com/en-us/sql-server/sql-server-downloads
You can download a copy of Entity Developer (trial version) from here: https://www.devart.com/entitydeveloper/download.html
Create the Database
Now that the ASP.NET Core Web API project has been created in Visual Studio 2019; the next step is to create the database. Note that for the sake of simplicity we’ll use a database with just two tables with simple design in this example.
Launch the SQL Server Management Studio and create a new database called Demo. Next, use the following script to create two tables named Products and Categories inside the Demo database.
xxxxxxxxxx
CREATE TABLE [dbo].[Products](
[ID] [int] IDENTITY(1,1) NOT NULL,
[ProductName] [nvarchar](40) NOT NULL,
[CategoryID] [int] NOT NULL,
[QuantityPerUnit] [nvarchar](20) NULL,
[UnitPrice] [money] NULL,
[UnitsInStock] [smallint] NULL,
[ReorderLevel] [smallint] NULL,
[Discontinued] [bit] NOT NULL,
CONSTRAINT [PK_Products] PRIMARY KEY CLUSTERED
(
[ID] ASC
)WITH (PAD_INDEX = OFF, STATISTICS_NORECOMPUTE = OFF, IGNORE_DUP_KEY = OFF, ALLOW_ROW_LOCKS = ON, ALLOW_PAGE_LOCKS = ON) ON [PRIMARY]
) ON [PRIMARY]
GO
CREATE TABLE [dbo].[Categories](
[ID] [int] IDENTITY(1,1) NOT NULL,
[CategoryName] [nvarchar](15) NOT NULL,
[Description] [ntext] NULL,
CONSTRAINT [PK_Categories] PRIMARY KEY CLUSTERED
(
[ID] ASC
)WITH (PAD_INDEX = OFF, STATISTICS_NORECOMPUTE = OFF, IGNORE_DUP_KEY = OFF, ALLOW_ROW_LOCKS = ON, ALLOW_PAGE_LOCKS = ON) ON [PRIMARY]
) ON [PRIMARY] TEXTIMAGE_ON [PRIMARY]
GO
Figure 1 shows how these two tables are related.
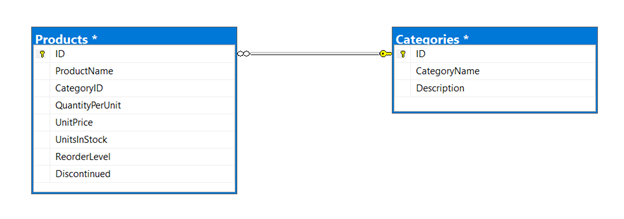
We’ll use this database in the subsequent sections of this article to store, edit, delete, and retrieve data.
Create a New ASP.NET Core Web API Project
Assuming that the necessary software has been installed in your computer to be able to work with Entity Developer, follow the steps outlined below to create a new ASP.NET Core Web API project.
- First off, open the Visual Studio 2019 IDE
- Next, click "Create a new project" once the IDE has loaded
- Click "Create a new project"
- Next, select "ASP.NET Core Web Application"
- Click the "Next" button
- Specify the project name and location - where it should be stored in your system
- Optionally, click the "Place solution and project in the same directory" checkbox.
- Next, click the "Create" button
- In the "Create a new ASP.NET Core Web Application" dialog window that is shown next, select "API" as the project template.
- Select ASP.NET Core 3.1 or later as the version.
- You should disable the "Configure for HTTPS" and "Enable Docker Support" options by disabling the respective checkboxes.
- Since we'll not be using authentication in this example, specify authentication as "No Authentication".
- Finally, click on the "Create" button to finish the process.
Create an Entity Data Model
The next thing you should do is create an entity data model. When you create a model in Entity Developer, there are two options to choose from: Database First (this is selected by default) and Model First. In this example, we’ll take advantage of the Database First approach. Remember to select the “Generate from Database” option to generate your model from the database and select the database objects you would want to be a part of your entity data model.
Follow these steps outlined below to create an entity data model in Entity Developer using the database-first approach.
1. Select your project in the Solution Explorer Window
2. Right-click and select Add->New Item
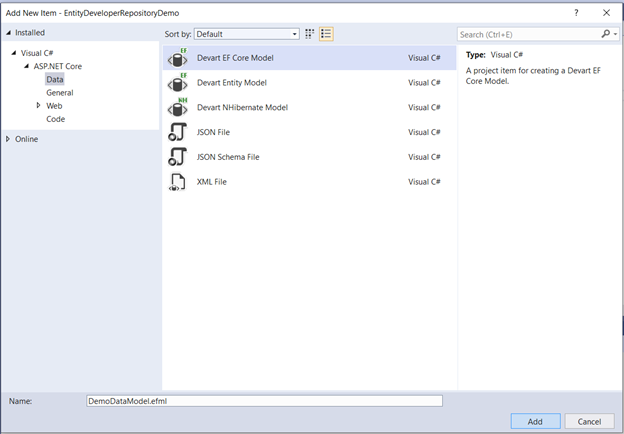
3. Select Devart EF Core Model as the template as shown in Figure 2
4. Specify a name for your entity data model and click Add
5. Specify the connection properties and test the connection
6. Click on the “Next” button to continue.
7. By default, the option “Generate from Database” will be selected. Since we want the model to be created from the database, click on the “Next” button to continue.
8. De-select all options and then specify only the database objects you would like to be a part of the model. Here’s where you should select the Products and Categories tables.
9. In the "Set up naming rules" screen you can optionally specify naming rules for your entities.
10. In the next screen, you can optionally specify the model properties.
11. In the next screen, you can optionally choose the model diagram content.
12. In the next screen, you can optionally specify code generation templates.
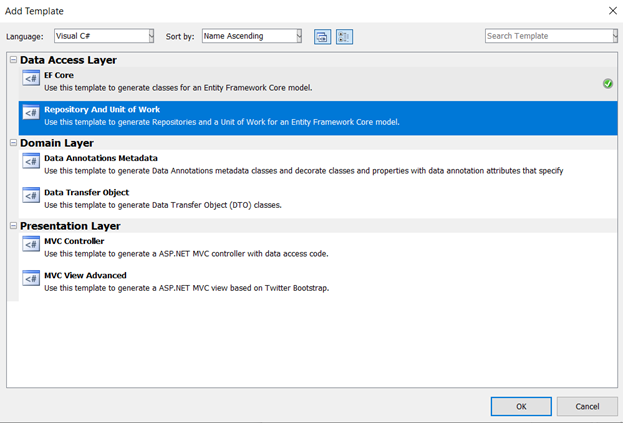
13. Specify Repository and Unit of Work as the code generation template as shown in Figure 3.
14. Lastly, click “Finish” to complete the process.
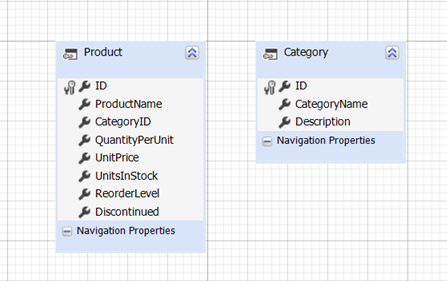
Your ADO.NET Entity Data Model using Entity Developer will be created along with the repository and unit of work classes and interfaces. Here’s how your Entity Data Model would look like.
Generated Classes and Interfaces
Here’s how the Solution Explorer Window would look like – note the generated classes and interfaces.
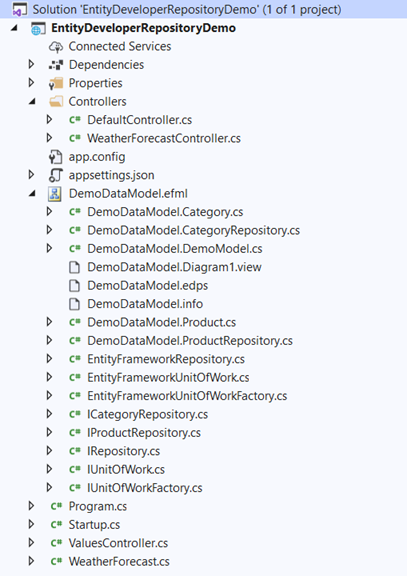
If you observe the generated classes and interfaces in the Solution Explorer Window, you'll find three repository interfaces namely IRepository, IProductRepository, and ICategoryRepository, and three repository classes namely EntityFrameworkRepository, ProductRepository, and CategoryRepository. You'll also observe the Category and Product classes - these are model classes. You'll also observe the IUnitOfWork interface and the EntityFrameworkUnitOfWork and EntityFrameworkUnitOfWorkFactory classes - these are types used for using the unit of work design pattern. In the sections that follow we’ll examine how we can work with these classes and interfaces.
Using the Repository Classes and Interfaces
There are two approaches to building repositories in an application. These include the following: -
- Repository per entity type
- Generic Repository
The easiest approach to implementing the Repository design pattern is to create a repository per business object. The generated repository we used earlier follows this approach. Since we've two tables, there are two business classes namely Product and Category, and you would typically have two classes named ProductRepository and CategoryRepository implementing two interfaces IProductRepository and ICategoryRepository respectively.
The following code snippet shows the IRepository, IProductRepository and ICategoryRepository interfaces.
xxxxxxxxxx
public partial interface IRepository<T>
{
void Add(T entity);
void Remove(T entity);
}
public partial interface IProductRepository : IRepository<Product>
{
ICollection<Product> GetAll();
Product GetByKey(int _ID);
}
public partial interface ICategoryRepository : IRepository<Category>
{
ICollection<Category> GetAll();
Category GetByKey(int _ID);
}
The EntityFrameworkRepository class represents a generic repository and implements the IRepository interface. The ProductRepository class implements the methods declared in the IProductRepository interface and the CategoryRepository class implements the ICategoryRepository interface. Please find these classes below.
xxxxxxxxxx
public partial class EntityFrameworkRepository<T> : IRepository<T> where T : class
{
private DbContext context;
protected DbSet<T> objectSet;
public EntityFrameworkRepository(DbContext context)
{
if (context == null)
{
throw new ArgumentNullException("context");
}
this.context = context;
this.objectSet = context.Set<T>();
}
public virtual void Add(T entity)
{
if (entity == null)
{
throw new ArgumentNullException("entity");
}
objectSet.Add(entity);
}
public virtual void Remove(T entity)
{
if (entity == null)
{
throw new ArgumentNullException("entity");
}
objectSet.Remove(entity);
}
public DbContext Context
{
get
{
return context;
}
}
}
public partial class ProductRepository : EntityFrameworkRepository<Product>, IProductRepository
{
public ProductRepository(DemoModel context) : base(context)
{
}
public virtual ICollection<Product> GetAll()
{
return objectSet.ToList();
}
public virtual Product GetByKey(int _ID)
{
return objectSet.SingleOrDefault(e => e.ID == _ID);
}
public new DemoModel Context
{
get
{
return (DemoModel)base.Context;
}
}
}
public partial class CategoryRepository : EntityFrameworkRepository<Category>, ICategoryRepository
{
public CategoryRepository(DemoModel context) : base(context)
{
}
public virtual ICollection<Category> GetAll()
{
return objectSet.ToList();
}
public virtual Category GetByKey(int _ID)
{
return objectSet.SingleOrDefault(e => e.ID == _ID);
}
public new DemoModel Context
{
get
{
return (DemoModel)base.Context;
}
}
}
You can now take advantage of dependency injection to inject these instances to your controllers. The following code snippet illustrates how you can create instance of the product repository in the ConfigureServices method of the Startup class.
xxxxxxxxxx
public void ConfigureServices(IServiceCollection services)
{
services.AddScoped<ProductRepository>(x =>
{ return new ProductRepository(new DemoModel()); });
services.AddControllers();
}
Use the Repository in the Controller Classes
Now that we’ve the repository class ready, let’s create controller classes and examine how we can use these repositories in them. Follow the steps given below to create the Product and Category controller classes in your project.
- Select the project in the SolutionExplorer Window
- Right-click and click on Add->New Item…
- Select the “API Controller with read/write actions” template
- Specify a name for your controller class
- Click Add to add the new controller to your project
To use the repository instances, we should take advantage of dependency injection to inject an instance of the ProductRepository class as shown in the code snippet given below.
xxxxxxxxxx
public class ProductController : ControllerBase
{
private readonly IProductRepository _productRepository;
public ProductController(IProductRepository
productRepository)
{
_productRepository = productRepository;
}
//Action methods
}
Once the repository instance is available, you can invoke its methods from the action methods in your controller classes to perform CRUD operations against the underlying database.
Use the Generic Repository
The other approach is to use a generic repository – we’ve already looked at it in the earlier section. The generated code contains a generic repository named EntityFrameworkRepository. You should first register an instance of this repository class as a scoped instance so that you can use this instance in all classes in this application.
The following code snippet illustrates how you can create an instance of the generic repository in the ConfigureServices method of the Startup class.
xxxxxxxxxx
public void ConfigureServices(IServiceCollection services)
{
services.AddScoped<IRepository<Product>>(x =>
{ return new EntityFrameworkRepository<Product>(new DemoModel()); });
services.AddControllers();
}
You can now use this generic repository in your controller classes. The following code snippet shows how you can use the generic repository in the controller classes.
xxxxxxxxxx
[Route("api/[controller]")]
[ApiController]
public class ProductController : ControllerBase
{
private readonly IRepository<Product> _repository;
public DefaultController(EntityFrameworkRepository<Product> genericRepository)
{
_repository = genericRepository;
}
//Action methods
}
Use the UnitOfWork Pattern
Unit Of Pattern can be used to create an abstraction layer between the data access layer and the business logic layer of an application - it helps us implement the repository pattern elegantly. The generated classes contain the IUnitOfWork interface and the EntityFrameworkUnitOfWork class. You can take advantage of these types to use UnitOfWork in your controller or business logic classes.
The following code snippet illustrates how you can take advantage of the unit of work to store a product record in the database.
xxxxxxxxxx
using (EntityFrameworkUnitOfWork unitOfWork = new EntityFrameworkUnitOfWork(new DemoModel()))
{
unitOfWork.Context.Add(new Product {ID = 1, CategoryID = 3, Discontinued = false, ProductName = "ABC Laptop",
QuantityPerUnit = 5, ReorderLevel = 20, UnitPrice = 20000.00, UnitsInStock = 100});
unitOfWork.Save();
}
Summary
The Repository Pattern was first introduced as part of Domain-Driven Design in the year 2004. Since then it has become extremely popular and has been the design pattern of choice for abstracting calls from an application to the underlying database.
Proper use of the Repository pattern improves testability, code extensibility, and maintenance. In this article, we’ve examined how we can build a repository and encapsulate all calls to the database using the Entity Developer ORM tool.

