Autoscaling Your Kubernetes Microservice with KEDA
Recently, I've been having a look around at autoscaling options for applications deployed onto Kubernetes. There are quite a few emerging options. I decided to give KEDA a spin. KEDA stands for Kubernetes Event-Driven Autoscaling, and that's exactly what it does.
Introducing KEDA
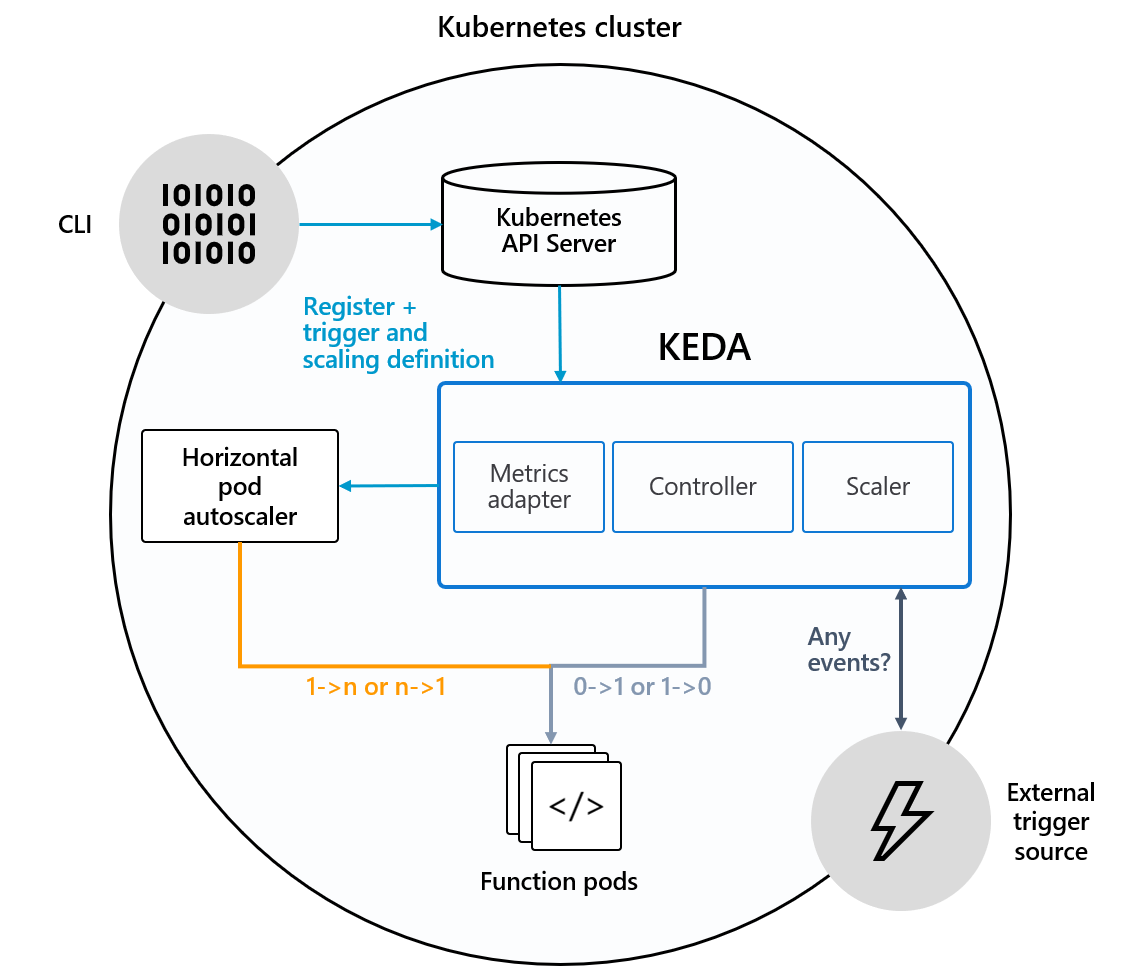
KEDA is a tool you can deploy into your Kubernetes cluster which will autoscale Pods based on an external event or trigger. Events are collected by a set of Scalers, which integrate with a range of applications like:
- ActiveMQ Artemis
- Apache Kafka
- Amazon SQS
- Azure Service Bus
- RabbitMQ Queue
- and about 20 others
To implement autoscaling with KEDA, you firstly configure a Scaler to monitor an application or cloud resource for a metric. This metric is usually something fairly simple, as the number of messages in a queue.
When the metric goes above a certain threshold, KEDA can scale up a Deployment automatically (called “Scaling Deployments”), or create a Job (called “Scaling Jobs”). It can also scale deployments down again when the metric falls, even scaling to zero. It does this by using the Horizontal Pod Autoscaler (HPA) in Kubernetes.
Since KEDA runs as a separate component in your cluster, and it uses the Kubernetes HPA, it is fairly non-intrusive for your application, so it requires almost no change to the application being scaled itself.

There are many potential use cases for KEDA. Perhaps the most obvious one is scaling an application when messages are received in a queue.
Many integration applications use messaging as a way of receiving events. So if we can scale an application up and down based on the number of events received, there's the potential to free up resources when they aren't needed, and also to provide increased capacity when we need it.
This is even more true if we combine something like KEDA with cluster-level autoscaling. If we can scale the cluster's nodes themselves, according to the demand from applications, then this could help save costs.
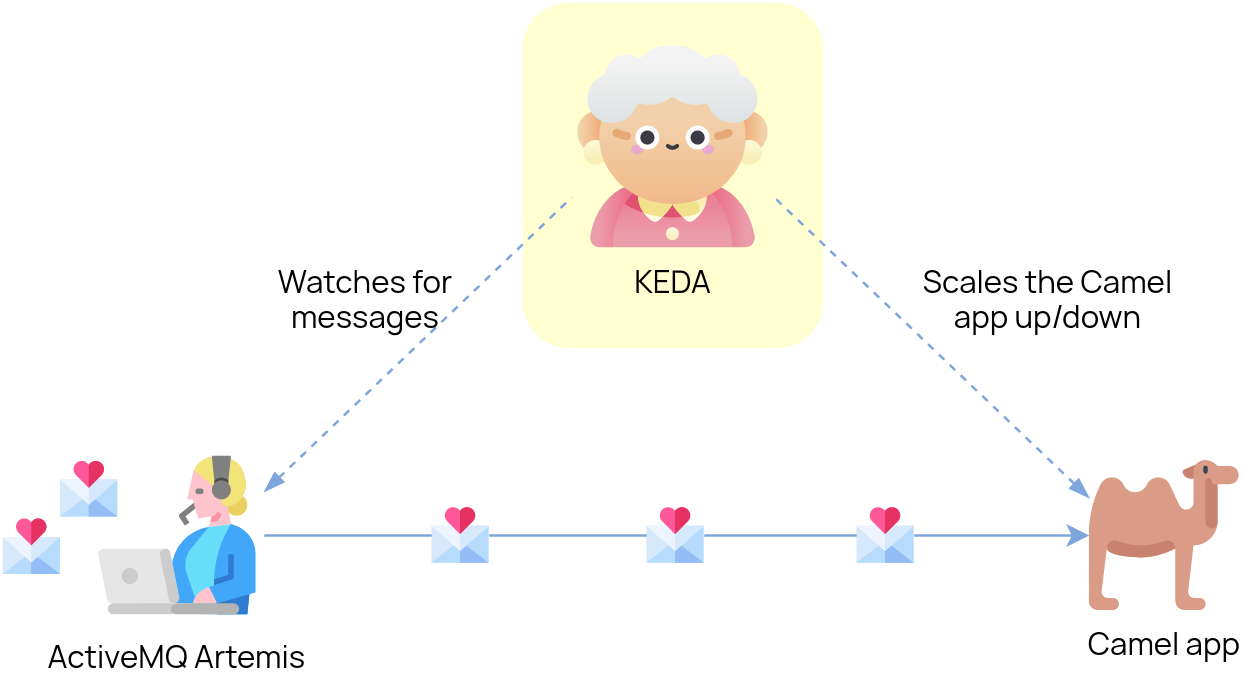
Many of the KEDA scalers are based around messaging, which is a common pattern for integration. When I think of messaging and integration, I immediately think of Apache Camel and Apache ActiveMQ and wanted to explore whether it's possible to use KEDA to scale a simple microservice that uses these popular projects. So let's see what KEDA can do.
Demo - KEDA with Apache Camel and ActiveMQ Artemis
We'll deploy a Java microservice onto Kubernetes which consumes messages from a queue. The application uses Apache Camel as the integration framework and Quarkus as the runtime.
We’ll also deploy an ActiveMQ Artemis message broker, and use KEDA’s Artemis scaler to watch for messages on the queue and scale the application up or down.

Creating the Demo Application
I’ve already created the example Camel application, which uses Quarkus as the runtime. I’ve published the container image to Docker Hub and I use that in the steps further below. But, if you’re interested in how it was created, read on.
Get the code on GitHub
Get the image on Docker Hub
I decided to use Quarkus because it boasts super-fast startup times, considerably faster than Spring Boot. When we’re reacting to events, we want to be able to start up quickly and not wait too long for the app to start.
To create the app, I used the Quarkus app generator.
Quarkus is configured using extensions, so I needed to find an extension that would help me create a connection factory to talk to ActiveMQ Artemis. For this, we can use the Qpid JMS Extension for Quarkus, which wraps up the Apache Qpid JMS client for Quarkus applications. This allows me to talk to ActiveMQ Artemis using the open AMQP 1.0 protocol.
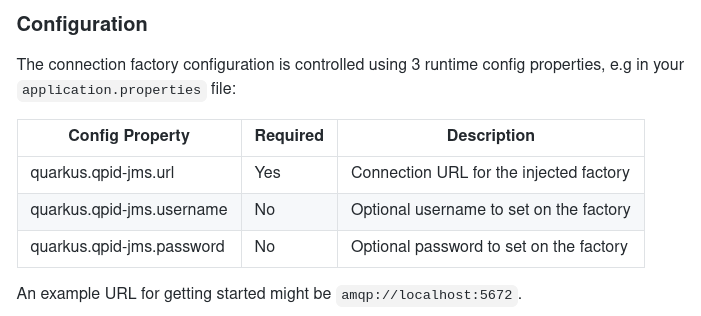
The Qpid JMS extension creates a connection factory to ActiveMQ when it finds certain config properties. You only need to set the properties quarkus.qpid-jms.url, quarkus.qpid-jms.username and quarkus.qpid-jms.password. The Extension will do the rest automatically, as it says in the readme:

Then, I use Camel’s JMS component to consume the messages. This will detect and use the same connection factory created by the extension. The Camel route looks like this:
xxxxxxxxxx
from("jms:queue:ALEX.BIRD")
.log("Honk honk! I just received a message: ${body}");
Finally, I compile the application into a native binary, not a JAR. This will help it to start up very quickly. You need GraalVM to be able to do this. Switch to your GraalVM (e.g. using Sdkman), then:
./mvnw package -Pnative
Or, if you don’t want to install GraalVM, you can tell Quarkus to use a Docker container with GraalVM baked in, to build the native image. You’ll need Docker running to be able to do this, of course:
./mvnw package -Pnative -Dquarkus.native.container-build=true
The output from this is a native binary application, which should start up faster than a typical JVM-based application. Nice. Good for rapid scale-up when we receive messages!
Finally, I build the native binary into a container image with Docker, and push it up to a registry; in this case, Docker Hub. There’s a Dockerfile provided with the Quarkus quickstart to do the build. Then the final step is a docker push:
docker build -f src/main/docker/Dockerfile.native -t monodot/camel-amqp-quarkus .
docker push monodot/camel-amqp-quarkus
Now we’re ready to deploy the app, deploy KEDA, and configure it to auto-scale the app.
Deploying KEDA and the Demo App
1. First, install KEDA on your Kubernetes cluster and create some namespaces for the demo.
To deploy KEDA, you can follow the latest instructions on the KEDA web site, and I installed it using the Helm option:
$ helm repo add kedacore https://kedacore.github.io/charts
$ helm repo update
$ kubectl create namespace keda
$ helm install keda kedacore/keda --namespace keda
$ kubectl create namespace keda-demo
2. Now we need to deploy an ActiveMQ Artemis message broker.
Here’s some YAML to create a Deployment, Service, and ConfigMap in Kubernetes. It uses the vromero/activemq-artemis community image of Artemis on Docker Hub and exposes its console and AMQP ports. I’m customizing it by adding a ConfigMap which:
- Changes the internal name of the broker to a static name:
keda-demo-broker - Defines one queue, called
ALEX.BIRD. If we don’t do this, then the queue will be created when a consumer connects to it, but it will be removed again when the consumer is scaled down, and so KEDA won't be able to fetch the metric correctly anymore. So we define the queue explicitly.
The YAML:
x
$ kubectl apply -f - <<API
apiVersionv1
kindList
items
apiVersionv1
kindService
metadata
creationTimestampnull
nameartemis
namespacekeda-demo
spec
ports
port61616
protocolTCP
targetPort61616
nameamqp
port8161
protocolTCP
targetPort8161
nameconsole
selector
runartemis
status
loadBalancer
apiVersionapps/v1
kindDeployment
metadata
creationTimestampnull
labels
runartemis
nameartemis
namespacekeda-demo
spec
replicas1
selector
matchLabels
runartemis
strategy
template
metadata
creationTimestampnull
labels
runartemis
spec
containers
env
nameARTEMIS_USERNAME
valuequarkus
nameARTEMIS_PASSWORD
valuequarkus
imagevromero/activemq-artemis2.11.0-alpine
nameartemis
ports
containerPort61616
containerPort8161
volumeMounts
nameconfig-volume
mountPath/var/lib/artemis/etc-override
volumes
nameconfig-volume
configMap
nameartemis
apiVersionv1
kindConfigMap
metadata
nameartemis
namespacekeda-demo
data
broker-0.xml
<?xml version="1.0" encoding="UTF-8" standalone="no"?>
<configuration xmlns="urn:activemq" xmlns:xsi="http://www.w3.org/2001/XMLSchema-instance" xsi:schemaLocation="urn:activemq /schema/artemis-configuration.xsd">
<core xmlns="urn:activemq:core" xsi:schemaLocation="urn:activemq:core ">
<name>keda-demo-broker</name>
<addresses>
<address name="DLQ">
<anycast>
<queue name="DLQ"/>
</anycast>
</address>
<address name="ExpiryQueue">
<anycast>
<queue name="ExpiryQueue"/>
</anycast>
</address>
<address name="ALEX.BIRD">
<anycast>
<queue name="ALEX.BIRD"/>
</anycast>
</address>
</addresses>
</core>
</configuration>
API
3. Next, we deploy the demo Camel application and add some configuration.
So we need to create a Deployment. I’m deploying my demo image monodot/camel-amqp-quarkus from Docker Hub. You can deploy my image, or you can build and deploy your image if you prefer.
We use the environment variables QUARKUS_QPID_JMS_* to set the URL, username and password for the ActiveMQ Artemis broker. These will override the properties quarkus.qpid-jms.* in my application’s properties file:
xxxxxxxxxx
$ kubectl apply -f - <<API
apiVersionapps/v1
kindDeployment
metadata
creationTimestampnull
labels
runcamel-amqp-quarkus
namecamel-amqp-quarkus
namespacekeda-demo
spec
replicas1
selector
matchLabels
runcamel-amqp-quarkus
strategy
template
metadata
creationTimestampnull
labels
runcamel-amqp-quarkus
spec
containers
env
nameQUARKUS_QPID_JMS_URL
valueamqp//artemis61616
nameQUARKUS_QPID_JMS_USERNAME
valuequarkus
nameQUARKUS_QPID_JMS_PASSWORD
valuequarkus
imagemonodot/camel-amqp-quarkuslatest
namecamel-amqp-quarkus
resources
API
4. Now we tell KEDA to scale down the pod when it sees no messages and scales it back up when there are messages.
We do this by creating a ScaledObject. This tells KEDA which Deployment to scale, and when to scale it. The triggers section defines the Scaler to be used. In this case, it's the ActiveMQ Artemis scaler, which uses the Artemis API to query messages on an address (queue):
x
$ kubectl apply -f - <<API
apiVersionkeda.k8s.io/v1alpha1
kindScaledObject
metadata
namecamel-amqp-quarkus-scaler
namespacekeda-demo
spec
scaleTargetRef
deploymentNamecamel-amqp-quarkus
pollingInterval30
cooldownPeriod30 # Default: 300 seconds
minReplicaCount0
maxReplicaCount2
triggers
typeartemis-queue
metadata
managementEndpoint"artemis.keda-demo:8161"
brokerName"keda-demo-broker"
username'QUARKUS_QPID_JMS_USERNAME'
password'QUARKUS_QPID_JMS_PASSWORD'
queueName"ALEX.BIRD"
brokerAddress"ALEX.BIRD"
queueLength'10'
API
By the way, to get the credentials to use the Artemis API, KEDA will look for any environment variables which are set on the Camel app's Deployment object. This means that you don’t have to specify the credentials twice. So here I’m using QUARKUS_QPID_JMS_USERNAME and PASSWORD. These identifiers reference the same environment variables on the demo app’s Deployment.
5. Now let’s put some test messages onto the queue.
You can do this in a couple of different ways: either point and click using the Artemis web console, or use the Jolokia REST API.
Either way, we need to be able to reach the artemis Kubernetes Service, which isn’t exposed outside the Kubernetes cluster. You can expose it by setting up an Ingress, or a Route in OpenShift, but I just use kubectl’s port forwarding feature instead. It’s simple. This allows me to access the ActiveMQ web console and API on localhost port 8161:
xxxxxxxxxx
$ kubectl port-forward -n keda-demo svc/artemis 8161:8161
Leave that running in the background.
Now, in a different terminal, hit the Artemis Jolokia API with curl, via the kubectl port-forwarding proxy. We want to send a message to an Artemis queue called ALEX.BIRD.
This part requires a ridiculously long API call, so I’ve added some line breaks here to make it easier to read. This uses ActiveMQ’s Jolokia REST API to put a message in the Artemis queue:
x
curl -X POST --data "{\"type\":\"exec\",\
\"mbean\":\
\"org.apache.activemq.artemis:broker=\\\"keda-demo-broker\\\",component=addresses,address=\\\"ALEX.BIRD\\\",subcomponent=queues,routing-type=\\\"anycast\\\",queue=\\\"ALEX.BIRD\\\"\",\
\"operation\":\
\"sendMessage(java.util.Map,int,java.lang.String,boolean,java.lang.String,java.lang.String)\",\
\"arguments\":\
[null,3,\"HELLO ALEX\",false,\"quarkus\",\"quarkus\"]}" http://quarkus:quarkus@localhost:8161/console/jolokia/
(If you have any issues with this, just use the Artemis web console to send a message; you'll find it at http://localhost:8161/console)
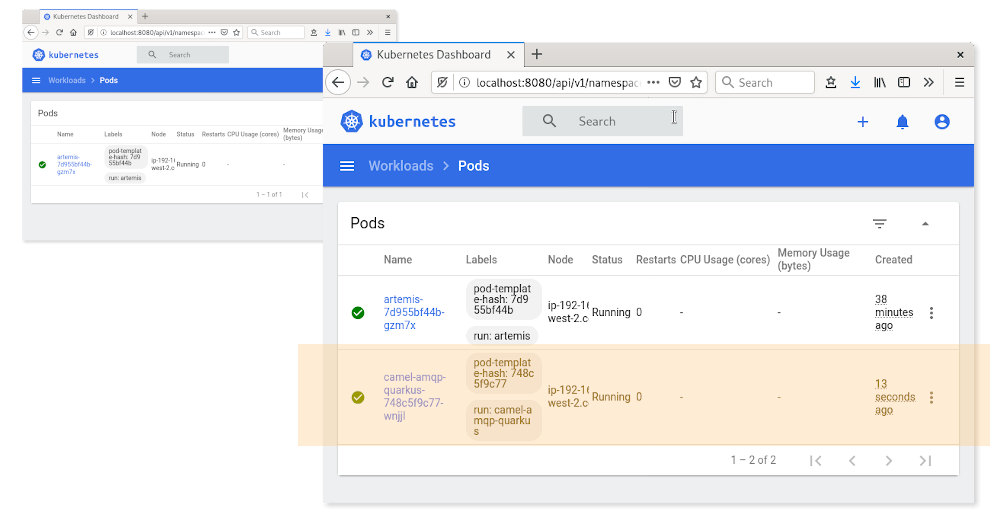
6. Once you've put messages in the queue, you should see the demo app pod starting up and consuming the messages. In the screenshot on the left, there was previously no Pod running, but when a message was sent, KEDA scaled up the application (shown in yellow):

After all, messages are consumed, there will be no messages left on the queue. KEDA waits for the cooldown period (in this demo I’ve used 30 seconds as an example) and then scales down the deployment to zero, so no pods are running.
You can also see this behavior if you watch the pods using kubectl get pods:
xxxxxxxxxx
$ kubectl get pods -n keda-demo -w
NAME READY STATUS RESTARTS AGE
artemis-7d955bf44b-892k4 1/1 Running 0 84s
camel-amqp-quarkus-748c5f9c77-nrf5k 0/1 Pending 0 0s
camel-amqp-quarkus-748c5f9c77-nrf5k 0/1 Pending 0 0s
camel-amqp-quarkus-748c5f9c77-nrf5k 0/1 ContainerCreating 0 0s
camel-amqp-quarkus-748c5f9c77-nrf5k 1/1 Running 0 3s
camel-amqp-quarkus-748c5f9c77-nrf5k 1/1 Terminating 0 30s
camel-amqp-quarkus-748c5f9c77-nrf5k 0/1 Terminating 0 32s
camel-amqp-quarkus-748c5f9c77-nrf5k 0/1 Terminating 0 43s
camel-amqp-quarkus-748c5f9c77-nrf5k 0/1 Terminating 0 43s
Conclusion
KEDA is a useful emerging project for autoscaling applications on Kubernetes and it's got lots of potential uses. I like it because of its relative simplicity. It's very quick to deploy and non-intrusive to the applications that you want to scale.
KEDA makes it possible to scale applications based on events, which is something that many product teams could be interested in, especially with the potential savings on resources.

