Selenium Python Tutorial: Getting Started With BDD In Behave
As technology becomes more complex, the number of people who actually understand it decreases. With Selenium test automation, the story is not so different, key stakeholders in a project, with the nontechnical background but with more insight into customer demand and use cases, might find it difficult to contribute to the process.
Wouldn’t it be great, if the testers, developers, product managers, business managers, and other stakeholders in a project could sit under one roof to unearth new test cases, user stories and bugs for ensuring awesome product quality?
Well, this is not that far fetched! With Python Behave, a BDD (Behavior Driven Development) framework, written in plain language, you can help stakeholders to easily understand the logic in the test scripts.
In this Selenium Python tutorial, I’ll give you a detailed look at performing Selenium test automation with Python Behave, a behavior-driven test automation framework.
Below are the sub-topics covered as a part of this Selenium Python tutorial:
What Is BDD in Python Behave?
Behavior Driven Development (BDD) is an extension of TDD (Test Driven Development) used for automated browser testing. As per BDD, the implementation of functionality comes at a later stage as tests should be created first. Insightful discussions and conversations form the base of BDD as all the stakeholders (technical and non-technical) work towards creating effective Selenium test automation cases that are in-line with the feature requirements.
As a developer or tester, you may have a doubt about the scenarios when you need to select BDD over TDD. TDD is ideal when a single unit has to be tested and you are not looking at performing regression testing anytime sooner. Complexities multiply and working implementation might fail if different modules are integrated. This is where BDD can be used as it is best suited for integration testing or behavior testing.
The best part about behavior tests is that the tests are derived from features and business specifications, unlike other testing methodologies where technical specifications form the base of the test code. BDD stands on the pillar of effective communication/conversation and everything apart from that is optional.
BDD is also considered as another variation of ATDD (Acceptance Test Driven Development); the fundamental difference is that in BDD, the major focus is on behavior rather than tests.
Test Scenarios In BDD
The main advantage of using BDD is that the language used in writing the test scenarios is simple in nature. Once you have an in-depth understanding about creating Selenium test automation scenarios, you can easily understand a BDD test that is written with some other BDD test framework e.g. SpecFlow, Cucumber, etc.
Before writing Selenium test automation scripts, developers first have to come up with user stories. A good user story will be vital in documenting the feature and executing the acceptance tests.
Scenarios in BDD indicates how a particular feature should behave depending on the input parameters supplied to the test. Irrespective of the BDD test framework being used, the overall format of a feature file still remains the same.
For creating scenarios, Gherkin, a domain-specific language, is used for implementing the Selenium test automation scenarios. Unlike other testing methodologies that are based on technical specifications, scenarios in BDD are based on business and feature requirements as they can be well understood by technical as well as the non-technical crowd. BDD is not restricted to Python Behave but is also used in other frameworks such as Cucumber for Selenium testing.
Advantages of BDD
There are several benefits of using BDD; some of the major ones are listed below:
BDD ensures that all the necessary project stakeholders are on the same page and collectively work towards making the product better via testing.
As the tests are written in Gherkin i.e. a simple language, every team member can participate in test creation, as the Selenium test automation scenarios written in plain language in Gherkin. Learn more about business-driven development with Gherkin.
BDD tests are more reusable and modular when compared to TDD tests as changes in the business or feature specification will lead to minimal changes in the corresponding BDD features and scenarios.
As the emphasis is laid on business and feature specification, BDD tests have an improved shelf-life in comparison to TDD
BDD Scenarios and Feature Files in Gherkin
Tests in BDD are based on the principles of ‘Given, When, Then’. The simplified syntax of Gherkin is below:
Scenario: Title/Short Description
Given [A Precondition]
When [Some Event]
Then [Some Outcome]
Suppose, you want to search for LambdaTest on the search engine DuckDuckGo, the test scenario will be,‘Performing search for LambdaTest’ on DuckDuckGo, and the user story will include the ideal usage of Gherkin keywords to achieve the end result.
xxxxxxxxxx
Feature: LambdaTest search
Scenario: Search for LambdaTest on DuckDuckGo
Given I am on the DuckDuckGo homepage
When I enter search term as LambdaTest
Then Search results for LambdaTest should appear
The example is shown above in this Selenium Python tutorial makes use of the most frequently used Gherkin keywords i.e. Given, When, and Then. Detailed information about the keywords being used is below in this Selenium Python tutorial:
Feature keyword — Provides a high-level description of the software feature.
Scenario keyword — Indicates the title of the test case.
Given keyword — Describes a set of pre-conditions for the Selenium test automation scenario. In the above example for the Selenium Python tutorial, the precondition is that the user should be on the DuckDuckGo homepage.
When keyword — Describes the scenario steps. This is where the execution takes place. As shown above, the user should enter the search-term before performing the search operation.
Then keyword — Describes the Scenario outcome. Validation is also done in this step. Search results for LambdaTest should appear in the search window.
And — Used to provide additional steps. It is used along with other keywords such as Given, When, and Then.
Feature files in Gherkin are plain simple text files that have a .feature extension and can be pivotal in business-driven development. A feature file can contain one or more scenarios. Relevant Tags (@Tag) are used to differentiate between different Scenarios. Shown below in this Selenium Python tutorial, is a simple feature file that consists of two Scenarios — Search for the keyword LambdaTest on Google and Search for the keyword LambdaTest on DuckDuckGo.
xxxxxxxxxx
Feature: Search using Google and DuckDuckGo
Search for LambdaTest on Google
Search for LambdaTest on DuckDuckGo
Compare the results
: Search for LambdaTest on DuckDuckGo
Given I am on the DuckDuckGo homepage
When I enter search term as LambdaTest
Then Search results for LambdaTest should appear
Scenario: Search for LambdaTest on Google
Given I am on the Google homepage
When I enter search term as LambdaTest
Then Search results for LambdaTest should appear
Getting Started With Behave In Python For Behaviour Testing
In this Selenium Python tutorial, I’ll show you how to use the BDD test framework called Behave with Selenium and Python particularly for automated browser testing related scenarios.
What Is Behave in Python?
Behave is a behavior-driven test framework that is largely similar to other BDD test frameworks such as Cucumber, SpecFlow, Cucumber-JVM, etc. Being a BDD test framework, Python Behave is fundamentally different from other popular Selenium Python test frameworks such as pytest, pyunit, etc.
Feature files in Python Behave are similar to test scripts. Hooks in environment.py and fixtures can insert helper logic for Selenium test automation execution.
Context in Python Behave
Context is a very important feature in Python Behave where the user and Behave can store information to share around. It holds the contextual information during the execution of tests. It is an object that can store user-defined data along with Python Behave-defined data, in context attributes. It runs at three levels (feature, scenario, and test) that is automatically managed by Python Behave.
A new layer is added to the context whenever Python Behave launches into a new feature or scenario. This allows the new activity level to add new values or overwrite the ones that were previously defined for the duration of that activity. This can be called scopes.
Values can be defined in the environmental controls file i.e. environment.py that may be set at a feature level and then overridden for some scenarios. Changes made at a scenario level do not permanently affect the value set at the feature level. Context variable in all cases is an instance of behave.runner.Context.
Environmental Controls (environment.py) In Python Behave
Environment.py is an environment file with Python Behave hooks. It can be used to define code that should be executed before and after the occurrence of certain events during the Selenium test automation cycle.
Some of the common environmental controls that can be used in Python Behave are below:
before_step(context, step), after_step(context, step) — Executed before and after every step.
before_scenario(context, scenario), after_scenario(context, scenario) — Executed before and after every scenario.
before_scenario(context, feature), after_scenario(context, feature) — Executed before and after every feature.
before_all(context), after_all(context) — Executed before and after the execution of the entire test cycle. In the Selenium test automation examples demonstrated below, we would make use of before_all and after_all for allocating and deallocating resources required for the test execution.
How To Install Python Behave and Other Dependencies For Selenium Test Automation
Before installing Python Behave, the pre-requisites should be installed on the machine. The official support for Behave is for Python 2 but it works perfectly fine with Python 3.x. For the demonstration of automated browser testing with Behave and Selenium, we would be using the test machine with the Windows 10 operating system.
Python for Windows can be downloaded from here. The IDE (Integrated Development Environment) I’ll use is PyCharm (Community Edition) which can be downloaded from the PyCharm website.
As the Selenium framework is used with Python Behave, you also need to install the Selenium WebDriver for the web browser on which Selenium test automation is performed. Selenium WebDriver for popular web browsers can be downloaded from the following locations:
Browser |
Download location |
Opera |
https://github.com/operasoftware/operachromiumdriver/releases |
Firefox |
https://github.com/mozilla/geckodriver/releases |
Chrome |
http://chromedriver.chromium.org/downloads |
Internet Explorer |
https://github.com/SeleniumHQ/selenium/wiki/InternetExplorerDriver |
Microsoft Edge |
https://blogs.windows.com/msedgedev/2015/07/23/bringing-automated-testing-to-microsoft-edge-through-webdriver/ |
After installing the required prerequisites completed, you can now install Python Behave framework. There are several ways using which you can install Python Behave on your machine.
a. Using Pip Command
Execute the following command on the terminal
pip install behave
b. Using the Python Behave Source Distribution
Once the behave source distribution is unpacked, enter the newly created “behave-<version>” directory and execute the following command:
python setup.py install
c. Using the Github Repository
Run the following command on the terminal to install the latest version of behaving from the GitHub repository.
pip install git+https://github.com/behave/behave
Directory (Project) Structure
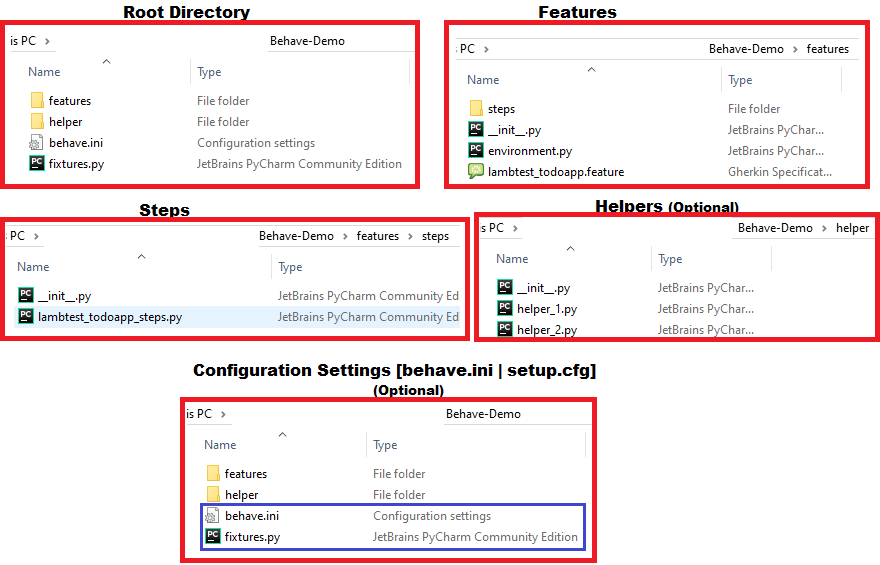
As files of different types are present in any project that uses Python behave, the framework has a stringent directory structure. This opinionated project structure comes handy when adding new features to an existing project as files are placed in specific folders in the structure. If the project requirement is not complex, you can still do away with the structure and use a single folder for all the file types. However, maintaining a uniform project structure helps in the maintainability of the project.
The entire implementation should be present under the ‘features’ directory.
Feature files (*.feature) should be present in the ‘features’ directory, including ‘environment.py’ (that contains the necessary hooks for initialization and de-initialization).
The implementation of step definitions should be present in the features/steps directory.
In this Selenium Python tutorial, I’ll demonstrate Selenium test automation scenarios hence; we would have configuration settings that will be located either in .ini/.cfg files.
The overall directory structure for this Selenium Python tutorial is shown below:
xxxxxxxxxx
[Root Directory]
| ‐‐------------------- Core Implementation
| ---------------------- [features]
| | -------------- environment.py
| | -------------- *.feature
| | -------------- [steps]
| | -------------- *_steps.py
| ---------------------- [helpers]
| | -------------- *.py
| ---------------------- [Config Settings (behave.ini | setup.cfg | .behaverc)]
You can see the snapshot of the project directory below, to be used in this Selenium Python tutorial.
How To Run Tests On Behave and Selenium WebDriver?
In this section of the Selenium Python tutorial, we will look into the usage of Python Behave framework with Selenium WebDriver for scenarios related to automated browser testing.
ToDoApp: Testing With Behave and Selenium WebDriver
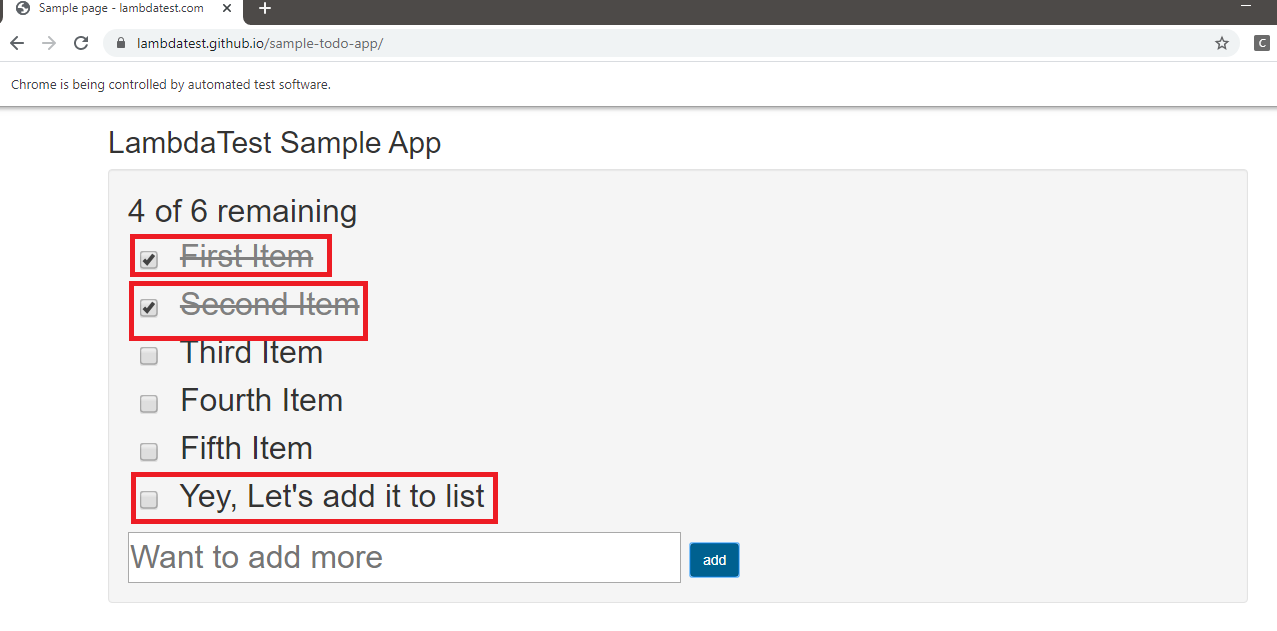
To demonstrate the usage of Python Behave with local Selenium WebDriver, I’ll take the example of a simple to-do app. Shown below in this in this Selenium Python tutorial are more details about the overall test:
Navigate to the to-do app using the Chrome WebDriver.
Mark the first two items as Done i.e. Check those two items.
Add a new item — Yey, Let's add it to list
Click Add button to add that new item to the list
Implementation
The overall implementation process for this Selenium Python tutorial is subdivided into simple steps
Project creation
Feature file creation
Creating the Configuration Settings (behave.ini | setup.cfg)
Creating Helper Functions
Creating environmental controls file (environment.py)
Creating Step Definitions for each Scenario Step
Execution
Let’s look into each of these sub-tasks for the Selenium Python tutorial in more detail:
1. Projection Creation — Create a new project in PyCharm using the File -> New Project option. Before creating the project, you have to ensure that the prerequisites i.e. Python, Behave are installed on the machine.
2. Feature File Creation — All the Gherkin feature files should be present in the features\steps directory. We make use of Then, When, and Then keywords to come up with ToDoApp.feature.
The prerequisite is that the user has to be present on the ToDo app. Hence, the Scenario step starts with the Given keyword.
Given that I am on the LambdaTest Sample app
Shown below is the Feature file for the ToDo app — Scenario steps are created based on the tasks that have to be performed in the test i.e. Click on the first checkbox and second checkbox and mark as Done.
xxxxxxxxxx
Feature: Test to add item
Scenario: Test Advance boy
Given I go to 4davanceboy to add item
Then I Click on first checkbox and second checkbox
When I enter item to add
When I click add button
Then I should verify the added item
3. Creating the Configuration Settings (behave.ini | setup.cfg) — Configuration files (behave.ini, setup.cfg, tox.ini, and .behaverc) in Python Behave do not have problems like fixtures and can be used to set up the environment.
In behave.ini, the values under [behave.userdata] tag are user-defined environment variables. In setup.cfg, user-defined environment variables are under the [Environment] tag.
In our example, the browser on which testing is performed is Chrome and a new environment variable ‘Browser’ is defined in setup.cfg.
[Environment] Browser = chrome
4. Creating Helper Functions - Interaction with the web elements on a web page is performed through the corresponding browser’s Selenium WebDriver. You could directly use the Selenium WebDriver APIs for Python in the Selenium test automation implementation however it would lead to repetitive code. Also, it makes the code a lot less maintainable.
Hence, I created Helper functions (or wrapper functions) that internally calls the corresponding Selenium WebDriver APIs for Python. As all of the elements on a web page might not be loaded simultaneously, an explicit wait in Selenium has to be performed before any action is performed on the web element.
WebDriverWait class is used to define wait depending on certain conditions before proceeding further in the code. Along with wrapper for Selenium WebDriverWait, we create wrapper functions for performing actions such as creating a Selenium WebDriver (open), releasing the resources allocated by Selenium WebDriver (close), locating elements by XPath, locating elements by ID, etc.
xxxxxxxxxx
from selenium.webdriver.common.by import By
from selenium.webdriver.support.wait import WebDriverWait
from selenium.webdriver.support import expected_conditions as EC
class HelperFunc(object):
__TIMEOUT = 10
def __init__(self, driver):
super(HelperFunc, self).__init__()
self._driver_wait = WebDriverWait(driver, HelperFunc.__TIMEOUT)
self._driver = driver
def open(self, url):
self._driver.get(url)
def maximize(self):
self._driver.maximize_window()
def close(self):
self._driver.quit()
# Helper functions that are used to identify the web locators in Selenium Python tutorial
def find_by_xpath(self, xpath):
return self._driver_wait.until(EC.visibility_of_element_located((By.XPATH, xpath)))
def find_by_name(self, name):
return self._driver_wait.until(EC.visibility_of_element_located((By.NAME, name)))
def find_by_id(self, id):
return self._driver_wait.until(EC.visibility_of_element_located((By.ID, id)))
In the constructor, instance of the variable self._driver_wait has reference to instance of the Selenium WebDriverWait class (i.e. class selenium.webdriver.support.wait.WebDriverWait). self._driver_wait is used in all the helper functions to ensure that the corresponding web element is loaded before any operation to search for the element via XPath, ID, etc. is performed on the page.
xxxxxxxxxx
def __init__(self, driver):
super(HelperFunc, self).__init__()
self._driver_wait = WebDriverWait(driver, HelperFunc.__TIMEOUT)
self._driver = driver
def open(self, url):
self._driver.get(url)
To start the Selenium WebDriver, we can make use of behave fixtures. Like pytest fixtures, fixtures in behavior are also functions that are mainly used to execute code related to initialization, configuration, and cleanup activity in the test cycle. Fixtures have a scope that is defined using the tag @fixture. Fixtures when used in scenarios related to automated browser testing have a huge disadvantage — browser instances will open and close for every scenario/feature with the @fixture tag. It is not a good option when the test has to be performed across different types and versions of web browsers.
In this Selenium Python Tutorial, the environment function is used to start the WebDriver. The access to the Web instance is done through the before_all environment function in environment.py
xxxxxxxxxx
from selenium import webdriver
from helper.helper_base import HelperFunc
def get_browser(browser):
if browser == "chrome":
return HelperFunc(webdriver.Chrome())
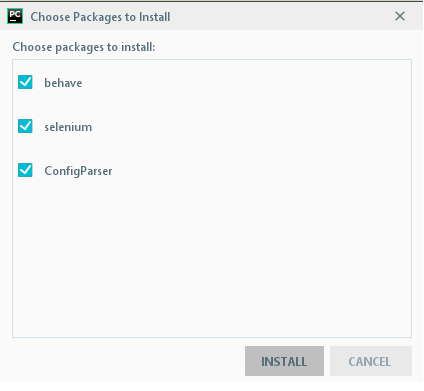
5. Creating environmental controls file (environment.py) — The required hooks that have to be executed before and after the Selenium test automation cycle are defined in environment.py. As a configuration file (setup.cfg) is used to define user-defined environment variables, the ConfigParser module has to be used to parse the contents of the .cfg file. PyCharm will prompt to install the necessary dependencies once the project is loaded.
xxxxxxxxxx
from behave.fixture import use_fixture_by_tag
from selenium import webdriver
import os
from configparser import ConfigParser
from selenium.webdriver.common.keys import Keys
import time
from behave.fixture import use_fixture_by_tag
from helper.helper_web import get_browser
def before_all(context):
config = ConfigParser()
print((os.path.join(os.getcwd(), 'setup.cfg')))
my_file = (os.path.join(os.getcwd(), 'setup.cfg'))
config.read(my_file)
# Reading the browser type from the configuration file for Selenium Python Tutorial
helper_func = get_browser(config.get('Environment', 'Browser'))
context.helperfunc = helper_func
# Local Chrome WebDriver
#if context.browser == "chrome":
# context.driver = webdriver.Chrome()
def after_all(context):
context.helperfunc.close()
The browser on which tests have been performed are read from the ‘Browser’ variable defined in setup.cfg in [Environment] section
xxxxxxxxxx
my_file = (os.path.join(os.getcwd(), 'setup.cfg'))
config.read(my_file)
# Reading the browser type from the configuration file for Selenium test automation
helper_func = get_browser(config.get('Environment', 'Browser'))
Resources allocated for Selenium test automation are freed as part of the after_all control. As seen in the implementation below, the environment functions (or helper functions) are used to perform the clean-up activity.
xxxxxxxxxx
def after_all(context):
context.helperfunc.close()
6. Creating Step Definitions for each Scenario Step — Each scenario step is mapped to a decorated Python function called a step definition. Shown below in this Selenium Python tutorial is a snippet of a scenario step bound with step definition:
Scenario Step -
Given I go to 4davanceboy to add item
Step Definition -
xxxxxxxxxx
('I go to 4davanceboy to add item')
def step(context):
context.helperfunc.open('https://lambdatest.github.io/sample-todo-app/')
context.helperfunc.maximize()
The complete implementation of step definitions for this Selenium Python tutorial is below:
xxxxxxxxxx
#Python Behave testing example for Selenium test automation
from selenium import webdriver
import os
from configparser import ConfigParser
from selenium.webdriver.common.keys import Keys
import time
from behave import given, when, then
('I go to 4davanceboy to add item')
def step(context):
context.helperfunc.open('https://lambdatest.github.io/sample-todo-app/')
context.helperfunc.maximize()
('I Click on first checkbox and second checkbox')
def click_on_checkbox_one(context):
context.helperfunc.find_by_name('li1').click()
context.helperfunc.find_by_name('li2').click()
('I enter item to add')
def enter_item_name(context):
context.helperfunc.find_by_id('sampletodotext').send_keys("Yey, Let's add it to list")
('I click add button')
def click_on_add_button(context):
context.helperfunc.find_by_id('addbutton').click()
('I should verify the added item')
def see_login_message(context):
added_item = context.helperfunc.find_by_xpath("//span[@class='done-false']").text
time.sleep(10)
if added_item in "Yey, Let's add it to list":
return True
else:
return False
As seen in the above implementation for this Selenium Python tutorial, the Context object is used to access the helper/environment functions. The respective helper functions are used for invoking the web browser, opening the test URL, locating respective elements on the page, and performing necessary actions on those elements after they are loaded on the page.
The elements can be located using the Inspect tool in Chrome/Firefox browser.
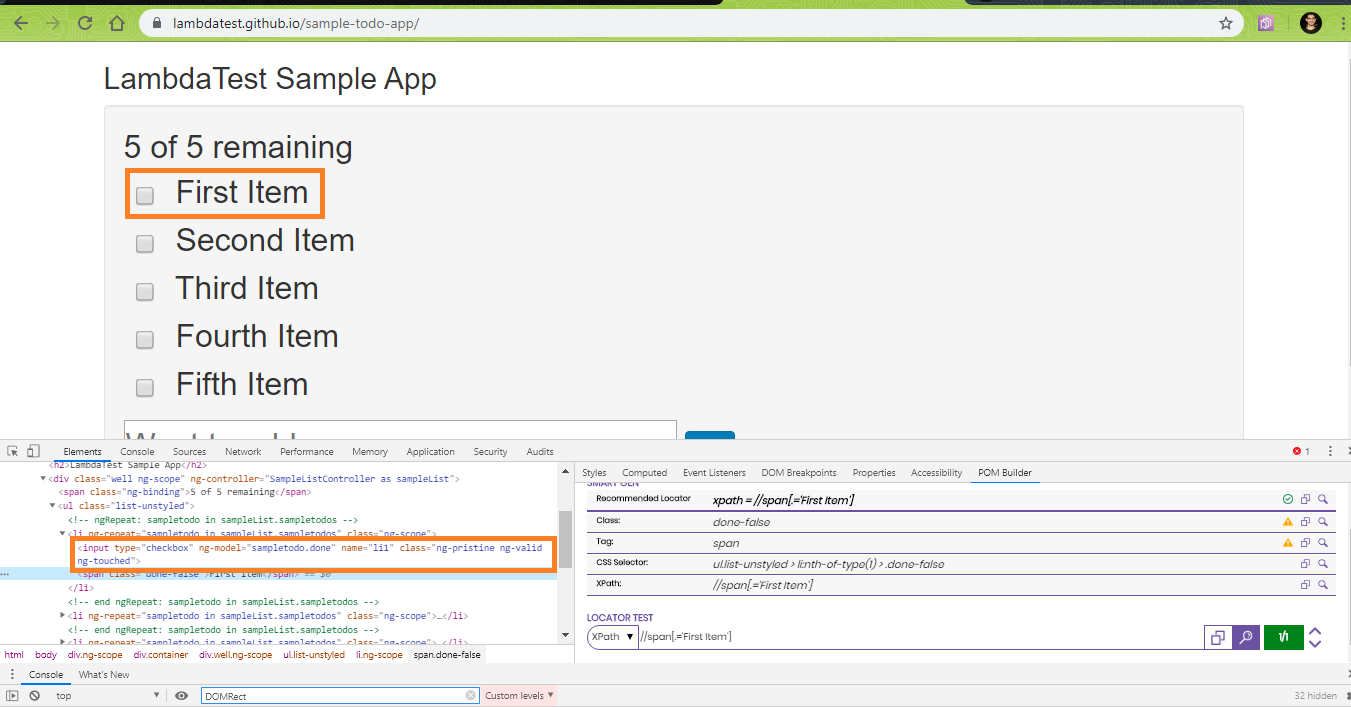
As a part of the step definition for the step I Click on the first checkbox and second checkbox, the two checkbox elements are located using the Name locator. Once located, a click operation is performed on those elements.
xxxxxxxxxx
('I Click on first checkbox and second checkbox')
def click_on_checkbox_one(context):
context.helperfunc.find_by_name('li1').click()
context.helperfunc.find_by_name('li2').click()
7. Execution — For executing the newly implemented BDD tests, we use the command-line tool behave that can be configurable using configuration files and also has a bunch of command-line arguments.
For execution, your current directory should be the one that contains the source code, folders — features, helper, etc.
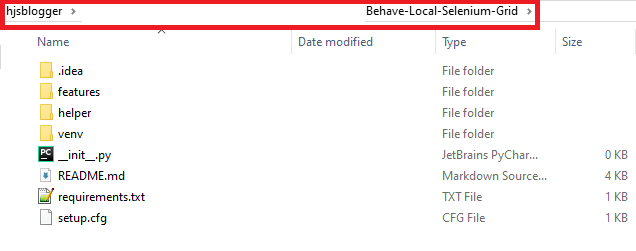
Python Behave supports several command-line arguments. Execute the help command to know more about those options.
behave --help
The feature file is located in features\ToDoApp.feature. Run the following command on the terminal to trigger the execution of the feature file.
behave features\ToDoApp.feature
Shown below is the execution snapshot of the Selenium test automation performed using the local WebDriver:
Using Python Behave With Cloud Selenium Grid
Selenium test automation with local Selenium Grid can be used for testing on a countable number of browser and OS combinations. Having an in-house infrastructure that houses machines with different browser types, browser versions, and operating systems can be very costly. It is also not a scalable approach.
Automated browser testing for web products is extremely important as it helps improve the test coverage, in turn, the product quality. A more scalable approach is to use cross-browser testing on the cloud as tests can be performed across a large number of browser and platform combinations.
The effort involved in porting an existing implementation on the local Selenium grid to a cloud-based remote Selenium grid is minimal as the changes are majorly related to the infrastructure. Once you have created an account on LambdaTest, you have to make a note of the user-name and access-key from the Profile Section since that combination is used for accessing the Cloud Selenium Grid. The Dashboard is used to view all the details related to the tests performed on the remote Selenium grid. The capabilities generator is used to generate the desired browser and platform capabilities that will be used for automated browser testing.
ToDoApp: Testing With Python Behave and Remote Selenium WebDriver
To demonstrate the usage of Python Behave with remote Selenium WebDriver, we use the same test scenario of ToDoApp. The steps that have to be performed in the tests also remain the same.
|
Implementation
The existing code has to be changed to make it work on the Cloud Selenium grid. The core logic of the test scenarios remains unchanged. Below are the major changes in the implementation in this Selenium Python tutorial:
For demonstrating the usage of behave.ini, setup.cfg will not be used for creation of the configuration settings. Like setup.cfg, behave.ini will also be present in the parent directory that contains the test code.
As a different configuration setting is used, corresponding changes have to be made in the implementation. The files that have to be added/changed are below:
xxxxxxxxxx
Add – behave.ini
Modify — helper\helper_web.py
Modify — features\environment.py
Modify — features\steps\ToDoApp_steps.py
The tests have to be performed on Chrome (version — 76.0) for Windows 10 platform. The required capabilities can be generated using the LambdaTest capabilities generator.
xxxxxxxxxx
capabilities = {
"build" : "your build name",
"name" : "your test name",
"platform" : "Windows 10",
"browserName" : "Chrome",
"version" : "76.0"
}
The capabilities will be a part of the behave.ini file and the corresponding entries from the ini file are read in the get_browser API (defined in helper\helper_web.py).
1. Creating the Configuration Settings (behave.ini)
Shown below are the contents of behave.ini:
xxxxxxxxxx
[behave]
stderr_capture = False
stdout_capture = False
[behave.userdata]
name = user-name@gmail.com
app_key = access_key
platform = Windows 10
browser = chrome
browser_version = 76.0
Instead of just the browser name (i.e. Chrome) which was included in the configuration setting for test using local Selenium WebDriver, here the other browser capabilities along with the LambdaTest credentials are present. The user-name and access-key combination can be obtained from the Profile Section on LambdaTest.
Hence, the context object contains more information when compared to the corresponding test that used local Selenium WebDriver.
2. Creating appropriate Helper Functions (helper_web.py)
Along with the browser, four more arguments are added to the get_browser API. These additional arguments are in-line with the parameters present under [behave.userdata] section of behave.ini.
xxxxxxxxxx
from selenium import webdriver
from helper.helper_base import HelperFunc
caps = {}
def get_browser(browser, browser_version, platform, user_name, access_key):
remote_url = "https://" + user_name + ":" + access_key + "@hub.lambdatest.com/wd/hub"
caps['name'] = "[LambdaTest] [Behave] ToDo Application using Behave and Selenium"
caps['build'] = "[LambdaTest] [Behave] ToDo Application using Behave and Selenium"
caps['browserName'] = browser
caps['version'] = browser_version
caps['platform'] = platform
caps['network'] = True
caps['visual'] = True
caps['video'] = True
caps['console'] = True
if browser == "chrome":
# return Web(webdriver.Chrome())
return HelperFunc(webdriver.Remote(command_executor=remote_url, desired_capabilities=caps))
For simplification, we have used the test browser like Chrome. Instead of using local Selenium WebDriver, remote Selenium WebDriver for Chrome is invoked. The browser capabilities are passed along with the remote_url that contains the location of the remote Selenium grid.
xxxxxxxxxx
def get_browser(browser, browser_version, platform, user_name, access_key):
remote_url = "https://" + user_name + ":" + access_key + "@hub.lambdatest.com/wd/hub"
……………………………………………………………………………………………………………………………….
……………………………………………………………………………………………………………………………….
if browser == "chrome":
# return Web(webdriver.Chrome())
return HelperFunc(webdriver.Remote(command_executor=remote_url, desired_capabilities=caps))
3. Creating environmental controls file (environment.py)
Apart from the currently set browser variable, we defined the browser_version and the platform in the [behave.userdata] section of behave.ini.
xxxxxxxxxx
from behave.fixture import use_fixture_by_tag
from selenium import webdriver
import os
from configparser import ConfigParser
from selenium.webdriver.common.keys import Keys
import time
from behave.fixture import use_fixture_by_tag
from helper.helper_web import get_browser
caps = {}
def before_all(context):
caps['browserName'] = context.config.userdata['browser']
caps['version'] = context.config.userdata['browser_version']
caps['platform'] = context.config.userdata['platform']
helper_func = get_browser(caps['browserName'], caps['version'], caps['platform'], context.config.userdata['name'],
context.config.userdata['app_key'])
context.helperfunc = helper_func
def after_all(context):
context.helperfunc.close()
The values from the [behave.userdata] section (in behave.ini) are read using config.userdata['attribute_name'] in before_all hook. These values are also added to the context object as they would be used during the entire testing cycle.
xxxxxxxxxx
def before_all(context):
caps['browserName'] = context.config.userdata['browser']
caps['version'] = context.config.userdata['browser_version']
caps['platform'] = context.config.userdata['platform']
helper_func = get_browser(caps['browserName'], caps['version'], caps['platform'], context.config.userdata['name'],
context.config.userdata['app_key'])
4. Creating Step Definitions for each Scenario Step (features\steps\ToDoApp_steps.py)
Though there are no major changes in the file that contains the step definitions, a small change is done to suppress urllib3 warnings.
xxxxxxxxxx
from selenium import webdriver
import os
from configparser import ConfigParser
from selenium.webdriver.common.keys import Keys
import time
from behave import given, when, then
import urllib3
urllib3.disable_warnings()
('I go to 4davanceboy to add item')
def step(context):
context.helperfunc.open('https://lambdatest.github.io/sample-todo-app/')
context.helperfunc.maximize()
........................................................
........................................................
........................................................
For executing the tests on the remote Selenium grid, we trigger the same Python behave command on the terminal
behave features\ToDoApp.feature
Shown below is the execution snapshot on LambdaTest for the test performed using the remote Selenium WebDriver:
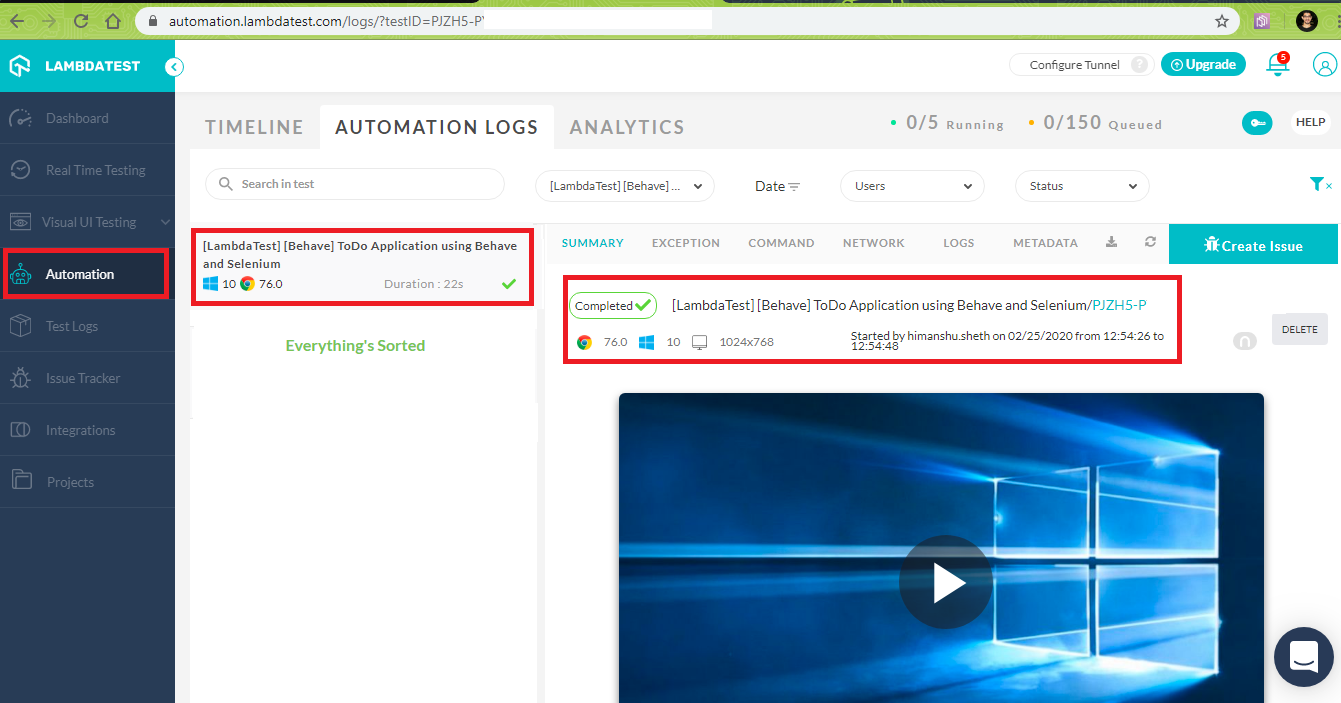
The Automation Dashboard contains detailed information about the test, including the summary, network logs, Selenium logs, exceptions, and more. Below is the snapshot of the execution of the feature file (i.e. features\ToDoApp.feature) in this Selenium Python tutorial:

Pros and Cons of Python Behave Framework
Every framework has its share of advantages (pros) and shortcomings (cons), the same is the case with the Python behave framework. Though it is a popular framework for BDD it does not have its fair share of shortcomings.
Pros Of Using Python Behave Framework
Excellent online documentation and tutorials.
Supports PyCharm (Professional Edition).
Full support of the Gherkin language.
Easy to ramp-up with prior knowledge of any BDD framework.
Easy setup and cleanup due to the availability of environmental functions, configuration settings, fixtures, and more.
Supports integration with Django and Flask.
Cons Of Using Python Behave Framework
Not supported by PyCharm (Community Edition).
Sharing steps between different feature files are not straightforward.
No in-built support for parallel test execution. Workarounds for parallel test execution require additional software, popular discussion threads on StackOverflow here, and here.
Popular framework behave-parallel that earlier facilitated parallel test execution on Python behave is now deprecated.
It’s A Wrap!
Behave is one of the popular BDD frameworks that is preferred by experienced Python practitioners. In this Selenium Python tutorial, I explained in detail, how to use Python Behave for Selenium test automation. The upside of using Python Behave is that there is plenty of documentation and support available on the internet that can be helpful to get started.
As Gherkin is used, the creation of feature files does not require any technical know-how. Parallel testing with Python is the most vital feature when it comes to Selenium test automation as numerous tests have to be performed on ‘N’ combinations of browsers, platforms, and devices.
Python Behave is best-suited for serial automated browser testing. Even if we shift the testing to a powerful Selenium grid, you might not be able to get the expected throughput as parallel testing is a hassle to behave. To summarize, Python has the right set of features (with a few shortcomings) which makes it useful for BDD.
That was all for now, I hope you found the article informative. Feel free to retweet this article and share it with your peers!
Happy Testing

