Mocha JavaScript Tutorial With Examples for Selenium Testing
As per StackOverflow insights, JavaScript is the most popular programming language. As the power of web and mobile is increasing day by day, JavaScript and JavaScript frameworks are becoming more popular. It would not be surprising to hear that JavaScript has become a preference for test automation as well. Over the past few years, a lot of development has happened in the open-source JavaScript based test automation framework development and now we have multiple JavaScript testing frameworks that are robust enough to be used professionally. There are scalable frameworks that can be used by web developers and testers to automate even unit test cases and create complete end-to-end automation test suites. Mocha is one JavaScript testing framework that has been well renowned since 2016, as per StateofJS.
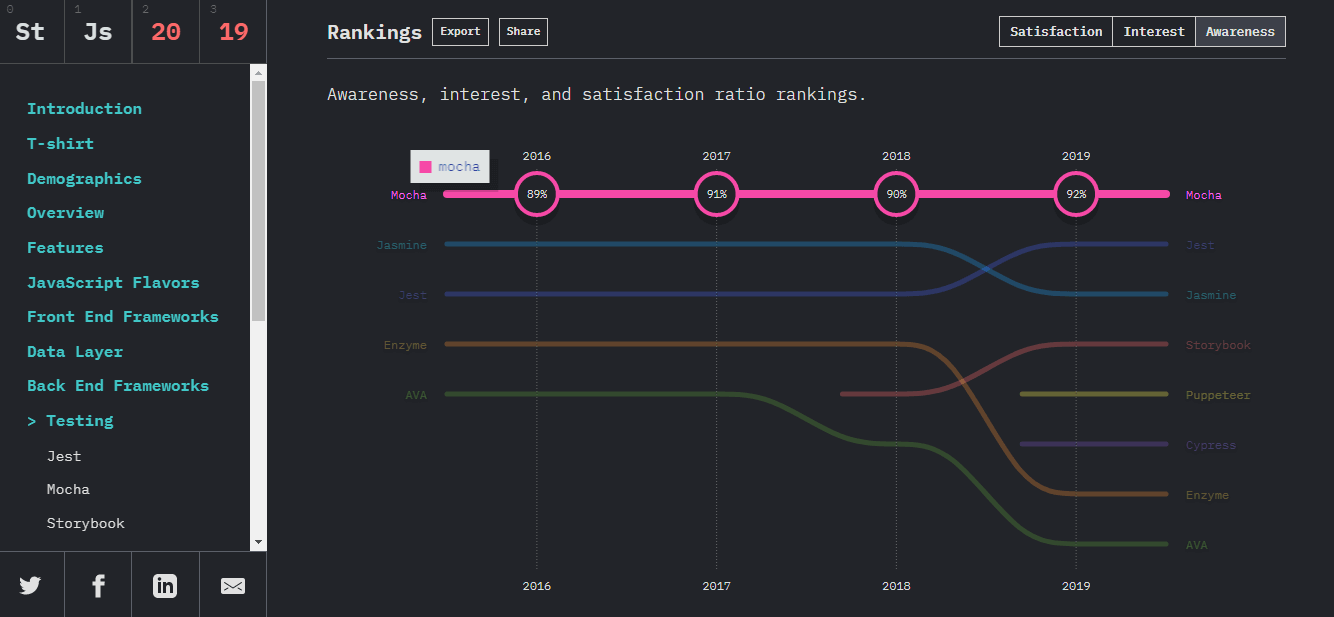 With that said, when we talk about JavaScript automation testing, we can’t afford not to loop Selenium into the discussion. So I thought coming up with a step-by-step Mocha testing tutorial on the framework will be beneficial for you to kickstart your JavaScript automation testing with Mocha and Selenium. We will also be looking into how you can run it on the LambdaTest automation testing platform to get a better browser coverage and faster execution times. By the end of this Mocha testing tutorial, you will have a clear understanding of the setup, installation, and execution of your first automation script with Mocha for JavaScript testing.
What Will You Learn From This Mocha Testing Tutorial?
In this article, we are going to deep dive into Mocha JavaScript testing to perform automated browser testing with Selenium and JavaScript. We will:
- Start with the installation and prerequisites for the Mocha framework and explore its advantages.
- Execute our first Selenium JavaScript test through Mocha with examples.
- Execute group tests.
- Use the assertion library.
- Encounter possible issues along with their resolutions.
- Execute some Mocha test scripts on the Selenium cloud grid platform with minimal configuration changes and tests on various browsers and operating systems.
What Makes Mocha Prevalent?
Mochajs, or simply Mocha, is a feature-affluent JavaScript test framework that runs test cases on Node.js and in the browser, making testing simple and fun. By running serially, Mocha JavaScript testing warrants flexibility and precise reporting, while mapping uncaught exceptions to the correct test cases.
Mocha provides a categorical way to write a structured code for testing the applications by thoroughly classifying them into test suites and test cases modules for execution and to produce a test report after the run by mapping errors to corresponding test cases.
What Makes Mocha a Better Choice Compared To Other JavaScript Testing Frameworks?
- Range of installation methods: It can be installed globally or as a development dependency for the project. Also, it can be set up to run test cases directly on the web browser.
- Various browser support: Can be used to run test cases seamlessly on all major web browsers and provides many browser-specific methods and options. Each revision of Mocha provides upgraded JavaScript and CSS build for different web browsers.
- Number of ways to offer test reports: It provides users with a variety of reporting options, like list, progress and JSON, to choose from with a default reporter displaying the output based on the hierarchy of test cases.
- Support for several JavaScript assertion libraries: It helps users cut testing cost and speed-up the process by having compatibility for a set of JavaScript assertion libraries—Express.js, Should.js, Chai. This multiple library support makes it easier for testers to write lengthy complex test cases and use them if everything works fine.
- Works in TDD and BDD environments: Mocha supports behavior driven development (BDD) and test driven development (TDD), allowing developers to write high quality test cases and enhance test coverage.
- Support for synchronous and asynchronous testing: Unlike other JavaScript testing frameworks, Mocha is designed with features to fortify asynchronous testing utilizing async/await by invoking the callback once the test is finished. It enables synchronous testing by omitting the callback.
Setting Up Mocha and Initial Requirements
Before we start our endeavor and explore more of Mocha testing, there are some important prerequisites we need to set up to get started with this Mocha testing tutorial for automation testing with Selenium and JavaScript:
- Node.js and (npm): The Mocha module requires Node.js to be installed on the system. If it is not already present on the system, it can be installed using the npm manager or by downloading the Windows installer directly from the official Node.js website .
- Mocha package module: Once we have successfully installed Node.js on the system, we can make use of the node package manager, i.e. npm, to install the required package, which is Mocha. To install the latest version using the npm command line tool, we will first initialize the npm using the below command :
$ npm initNext, we will install the Mocha module using npm with the below command:
$ npm install -g mocha Here, “g” is for installing the module globally, it allows us to access and use the module like a command line tool and does not limit its use to the current project. The –save-dev command below will place the Mocha executable in our ./node_modules/.bin folder:
$ npm install --save-dev mochaWe will now be able to run the commands in our command line using the mocha keyword:
- Java—SDK: Since Mocha is a Selenium test framework and Selenium is built upon Java, we would also be installing the Java Development Kit (preferably JDK 7.0 or above) on the system and configure the Java environment.
- Selenium WebDriver: We require a Selenium WebDriver and that should be already present in our npm node modules. If it is not found in the module, we can install the latest version of Selenium WebDriver using the below command:
$ npm install selenium-webdriver- Browser driver: Lastly, we will be installing the driver of the specific browser we are going to use. This executable also needs to be placed inside the same bin folder:
$ npm install -g chromedriver Writing Our First Mocha JavaScript Testing Script
We will create a project directory named mocha_test and then we will create a subfolder name scripts with a test script name single_test.js inside it.
Finally, we will initialize our project by hitting the command npm init. This will create a package.json file in an interactive way, which will contain all our required project configurations. It will be required to execute our test script single_test.js.
Finally, we will have a file structure that looks like the below:
mocha_test
        | -- scripts
                    | -- single_test.js
        | -- package.json
{
  "name": "mocha selenium test sample",
  "version": "1.0.0",
  "description": " Getting Started with Our First New Mocha Selenium Test Script and Executing it on a Local Selenium Setup ",
  "scripts": {
    "test": "npm run single",
    "single": "./node_modules/.bin/mocha scripts/single_test.js",
  },
  "author": "rohit",
  "license": "" ,
  "homepage": "https://mochajs.org",
  "keywords": [
    "mocha",
    "bdd",
    "selenium",
    "examples",
    "test",
    "bdd",
    "tdd",
    "tap"
    "framework"
  ],
  "dependencies": {
    "bluebird": "^3.7.2",
    "mocha": "^6.2.2",
    "selenium-webdriver": "^3.6.0"
  }
}
You have successfully configured your project and are ready to execute your first Mocha JavaScript testing script.You can now write your first test script in the file single_test.js that was created earlier:
var assert = require('assert');
describe('IndexArray', function() {
  describe('#checkIndex negative()', function() {
    it('the function should return -1 when the value is not present', function(){
      assert.equal(-1, [4,5,6].indexOf(7));
    });
  });
});
Code Walkthrough of Our Mocha JavaScript Testing Script
We will now walk through the test script and understand what exactly is happening in the script we just wrote. When writing any Mocha test case in JavaScript, there are two basic function calls we should remember that does the job for us under the hood. These functions are:
describe()it()
We have used both of them in the test script we wrote above.
describe(): Is mainly used to define the creation of test groups in Mocha in a simple way. The describe() function takes in two arguments as the input. The first argument is the name of the test group, and the second argument is a callback function. We can also have a nested test group in our test as per the requirement of the test case.
If we look at our test case now, we see that we have a test group named IndexArray, which has a callback function that has inside it a nested test group named #checkIndex negative() and inside of that, is another callback function that contains our actual test.

it(): This function is used for writing individual Mocha JavaScript test cases. It should be written in a layman way conveying what the test does. The It() function also takes in two arguments as the input, the first argument is a string explaining what the test should do, and the second argument is a callback function, which contains our actual test.
In the above Mocha JavaScript testing script, we see that we have the first argument of the it() function that is written as “the function should return -1 when the value is not present” and the second argument is a callback function that contains our test condition with the assertion.

- Assertion: The assertion libraries are used to verify whether the condition given to it is
trueorfalse. It verifies the test results with theassert.equal(actual, expected)method and makes the equality tests between our actual and expected parameters. It makes our testing easier by using the Node.js built-in assert module. In our Mocha JavaScript testing script, we are not using the entire assert library as we only require the assert module with one line of code for this Mocha testing tutorial.

If the expected parameter equals our actual parameter, the test is passed, and the assert returns true. If it doesn’t equal, then the test fails, and the assert returns false.
It is important to check whether the below section is present in our package.json file as this contains the configurations of our Mocha JavaScript testing script:
"scripts": {
    "test": "npm run single",
    "single": "./node_modules/.bin/mocha scripts/single_test.js"
  },
Finally, we can run our test in the command line and execute from the base directory of the project using the below command:
$  npm test
or
$  npm run single
The output of the above test is :

This indicates we have successfully passed our test and the assert condition is giving us the proper return value of the function based on our test input passed.
Let us extend it further and add one more test case to our test suite and execute the test. Now, our Mocha JavaScript testing script: single_test.js will have one more test that will check the positive scenario of the test and give the corresponding output:
var assert = require('assert');
describe('IndexArray', function() {
  describe('#checkIndex negative()', function() {
    it('the function should return -1 when the value is not present', function(){
      assert.equal(-1, [4,5,6].indexOf(7));
    });
  });
    describe('#checkIndex positive()', function() {
    it('the function should return 0 when the value is present', function(){
      assert.equal(0, [8,9,10].indexOf(8));
    });
  });

});
The output of the above Mocha JavaScript testing script is :
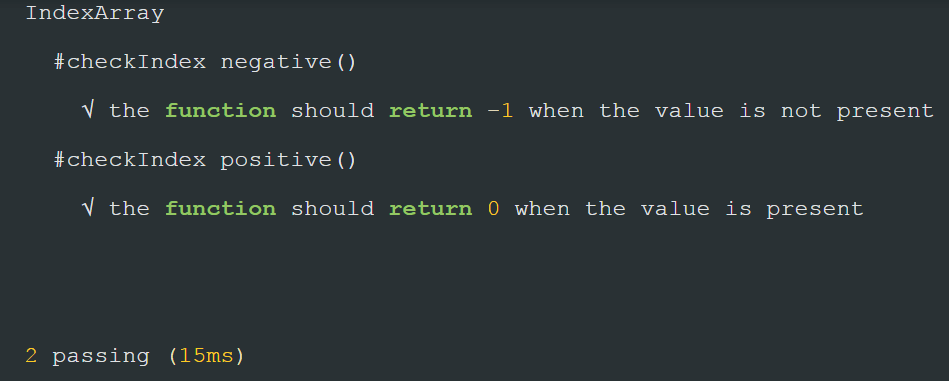
You have successfully executed your first Mocha JavaScript testing script in your local machine for Selenium and JavaScript execution.
Note: If you have a larger test suite for cross browser testing with Selenium JavaScript, the execution on local infrastructure is not your best call.
Drawbacks of Local Automated Testing Setup
As you expand your web application, bring in new code changes, overnight hotfixes, and more. With these new changes, comes new testing requirements, so your Selenium automation testing scripts are bound to go bigger, you may need to test across more browsers, more browser versions, and more operating systems. This becomes a challenge when you perform JavaScript Selenium testing through the local setup. Some of the major pain points of performing Selenium JavaScript testing on the local setup are:
- There is a limitation that the testing can only be performed locally, i.e., on the browsers that are installed locally in the system.
- This is not beneficial when there is a requirement to execute cross browser testing and perform the test on all the major browsers available for successful results.
- The test team might not be aware of all the new browsers versions and the compatibility with them will be tested properly.
- There is a need to devise a proper cross browser testing strategy to ensure satisfactory test coverage.
- There arise certain scenarios when it is required to execute tests on some of the legacy browsers or browser versions for a specific set of users and operating systems.
- It might be necessary to test the application on various combinations of browsers and operating systems, and that is not easily available with the local inhouse system setup.
Now, you may be wondering about a way to overcome these challenges. Well, don’t stress too much because an online Selenium Grid is there for your rescue.
Executing Mocha Script Using Remote Selenium WebDriver on LambdaTest Selenium Grid
Since we know that executing our test script on the cloud grid has great benefits to offer, let us get our hands dirty on the same. The process of executing a script on the LambdaTest Selenium Grid is fairly straightforward and exciting. We can execute our local test script by adding a few lines of code that is required to connect to the LambdaTest platform:
- It gives us the privilege to execute our test on different browsers seamlessly.
- It has all the popular operating systems and also provides us the flexibility to make various combinations of the operating system and browsers.
- We can pass on our environment and config details from within the script itself.
- The test scripts can be executed parallelly and save on executing time.
- It provides us with an interactive user interface and dashboard to view and analyze test logs.
- It also provides us the desired capabilities generator with an interactive user interface, which is used to select the environment specification details with various combinations to choose from.
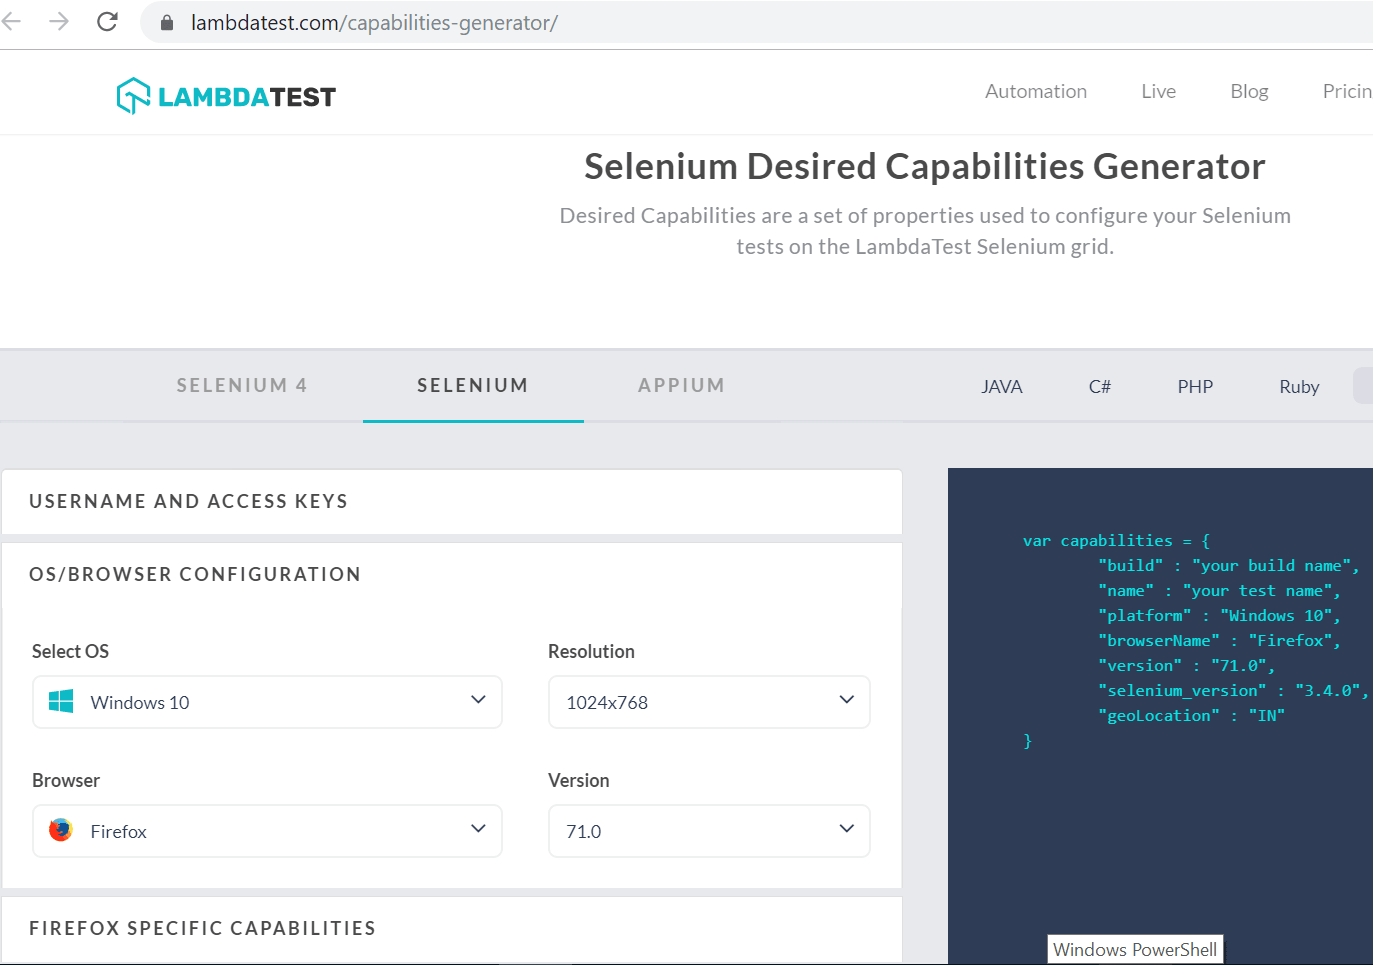
So, in our case, the multiCapabilities class in the single.conf.js and parallel.conf.js configuration file will look similar to the below:
multiCapabilities: [
    { // Desired Capabilities
      build: "Mocha Selenium Automation Parallel Test",
name: "Mocha Selenium Test Firefox",
      platform: "Windows 10",
      browserName: "firefox",
      version: "71.0",
      visual: false,
tunnel: false,
      network: false,
      console: false
    }
Next, the most important thing is to generate our access key token, which is basically a secret key to connect to the platform and execute automated tests on LambdaTest. This access key is unique to every user and can be copied and regenerated from the profile section of the user account as shown below.

The information regarding the access key, username, and hub can be alternatively fetched from the LambdaTest user profile page Automation dashboard, which looks like the one as mentioned in the screenshot below.

Accelerating With Parallel Testing Using LambdaTest Selenium Grid
In our demonstration, we will be creating a script that uses the Selenium WebDriver to make a search, open a website, and assert whether the correct website is open. If the assert returns true, it indicates that the test case passed successfully and will show up in the automation logs dashboard.
If the assert returns false, the test case fails, and the errors will be displayed in the automation logs. Now, since we are using LambdaTest, we would like to leverage it and execute our tests on different browsers and operating systems. We will execute our test script as below:
- Single test: On a single environment (Windows 10) and single browser (Chrome).
- Parallel test: On a parallel environment, i.e., different operating system (Windows 10 and Mac OS Catalina) and different browsers (Chrome, Mozilla Firefox, and Safari).
Here we will create a new subfolder in our project directory, i.e., conf. This folder will contain the configurations that are required to connect to the LambdaTest platform.
We will create single.conf.js and parallel.conf.js where we need to declare the user configuration, i.e, username and access key along with the desired capabilities for both our single test and parallel test cases.
Now, we will have a file structure that looks like below:
LT_USERNAME = process.env.LT_USERNAME || "irohitgoyal"; // Lambda Test User name
LT_ACCESS_KEY = process.env.LT_ACCESS_KEY || "1267367484683738"; // Lambda Test Access key

//Configurations
var config = {
  commanCapabilities: {
    build: "Mocha Selenium Automation Parallel Test", // Build Name to be displayed in the test logs
    tunnel: false // It is required if we need to run the localhost through the tunnel
  },
  multiCapabilities: [
    {
      // Desired Capabilities , this is very important to configure
      name: "Mocha Selenium Test Firefox", // Test name that to distinguish amongst test cases
      platform: "Windows 10", //  Name of the Operating System
      browserName: "firefox", // Name of the browser
      version: "71.0", // browser version to be used
      visual: false, // whether to take step by step screenshot, we made it false for now
      network: false, // whether to capture network logs, we made it false for now
      console: false // whether to capture console logs, we made it false for now
    },
    {
      name: "Mocha Selenium Test Chrome", // Test name that to distinguish amongst test cases
      platform: "Windows 10", //  Name of the Operating System
      browserName: "chrome",// Name of the browser
      version: "79.0", // browser version to be used
      visual: false, // // whether to take step by step screenshot, we made it false for now
      network: false, // // whether to capture network logs, we made it false for now
      console: false // // whether to capture console logs, we made it false for now
    },
    {
   name: "Mocha Selenium Test Safari", // Test name that to distinguish amongst test cases
      platform: "MacOS Catalina", //  Name of the Operating System
      browserName: "safari",// Name of the browser
      version: "13.0", // browser version to be used
      visual: false, // // whether to take step by step screenshot, we made it false for now
      network: false, // // whether to capture network logs, we made it false for now
      console: false // // whether tocapture console logs., we made it false for now
    }
  ]
};

exports.capabilities = [];
// Code to integrate and support common capabilities
config.multiCapabilities.forEach(function(caps) {
  var temp_caps = JSON.parse(JSON.stringify(config.commanCapabilities));
  for (var i in caps) temp_caps[i] = caps[i];
  exports.capabilities.push(temp_caps);
});
var assert = require("assert"),// declaring assert
webdriver = require("selenium-webdriver"), // declaring selenium web driver
conf_file = process.argv[3] || "conf/single.conf.js"; // passing the configuration file
var caps = require("../" + conf_file).capabilities;
// Build the web driver that we will be using in Lambda Test
var buildDriver = function(caps) {
return new webdriver.Builder()
.usingServer(
"http://" +
LT_USERNAME +
":" +
LT_ACCESS_KEY +
"@hub.lambdatest.com/wd/hub"
)
.withCapabilities(caps)
.build();
};
// declaring the test group Search Engine Functionality for Single Test Using Mocha in Browser
describe("Search Engine Functionality for Single Test Using Mocha in Browser " + caps.browserName, function() {
var driver;
this.timeout(0);
// adding the before an event that triggers before the rest execution
beforeEach(function(done) {
caps.name = this.currentTest.title;
driver = buildDriver(caps);
done();
});
// defining the test case to be executed
it("should find the required search result in the browser ", function(done) {
driver.get("https://www.mochajs.org").then(function() {
driver.getTitle().then(function(title) {
setTimeout(function() {
console.log(title);
assert(
title.match(
"Mocha | The fun simple flexible JavaScript test framework | JavaScript | Automated Browser Test"
) != null
);
done();
}, 10000);
});
});
});
// adding the after event that triggers to check if the test passed or failed
afterEach(function(done) {
if (this.currentTest.isPassed) {
driver.executeScript("lambda-status=passed");
} else {
driver.executeScript("lambda-status=failed");
}
driver.quit().then(function() {
done();
});
});
});
var assert = require("assert"), // declaring assert
webdriver = require("selenium-webdriver"), // declaring selenium web driver
conf_file = process.argv[3] || "conf/parallel.conf.js"; // passing the configuration file
var capabilities = require("../" + conf_file).capabilities;
// Build the web driver that we will be using in Lambda Test
var buildDriver = function(caps) {
return new webdriver.Builder()
.usingServer(
"http://" +
LT_USERNAME +
":" +
LT_ACCESS_KEY +
"@hub.lambdatest.com/wd/hub"
)
.withCapabilities(caps)
.build();
};
capabilities.forEach(function(caps) {
// declaring the test group Search Engine Functionality for Parallel Test Using Mocha in Browser
describe("Search Engine Functionality for Parallel Test Using Mocha in Browser " + caps.browserName, function() {
var driver;
this.timeout(0);
// adding the before event that triggers before the rest execution
beforeEach(function(done) {
caps.name = this.currentTest.title;
driver = buildDriver(caps);
done();
});
// defining the test case to be executed
it("should find the required search result in the browser " + caps.browserName, function(done) {
driver.get("https://www.mochajs.org").then(function() {
driver.getTitle().then(function(title) {
setTimeout(function() {
console.log(title);
assert(
title.match(
"Mocha | The fun simple flexible JavaScript test framework | JavaScript | Automated Browser Test"
) != null
);
done();
}, 10000);
});
});
});
// adding the after event that triggers to check if the test passed or failed
afterEach(function(done) {
if (this.currentTest.isPassed) {
driver.executeScript("lambda-status=passed");
} else {
driver.executeScript("lambda-status=failed");
}
driver.quit().then(function() {
done();
});
});
});
});Finally, we have our package.json that has an additional added configuration for parallel testing and required files:
"scripts": {
    "test": "npm run single && npm run parallel",
    "single": "./node_modules/.bin/mocha specs/single_test.js conf/single.conf.js",
    "parallel": "./node_modules/.bin/mocha specs/parallel_test.js conf/parallel.conf.js --timeout=50000"
  },
{
"name": "mocha selenium automation test sample",
"version": "1.0.0",
"description": " Getting Started with Our First New Mocha Selenium Test Script and Executing it on a Local Selenium Setup",
"scripts": {
"test": "npm run single && npm run parallel",
"single": "./node_modules/.bin/mocha scripts/single_test.js conf/single.conf.js",
"parallel": "./node_modules/.bin/mocha scripts/parallel_test.js conf/parallel.conf.js --timeout=50000"
},
"author": "rohit",
"license": "" ,
"homepage": "https://mochajs.org",
"keywords": [
"mocha",
"bdd",
"selenium",
"examples",
"test",
"bdd",
"tdd",
"tap"
],
"dependencies": {
"bluebird": "^3.7.2",
"mocha": "^6.2.2",
"selenium-webdriver": "^3.6.0"
}
}The final thing we should do is execute our tests from the base project directory by using the below command:
$ npm testThis command will validate the test cases and execute our test suite, i.e., the single test and parallel test cases.
Below is the output from the command line.
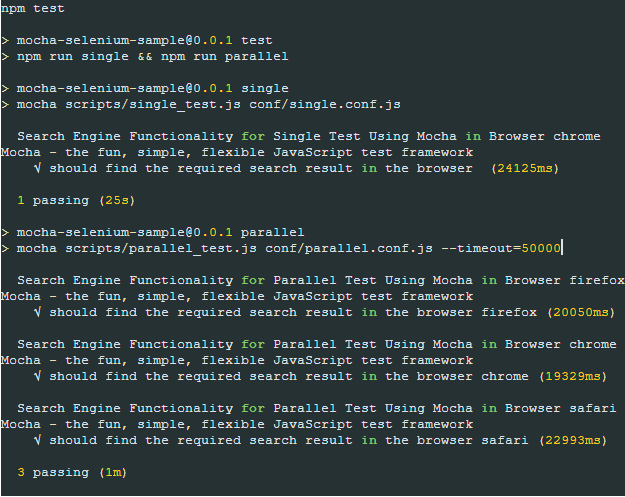
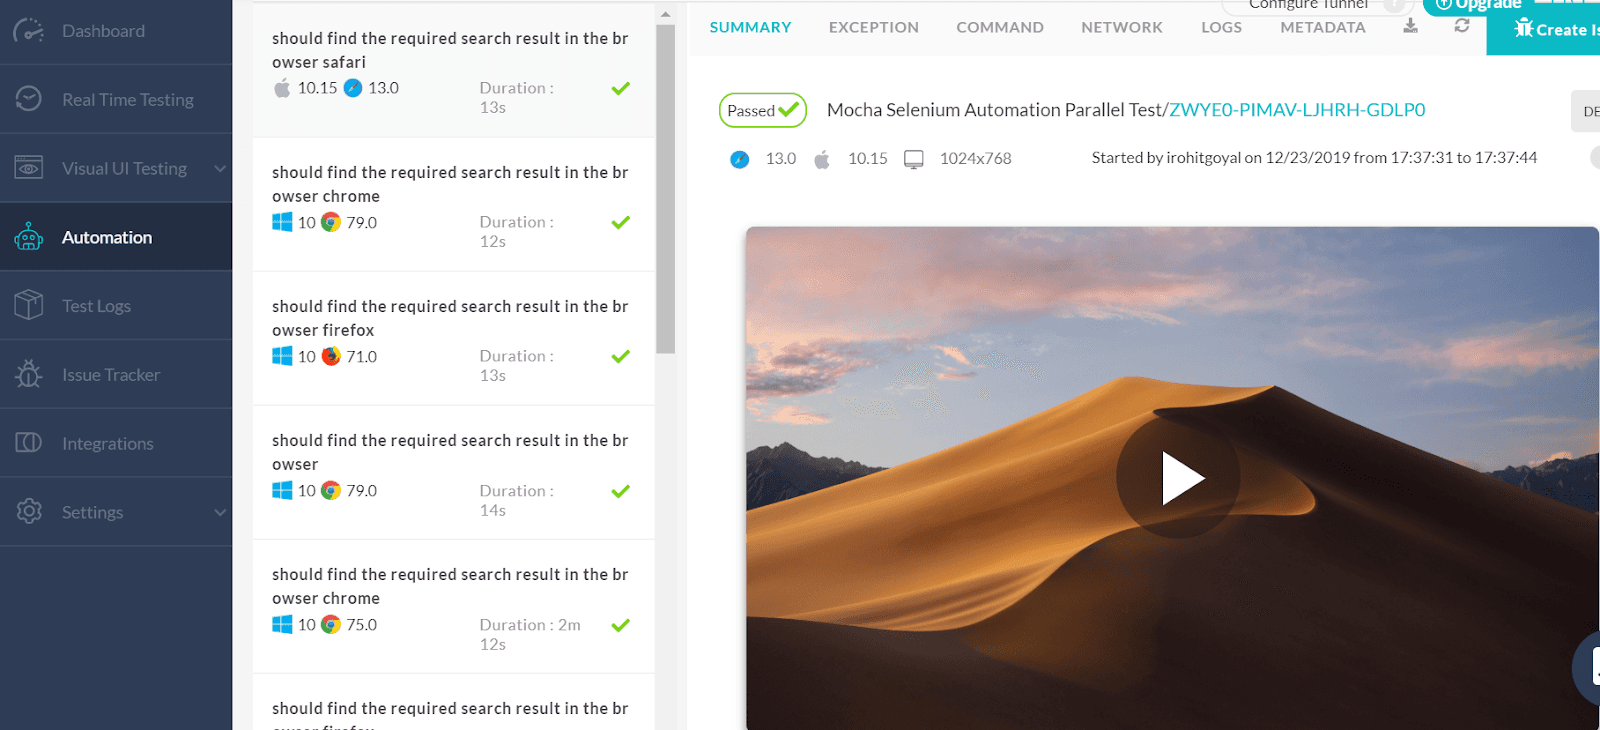
Now, if we open the LambdaTest platform and check the user interface, we will see the test runs on Chrome, Firefox, and Safari browsers on the environment specified, i.e., Windows 10 and Mac OS, and the test is passed successfully with positive results.

Below, we see a screenshot that depicts our Mocha code is running over different browsers, i.e Chrome, Firefox, and Safari, on the LambdaTest Selenium Grid Platform. The results of the test script execution along with the logs can be accessed from the LambdaTest Automation dashboard.
Alternatively, if we want to execute the single test, we can execute the following command:
$ npm run singleTo execute the test cases in different environments in a parallel way, run the below command:
$ npm run parallelWrap Up!
This concludes our Mocha testing tutorial and now, we have a clear idea about what Mocha is and how to set it up. It allows us to automate the entire test suite and get started quickly with the minimal configuration and is well readable and also easy to update. We are now able to perform an end-to-end test using group tests and the assertion library. The test cases results can be fetched directly from the command line terminal.

