Javac and Java Katas, Part 1: Class Path
Here, I'd like to talk you through three Java katas, ranging from the simplest to the most complex. These exercises should help you gain experience working with JDK tools such as javac, java, and jar. By doing them, you'll get a good understanding of what goes on behind the scenes of your favorite IDE or build tools like Maven, Gradle, etc.
None of this denies the benefits of an IDE. But to be truly skilled at your craft, understand your essential tools and don’t let them get rusty.
- Gail Ollis, "Don’t hIDE Your Tools"
Getting Started
The source code can be found in the GitHub repository. All commands in the exercises below are executed inside a Docker container to avoid any particularities related to a specific environment.
Thus, to get started, clone the repository and run the command below from its java-javac-kata folder:
docker run --rm -it --name java_kata -v .:/java-javac-kata --entrypoint /bin/bash maven:3.9.6-amazoncorretto-17-debianKata 1: "Hello, World!" Warm Up
In this kata, we will be dealing with a simple Java application without any third-party dependencies. Let's navigate to the /class-path-part/kata-one-hello-world-warm-up folder and have a look at the directory structure.
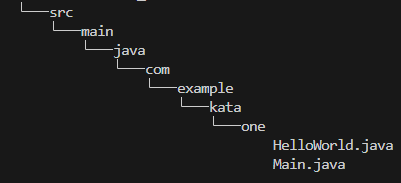
Within this directory, we can see the Java project structure and two classes in the com.example.kata.one package.
Compilation
javac -d ./target/classes $(find -name '*.java')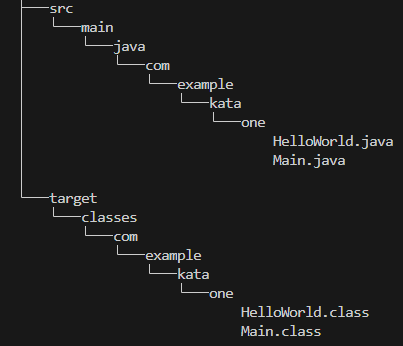
The compiled Java classes should appear in the target/classes folder, as shown in the screenshot above. Try using the verbose option to see more details about the compilation process in the console output:
javac -verbose -d ./target/classes $(find -name '*.java')With that covered, let's jump into the execution part.
Execution
java --class-path "./target/classes" com.example.kata.one.MainAs a result, you should see Hello World! in your console.
Try using different verbose:[class|gc|jni] options to get more details on the execution process:
java -verbose:class --class-path "./target/classes" com.example.kata.one.MainAs an extra step, it's worth trying to remove classes or rename packages to see what happens during both the complication and execution stages. This will give you a better understanding of which problems result in particular errors.
Packaging
Building Jar
jar --create --file ./target/hello-world-warm-up.jar -C target/classes/ .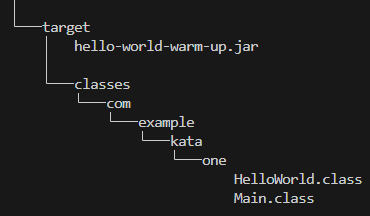
The built jar is placed in the target folder. Don't forget to use the verbose option as well to see more details:
jar --verbose --create --file ./target/hello-world-warm-up.jar -C target/classes/ .You can view the structure of the built jar using the following command:
jar -tf ./target/hello-world-warm-up.jarWith that, let's proceed to run it:
java --class-path "./target/hello-world-warm-up.jar" com.example.kata.one.MainBuilding Executable Jar
To build an executable jar, the main-class must be specified:
jar --create --file ./target/hello-world-warm-up.jar --main-class=com.example.kata.one.Main -C target/classes/ .It can then be run via jar option:
java -jar ./target/hello-world-warm-up.jarKata 2: Third-Party Dependency
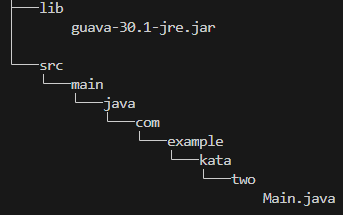
In this kata, you will follow the same steps as in the previous one. The main difference is that our Hello World! application uses guava-30.1-jre.jar as a third-party dependency. Also, remember to use the verbose option to get more details.
So, without further ado, let's get to the /class-path-part/kata-two-third-party-dependency folder and check out the directory's structure.
Compilation
javac --class-path "./lib/*" -d ./target/classes/ $(find -name '*.java')The class-path option is used to specify the path to the lib folder where our dependency is stored.
Execution
java --class-path "./target/classes:./lib/*" com.example.kata.two.MainPackaging
Building Jar
jar --create --file ./target/third-party-dependency.jar -C target/classes/ .And let us run it:
java --class-path "./target/third-party-dependency.jar:./lib/*" com.example.kata.two.MainBuilding Executable Jar
Our first step here is to create a MANIFEST.FM file with the Class-Path specified:
echo 'Class-Path: ../lib/guava-30.1-jre.jar' > ./target/MANIFEST.FMNext up, we build a jar with the provided manifest option:
jar --create \
    --file ./target/third-party-dependency.jar \
    --main-class=com.example.kata.two.Main \
    --manifest=./target/MANIFEST.FM \
    -C target/classes/ .
Finally, we execute it:
java -jar ./target/third-party-dependency.jarBuilding Fat Jar
First of all, we need to unpack our guava-30.1-jre.jar into the ./target/classes/ folder (be patient, this can take some time):
cp lib/guava-30.1-jre.jar ./target/classes && \
cd ./target/classes && \
jar xf guava-30.1-jre.jar && \
rm ./guava-30.1-jre.jar && \
rm -r ./META-INF && \
cd ../../
With all the necessary classes in the ./target/classes folder, we can build our fat jar (again, be patient as this can take some time):
jar --create --file ./target/third-party-dependency-fat.jar --main-class=com.example.kata.two.Main -C target/classes/ .Now, we can run our built jar:
java -jar ./target/third-party-dependency-fat.jarKata 3: Spring Boot Application Conquest
In the /class-path-part/kata-three-spring-boot-app-conquest folder, you will find a Maven project for a simple Spring Boot application. The main goal here is to apply everything that we have learned so far to manage all its dependencies and run the application, including its test code.
As a starting point, let's run the following command:
mvn clean package && \
find ./target/ -mindepth 1 ! -regex '^./target/lib\(/.*\)?' -delete
This will leave only the source code and download all necessary dependencies into the ./target/lib folder.
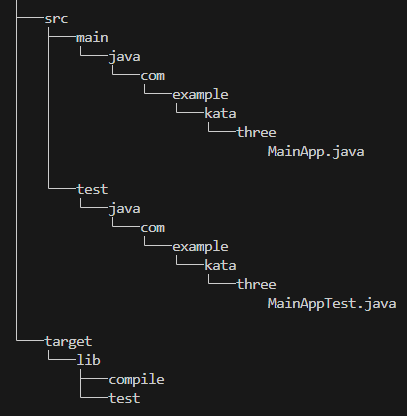 Compilation
javac --class-path "./target/lib/compile/*" -d ./target/classes/ $(find -P ./src/main/ -name '*.java')Execution
java --class-path "./target/classes:./target/lib/compile/*" com.example.kata.three.MainAs an extra step for both complication and execution, you can try specifying all necessary dependencies explicitly in the class-path. This will help you understand that not all artifacts in the ./target/lib/compile are needed to do that.
Packaging
Let's package our compiled code as a jar and try to run it.
It won't be a Spring Boot jar because Spring Boot uses a non-standard approach to build fat jars, including its own class loader. See the documentation on The Executable Jar Format for more details. In this exercise, we will package our source code as we did before to demonstrate that everything can work in the same way with Spring Boot, too.
jar --create --file ./target/spring-boot-app-conquest.jar -C target/classes/ .Now, let's run it to verify that it works:
java --class-path "./target/spring-boot-app-conquest.jar:./target/lib/compile/*" com.example.kata.three.MainTest Compilation
javac --class-path "./target/classes:./target/lib/test/*:./target/lib/compile/*" -d ./target/test-classes/ $(find -P ./src/test/ -name '*.java')Take notice that this time we are searching for source files in the ./src/test/ directory, and both the application source code and test dependencies are added to the class-path.
Test Execution
To be able to run code via java, we need an entry point (a class with the main method). Traditionally, tests are run via a Maven plugin or by an IDE, which have their own launchers to make this process comfortable for developers. To demonstrate test execution, the junit-platform-console-standalone dependency, which includes the org.junit.platform.console.ConsoleLauncher with the main method, is added to our pom.xml. Its artifact can also be seen in the ./target/lib/test/* folder.
java --class-path "./target/classes:./target/test-classes:./target/lib/compile/*:./target/lib/test/*" \
     org.junit.platform.console.ConsoleLauncher execute --scan-classpath --disable-ansi-colors
Wrapping Up
Gail's article, "Don’t hIDE Your Tools" quoted at the very beginning of this article, taken from 97 Things Every Java Programmer Should Know by Kevlin Henney and Trisha Gee, inspired me to start thinking in this direction and eventually led to the creation of this post.
Hopefully, by doing these katas and not just reading them, you have developed a better understanding of how the essential JDK tools work.

