Setup Wordpress Debug Environment With Docker and Xdebug
It's a common practice to debug PHP using Xdebug. Xdebug is an extension for PHP to assist with debugging and development.
In this article, I'm going to introduce a more convenient way to quickly set up development environment with PHPStorm, Docker, Docker compose and Xdebug. The source code for docker compose configs are available in the Github: https://github.com/liqili/wordpress-xdebug-docker/
First of all, suppose we have installed Docker and Docker compose in a Linux-like OS, and installed a Wordpress site in production. Then, what we need to do is to setup a development environment for that site so that we can customize plugins or what else. This post will help you learn how to:
- Use Docker compose to mange docker containers.
- Export production db to dev Mysql docker container.
- Integrate Xdebug plugin with docker container as well as PHPStorm.
- How to initialize MySQL container with sql script file.
docker-compose.yml for container management
xxxxxxxxxx
version"3"
services
mysql
imagemysql5.7
container_namemysqldb
ports
"3306:3306"
command--max_allowed_packet=1073741824 --sql_mode="STRICT_TRANS_TABLES,NO_ZERO_IN_DATE,NO_ZERO_DATE,ERROR_FOR_DIVISION_BY_ZERO,NO_AUTO_CREATE_USER,NO_ENGINE_SUBSTITUTION"
environment
MYSQL_ROOT_PASSWORD123
MYSQL_DATABASElog
volumes
./configs/db/:/docker-entrypoint-initdb.d # mysql will execute the initial sql script under the mount point one by one
db-data:/var/lib/mysql
wordpress-app
build
./configs/php/
container_namewordpress-app
ports
"80:80"
"443:443"
restartalways
environment
XDEBUG_CONFIG"remote_host=host.docker.internal" #This config works for MacOS, otherwise should be ip address of the host machine because docker container cannot find the host by localhost.
volumes
../local-wordpress:/var/www/html # mount your local wordpress site here
/tmp/wp-errors.log:/tmp/wp-errors.log
depends_on
mysql
volumes
db-data
Customize Dockerfile for Apache Web Server
We need to download Xdebug source code and prepare a customized php.ini and dockerfile:
Download the specific version Xdebug source code according to your php version, in this post I'm using php7.4, so I use xdebug-2.9.6(https://xdebug.org/files/xdebug-2.9.6.tgz).
Dockerfile for php apache web server(please modify php.ini and xdebug location accordingly):
xxxxxxxxxx
FROM php:7.4-apache
COPY ./local/php.ini /usr/local/etc/php/php.ini
COPY ./xdebug-2.9.6 /app/xdebug
RUN apt-get update && apt-get install -y \
curl \
mariadb-client \
wget \
zlib1g-dev \
libzip-dev \
unzip \
libmemcached-dev zlib1g-dev \
&& docker-php-ext-install pdo pdo_mysql mysqli zip \
&& a2enmod rewrite \
&& cd /app/xdebug/ \
&& phpize \
&& ./configure \
&& make \
&& mkdir -p /usr/local/lib/php/extensions/no-debug-non-zts-20190902/ \
&& cp modules/xdebug.so /usr/local/lib/php/extensions/no-debug-non-zts-20190902/ \
Customize php.ini by adding the following lines to enable xdebug.
xxxxxxxxxx
xdebug.remote_enable=1
zend_extension = /usr/local/lib/php/extensions/no-debug-non-zts-20190902/xdebug.so
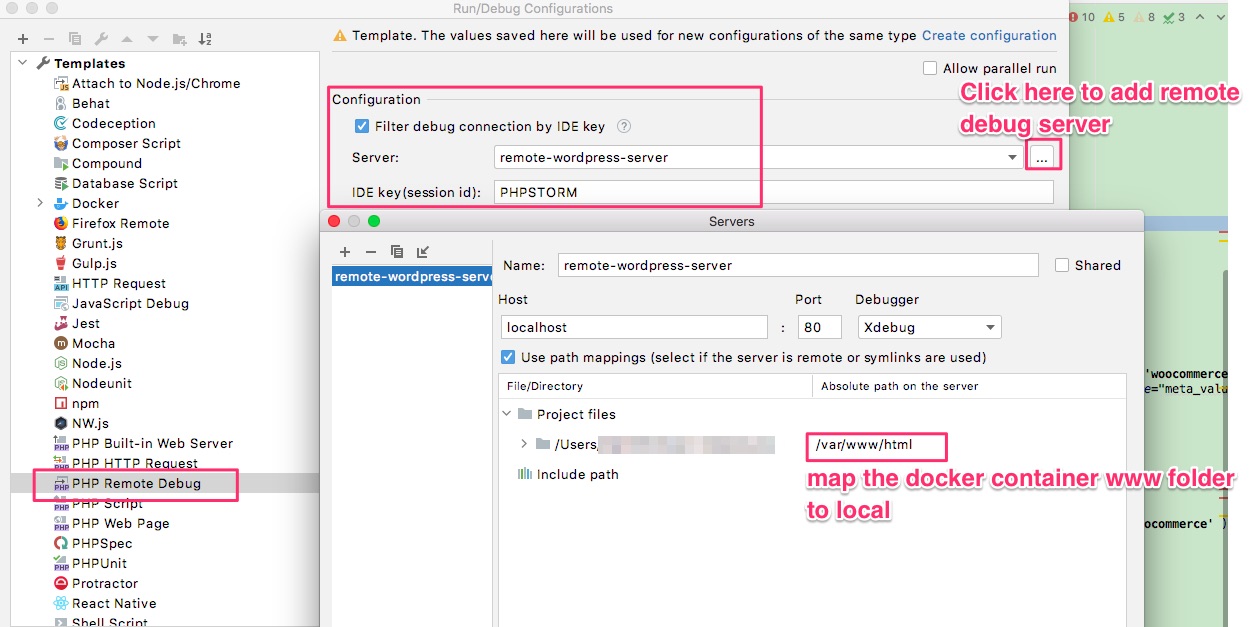
Configure your IDE(PHPStorm)
I get used to JetBeans IDEs, so I will only use PHPStorm to illustrate how to configure you IDE. For other IDEs, there are a lot of manuals available that can help with the Xdebug configuration.

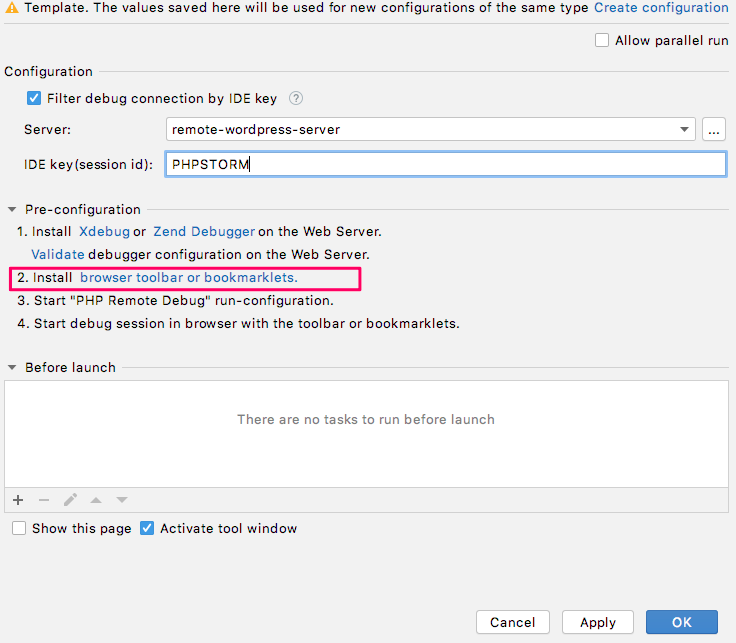
Finally, we need to install browser debug toolbar. Once installed, configure the option to set IDE Key to PHPSTORM.

You will be all set. Then you can start the docker containers and start debug in your IDE.
xxxxxxxxxx
docker-compose up --build //build and start up docker containers

