How To Use Open Source Cadence for Polling
This guide is for developers and engineers of all levels looking to understand how polling works in Cadence, the relatively new (and fully open source) fault-tolerant stateful code platform originally developed by Uber (and now supported by others, including us at Instaclustr). This guide provides “Hello, World!” type examples based on simple scenarios and use cases.
What You Will Learn
How to set up a simple Cadence polling application on Instaclustr’s Managed Service platform.
What You Will Need
- A free sign-up account on the Instaclustr platform
- Basic Java 11 and Gradle installation
- IntelliJ Community Edition (or any other IDE with Gradle support)
- Docker (optional: only needed to run Cadence command-line client)
So, What's So Great About Cadence?
A large number of use cases span beyond a single request-reply, require tracking of a complex state, respond to asynchronous events, and communicate to external unreliable dependencies. The usual approach to building such applications is a hodgepodge of stateless services, databases, cron jobs, and queuing systems. This negatively impacts developer productivity, as most of the code is dedicated to plumbing—obscuring the actual business logic behind a myriad of low-level details.
Cadence is a fully open-source orchestration framework that helps developers write fault-tolerant, long-running applications, also known as workflows. In essence, it provides a durable virtual memory that is not linked to a specific process and preserves the full application state, including function stacks, with local variables across all sorts of host and software failures. This allows you to write code using the full power of a programming language, while Cadence takes care of the durability, availability, and scalability of the application.
What Is Polling?
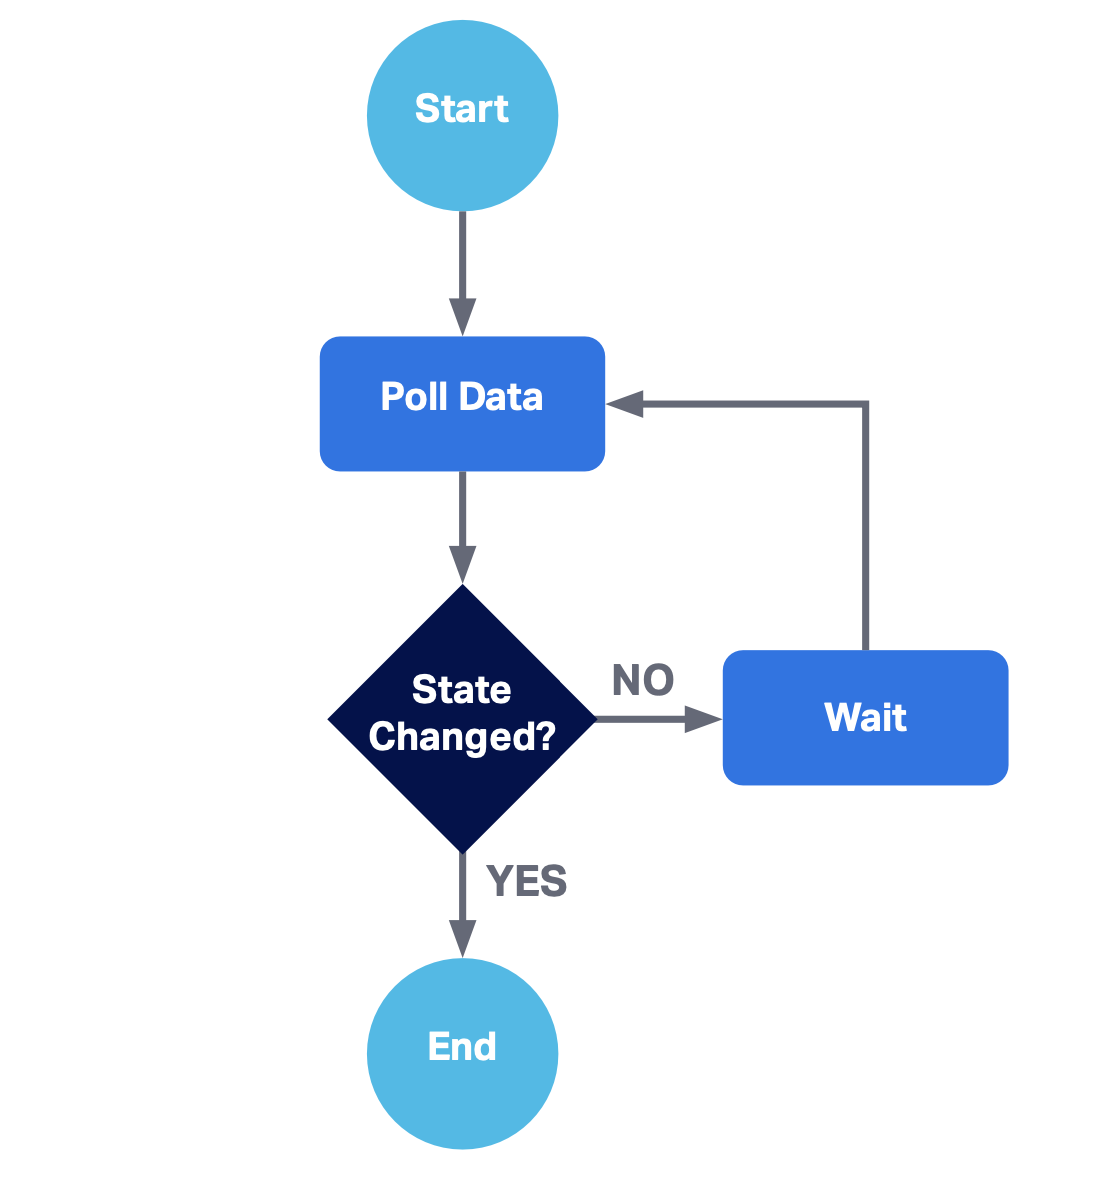
Polling is executing a periodic action to check for state change. Examples are pinging a host, calling a REST API, or listing a storage bucket for newly uploaded files.

Fig 1: Flow diagram for a polling process
Polling should be avoided where possible (favoring instead an event-triggered interrupt), as busy waiting typically eats a lot of CPU cycles unnecessarily unless either:
- You are only going to poll for a short time, or
- You can afford to sleep for a reasonable time in your polling loop.
It is to a computer the equivalent of asking every 5 minutes how far you are from your destination on a long trip. Nonetheless, there are times when it’s the only option available. Cadence's support for durable timers, long-running activities, and unlimited retries makes it a good fit.
Polling External Services With Cadence
There are several ways to implement a polling mechanism. We will focus on polling external services and how we can benefit from Cadence in doing so.
To begin with, let’s briefly explain some Cadence concepts. Cadence core abstraction is a fault-oblivious stateful workflow. What that means is that the state of the workflow code, including local variables and any threads it creates, is immune to process and Cadence service failures. This is a very powerful concept as it encapsulates state, processing threads, durable timers, and event handlers.
In order to fulfill deterministic execution requirements, workflows are not allowed to call any external API directly. Instead, they orchestrate the execution of activities. An activity is a business-level function that implements application logic, such as calling a service or transcoding a media file. Cadence does not recover the activity state in case of failures; therefore, an activity function is allowed to contain any code without restrictions.
Writing Our Polling Loop
The code itself is pretty simple—we’ll go line by line explaining what each thing does:
State polledState = externalServiceActivities.getState();   while(!expectedState.equals(polledState)) {

  Workflow.sleep(Duration.ofSeconds(30));

polledState = externalServiceActivities.getState();

}
We’ve reached our expected state!
We start by calling an activity, in this case, an external service which could be a REST API. We then have our condition, matching our diamond in Fig 1. If the desired state hasn’t been reached yet, we schedule a sleep of 10 seconds. This isn’t any kind of sleep, it’s a durable timer. In this case, our polling waits for a brief period of time but it could be longer, and in those cases, you wouldn’t want to wait for the whole interval if your execution were to fail.
Cadence solves this by persisting timers as events and alerting the corresponding worker (service that hosts the workflow and activity implementations) once it has been completed. These timers can manage intervals going from seconds to minutes, hours, days, and even months or years!
Finally, we refresh our state by calling again our external service. It's as easy as that!
Before we continue, let’s take a quick look at what Cadence is actually doing behind the scenes in order to avoid potential issues.
Important: Cadence History and Polling Caveats
How does Cadence achieve fault-oblivious stateful workflows? The secret lies in how Cadence persists in workflow execution. The workflow state recovery utilizes event sourcing which puts a few restrictions on how the code is written. Event sourcing persists state as a sequence of state-changing events. Whenever the state of our workflow changes, a new event is appended to its history of events. Cadence then reconstructs a workflow’s current state by replaying the events.
That is why all communication with the external world should happen through activities and Cadence APIs must be used to get the current time, sleep, and create new threads.
Why Be Careful When Polling?
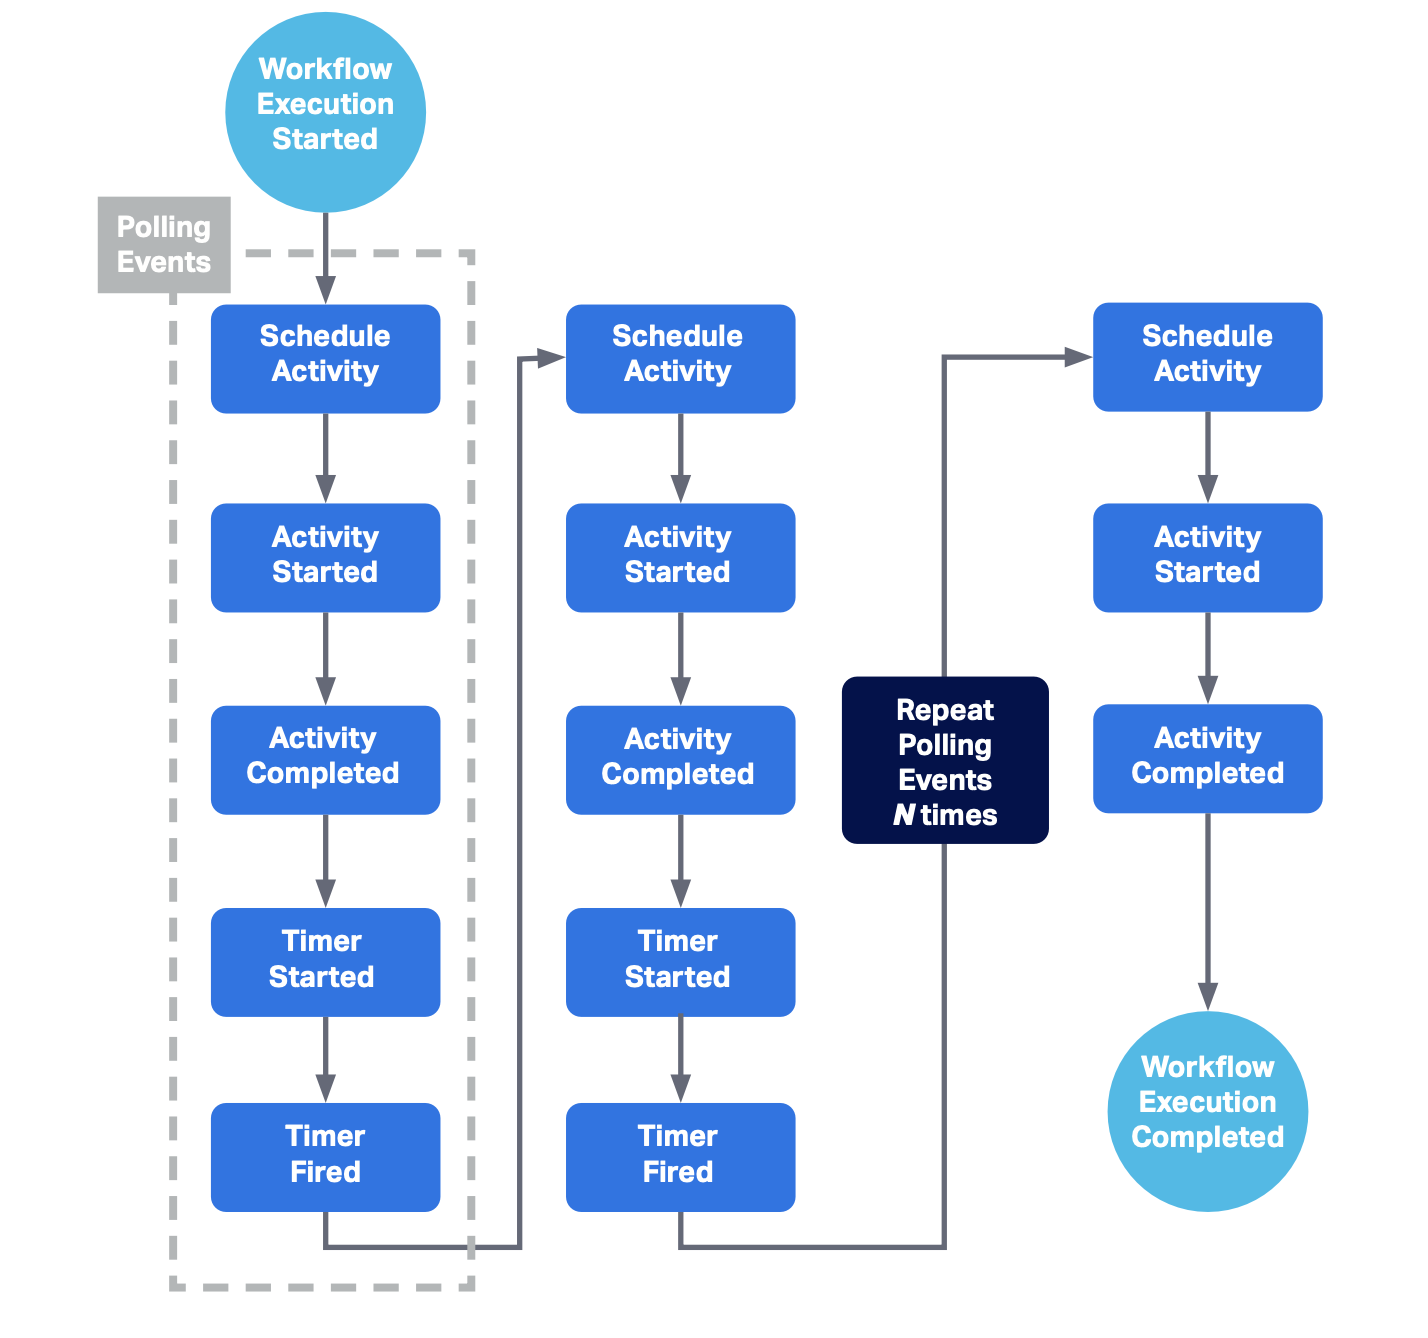
Polling requires looping over a condition over and over again. Since each activity call and timer event is persisted you may imagine how a short polling interval can result in a huge timeline. Let’s study what our polling snippet’s history could look like.
- We start by scheduling the activity needed to poll our external service.
- The activity is started by a worker.
- The activity completes and returns its result.
- Condition is not met yet, so a timer is started.
- Once time passes, an event is triggered to wake up the workflow.
- Steps 1 to 5 are repeated until the condition is met.
- The final poll confirms the condition is met (no need to set the timer).
- Workflow is marked as complete.

Fig 2. Cadence history of events for our polling snippet code
If the workflow were to fail somewhere in the middle and its history had to be replayed this could result in going through a huge list of events. There are several ways to keep it under control: avoid using short polling periods, set reasonable timeouts on your workflows, and limit polling to a certain number of polls.
Bottom line: remember all actions are persisted and may need to be replayed by workers.
Setting Up Activity Retries
What happens if our external service fails for some reason? We need to try, try, try again!
We briefly mentioned how Cadence uses activities for non-deterministic where something may fail unexpectedly, like consuming an API. This allows Cadence to record activity results and be able to resume workflows seamlessly while also adding support for extra functionality like retry logic.
Below is an example of activity configuration with retry options enabled:
private final ExternalServiceActivities externalServiceActivities =    Workflow.newActivityStub(ExternalServiceActivities.class,   new ActivityOptions.Builder()

 .setRetryOptions(new RetryOptions.Builder()   .setInitialInterval(Duration.ofSeconds(10))    .setMaximumAttempts(3)

 .build())

 .setScheduleToCloseTimeout(Duration.ofMinutes(5))    .build());
By doing so, we tell Cadence that actions present in ExternalServiceActivities should retry at most 3 times with an interval of 10 seconds between each try. In doing so, each call to an external service activity will be transparently retried without the need to write any retry logic.
Use Case Example: Instafood Meets MegaBurgers
In order to see this pattern in action, we’ll go through a fictional polling integration on our sample project.
Instafood Brief
Instafood is an online app-based meal delivery service. Customers can place an order for food from their favorite local restaurants via Instafood’s mobile app. Orders can be for pickup or delivery. If delivery is chosen, Instafood will organize to have one of their many delivery drivers pick up the order from the restaurant and deliver it to the customer. Instafood provides each restaurant a kiosk/tablet which is used for communication between Instafood and the restaurant. Instafood notifies the restaurant when an order is placed, and then the restaurant can accept the order, provide an ETA, mark it as ready, etc. For delivery orders, Instafood will coordinate to have a delivery driver pick up based on the ETA.
Polling “MegaBurgers”
MegaBurgers is a large multinational fast-food hamburger chain. They have an existing mobile app and website that uses a back-end REST API for customers to place orders. Instafood and MegaBurgers have come to an agreement where Instafood customers can place MegaBurger orders through the Instafood app for pickup and delivery. Instead of installing Instafood kiosks at all MegaBurger locations, it has been agreed that Instafood’s backend order workflow system will special-case MegaBurgers, and will directly integrate with MegaBurgers’s existing REST-based ordering system to place orders and receive updates.

Fig 3. MegaBurger’s order state machine
The MegaBurger’s REST API has no push-style mechanism (WebSockets, WebHooks, etc.) to receive order status updates. Instead, periodic GET requests need to be made to determine order status, and the result of these polls may cause the order workflow to progress on the Instafood side (such as scheduling a delivery driver for pickup).
Setting Up Instafood Project
In order to run the sample project by yourself, you’ll need to set up a Cadence cluster. In this example, we’ll be using the Instaclustr platform to do so.
Step 1: Creating Instaclustr Managed Clusters
A Cadence cluster requires an Apache Cassandra cluster to connect to for its persistence layer. In order to set up both Cadence and Cassandra clusters, we’ll follow the “Creating a Cadence Cluster” documentation.
The following operations are handled automatically for you:
- Firewall rules will automatically get configured on the Cassandra cluster for Cadence nodes.
- Authentication between Cadence and Cassandra will get configured, including client encryption settings.
- The Cadence default and visibility keyspaces will be created automatically in Cassandra.
- A link will be created between the two clusters, ensuring you don’t accidentally delete the Cassandra cluster before Cadence.
- A Load Balancer will be created. It is recommended to use the load balancer address to connect to your cluster.
Step 2: Setting Up Cadence Domain
Cadence is backed by a multi-tenant service where the unit of isolation is called a domain. In order to get our Instafood application running, we first need to register a domain for it.
In order to interact with our Cadence cluster, we need to install its command-line interface client.
macOS
If using a macOS client the Cadence CLI can be installed with Homebrew as follows:
brew install cadence-workflow

# run command line client

cadence <command> <arguments>
Other Systems
If not, the CLI can be used via Docker Hub image ubercadence/cli:
# run command line client

docker run --network=host --rm ubercadence/cli:master <command>  <arguments>
For the rest of the steps, we’ll use cadence to refer to the client.
2. In order to connect, it is recommended to use the load balancer address to connect to your cluster. This can be found at the top of the Connection Info tab, and will look like this:
“ab-cd12ef23-45gh-4baf-ad99-df4xy-azba45bc0c8da111.elb.us-east 1.amazonaws.com” We’ll call this the <cadence_host>.
3. We can now test our connection by listing current domains:
cadence --ad <cadence_host>:7933 admin domain list 4. Add instafood domain:
cadence --ad <cadence_host>:7933 --do instafood domain register --global_domain=false 5. Check that it was registered accordingly:
cadence --ad <cadence_host>:7933 --do instafood domain describe
Step 3: Run Instafood Sample Project
1. Clone Gradle project from Instafood project Git repository.
2. Open the property file at instafood/src/main/resources/instafood.properties and replace cadenceHost value with your load balancer address:
cadenceHost=<cadence_host> 3. You can now run the app by:
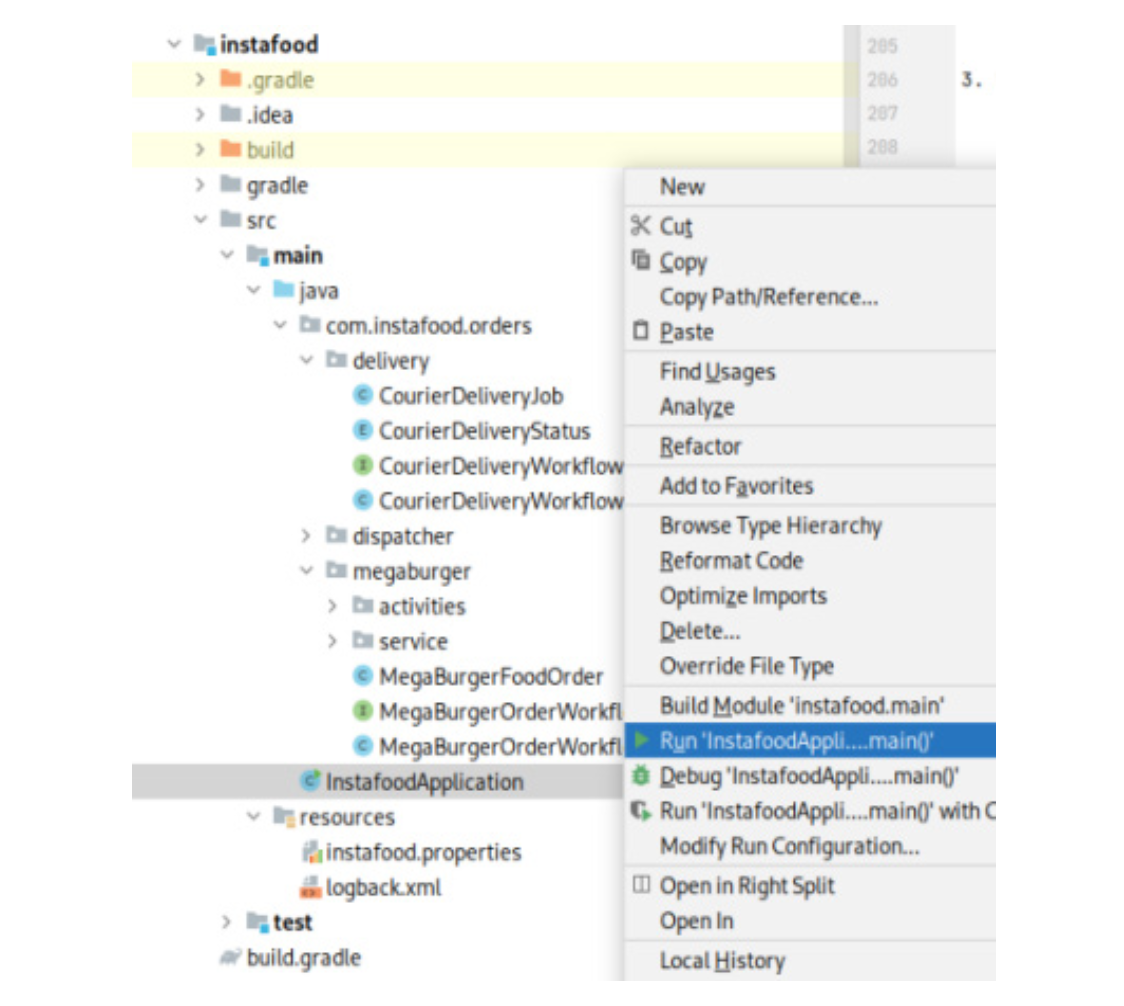
cadence-cookbooks-instafood/instafood$ ./gradlew run or executing InstafoodApplication main class from your IDE:

4. Check if it is running by looking into its terminal output:

Looking Into MegaBurger’s API
Before looking into how Instafood integrates with MegaBurger, let's first have a quick look into their API.
Run MegaBurger Server
Let’s start by running the server. This can be accomplished by running:
cadence-cookbooks-instafood/megaburger$ ./gradlew runor MegaburgerRestApplication from your IDE.
This is a simple Spring Boot Rest API with an in-memory persistence layer intended for demo purposes. All data is lost when the application closes.
MegaBurger’s Orders API
MegaBurger exposes its Orders API in order to track and update the state of each food order.
POST /orders
This creates an order and returns its id.
Request:
curl -X POST localhost:8080/orders -H “Content-Type: application/json” --data ‘{“meal”: “Vegan Burger”, “quantity”: 1}’ Response:
{

  “id”: 1,

  “meal”: “Vegan Burger”,

  “quantity”: 1,

  “status”: “PENDING”,

  “eta_minutes”: null

}
GET /orders
This returns a list with all Orders.
Request:
curl -X GET localhost:8080/orders Response:
[

{

    “id”: 0,

    “meal”: “Vegan Burger”,

    “quantity”: 1,

    “status”: “PENDING”,

    “eta_minutes”: null

},

{

    “id”: 1,

    “meal”: “Onion Rings”,

    “quantity”: 2,

    “status”: “PENDING”,

    “eta_minutes”: null

}

]
GET /orders / {orderId}
This returns Order with id equal to orderId.
Request:
curl -X GET localhost:8080/orders/1 Response:
{

  “id”: 1,

  “meal”: “Onion Rings”,

  “quantity”: 2,

  “status”: “PENDING”,

  “eta_minutes”: null

}
PATCH /orders/{orderId}
Updates Order with id equal to orderId
Request:
curl -X PATCH localhost:8080/orders/1 -H “Content-Type: application/ json” --data ‘{“status”:“ACCEPTED”}’ Response:
{

    “id”: 1,

    “meal”: “Onion Rings”,

    “quantity”: 2,

    “status”: “ACCEPTED”,

    “eta_minutes”: null

}
MegaBurger Polling Integration Review
Now that we have everything set up, let’s look at the actual integration between Instafood and MegaBurger.
Polling Workflow
We begin by defining a new workflow, MegaBurgerOrderWorkflow:
public interface MegaBurgerOrderWorkflow {

@WorkflowMethod

void orderFood(FoodOrder order);

// ...

}
This workflow has an orderFood method which will send and track the corresponding FoodOrder by integrating with MegaBurger.
Let’s look at its implementation:
public class MegaBurgerOrderWorkflowImpl implements MegaBurgerOrderWork flow {

// ...

@Override

public void orderFood(FoodOrder order) {

  OrderWorkflow parentOrderWorkflow = getParentOrderWorkflow();

Integer orderId = megaBurgerOrderActivities.createOrder(mapMega   BurgerFoodOrder(order));

 updateOrderStatus(parentOrderWorkflow, OrderStatus.PENDING);

// Poll until Order is accepted/rejected

updateOrderStatus(parentOrderWorkflow,              pollOrderStatusTransition(orderId, OrderStatus.

PENDING));

if (OrderStatus.REJECTED.equals(currentStatus)) {

 throw new RuntimeException(“Order with id “ + orderId + “      was rejected”);

}

  // Send ETA to parent workflow

  parentOrderWorkflow.updateEta(getOrderEta(orderId));  // Poll until Order is cooking

 updateOrderStatus(parentOrderWorkflow,            pollOrderStatusTransition(orderId, OrderStatus.ACCEPTED)); //   Poll until Order is ready

updateOrderStatus(parentOrderWorkflow,                pollOrderStatusTransition(orderId, OrderStatus.COOKING)); //   Poll until Order is delivered

updateOrderStatus(parentOrderWorkflow,

pollOrderStatusTransition(orderId, OrderStatus.READY)); }

// ...

}
The workflow starts by obtaining its parent workflow. Our MegaBurgerOrderWorkflow only handles the integration with MegaBurger, getting the order delivered to the client is managed by a separate workflow; this means we are working with a child workflow.
We then create the order through an activity and obtain an order id. This activity is just a wrapper for an API client which performs the POST to /orders.
After creating the order, the parent workflow is notified by a signal (an external asynchronous request to a workflow) that the order is now PENDING.
Now we must wait until the order transitions from PENDING to either ACCEPTED or REJECTED. This is where polling comes into play. Let's look at what our function pollOrderStatusTransition does:
private OrderStatus pollOrderStatusTransition(Integer orderId,  OrderStatus orderStatus) { OrderStatus polledStatus =

megaBurgerOrderActivities.getOrderById(orderId).getStatus();  while (orderStatus.equals(polledStatus)) {

    Workflow.sleep(Duration.ofSeconds(30));

 polledStatus = megaBurgerOrderActivities.

 getOrderById(orderId).getStatus();

}

return polledStatus;

}
This is very similar to the polling loop we presented in the introduction of this article. The only difference being instead of waiting for a specific state it polls until there is a transition. Once again, the actual API call used to get an order by id is hidden behind an activity that has retries enabled.
If the order is rejected, a runtime exception is thrown failing the workflow. If it is accepted, the parent is notified of MegaBurger’s ETA (this is used by the parent workflow to estimate delivery dispatching).
Finally, each of the remaining states shown in Fig 3 is transitioned, until the order is marked as delivered.
Running a Happy-Path Scenario
To wrap up, let’s run a whole order scenario. This scenario is part of the test suite included with our sample project. The only requirement is running both Instafood and MegaBurger server as described in the previous steps. This test case describes a client ordering through Instafood MegaBurger’s new Vegan Burger for pick-up:
cadence-cookbooks-instafood/instafood$ ./gradlew testor InstafoodApplicationTest from your IDE:
class InstafoodApplicationTest {

// ...

@Test

public void

givenAnOrderItShouldBeSentToMegaBurgerAndBeDeliveredAccordingly() {   FoodOrder order = new FoodOrder(Restaurant.MEGABURGER,      “Vegan Burger”, 2, “+54 11 2343-2324”, “Díaz velez 433, La        lucila”, true);

  // Client orders food

        WorkflowExecution workflowExecution= WorkflowClient       start(orderWorkflow::orderFood, order);

  // Wait until order is pending Megaburger’s acceptance await().until(() -> OrderStatus.PENDING.equals(orderWorkflow.    getStatus()));

// Megaburger accepts order and sends ETA

megaBurgerOrdersApiClient.updateStatusAndEta(getLastOrderId(),    “ACCEPTED”, 15);

await().until(() -> OrderStatus.ACCEPTED.equals(orderWorkflow.    getStatus()));

// Megaburger starts cooking order

megaBurgerOrdersApiClient.updateStatus(getLastOrderId(),    “COOKING”);

await().until(() -> OrderStatus.COOKING.equals(orderWorkflow.    getStatus()));

// Megaburger signals order is ready

megaBurgerOrdersApiClient.updateStatus(getLastOrderId(),    “READY”);

await().until(() -> OrderStatus.READY.equals(orderWorkflow.      getStatus()));

// Megaburger signals order has been picked-up

megaBurgerOrdersApiClient.updateStatus(getLastOrderId(),    “RESTAURANT_DELIVERED”);

await().until(() -> OrderStatus.RESTAURANT_DELIVERED.

equals(orderWorkflow.getStatus()));

await().until(() -> workflowHistoryHasEvent(workflowClient,         workflowExecution, EventType.WorkflowExecutionCompleted)):   }

 }
We have 3 actors in this scenario: Instafood, MegaBurger, and the Client.
- The Client sends the order to Instafood.
- Once the order reaches MegaBurger (order status is PENDING), MegaBurgers marks it as ACCEPTED and sends an ETA.
- We then have the whole sequence of status updates:
- MegaBurger marks the order as COOKING .
- MegaBurger marks the order as READY (this means it’s ready for delivery/pickup).
- MegaBurger marks the order as RESTAURANT_DELIVERED .
- Since this was an order created as pickup, once the Client has done so the workflow is complete.
Wrapping Up
In this article, we got first-hand experience with Cadence and how to use it for polling. We also showed you how to get a Cadence cluster running with our Instaclustr platform and how easy it is to get an application connected to it.

