Multi-Environment Angular With Dynamic Backend URI in Docker Compose

Our goals are simple — one frontend for different backends. Build once, reuse everywhere.
We did it with Angular 8 and docker-compose, and we are deploying our Angular application without rebuilding it for different backends.
Every client will own his own copy of the solution, without a centralized backend service. So our frontend should be able to change his requests endpoint dynamically during the start process.
Our delivery process is:
- Start installation script
- Start application
- Enjoy working application
As we don’t develop a centralized backend, we need our front-end application to be customizable for backend URI. And an important point here is that we decided to develop our front application with Angular 8. This means that after build we will receive static files **html/css/js**, which should include backend URI.
If you worked with Angular applications you know that it may not work out-of-the-box, so we will add our own service, which will manage backend URI.
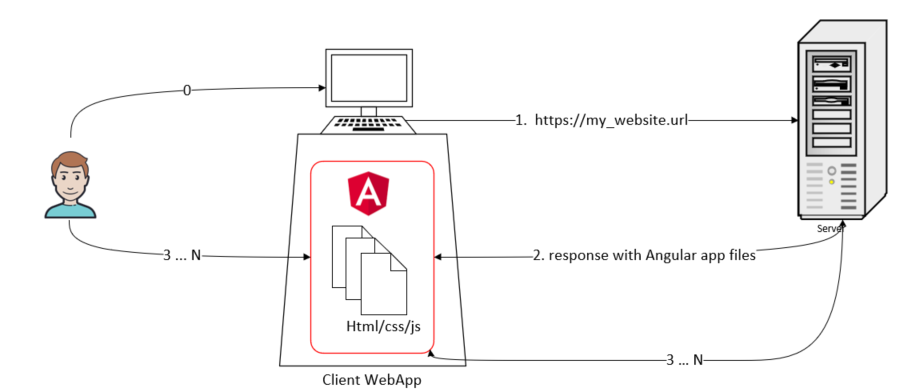
Standard Web App workflow

Web App Workflow
0: A user connects to a browser
1: The user inputs URL and the browser asks Server for files;
2: The user browser receives static files html/css/js which are the Angular web app.
3: Those steps represent user interaction with web app, which will communicate with the backend server and build representation on the client-side with JS code.
So by default, when we deploy our web app to the server it has to have backend service URI hardcoded in files, which is done automatically with Angular CLI during the build process.
You can find more about Angular in the official documentation.
Multi Backend Angular Web App
Our implementation differs from the original, with an additional file config.json which is in the assets directory and is served with other Angular files.
Content of the file:
x
// config.json example
{
"url": "https://my_backend.uri"
}
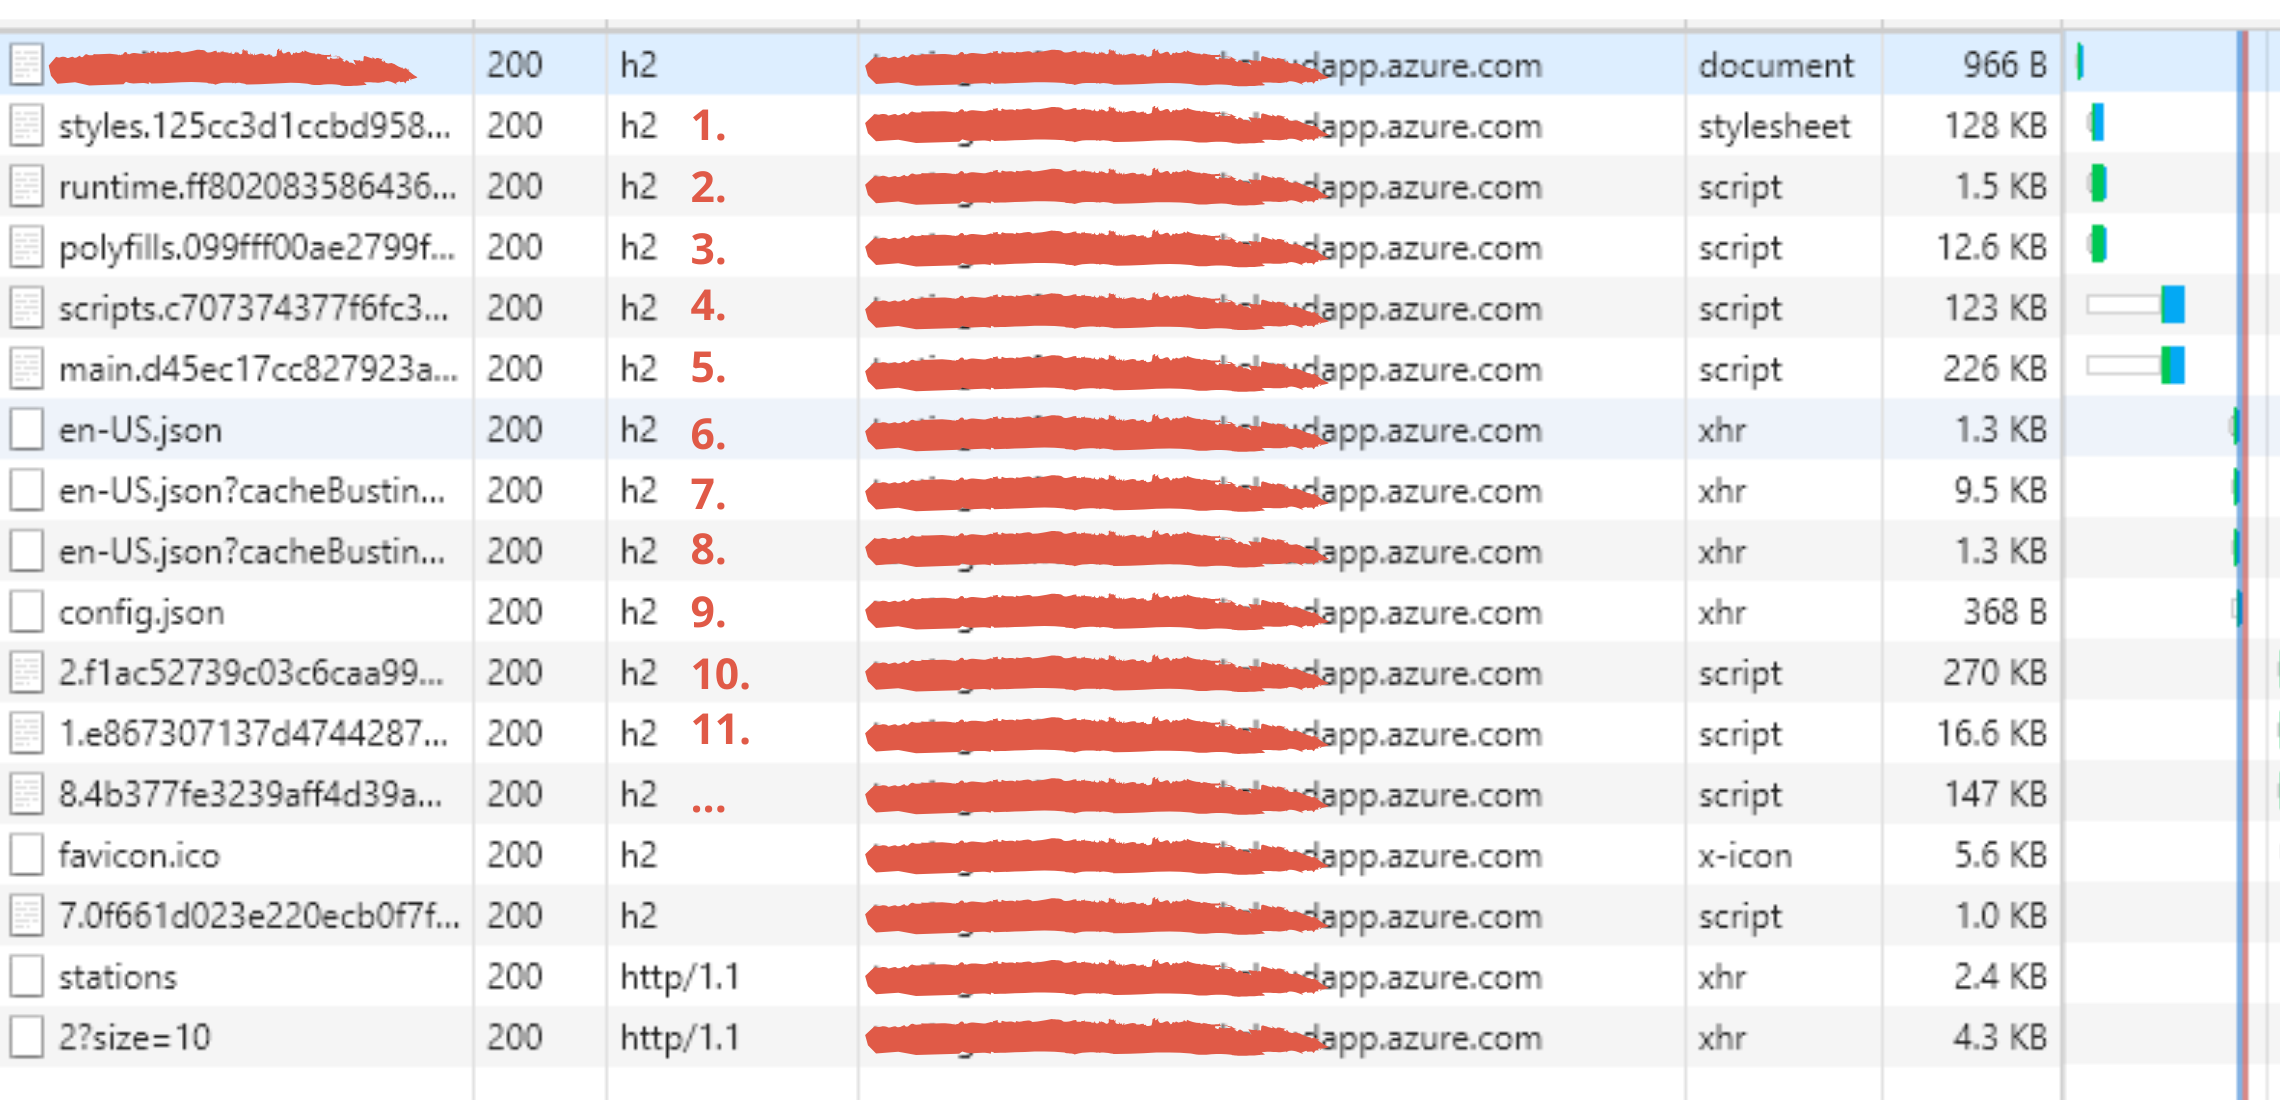
Here is our requests stack trace for the Angular web app:

From step 1-8, we are downloading files needed for Angular. And on step 9 we are receiving our config.json, which contains the URL of our backend service, to which the web app will send all requests.
Implementation Angular
I have created file config.teml.json which contains next template,
x
{
"url": "https://${SERVER_NAME}:${PORT_BACK_SSL}"
}
where SERVER_NAME is the backend service IP or domain name, and PORT_BACK_SSL is the backend service port for SSL communication if needed.
Then we should create a service which will configure our variables and inject them into the Angular app:
x
// app-config.ts
import { Injectable } from '@angular/core';
import { HttpClient } from '@angular/common/http';
interface Config {
url: string;
}
export interface IAppConfig {
baseUrl: string;
baseDMUrl: string;
baseStandardUrl: string;
load: () => Promise<void>;
}
()
export class AppConfig implements IAppConfig {
public baseUrl: string;
public baseDMUrl: string;
public baseStandardUrl: string;
constructor(private readonly http: HttpClient) {}
public load(): Promise<void> {
return this.http
.get<Config>('assets/config.json')
.toPromise()
.then(config => {
this.baseUrl = config.url;
});
}
}
export function initConfig(config: AppConfig): () => Promise<void> {
return () => config.load();
}
After, of course, we should inject this service into our app.module.ts:
xxxxxxxxxx
import { AppConfig, initConfig } from './app-config';
import { NgModule, Inject, APP_INITIALIZER } from '@angular/core';
import { HttpClientModule } from '@angular/common/http';
import { BrowserModule } from '@angular/platform-browser';
import { BrowserAnimationsModule } from '@angular/platform-browser/animations';
import { AppComponent } from './app.component';
({
imports: [
BrowserModule,
BrowserAnimationsModule,
HttpClientModule,
],
providers: [
AppConfig,
{
provide: APP_INITIALIZER,
useFactory: initConfig,
deps: [AppConfig],
multi: true
},
],
declarations: [AppComponent],
bootstrap: [AppComponent]
})
export class AppModule {
}
As you can see we are using the APP_INITIALIZER provider to initialize our AppConfig module.
Docker
The Docker image for our Angular application is based on Nginx:
x
# base image
FROM nginx:stable-alpine
# clean NGINX static files
RUN rm -rf /usr/share/nginx/html/*
# copy WebApp built files into NGINX directory
COPY ./dist/app /usr/share/nginx/html
Docker Compose
Our Docker Compose file is key for multi-backend deployment with an Angular app:
x
version: "3"
services:
backend:
image: privateregistry.azurecr.io/cc/backend:develop
expose:
- "8080"
frontend:
image: privateregistry.azurecr.io/cc/frontend:develop
ports:
- "80:80"
- "443:443"
- "8080:8080"
links:
- backend:backend
env_file:
- ./backend.env
command: /bin/sh -c "envsubst '$${SERVER_NAME},$${PORT_BACK_SSL}' < /usr/share/nginx/html/assets/config.templ.json > /usr/share/nginx/html/assets/config.json && exec nginx -g 'daemon off;'"
And the key component here is the last line:
x
command: /bin/sh -c "envsubst '$${SERVER_NAME},$${PORT_BACK_SSL}' < /usr/share/nginx/html/assets/config.templ.json > /usr/share/nginx/html/assets/config.json && exec nginx -g 'daemon off;'"
Where we execute swapping of strings ${SERVER_NAME} and ${PORT_BACK_SSL} in config.templ.json and we store this file in place of config.json which will be used by the frontend.
Values of those variables are taken from the environment variables for the Docker Compose environment, which are initialized in the file backend.env
x
SERVER_NAME=mydomainfortest.westeurope.cloudapp.azure.com
PORT_BACK_SSL=443
Automation
This moment is essential because creating an undefined number of files that contain separate SERVER_NAME instances for each client will be overcomplicated.
So I use this script, which is executed before each pull of images:
x
export SERVER_NAME=$(curl https://ipinfo.io/ip) && \
echo -e "\nSERVER_NAME="$SERVER_NAME >> backend.env
Thanks for reading!
If you have other errors during deployment or you interested in another topic, please add comments. I'm interested in the dialog.
Further Reading
Deployment Automation for Multi-Platform Environments
Dockerizing an Angular App via Nginx [Snippet]

