Testing WebSocket Endpoints With Firecamp
Consumer applications these days demand real-time information. Users prefer receiving fresh information on their devices rather than polling them from time to time. For example, a push notification will be sent to the user's mobile whenever the flight schedule changes. Also, a crypto trading web application keeps updating its UI to reflect the latest movements in the market.
Thanks to technologies like WebSockets, implementing real-time applications has become more accessible for developers.
In this tutorial, we will discuss implementing a WebSocket endpoint with Node.js. Then we will use Firecamp to test it.
What Is WebSocket?
WebSocket is a computer communications protocol, providing full-duplex communication channels over a single TCP connection.
In simple words, WebSocket allows client and server applications to achieve three things in particular:
- The client application establishes a persistent TCP connection with the server. That is called handshaking.
- Once connected, either party can transmit data at any given time. The transmission is real-time and happens in both directions.
- Either client or the server may decide to terminate the connection at its will.
Typically, WebSocket clients are web browsers. A good portion of modern browsers have the WebSocket API built into them. That makes building front-end applications straightforward and standardized.
WebSocket significantly differs from traditional HTTP as it doesn't close the connection after receiving data. HTTP has been designed as a stateless protocol. But some technologies built on top of HTTP, such as long polling and Comet, attempted to make it stateful and yet lacked reliability and performance.
Where to Use WebSockets
WebSockets is a stateful protocol. Hence, it is ideal for building real-time applications that wait for new information and update themselves.
Some examples include:
- Chat applications
- Stock trading consoles
- Live location tracking on maps
- Live auction bidding
- Social media applications with notifications
How to Build WebSocket Applications
A WebSocket application is made of a frontend and a backend. The frontend is the user-facing component, whereas the backend is responsible for tasks like managing client connections, accessing data storage, and writing messages back to the frontend.
Almost all frontend frameworks today come with native support for WebSockets. When it comes to the backend, most modern programming languages and frameworks provide SDKs and libraries to add WebSocket functionality. For example, Node.js provides the ws npm module.
These libraries and frameworks abstract the developer from writing low-level code to get the WebSocket functionality done. Instead, they can better focus on the application logic.
A Simple Node.js WebSockets Server
Let's imagine we have a simple Node.js WebSocket server that converts whatever text input it receives and writes that back to clients.
The complete code looks like this:
const WebSocket = require('ws');

const PORT = 8080;
const wss = new WebSocket.Server({ port: PORT });

wss.on('connection', (ws) => {
  const clientId = uuidv4();
  console.log("Connection accepted from client: " + clientId)
  ws.send('Welcome to the toUpper() service!');

  ws.on('message', function message(data) {
    const message = data.toString();
    console.log('received: %s', message);
    ws.send(message.toUpperCase());
  });

  ws.on("close", () => {
    console.log("Websocket client " + ws + " has been disconnected.")
  });
});

//A function to generate a unique client ID
function uuidv4() {
  return 'xxxxxxxx-xxxx-4xxx-yxxx-xxxxxxxxxxxx'.replace(/[xy]/g, function (c) {
    var r = Math.random() * 16 | 0, v = c == 'x' ? r : (r & 0x3 | 0x8);
    return v.toString(16);
  });
}

console.log("Websocket server has been started and listening on port " + PORT);
Running the Server
To run that, you need to have Node.js installed on your machine in the first place. Then clone this GitHub repository into a preferred location.
Go inside the cloned location and type the below command into a terminal to fetch the dependencies, including the ws library.
cd websockets-testing-with-firecamp
npm install
Start the server by:
node server.js
Testing the WebSocket Server With Firecamp
Now that we have a functional WebSocket server up and running, the next thing is testing.
How can we find a quick way of testing that code without writing a client? The answer is Firecamp.
Firecamp is a GUI client for testing multiple web API protocols such as WebSockets, SocketIO, GraphQL, and REST. If you build an API backend, you can use Firecamp to fire up quick tests against the backend, share API requests with fellow developers, and collaborate over the project. Ultimately, Firecamp increases the developer's productivity by cutting down the boring but necessary tasks.
Step 1: Setting Things Up
To get started, download and install Firecamp on your local machine. Firecamp provides you with multiple choices for installation. You may use a desktop client or a browser extension. Either way, the underlying functionality will be the same.
Step 2: Connect to the Server
Let's connect Firecamp to the Node.js server running on port 8080. For that, we need to create a WebSocket request.
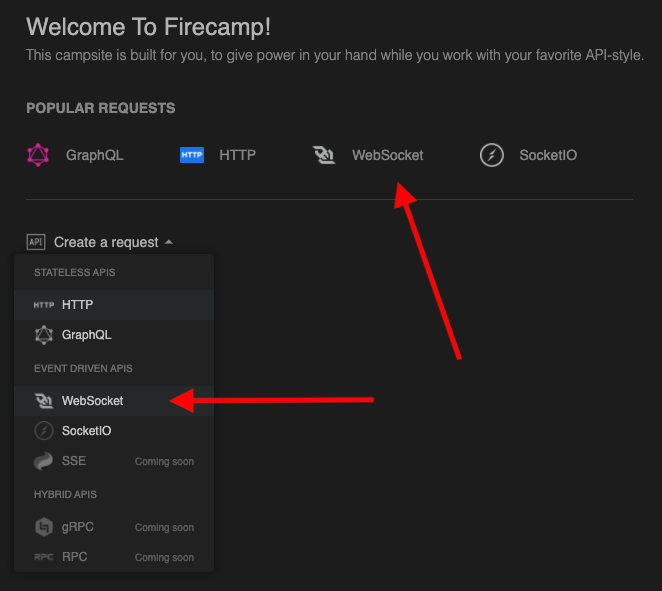
Launch Firecamp and then locate the create a request dropdown menu on the splash page. Select WebSocket as follows.

Alternatively, you can click on the tab panel and select WebSocket.
In the next screen, type in ws://localhost:8080 in the URL bar and click on the Connect button.
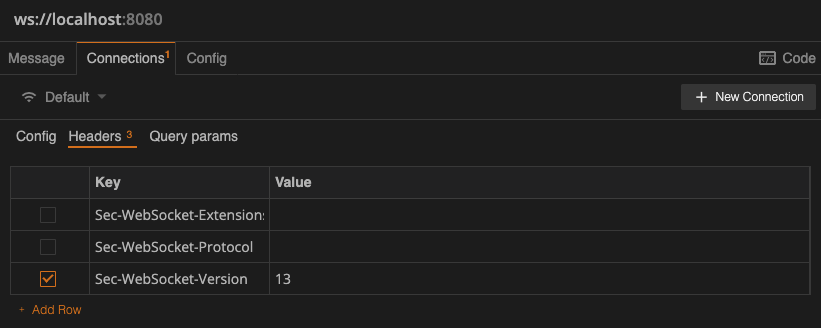
Once you click on the Connect button, Firecamp attempts to establish a connection with the Node.js WebSocket server that runs on port 8080. That is called handshaking. At this point, you can pass additional parameters to the server, such as configurations, headers, and query parameters, using the Connections tab as follows.

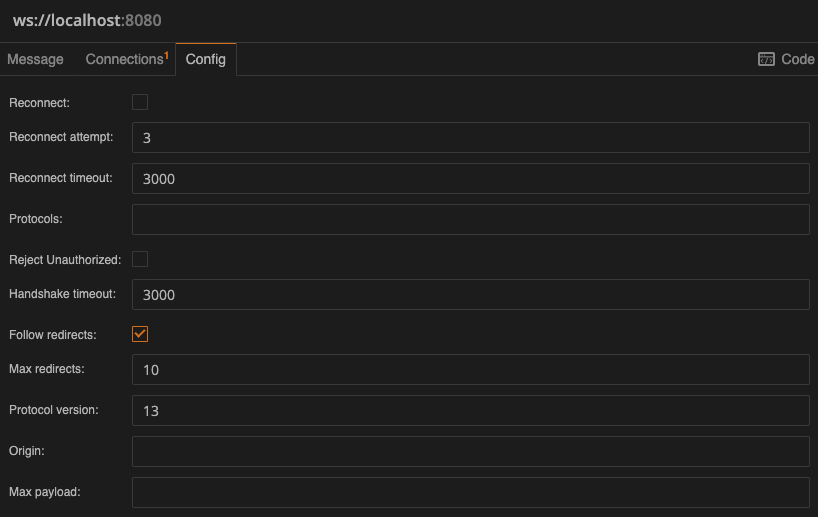
Moreover, the Config tab allows you to set various configuration settings about the connection. That includes the reconnect attempts, protocol version, max payload size, etc.

If the handshaking goes well, you will see a list of log messages on the right-side panel in chronological order as follows.

At this point, Firecamp has connected to the Node.js server, upgraded it to a WebSocket connection, and is ready to send/receive data from both ends.
Step 3: Send a Message to the Server and Observe the Response
Now that we have an open connection to the WebSocket server, let's send a message and examine the output of the response as well.
To send a message, select the Message tab below the URL bar and select text as the message format from the dropdown list.
Type in a message of your choice and click on the arrowhead-shaped button to send it. Then Firecamp will write that message to the WebSocket and eventually it will be sent out to the server.

The server receives the message, converts it to uppercase, and writes that back to the opened connection.
When Firecamp receives the response, it will be logged in the right-side panel like this:

You can click on each log entry to see more details.
Step 4: Send and Receive JSON Messages
Now we can confirm that our Node.js WebSocket server works well for text messages. Let's go one step ahead and change the code to process JSON messages instead of text.
The only change you need to make would be:
ws.on('message', function message(data) {
    const originalMessage = JSON.parse(data);
    console.log('received: %s', originalMessage);

    const ucMessage = originalMessage.message.toUpperCase();
    ws.send(JSON.stringify({"transformed" : ucMessage}));
  });
You can find the modified server code in the server-json.js file in the same directory. Stop the existing server and start the new JSON server using:
node server-json.js
Follow the same steps as Step 2 to connect Firecamp to the new WebSocket server that supports JSON. After establishing the connection, select the Message tab, and then select JSON as the message type.

Send the message and observe the JSON-formatted response appear in the log panel.

Step 5: Terminate the Connection
You can continue to send and receive different messages with Firecamp. In the end, you can close the connection by clicking on the Connect button again. Firecamp will prompt you for a status code and a reason for the closure. You can leave them blank for the moment.
Firecamp then terminates the WebSocket connection to the server and logs in the following message afterward:
"1000: Normal closure; the connection successfully completed whatever purpose for which it was created."
Conclusion
In this post, you learned how quickly you can test a WebSocket backend using Firecamp.
Firecamp brings all possible tools to test and debug any WebSocket endpoints without writing any client-side code. It offers you rich GUI support to pass in additional headers, fiddle with different configuration settings, and examine the response received from the server.
Apart from WebSockets, Firecamp supports other web protocols such as Socket.IO, GraphQL, and REST. To learn more about working with them, you can visit here.

