How To Approach Amazon API Gateway as a Mule Developer (Part I)
Amazon API Gateway
Do you want to create your first API in Amazon API Gateway but don’t know where to start? Plus, you have experience defining API Specifications in RAML with Design Center, and you are wondering if that knowledge can be leveraged.
If you have defined API specifications in Anypoint Platform’s Design Center with RAML in the past, understanding and working with Amazon API Gateway can be an easy lift. While RAML is a modeling language and Amazon API Gateway is a service (and are, by definition, tools for different purposes), we can leverage your knowledge.
Follow this article for a step-by-step into Amazon API Gateway via a comparison with what you usually do with Design Center and RAML.
Note: If you already have an OpenAPI Specification (OAS) and want to kickstart the creation of your API in AWS API Gateway, follow this link to learn How to leverage OAS & RAML in AWS API Gateway
To effectively use Amazon API Gateway, it's crucial to have a basic understanding of APIs, such as resources, methods, status codes, responses, query parameters, path parameters, headers, and body requests. If you're unfamiliar with these concepts, we suggest learning the basics before diving into this article.
What Is Amazon API Gateway?
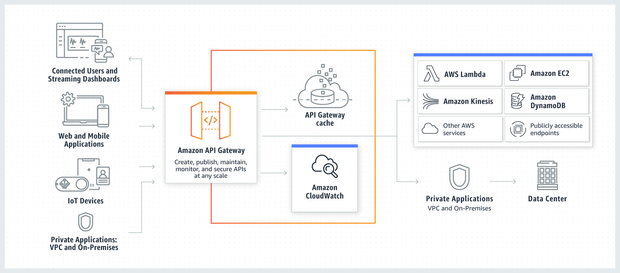
Amazon API Gateway is a fully managed service provided by Amazon Web Services that allows developers to create, publish, monitor, and secure APIs at any scale. Using API Gateway, you can build RESTful APIs and WebSocket APIs that enable real-time two-way communication applications. API Gateway supports containerized and serverless workloads, as well as web applications.
Some of the benefits of this service are efficient API development, performance at any scale, cost savings at scale, easy monitoring, flexibility, and security controls.
Defining REST APIs: Design Center With RAML vs. Amazon API Gateway
Let's start defining an API step by step. First, we’ll recreate how you usually do it with Design Center and then guide you on how to do it with Amazon API Gateway.
1. Creating the API Definition
We can create our API from scratch or import an existing file in the Design Center and Amazon API Gateway. In this case, we will make the API from scratch.
On the Design Center main page, click the Create button and select New API Specification.

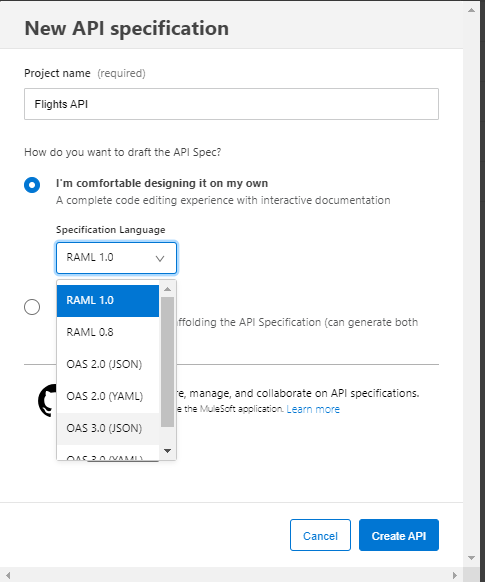
In the Design Center, we have a lot of definition languages to choose from. This doesn’t happen in Amazon API Gateway because we’ll usually do the definitions in the API Gateway console.
In Design Center, in the prompt window, set the project name to “Flights API,” RAML 1.0 as a Specification Language, and click the Create API button. The project should be created.
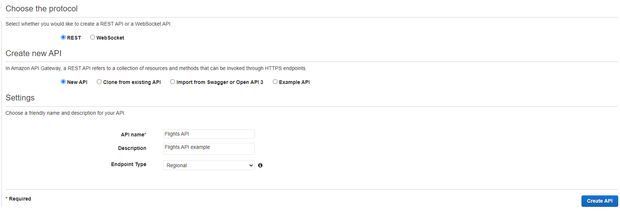
On the Amazon API Gateway console main page, click on the Create API button.

Select the REST API option.

Set the name to “Flights API, “set the description to “Flights API example, “ and leave the Endpoint with the default option.
2. Creating a Resource
At this point, we only have our API’s name. Then, we will create an endpoint called flights to receive requests from different HTTP verbs.
We must write the correct RAML syntax in the Design Center, and the endpoint will be created.

In the Amazon API Gateway console, we need to specify we want to create a resource.
Then, we have to set some configurations. We only have to set the resource name to flights. Resource paths should be filled automatically with the same name. If not, type it.

Click on the Create Resource button. The endpoint will be created.

3. Creating a Method
We must write the correct RAML syntax in the Design Center to create a method. In this case, we will create a get method.

In the Amazon API Gateway console, to create a new method while /flights resource is selected, click on the actions button and select the create method option.

An input with a list of HTTP methods will be displayed.
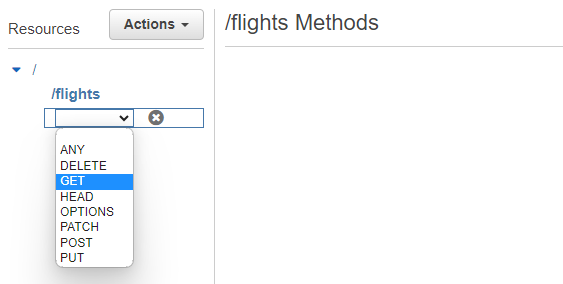
Select GET and then click the check button.

A new GET method will be created. Amazon API Gateway is more complex than an API specification because we must establish several settings to integrate a backend with our API.
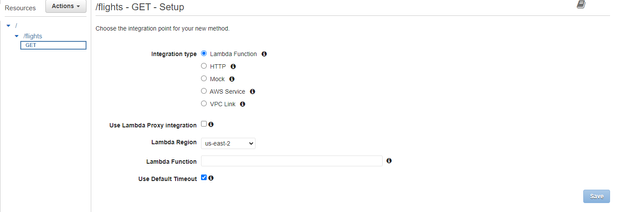
For this exercise, we will use mocks to represent our Flights data. We won’t integrate any backend service to our API. Select Mocks as Integration type and click the Save button.

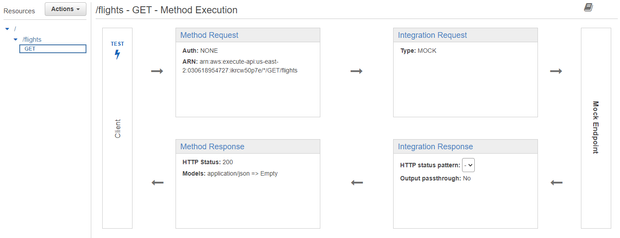
Our approach should appear like the following. From now this screen will be called and refer to /flights - GET - Method Execution.
4. Creating a Headers
In Design Center, using the correct RAML syntax, we have to write the corresponding code to define a header and set whether it is required. In this case, it will be necessary.

In the Amazon API Gateway console, click on Method Request in /flights - GET - Method Execution and expand HTTP Request Headers. The following screen should appear.
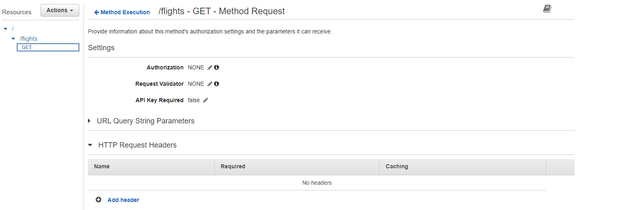
Click Add header, set the header name to user_id, click the check button, and check the required box.
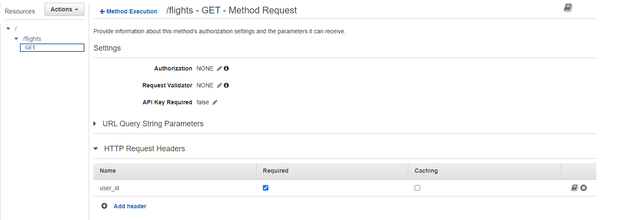
Click on the Edit button in the Request validator. A select input should appear. Select the option Validate body, query string parameters, and headers. Click the check rounded button to save the configuration.
Now, both of our APIs require a header named user_id.
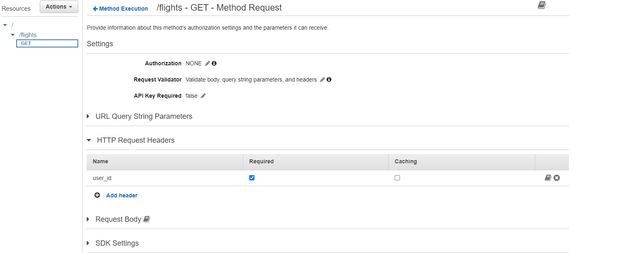
5. Creating Query Parameters
In Design Center, using the correct RAML syntax, we have to write the corresponding code to define a query parameter, set the name to the origin, and type the string, and in this case, it will not be required.
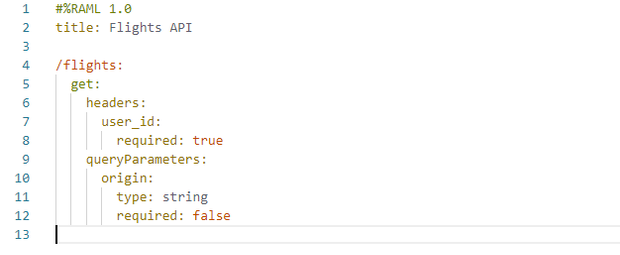
In the Amazon API Gateway console, select Method Request in /flights - GET - Method Execution and expand URL Query String Parameters. The following screen should appear.

Click on Add query string, set the name to the origin, and click the check button. This query parameter won’t be required, so there is no need to check the Required box.

6. Creating a Dynamic URI Path Parameter
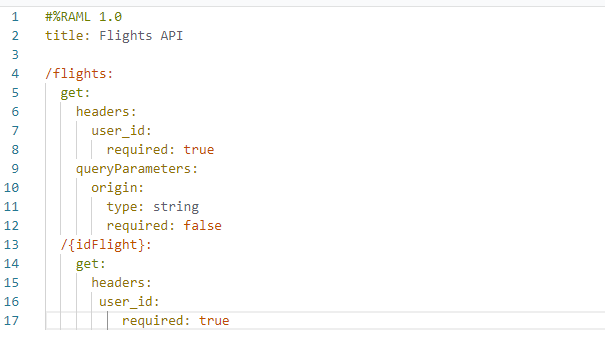
Using the correct RAML syntax in Design Center, we must write the resource with the path param we want to create. In this example, we will create an idFlight path param to retrieve flight data with that id.
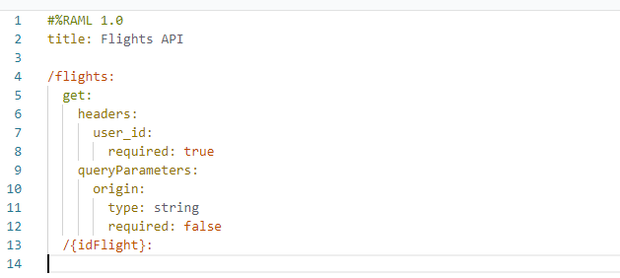
Remember to write the method at the same indentation as the first get method. Set a GET method for this resource and its required user_id header.
In the Amazon API Gateway console, to create a resource with a path param, be sure the /flights resource is selected and, click the Actions button, select the Create resource button.

Set the Resource name to /flights and change the resource path to {idFlight}. Click on the Create resource button.

The new resource /{idFlight} should be created under the /flights GET method.

Click on the Actions button while /{idFlight} resource is selected. Click on the create method. Select GET and click on the rounded check button.

Set the integration type to Mock. Click the save button.

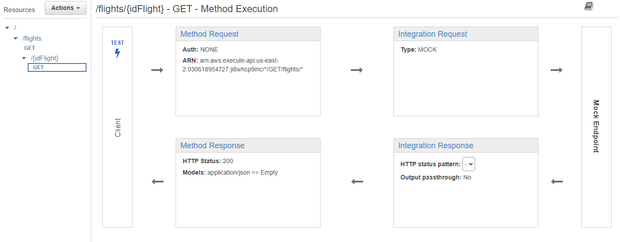
A new method under the /{idFlight} resource should be created. From now this screen will be referred to /flights/{idFlight} - GET - Method Execution.
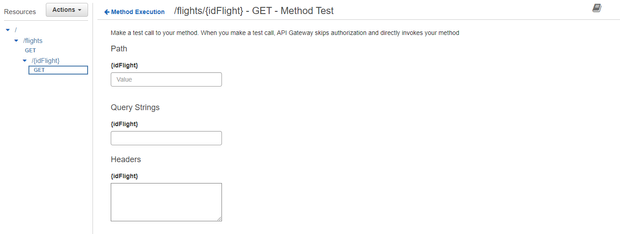
Click on the test button, and note there is a new path param field {idFlight}. There, you can set the value for your id.
7. Creating Models and Creating DataTypes
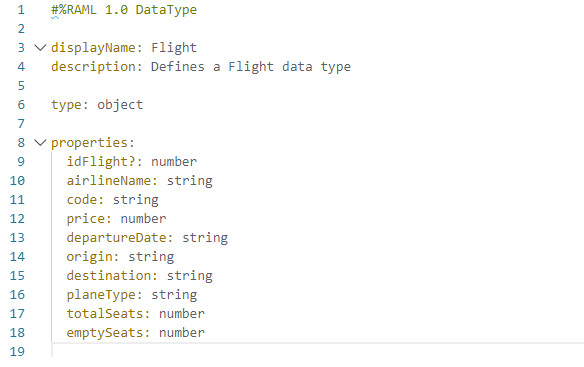
We are almost ready to send our first request to our APIs, but first, we need to define a data type that will represent an object containing properties and values for flight data.
In the Design Center, inside the project, we have to create a new folder named 'data-types'; inside that folder, we need a RAML 1.0 Data Type file called Flight.raml.
The properties of the data type file are the following.
Visit the Amazon API Gateway here.
Returning to the Amazon API Gateway console, click on the Models link located in the left panel of the console. The following screen should appear.
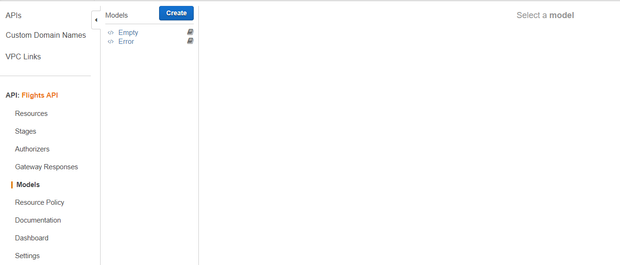
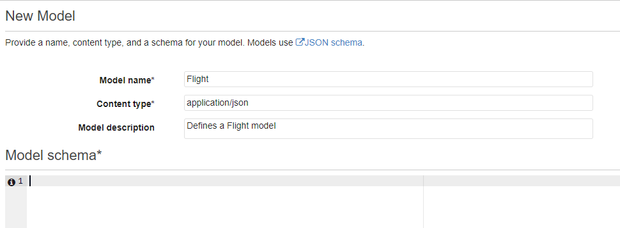
Click on the create button, set the name to Flight, the content type to application/json, and set an optional description.
In the Model schema input, set the value shown in the following image. 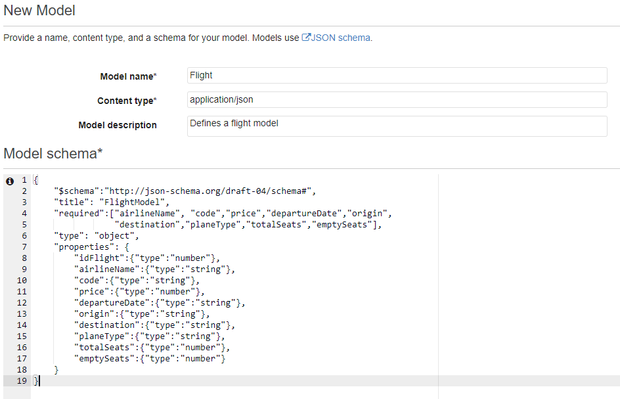
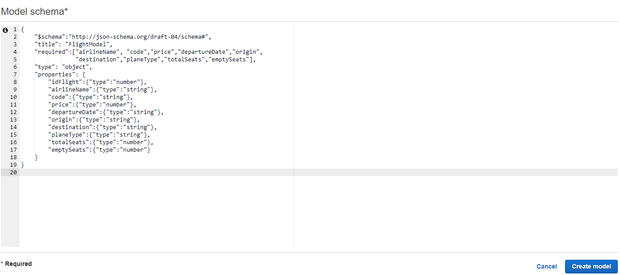
Click the Create Model button at the bottom right of the screen, and your model will be on the right side of the console.
Click on the Create button again to create a new model. Set the name to Flights, Content-Type to application/json, the description “Defines an array of Flights model, “ and the Model Schema as the following:
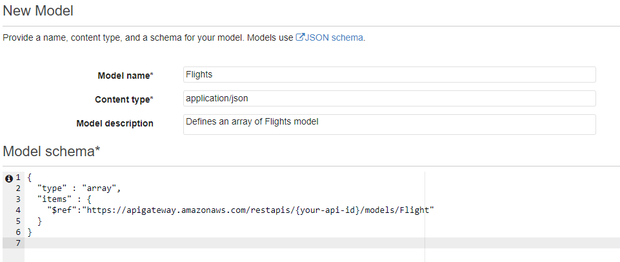
The value {your-api-id} in the $ref property must be changed to your Amazon API. Otherwise, the console won't be able to create the Flights model. The API ID can be found at the top of the console next to the Flights API link, as shown below.

This model indicates that it will be an array of Flights (the last model created). Finally, click on the create model button at the bottom right of the console, and your Flights model will be created and located on the left side of the console.
8. Mocking Responses
Once we have created the models and data types, the next step is to create an object with representative data to simulate a response from the server.
In the Design Center, inside the project, we have to create a new folder named 'examples,' and inside that folder, we need to create a RAML 1.0 Example file called Flight.raml
The properties of the Flights.raml file is the following.
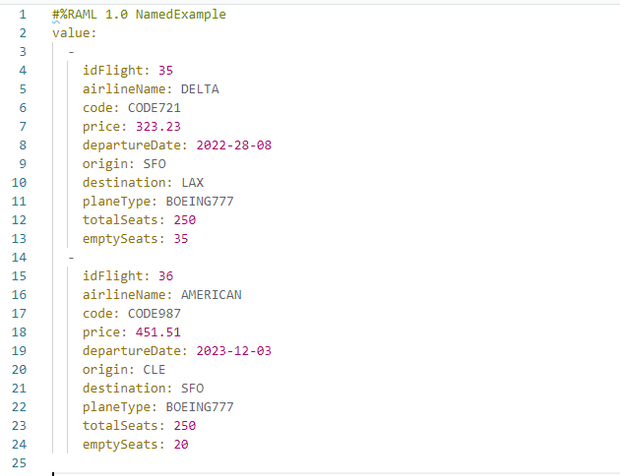
Repeat the last steps for a RAML 1.0 Example file named Flight.raml with the following properties.
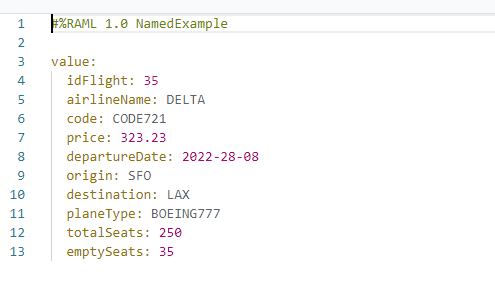
Amazon API Gateway does not have examples. Instead, they refer to this functionality as Mock Integrations. For this exercise, we are not calling any backend service to retrieve actual data from a database; instead, we are simulating data.
To create a mock integration in the Amazon API Gateway console, click on the Resources link on the left side, then click the GET method, and the following screen should appear.
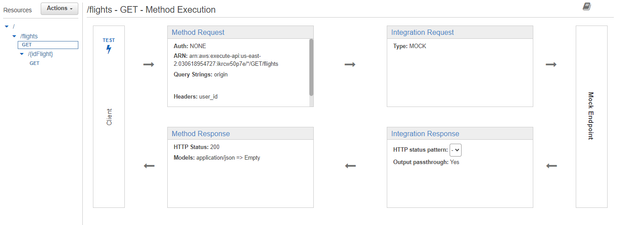
Click Integration Request. Be sure the Mock checkbox is chosen as the Integration type. Expand Mapping Templates. Choose or add an application/json mapping template. The screen should appear like the following.
The template input should be generated automatically with a status code. If not, the following JSON code should work: {"statusCode": 200}
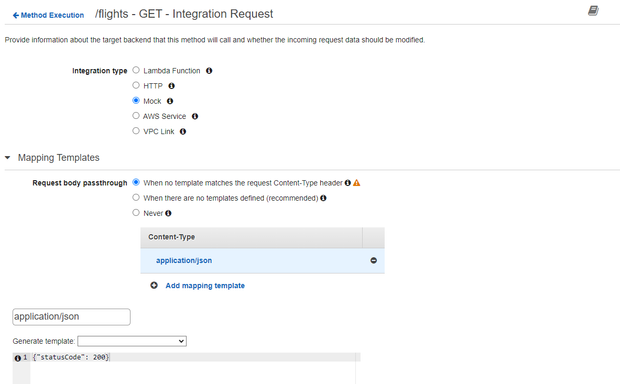
Return to /flights - GET - Method Execution and click Integration Response. Expand the 200 response and then the Mapping Templates section. The screen should be like the following.
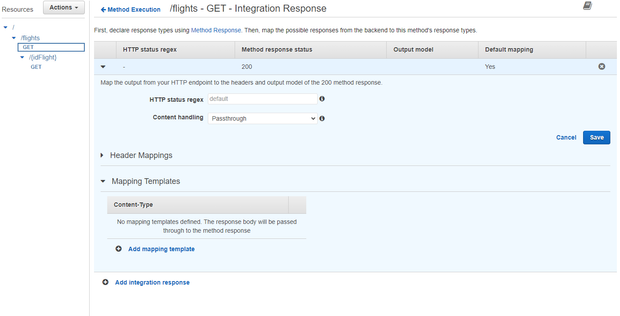
Click on Add mapping template. Set the Content-Type to application/json and click the check rounded button. The following screen should appear.
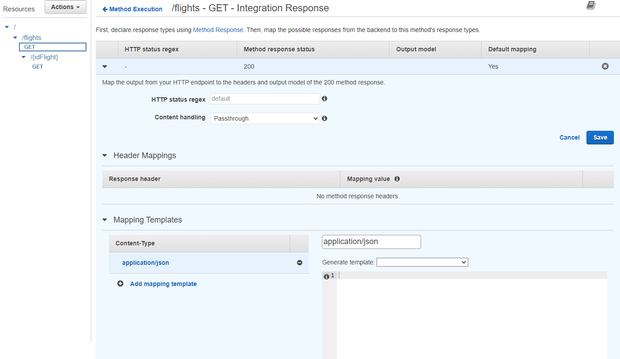
Click on the Generate template select input, and notice there are four options to generate a template. Click on the Flights option. The Amazon API Gateway console should generate a template like the following.
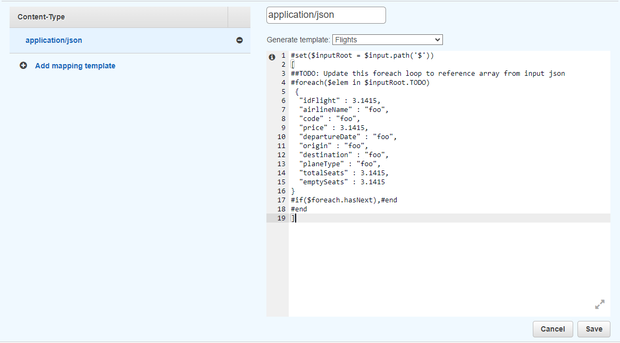
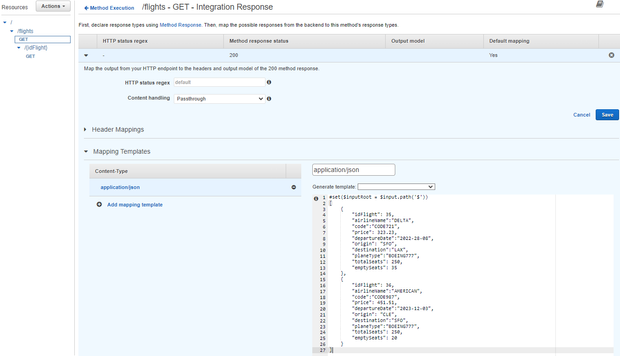
The Amazon API Gateway creates a mapping template based on the Model created earlier in this article. However, we will not be using that template in this case. Instead, input the code in the image below and click the save button.
#set($inputRoot = $input.path('$'))
[
    {
        "idFlight": 35,
        "airlineName":"DELTA",
        "code":"CODE721",
        "price": 323.23,
        "departureDate":"2022-28-08",
        "origin": "SFO",
        "destination":"LAX",
        "planeType":"BOEING777",
        "totalSeats": 250,
        "emptySeats": 35
    },
    {
        "idFlight": 36,
        "airlineName":"AMERICAN",
        "code":"CODE987",
        "price": 451.51,
        "departureDate":"2023-12-03",
        "origin": "CLE",
        "destination":"SFO",
        "planeType":"BOEING777",
        "totalSeats": 250,
        "emptySeats": 20
    }
]
Amazon API Gateway console should be like the following:
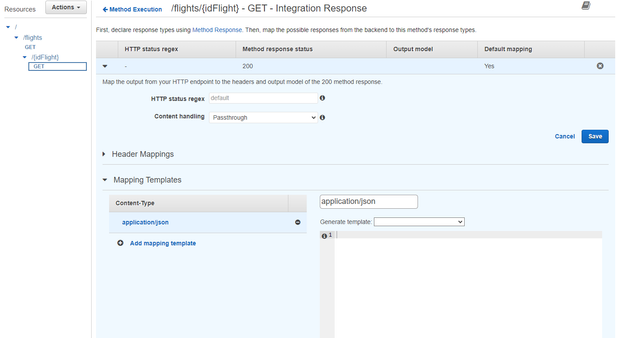
Let's repeat all the steps for the GET Method in /{flights} resource. Click on Integration response in /flights/{idFlight} - GET - Method Execution. Expand the 200 response and then the Mapping Templates section. Add a Mapping template with the value application/json. Finally, click on the check rounded button.
Then select the Flight option in the Generate template input. It should generate a template like the following.
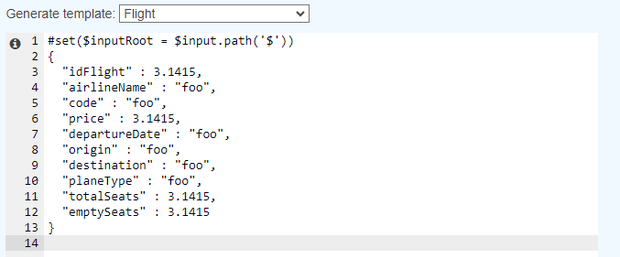
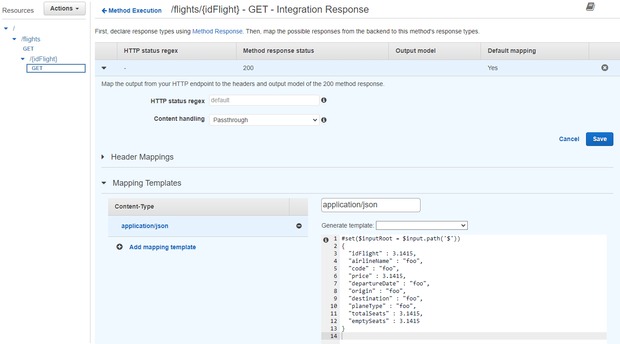
We are using this example but making some changes to the template. Use the following code.
#set($inputRoot = $input.path('$'))
{
    {
        "idFlight": 35,
        "airlineName":"DELTA",
        "code":"CODE721",
        "price": 323.23,
        "departureDate":"2022-28-08",
        "origin": "SFO",
        "destination":"LAX",
        "planeType":"BOEING777",
        "totalSeats": 250,
        "emptySeats": 35
    }
}
Finally, click the save button, and the success response for GET /{idFlight} will be created.
9. Creating a Success Response
In Design Center, using the correct RAML syntax, we have to write the corresponding code to define a 200 success response. Write 200, define a body, this response is an application/json, type Flight[], and add the example created importing with the !include syntax. The success response will be created.
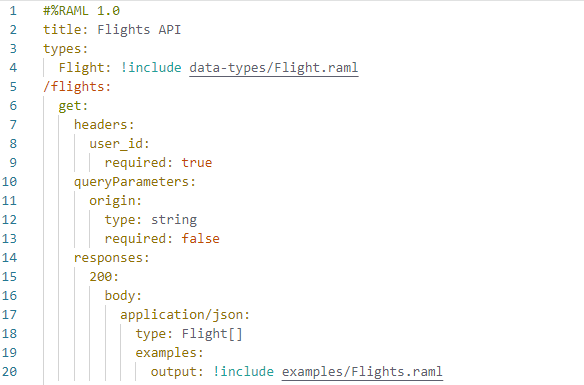
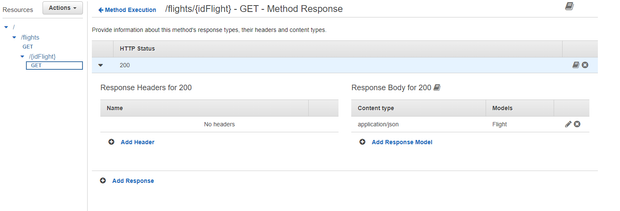
In the Amazon API Gateway console, go back to /flights - GET - Method Execution and click Method Response. The 200 response should be created. Expand 200 response, and you will see the response body has an empty model. Click the Edit button on the Response Body and select the Flights model.

Follow the previous steps to generate a successful response for the GET method in the /{idFlight} resource, but in this case, instead of Flights, choose Flight as the Model.
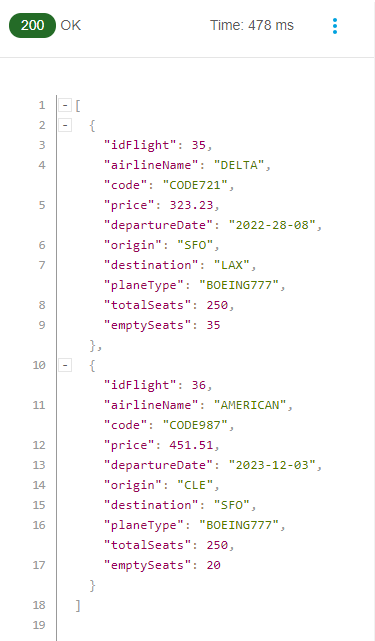
We can test the API specification in the Design Center in the API console. We will test the first endpoint we created with the GET method.
Click on the GET method, click the Try it button, and set the user_id header to any value. Click the Send button, and a 200 response should appear with the Flights data.
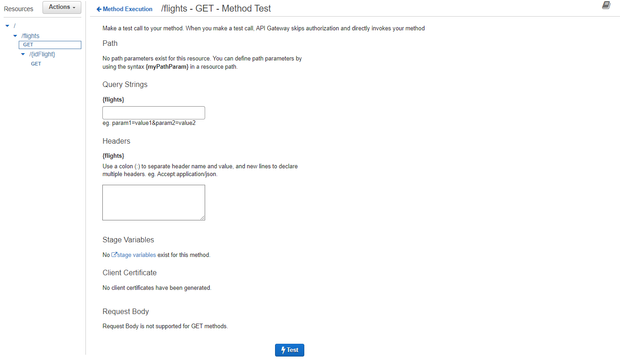
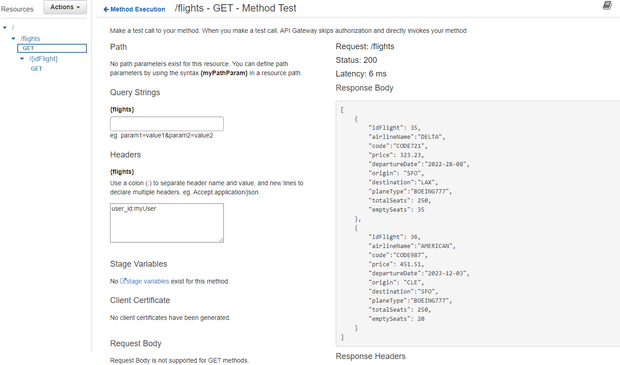
In the Amazon API Gateway console, return to /flights - GET - Method Execution and click the Test button. The following screen should appear.
Click on the test button. A 400 response should be returned with a message requiring a parameter named user_id is missing in your request.
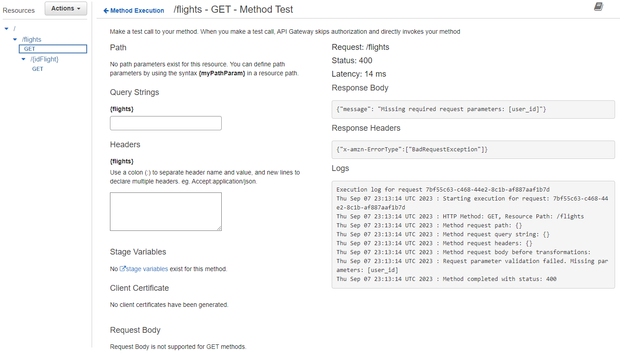
To avoid this response, set the value to user_id:myUser. Click the test button again, and a 200 response should be returned with the Flight data.
11. Documentation
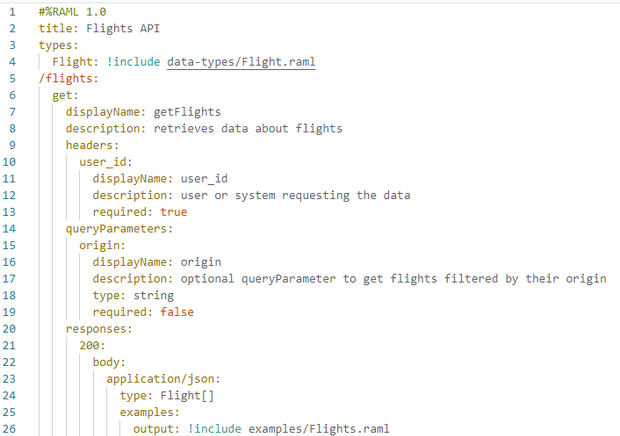
Let’s write a short documentation with RAML syntax in the Design Center. Locate the get method in /flights resource, and set a displayName and description. Do the same for the header and the query parameter.
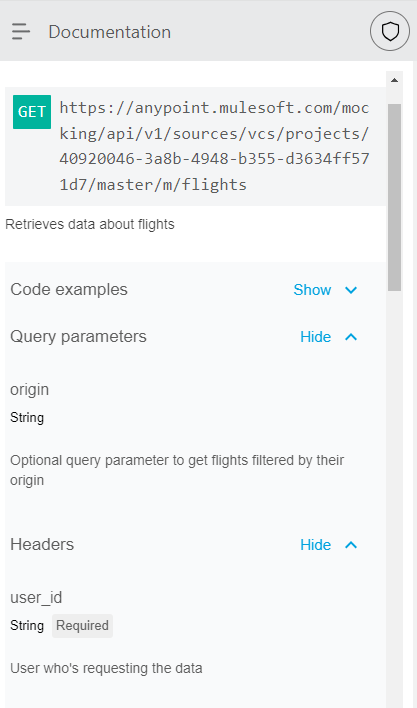
This is how the console in the Design Center shows the documentation we have written.
In Amazon API Gateway, documentation for resources, methods, query parameters, or headers must be written in JSON format. This section of the article explains how to document your API in Amazon API Gateway. To learn more about documentation in Amazon API Gateway, click here.
Returning to the Amazon API Gateway console, go back to /flights - GET - Method Execution, and in the upper right corner should be a book button. Click on it. The following screen should appear.
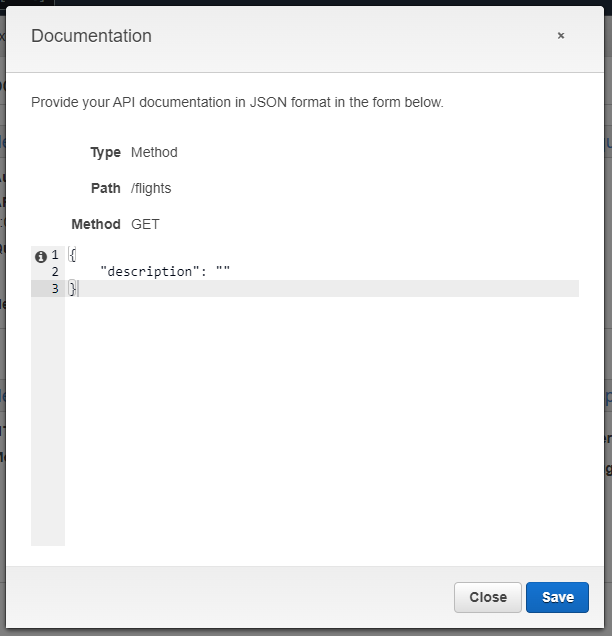 Replace the default value with the following code.
{
  "description": "Retrieves information about flights",
  "pathParams": {},
  "body": {},
  "queryParams": [
    {
      "origin": {
        "required": false
      }
    }
  ],
  "responses": [
    {
      "200": [
        {
          "idFlight": 4,
          "airlineName": "DELTA",
          "code": "ER04kg",
          "price": 532,
          "departureDate": "2015-02-12T00:00:00.000Z",
          "origin": "MUA",
          "destination": "PDX",
          "emptySeats": 30,
          "planeType": "Boeing 737",
          "totalSeats": 150
        },
        {
          "idFlight": 36,
          "airlineName": "AMERICAN",
          "code": "CODE987",
          "price": 451.51,
          "departureDate": "2023-12-03",
          "origin": "CLE",
          "destination": "SFO",
          "planeType": "BOEING777",
          "totalSeats": 250,
          "emptySeats": 20
        }
      ]
    }
  ]
}
Summary
Differences
- When using RAML in the Design Center, we primarily write code. However, we primarily utilize the console in Amazon API Gateway to configure our APIs.
- Creating a resource in RAML becomes easier when following the correct syntax with auto-complete in the Design Center. On the other hand, in Amazon API Gateway, creating a resource can be more complex due to the required configurations.
- While RAML in the Design Center employs data types, Amazon API Gateway uses Models to represent objects.
- Creating responses in Amazon API Gateway is more graphical than in Design Center with RAML.
Similarities
- Both Design Center and Amazon API Gateway allow you to use Mock Integrations to simulate accurate data.
- You can create your API spec from scratch or use an existing file where an API specification is already defined and then utilize it.
- Furthermore, you have the option to test the API specification from the UI from the Design Center and test the API from the Amazon API Gateway Console.
Conclusions
You already know the basic concepts for creating resources, methods, and documentation in the RAML API specification and Amazon API Gateway. Now, you can develop more strategies for your API in Amazon API Gateway and configure additional settings, such as security API Keys, or connect your API to accurate backend services like Lambda.
The process to create an API may be the same, but remember that RAML is a language for API specification. At the same time, Amazon API Gateway is a complete API management solution provided by AWS. Depending on your requirements and the ecosystem you're working with, you may choose one or both tools to design and manage your APIs.

