A Beginner’s Guide to Kubernetes

Image reference: https://unsplash.com/photos/eUMEWE-7Ewg
Kubernetes has now become the de facto standard for deploying containerized applications at scale in private, public and hybrid cloud environments. The largest public cloud platforms AWS, Google Cloud, Azure, IBM Cloud and Oracle Cloud now provide managed services for Kubernetes. A few years back RedHat completely replaced their OpenShift implementation with Kubernetes and collaborated with the Kubernetes community for implementing the next generation container platform. Mesosphere incorporated key features of Kubernetes such as container grouping, overlay networking, layer 4 routing, secrets, and more into their container platform DC/OS soon after Kubernetes got popular. DC/OS also integrated Kubernetes as a container orchestrator alongside Marathon. Pivotal recently introduced Pivotal Container Service (PKS) based on Kubernetes for deploying third-party services on Pivotal Cloud Foundry and as of today there are many other organizations and technology providers adapting it at a rapid phase.
Kubernetes started in 2014 with more than a decade of experience of running production workloads at Google with Google’s internal container cluster managers Borg and Omega. In my opinion, it made the adaption of emerging software architectural patterns such as microservices, serverless functions, service mesh, and event-driven applications much easier and paved the path towards the entire cloud-native ecosystem. Most importantly, its cloud agnostic design made containerized applications to run on any platform without any changes to the application code. Today, large enterprise deployments can use the Kubernetes ecosystem, and any small- to medium-scale enterprises can also save a considerable amount of infrastructure and maintenance costs in the long run. In this article I will explain the high-level architecture of Kubernetes, its application deployment model, service discovery and load balancing, internal/external routing separation, usage of persistent volumes, deploying daemons on nodes, deploying stateful distributed systems, running background jobs, deploying databases, configurations management, credentials management, rolling out updates, autoscaling, and package management.
Kubernetes Architecture
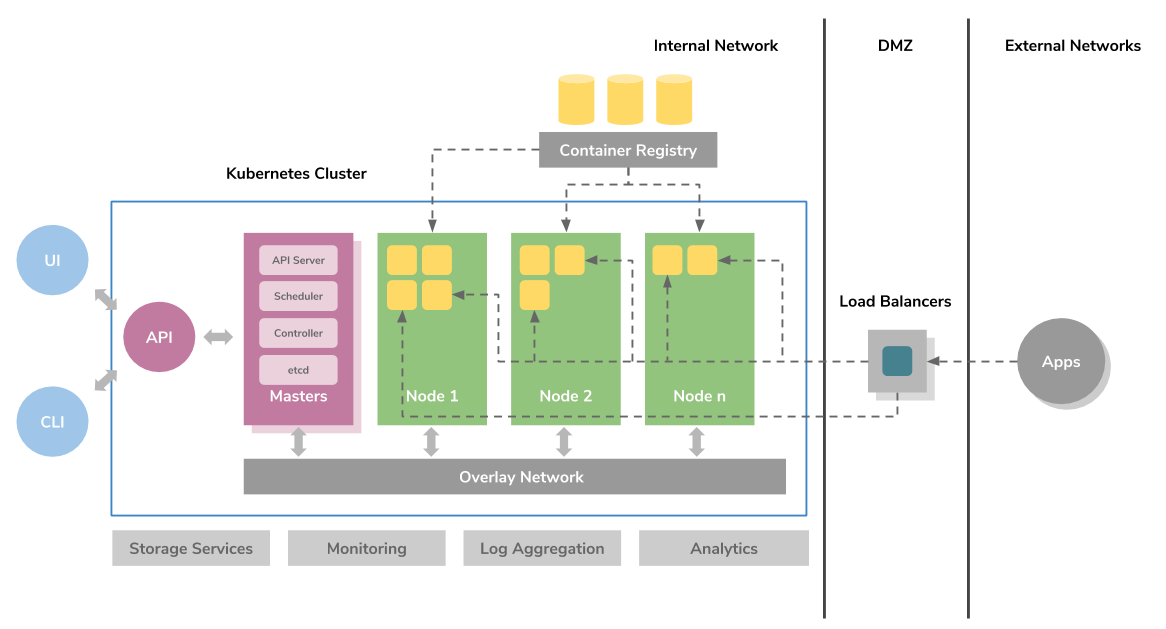
One of the fundamental design decisions which has been taken by this impeccable cluster manager is its ability to deploy existing applications that run on VMs without any changes to the application code. On the high level, any application that runs on VMs can be deployed on Kubernetes by simply containerizing its components. This is achieved by its core features: container grouping, container orchestration, overlay networking, container-to-container routing with layer 4 virtual IP based routing system, service discovery, support for running daemons, deploying stateful application components, and most importantly, the ability to extend the container orchestrator for supporting complex orchestration requirements.
On a very high-level, Kubernetes provides a set of dynamically scalable hosts for running workloads using containers and uses a set of management hosts called masters for providing an API for managing the entire container infrastructure. The workloads could include long-running services, batch jobs and container host specific daemons. All the container hosts are connected together using an overlay network for providing container-to-container routing. Applications deployed on Kubernetes are dynamically discoverable within the cluster network and can be exposed to the external networks using traditional load balancers. The state of the cluster manager is stored on a highly distributed key/value store, which runs within the master instances.
Kubernetes scheduler will always make sure that each application component is health checked, provides high availability, when the number of replicas is set to more than one each instance is scheduled in multiple hosts, and if one of those hosts becomes unavailable all the containers which were running in that host are scheduled in any of the remaining hosts. One of the fascinating capabilities Kubernetes offers is two level autoscaling. First, it provides the ability to autoscale containers using a resource called Horizontal Pod Autoscaler which watches the resource consumption and scales the number of containers needed accordingly. Second, it can scale the container cluster itself by adding and removing hosts depending on the resource requirements. Moreover, with the introduction of the cluster federation capability, it can even manage a collection of Kubernetes clusters which may span over multiple data centers using a single API endpoint.
That's just a glimpse of what Kubernetes provides out of the box. In the next few sections will go through its core features and explain how you can design your software applications to be deployed on it in no time.
Application Deployment Model
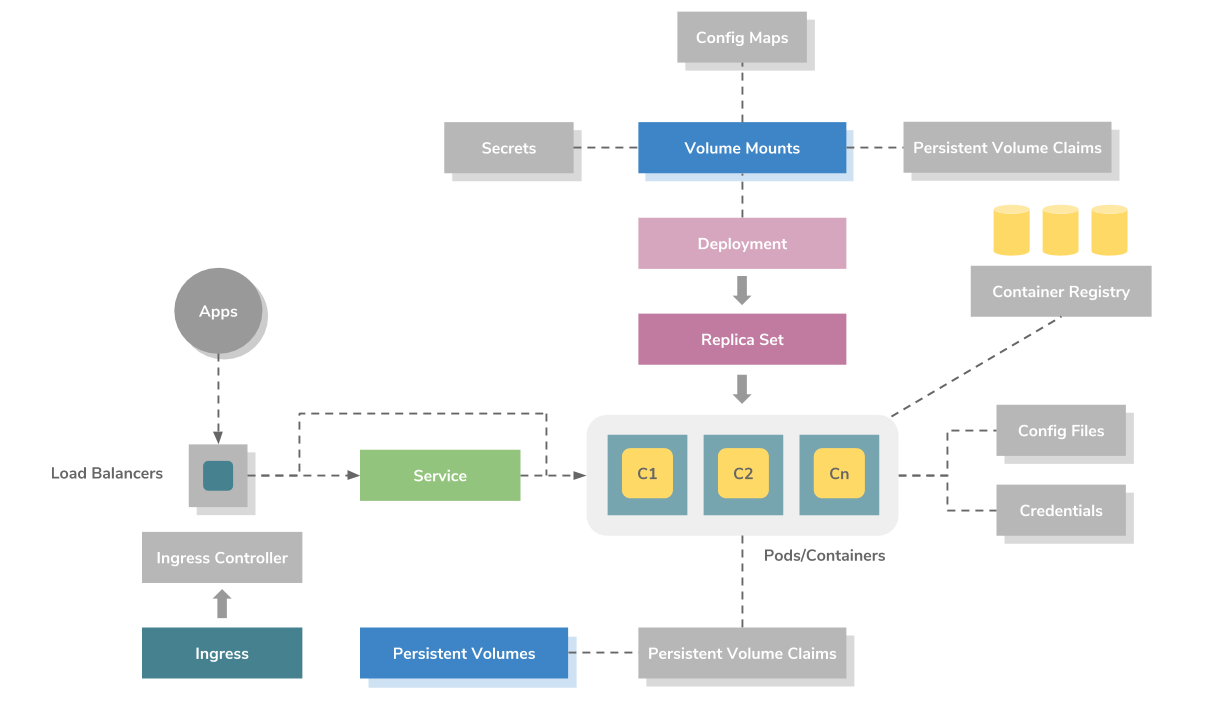
The above figure illustrates the high-level application deployment model on Kubernetes. It uses a resource called ReplicaSet for orchestrating containers. A ReplicaSet can be considered as a YAML- or a JSON-based metadata file which defines the container images, ports, the number of replicas, activation health checks, liveness health checks, environment variables, volume mounts, and security rules required for creating and managing the containers. Containers are always created on Kubernetes as groups called Pods, which is a Kubernetes metadata definition or a resource. Each pod allows sharing the file system, network interfaces, and operating system users among the containers using Linux namespaces, cgroups, and other kernel features. The ReplicaSets can be managed by another high-level resource called Deployments for providing features for rolling out updates and handling their rollbacks.
A containerized application can be deployed on Kubernetes using a deployment definition by executing a simple CLI command as follows:
kubectl run <application-name> --image=<container-image> --port=<port-no>Once the above CLI command is executed, it will create a deployment definition, a replica set and a pod using the given container image; add a selector label using the application name. According to the current design, each pod created by this will have two containers, one for the given application component and the other called pause for connecting the network interface.
Service Discovery & Load Balancing
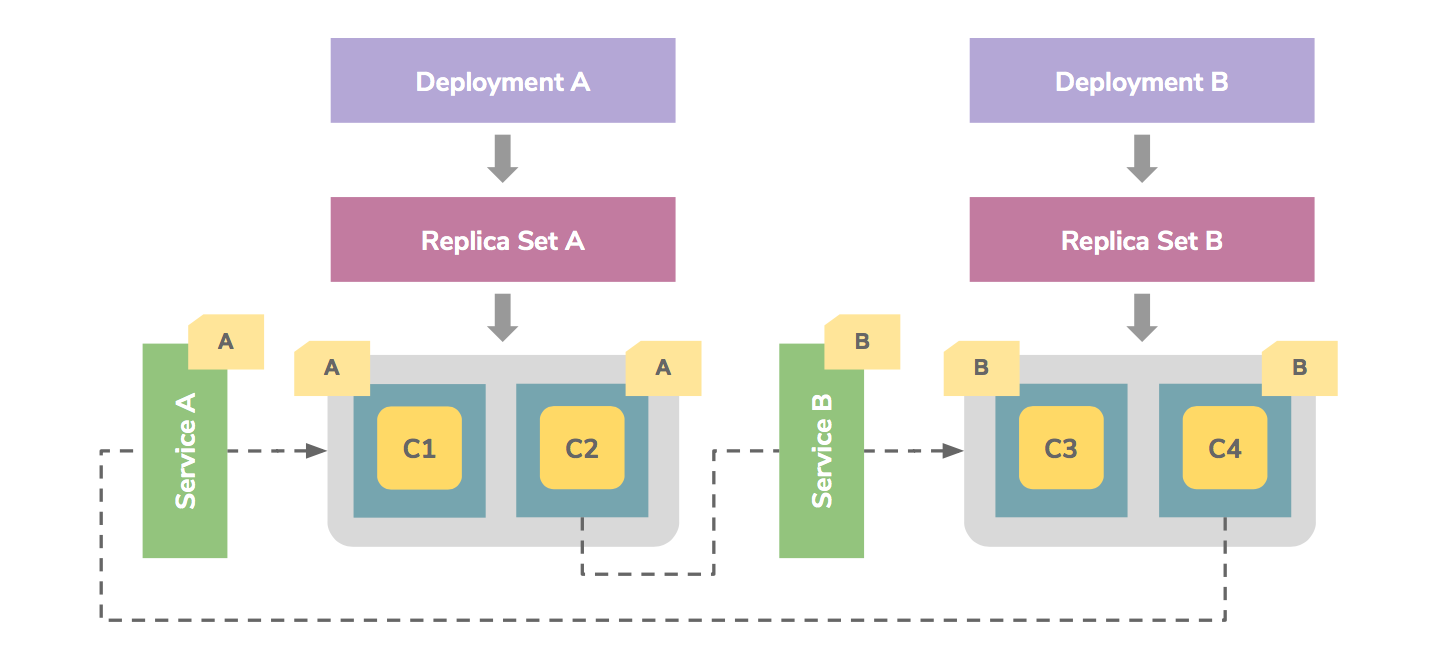
One of the key features of Kubernetes is its service discovery and internal routing model provided using SkyDNS and layer 4 virtual IP-based routing system. These features provide internal routing for application requests using services. A set of pods created via a replica set can be load balanced using a service within the cluster network. The services get connected to pods using selector labels. Each service will get assigned a unique IP address, a hostname derived from its name and route requests among the pods in round robin manner. The services will even provide IP-hash-based routing mechanism for applications which may require session affinity. A service can define a collection of ports and the properties defined for the given service will apply to all the ports in the same way. Therefore, in a scenario where session affinity is only needed for a given port where all the other ports required to use round robin based routing, multiple services may need to be used.
How Services Internally Work

Kubernetes services have been implemented using a component called kube-proxy. A kube-proxy instance runs in each node and provides three proxy modes: Userspace, iptables and IPVS. The current default is iptables.
In the first proxy mode,userspace, kube-proxy itself will act as a proxy server and delegate requests accepted by an iptable rule to the backend pods. In this mode kube-proxy will operate in the userspace and will add an additional hop to the message flow. In iptables, the kube-proxy will create a collection of iptable rules for forwarding incoming requests from the clients directly to the ports of backend pods on the network layer without adding an additional hop in the middle. This proxy mode is much faster than the first mode because of operating in the kernel space and not adding an additional proxy server in the middle.
The third proxy mode was added in Kubernetes v1.8 which is much similar to the second proxy mode and it makes use of an IPVS-based virtual server for routing requests without using iptable rules. IPVS is a transport layer load balancing feature which is available in the Linux kernel based on Netfilter and provides a collection of load balancing algorithms. The main reason for using IPVS over iptables is the performance overhead of syncing proxy rules when using iptables. When thousands of services are created, updating iptable rules takes a considerable amount of time compared to few milliseconds with IPVS. Moreover, IPVS uses a hash table for looking up the proxy rules over sequential scans with iptables. More information on introduction of IPVS proxy mode can be found in “Scaling Kubernetes to Support 50,000 Services” presentation done by Huawei at KubeCon 2017.
Internal/External Routing Separation
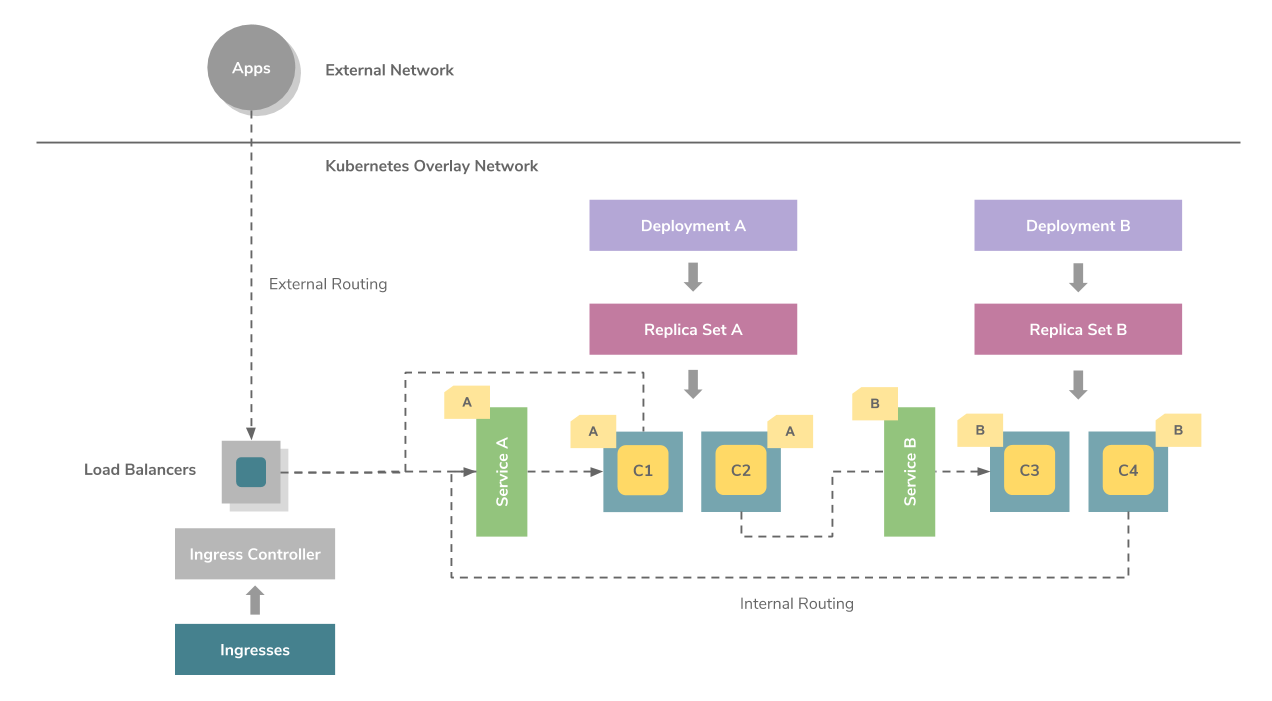
Kubernetes services can be exposed to the external networks in two main ways. The first is using node ports by exposing dynamic ports on the nodes that forward traffic to the service ports. The second is using a load balancer configured via an ingress controller which can delegate requests to the services by connecting to the same overlay network. An ingress controller is a background process which may run in a container which listens to the Kubernetes API, dynamically configure and reloads a given load balancer according to a given set of ingresses. An ingress defines the routing rules based on hostnames and context paths using services.
Once an application is deployed on Kubernetes using kubectl run command, it can be exposed to the external network via a load balancer as follows:
kubectl expose deployment <application-name> --type=LoadBalancer --name=<service-name>The above command will create a service of load balancer type and map it to the pods using the same selector label created when the pods were created. As a result, depending on how the Kubernetes cluster has been configured a load balancer service on the underlying infrastructure will get created for routing requests for the given pods either via the service or directly.
Usage of Persistent Volumes
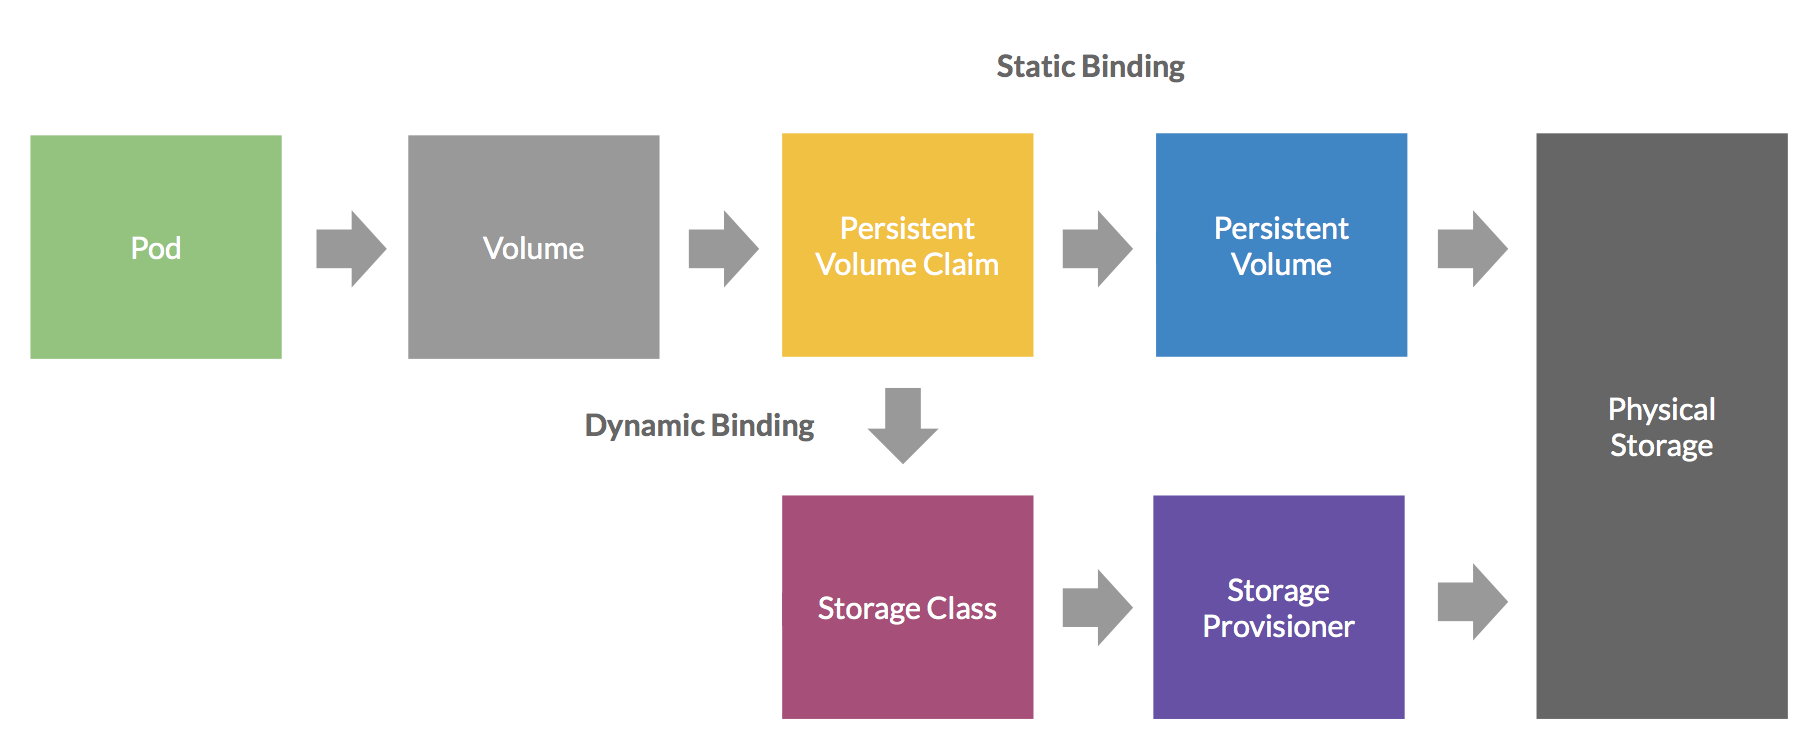
Applications that require persisting data on the filesystem may use volumes for mounting storage devices to ephemeral containers similar to how volumes are used with VMs. Kubernetes has properly designed this concept by loosely coupling physical storage devices with containers by introducing an intermediate resource called persistent volume claims (PVCs). A PVC defines the disk size, disk type (ReadWriteOnce, ReadOnlyMany, ReadWriteMany) and dynamically links a storage device to a volume defined against a pod. The binding process can either be done in a static way using PVs or dynamically be using a persistent storage provider. In both approaches, a volume will get linked to a PV one to one and depend on the configuration given data will be preserved even if the pods get terminated. According to the disk type used multiple pods will be able to connect to the same disk and read/write.
Disks that support ReadWriteOnce will only be able to connect to a single pod and will not be able to share among multiple pods at the same time. However, disks that support ReadOnlyMany will be able to share among multiple pods at the same time in read only mode. In contrast, as the name implies disks with ReadWriteMany support can be connected to multiple pods for sharing data in read and write mode. Kubernetes provides a collection of volume plugins for supporting storage services available on public cloud platforms such as AWS EBS, GCE Persistent Disk, Azure File, Azure Disk and many other well-known storage systems such as NFS, Glusterfs, Cinder, etc.
Deploying Daemons on Nodes
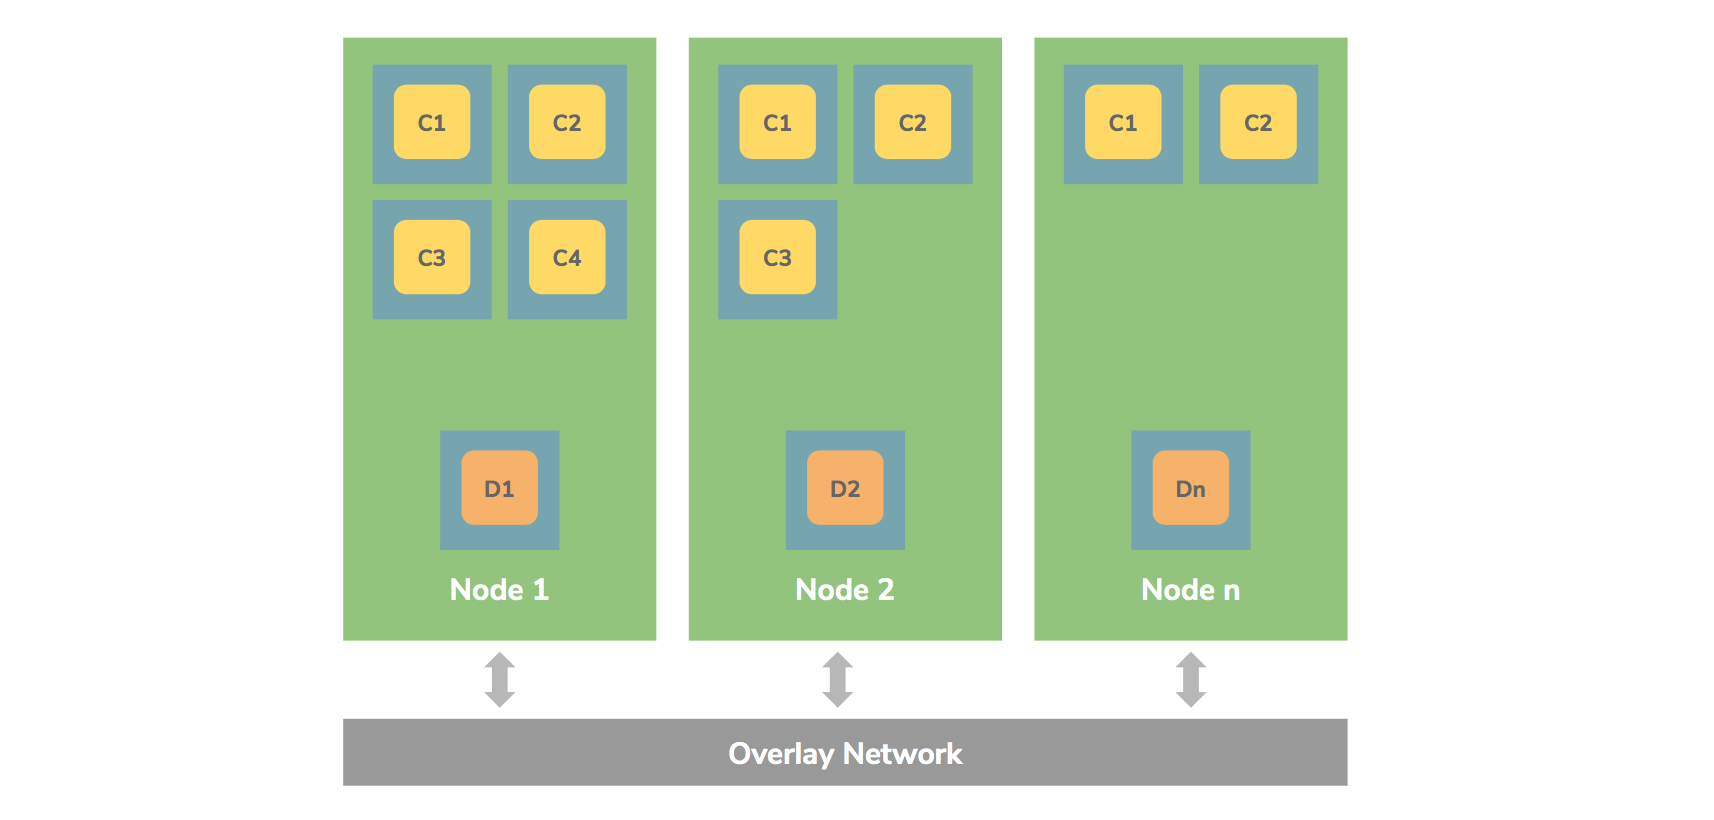
- A cluster storage daemon such as
glusterd,cephto be deployed on each node for providing persistence storage. - A node monitoring daemon such as Prometheus Node Exporter to be run on every node for monitoring the container hosts.
- A log collection daemon such as
fluentdorlogstashto be run on every node for collecting container and Kubernetes component logs. - An ingress controller pod to be run on a collection of nodes for providing external routing.
Deploying Stateful Distributed Systems
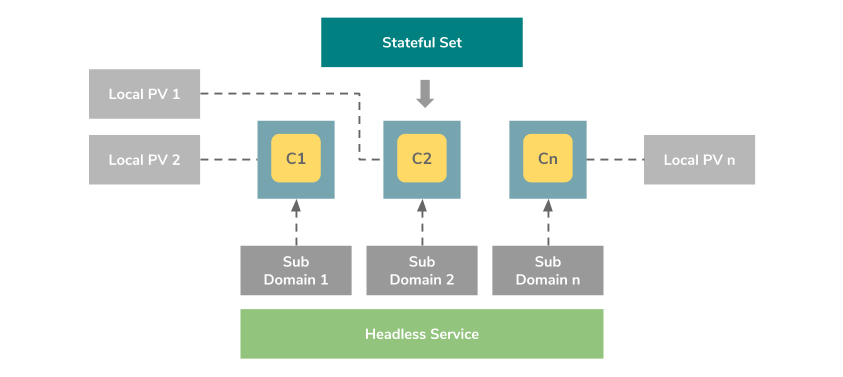
One of the most difficult tasks of containerizing applications is the process of designing the deployment architecture of stateful distributed components. Stateless components can be easily containerized as they may not have a predefined startup sequence, clustering requirements, point to point TCP connections, unique network identifiers, graceful startup and termination requirements, etc. Systems such as databases, big data analysis systems, distributed key/value stores, and message brokers may have complex distributed architectures that may require the above features. Kubernetes introduced the StatefulSets resource for supporting such complex requirements.
On a high-level, StatefulSets are similar to ReplicaSets except that it provides the ability to handle the startup sequence of pods, uniquely identify each pod for preserving its state while providing the following characteristics:
- Stable, unique network identifiers.
- Stable, persistent storage.
- Ordered, graceful deployment and scaling.
- Ordered, graceful deletion and termination.
- Ordered, automated rolling updates
Stable refers to preserving the network identifiers and persistent storage across pod rescheduling. Unique network identifiers are provided by using headless services as shown in the above figure. Kubernetes has provided examples of StatefulSets for deploying Cassandra, and Zookeeper in a distributed manner.
Running Background Jobs
In addition to ReplicaSets and StatefulSets, Kubernetes provides two additional controllers for running workloads in the background called Jobs and CronJobs. The difference between Jobs and CronJobs is that Jobs execute once and terminates whereas CronJobs get executed periodically by a given time interval similar to standard Linux cron jobs.
Deploying Databases
Deploying databases on container platforms for production usage would be a slightly difficult task than deploying applications due to their requirements for clustering, point to point connections, replication, shading, managing backups, etc. As mentioned previously StatefulSets have been designed specifically for supporting such complex requirements and there are a couple of options for running PostgreSQL, and MongoDB clusters on Kubernetes today. YouTube’s database clustering system Vitess which is now a CNCF project would be a great option for running MySQL at scale on Kubernetes with shading. By saying that it would be better to note that those options are still at very early stages and if an existing production grade database system is available on the given infrastructure such as RDS on AWS, Cloud SQL on GCP, or on-premise database cluster it might be better to choose one of those options considering the installation complexity and maintenance overhead.
Configurations Management
Containers generally use environment variables for parameterizing their runtime configurations. However, typical enterprise applications use a considerable amount of configuration files for providing static configurations required for a given deployment. Kubernetes provides a fabulous way of managing such configuration files using a simple resource called ConfigMaps without bundling them into the container images. ConfigMaps can be created using directories, files or literal values using following CLI command:
kubectl create configmap <map-name> <data-source>

# map-name: name of the config map
# data-source: directory, file or literal value
Once a ConfigMap is created, it can be mounted to a pod using a volume mount. With this loosely coupled architecture, configurations of an already running system can be updated seamlessly just by updating the relevant ConfigMap and executing a rolling update process which I will explain in one of the next sections. It might be important to note that ConfigMaps currently does not support nested folders; therefore, if there are configuration files available in a nested directory structure of the application, a ConfigMap would need to be created for each directory level.
Credentials Management
Similar to ConfigMaps, Kubernetes provides another valuable resource called Secrets for managing sensitive information such as passwords, OAuth tokens, and ssh keys. Otherwise, updating that information on an already running system might require rebuilding the container images.
A secret can be created for managing basic auth credentials using the following way:
# write credentials to two files
$ echo -n 'admin' > ./username.txt
$ echo -n '1f2d1e2e67df' > ./password.txt

# create a secret
$ kubectl create secret generic app-credentials --from-file=./username.txt --from-file=./password.txt
Once a secret is created, it can be read by a pod either using environment variables or volume mounts. Similarly, any other type of sensitive information can be injected into pods using the same approach.
Rolling Out Updates
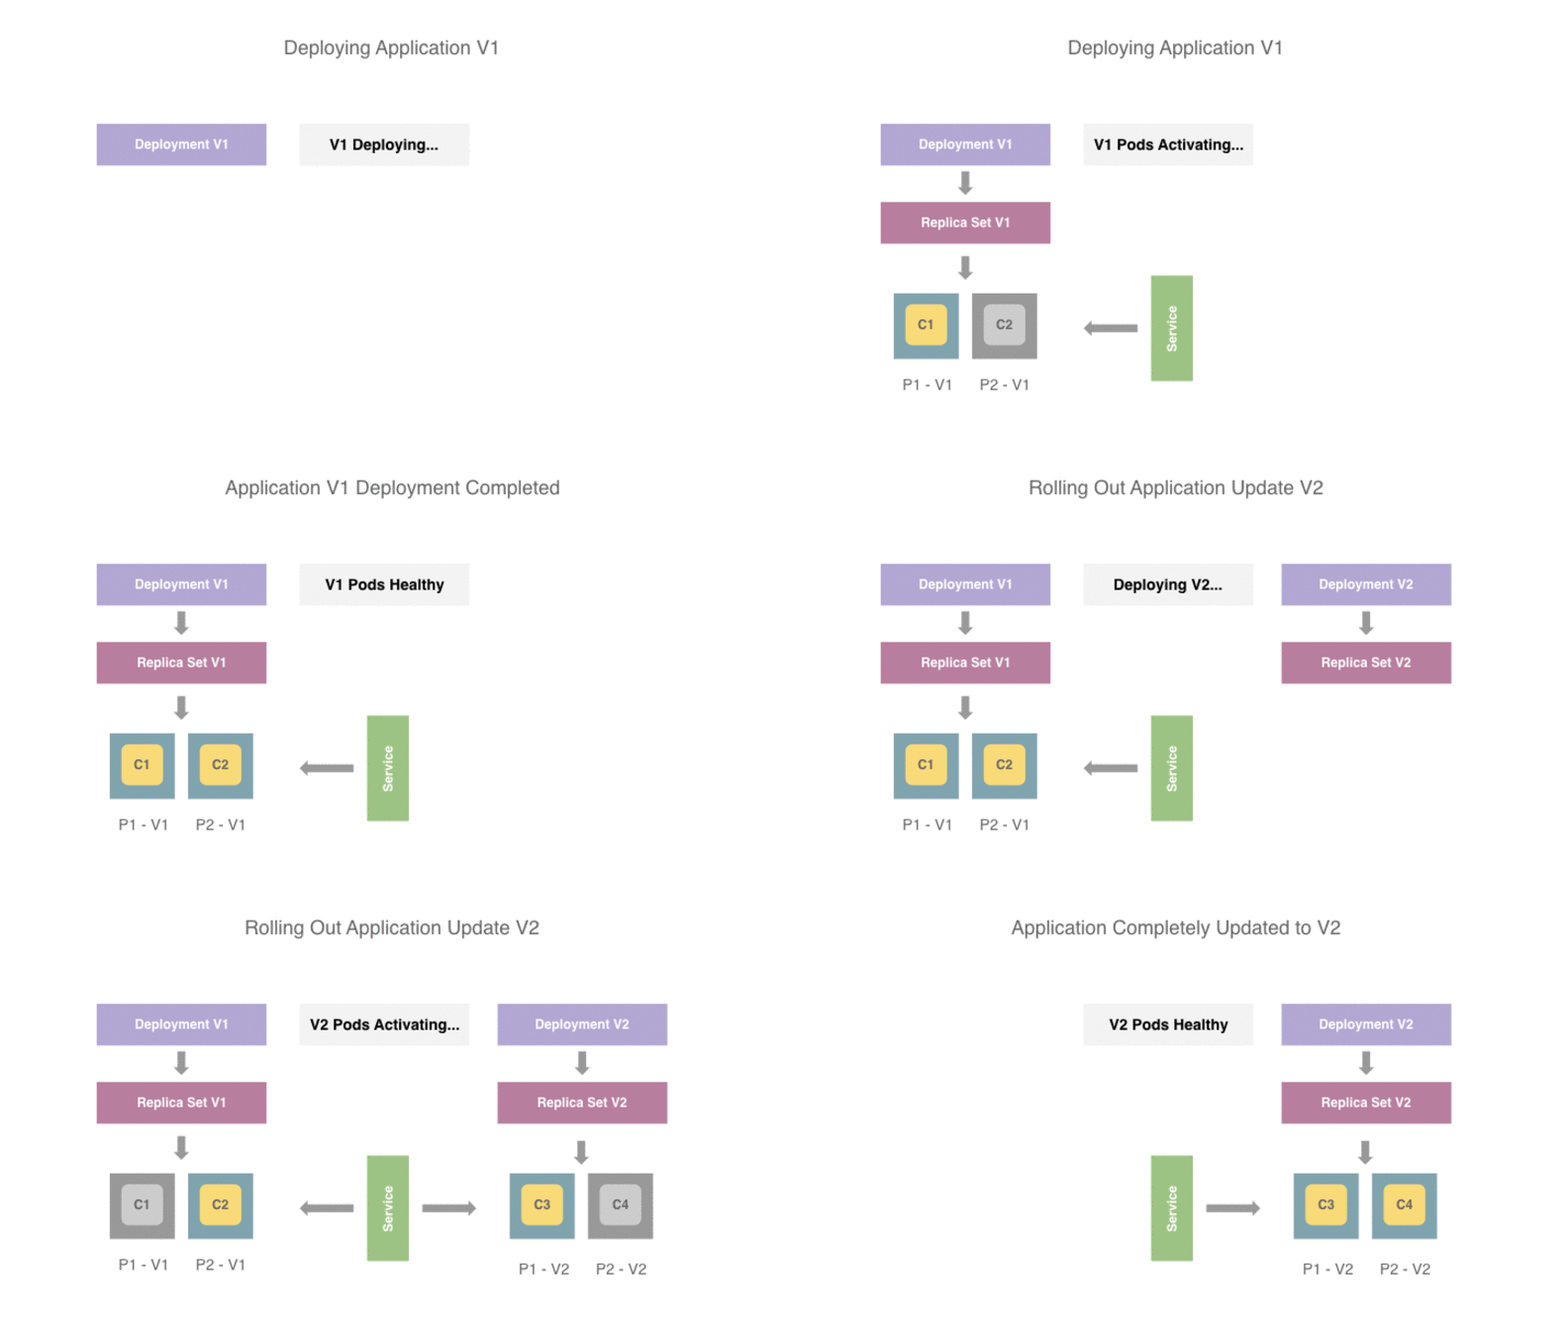
The above animated-image illustrates how application updates can be rolled out for an already running application using a blue/green deployment method without having system downtime. This is another invaluable feature of Kubernetes which allows applications to seamlessly roll out security updates and backward compatible changes without much effort. If the changes are not backward compatible, a manual blue/green deployment might need to be executed using a separate deployment definition.
This approach allows a rollout to be executed for updating a container image using a simple CLI command:
$ kubectl set image deployment/<application-name> <container-name>=<container-image-name>:<new-version>Once a rollout is executed, the status of the rollout process can be checked as follows:
$ kubectl rollout status deployment/<application-name>Waiting for rollout to finish: 2 out of 3 new replicas have been updated...deployment "<application-name>" successfully rolled outUsing the same CLI command kubectl set image deployment , an update can be rolled back to a previous state.
Autoscaling

Kubernetes allows pods to be manually scaled either using ReplicaSets or Deployments. This can be achieved using the following CLI command:
kubectl scale --replicas=<desired-instance-count> deployment/<application-name>As shown in the above figure, this functionality can be extended by adding another resource called Horizontal Pod Autoscaler (HPA) against a deployment for dynamically scaling the pods based on their actual resource usage. The HPA will monitor the resource usage of each pod via the resource metrics API and inform the deployment to change the replica count of the ReplicaSet accordingly. Kubernetes uses an upscale delay and a downscale delay for avoiding thrashing which could occur due to frequent resource usage fluctuations in some situations. Currently, HPA only provides support for scaling based on CPU usage. If needed custom metrics can also be plugged in via the Custom Metrics API depending on the nature of the application.
Package Management

The Kubernetes community initiated a separate project for implementing a package manager for Kubernetes called Helm. This allows Kubernetes resources such as deployments, services, configmaps, ingresses, and more to be templated and packaged using a resource called chart and allows them to be configured at the installation time using input parameters. More importantly, it allows existing charts to be reused when implementing installation packages using dependencies. Helm repositories can be hosted in public and private cloud environments for managing application charts. Helm provides a CLI for installing applications from a given Helm repository into a selected Kubernetes environment.
A wide range of stable Helm charts for well-known software applications can be found in it’s Github repository and also in the central Helm server: Kubeapps Hub.
Conclusion
Kubernetes has been designed with over a decade of experience on running containerized applications at scale at Google. It has been already adopted by the largest public cloud vendors and technology providers, and is being embraced by even more software vendors and enterprises as this article is being written. It has even lead to the inception of the Cloud Native Computing Foundation (CNCF) in the year 2015, was the first project to graduate under CNCF, and started streamlining the container ecosystem together with other container-related projects such as CNI, Containerd, Envoy, Fluentd, gRPC, Jagger, Linkerd, Prometheus, rkt and Vitess. The key reasons for its popularity and to be endorsed at such level might be its flawless design, collaborations with industry leaders, its open-source characteristics, and always being open to ideas and contributions.
References
[1] What is Kubernetes: https://kubernetes.io/docs/concepts/overview/what-is-kubernetes/
[2] Borg, Omega and Kubernetes: https://ai.google/research/pubs/pub44843
[3] Kubernetes Components: https://kubernetes.io/docs/concepts/overview/components/
[4] Kubernetes Services: https://kubernetes.io/docs/concepts/services-networking/service/
[5] IPVS (IP Virtual Server) http://www.linuxvirtualserver.org/software/ipvs.html
[6] Introduction of IPVS Proxy Mode: https://github.com/kubernetes/kubernetes/issues/44063
[7] Kubernetes Persistent Volumes: https://kubernetes.io/docs/concepts/storage/persistent-volumes/
[8] Kubernetes Configuration Best Practices: https://kubernetes.io/docs/concepts/configuration/overview/
[9] Customer Resources & Custom Controllers: https://kubernetes.io/docs/concepts/api-extension/custom-resources/
[10] Understanding Vitess: https://vitess.io/overview/
[11] Skaffold, CI/CD for Kubernetes: https://github.com/GoogleContainerTools/skaffold
[12] Kaniko, Build Container Images in Kubernetes: https://github.com/GoogleContainerTools/kaniko
[13] Apache Spark 2.3 with Native Kubernetes Support https://kubernetes.io/blog/2018/03/apache-spark-23-with-native-kubernetes/
[14] Deploying Apache Kafka using StatefulSets: https://github.com/kubernetes/contrib/tree/master/statefulsets/kafka
[15] Deploying Apache Zookeeper using StatefulSets: https://github.com/kubernetes/contrib/tree/master/statefulsets/zookeeper

