Externalize Microservice Configuration With Spring Cloud Config
In a microservices system, we might need or want to externalize configuration so that we can abstract sensitive data or credentials outside the applications. We can do something like this with Docker Compose, but the compose file often contains values for multiple services together. We probably want further separation and limited access.
This is where solutions such as Spring Cloud Config come into play. We have a free Neo4j graph database instance on a public cloud, so we can set the credentials in an external location (such as a local file or other systems) and use Spring Cloud Config to access those keys and pass them to the approved application.
In this article, we will walk through how to set up a service that hosts the Spring Cloud Config server and how to wire an existing microservice as the config client service to utilize the credentials for accessing the database.
Let's dive in!
Architecture
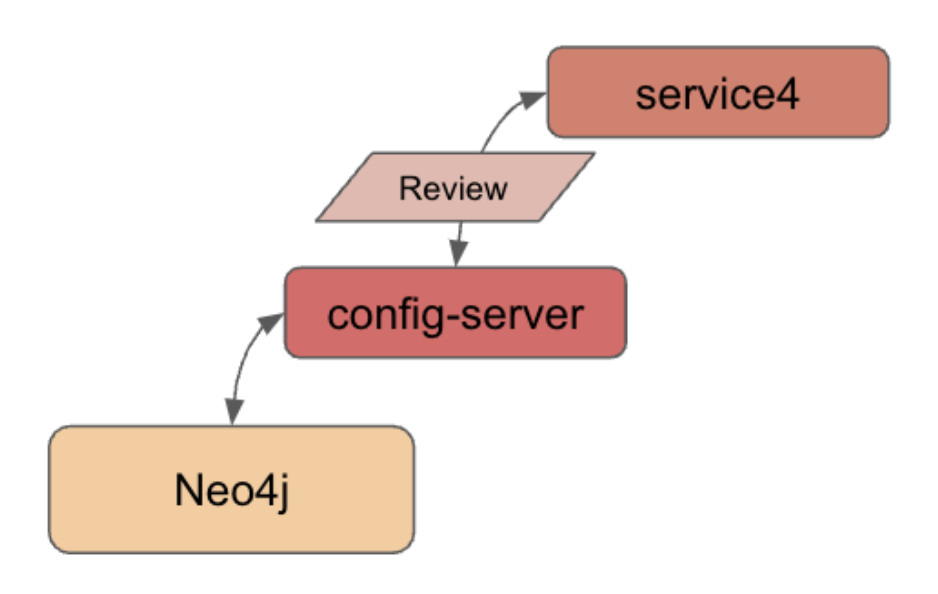
While the background is not required for this post, feel free to check out the previous blog post for more info on the Neo4j microservice. Our existing architecture has a Neo4j microservice (service4) and a Neo4j cloud database. In today’s post, we will add new service between them to manage and pull the credentials needed for the Neo4j service.
Here is the architecture:

Spring Cloud Config
The project overview for Spring Cloud Config has a good explanation of design and usage, but I'll briefly put it into my own words here.
Spring Cloud Config gives us a way to externalize configuration so that individual services can access only the properties they need to operate. Through a config server, we can set up varying environments so that credentials are organized and managed without manipulating values for testing. The project (by default) is set to use Git for the version-controlled properties files, but it can be set up to use other tools or implementations for managing environments and values.
Without further ado, let's start coding!
Applications — Spring Cloud Config Server
We will use the Spring Initializr at start.spring.io to set up the outline for our config server application.
On the form, we can leave Project, Language, and Spring Boot version fields defaulted. Under the Project Metadata section, I updated the group name for my personal projects, but you are welcome to leave it defaulted. I named the artifact config-server, though naming is up to you as long as we map it properly where needed. All other fields in this section can remain as they are. Under the Dependencies section, we need only Config Server (Spring Cloud Config). Finally, the project template is complete, and we can click Generate at the bottom to download the project.
Note: the Spring Initializr displays in dark mode or light mode via the moon or sun icons in the right column of the page.
Generating will download the project as a zip, so we can unzip it and move it to our project folder with the other services. Open the project in your favorite IDE, and let's get coding!
The pom.xml contains the dependencies and software versions we set up on the Spring Initializr so that we can move to the application.properties file in the src/main/resources folder.
server.port=8888
spring.cloud.config.server.git.uri=${HOME}/Projects/config/microservices-java-config
Since we potentially have multiple services running, we need to specify a port number for this application to use so that its traffic doesn't conflict with other services. The default port for Spring Cloud Config server is 8888, so we will use that. Next, we will use git locally to version-track our configuration file, so we need to specify the folder (or public repository URL, if we had that instead) as the value for the second property.
On to the project code!
Config Server — Project Code
There is very little we need to add since we are using the default setup. We don't have any big customizations or features required for now. So, there is only one small annotation we need to add to the ConfigServerApplication.java class.
@SpringBootApplication
@EnableConfigServer
public class ConfigServerApplication {
    public static void main(String[] args) {
        SpringApplication.run(ConfigServerApplication.class, args);
    }
}
The @EnableConfigServer annotation notifies Spring that this application needs to operate as the config server.
Now we need to add our configuration file that will contain the database credentials!
Storing Config Values
We need an externalized place for our configuration values to reside, i.e., a file with our database credentials for the config server to retrieve. Most of the tutorials you find on Spring Cloud Config recommend starting with a local config folder containing either a .properties or .yaml file. I went with the YAML file for this project.
A sample of the file is in the microservices-java-config folder of the Github project.
spring:
  neo4j:
    uri: <insert Neo4j URI here>
    database: <insert Neo4j database here>
    authentication:
      username: <insert Neo4j username here>
      password: <insert Neo4j password here>
We will need to fill in the values for our Neo4j AuraDB free instance in place of the dummy URL, database, username, and password shown above. Note: Database should be neo4j, unless you have specifically used commands to change the default. Then, we need to save the file and check it into to git by running the next statements from the command line.
microservices-java-config % git init
microservices-java-config % git add
microservices-java-config % git commit -am "Initial commit"
Let's test our config server application!
Test Config Server
Start the application from your IDE or command line. To test, we need to figure out the correct URL to ping. First, we are running the application locally and set the port to 8888, so the first part of the URL is localhost:8888. The rest of the URL was confusing to me in most of the tutorials, but once you know what the application is looking for, it isn't as intimidating.
Many tutorials use the /{application}/{profile} notation. The /{application} piece references the name you give your client application. This is an arbitrary name, except that your config file (in our case, yaml) needs to have the same name. Config file naming follows the pattern {application}-{profile}. If you do not specify a -{profile} (e.g., development, production) on the config file name, it uses the default profile.
Since our config file is named neo4j-client.yaml, our application name is neo4j-client. We do not specify a profile on our config file name, so it will use the default. This means the /{profile} piece of the URL is default.
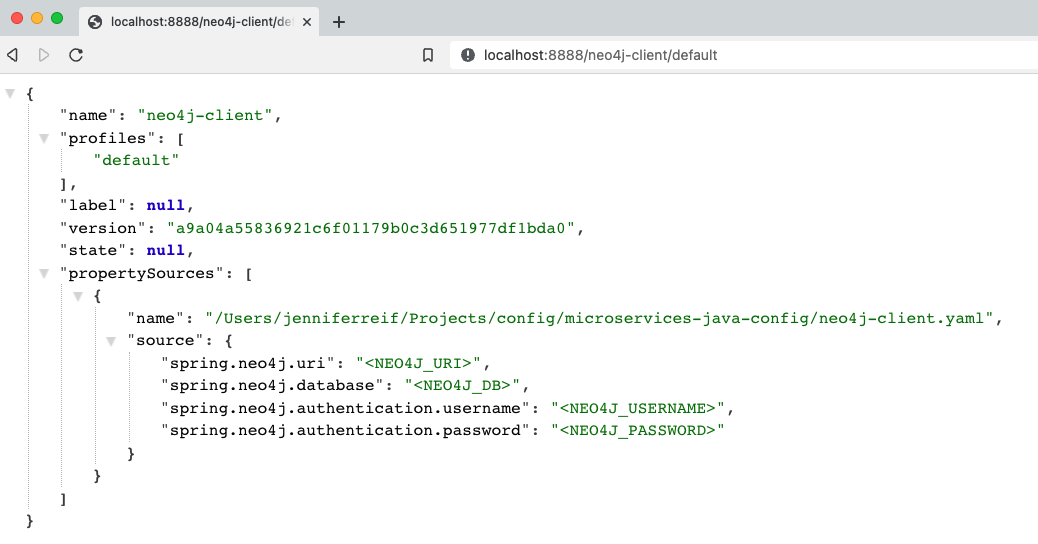
Our full URL for testing is then localhost:8888/neo4j-client/default!

Next, we need to plug our client service (
service4) in to use the config server we just set up.
Service4 — Modifications
We had an existing Neo4j microservice, so we need to make a few adjustments. To start, we need to add a dependency for the Spring Cloud Config client. Open the pom.xml and add the following items:
<properties>
    //java version property
    <spring-cloud.version>2021.0.3</spring-cloud.version>
</properties>
<dependencies>
    //other dependencies
    <dependency>
        <groupId>org.springframework.cloud</groupId>
        <artifactId>spring-cloud-starter-config</artifactId>
    </dependency>
</dependencies>
<dependencyManagement>
    <dependencies>
        <dependency>
            <groupId>org.springframework.cloud</groupId>
            <artifactId>spring-cloud-dependencies</artifactId>
            <version>${spring-cloud.version}</version>
            <type>pom</type>
            <scope>import</scope>
        </dependency>
    </dependencies>
</dependencyManagement>
On the third line of the above code, we add a property for the Spring Cloud Version. This allows us to source this value anywhere it's needed in the pom. In the dependencies section, we need to add the config client dependency (seventh line), making this application a client that will use the config server. Last, but not least, we add a dependency management section (line twelve) to handle versioning of Spring Cloud.
Now we need to update the application properties in the src/main/resources folder.
server.port=8083

spring.application.name=neo4j-client
spring.config.import=configserver:http://localhost:8888/
We leave the port property alone, but we can remove the database credential properties because those are being stored in the config server now. The next two properties specify the application name and where the config server is running. Remember that our application name and the name of our config file MUST match. So, that means our spring.application.name needs to be neo4j-client, as our config file name is neo4j-client.yaml. This is also the name that would be referenced between microservices or for service discovery, though we haven't delved into that part of microservices. Our config server is running locally, and on the default config server port, so the value of the last property should look familiar.
This actually wraps up all of our changes to the Neo4j service! We don't need to change anything in the Service4Application.java class because all of our config values are injected as part of the environment, so everything operates in the background.
Let's test it!
Put It to the Test
We will kick things off from the bottom to the top. First, ensure the Neo4j AuraDB instance is still running. Note: AuraDB free tier pauses automatically after 3 days. You can resume with the play icon on the instance.
Next, we need to start our config-server application, either through the IDE or command line. Once that is running, we can start the service4 application through the IDE or command line. Time to test the application using the following commands.
1. Test config server is working: open a browser and go to localhost:8888/neo4j-client/default or go to the command line with curl localhost:8888/neo4j-client/default.
2. Test service4 is live: open a browser and go to localhost:8083/neo or go to the command line with curl localhost:8083/neo.
3. Test backend reviews api: open a browser and go to localhost:8083/neo/reviews or go to the command line with curl localhost:8083/neo/reviews.
4. Test reviews api for a certain book: open a browser and go to localhost:8083/neo/reviews/178186 or go to the command line with curl localhost:8083/neo/178186.
And here is the resulting output from reviews api results!


Wrapping up
Today, we incorporated the Spring Cloud Config project to manage and provide database credentials to our Neo4j microservice. We created a new service to host the config server and set up an external YAML file containing our database credentials. We saw how to test those pieces and verify the config server was working before moving on to plug in our service4 application as the client to use the values provided by the config server. The client service didn't require too many code changes to do this, and then we tested those components (config server, config file, Neo4j microservice) together to ensure we could access our review data as expected.
Happy coding!

