How to Apply Patches to Mule 4.x

Patching a known security hole is like putting a better lock on a door that the bad guys can't sneak through. It's like removing the door altogether, so there's no longer any way through at all.
Mulesoft releases patches from time to time to protect the application from compromise. Applying a patch is necessary for all deployment models. Although Mulesoft takes care of CloudHub customers, customers which are using Standalone, RTF, PCF, and PCE have to be taken care of by themselves.
For Anypoint studio, developers have the flexibility to either apply patches on Anypoint studio runtime or download/update the latest version from the Mulesoft website.
IMPORTANT: Patches are created for a specific release of a product. Don't try to use a patch for a version with another product version. That could lead to instabilities and hard to debug issues.
Types of Patches
- Partial,
- Full, and,
- Cumulative.
PROCEDURE
Patching standalone Mule Runtime (4.1.x and 4.2.x)
Partial Patches (SE-NNN-X.Y.Z.jar/MULE-NNN-X.Y.Z.jar)
In this type of patch, we only override some files instead of full module replacement.
- Copy the patch jar file to {MULE_HOME}/lib/patches
- Restart the mule runtime instance to make it pick up the patch.
Full Module Patches (mule-AAA-BBB-X.Y.Z.jar)
- Stop the Mule runtime.
- Backup the original jar file from {MULE_HOME}/lib/mule and remove it.
- Copy the new patches in the folder {MULE_HOME}/lib/mule
- Restart the mule runtime instance to make it pick up the patch.
Cumulative Patch
Cumulative patch (mule-ee-cumulative-patch-4.3.0-YYYYMMDD.zip)
The continuous patching process presents cumulative patch to replace all previous patches:
- Stop the Mule runtime.
- Extract the content of the cumulative-patch ZIP file.
- Read the extracted README.TXT file to understand the necessary steps to install the patch.
- Backup the original content of the {MULE_HOME}/lib/patches folder.
- Remove any previous patch files from {MULE_HOME}/lib/patches.
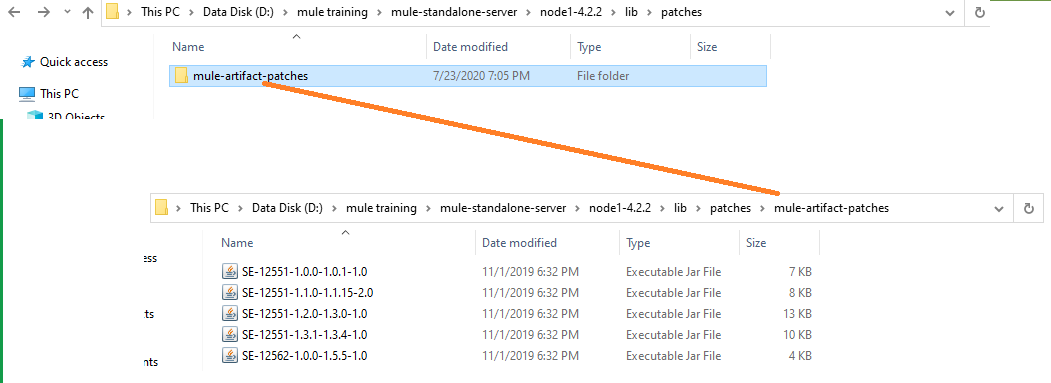
- IMPORTANT: Do not remove the patches inside {MULE_HOME}/lib/patches/mule-artifact-patches folder.
- Copy the new mule-ee-distribution-standalone-X.Y.Z-YYYYMMDD-patch.jar into {MULE_HOME}/lib/patches. At the end MULE_HOME/lib/patches folder only keep mule-ee-distribution-standalone-{version}-patch.jar and MULE_HOME/lib/patches/mule-artifact-patches dir should stay.
- The cumulative patch may require additional steps like patching a service or adding a system property, please refer to the README.TXT file for further details.
- If a service update is required, this same article explains how to install the new service version (see section 'Patching a Mule Service' below)
- And in case a new property is required, please check: How can I set Mule and Java system properties at startup?
- Restart the mule runtime instance to make it pick up the patch.

Patching a Mule Plugin
NOTE: Ensure that the instance was successfully started at least once before executing this procedure
- Stop the Mule runtime.
- Backup the directory {MULE_HOME}/plugins/mule-plugin-AAAA_NNNN-X.Y.Z and remove it (current expanded directory of the plugin).
- Paste the new patched plugin as it is (e.g.:mule-plugin-weave_A.AA-X.Y.Z-SE-NNNN-dist.zip) into {MULE_HOME}/plugins/ . When Mule starts it will expand that directory.
- Restart the Mule runtime.
Patching a Mule Service
For Mule Runtime 4.2.x and 4.3.x
-
Stop the Mule Runtime.
-
Backup the content of the existing folder of the service. For example {MULE_HOME}/services/mule-service-weave-ee-2.1.3-mule-service, and then remove it.
-
Rename the .JAR patch as a .ZIP file. For example rename mule-service-weave-ee-2.2.1-SE-14223-mule-service.jar to mule-service-weave-ee-2.2.1-SE-14223-mule-service.zip.
-
Extract the content of the new .ZIP file in MULE_HOME/services.
-
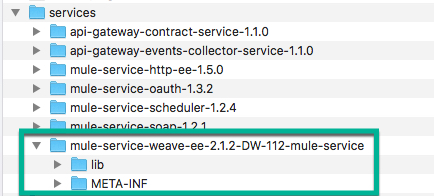
Inside <MULE_HOME>/services/<THE_SERVICE_YOU_ARE_UPGRADING> you must have the META-INF folder and the other folders as shown in below screenshot.

- Restart the Mule runtime.
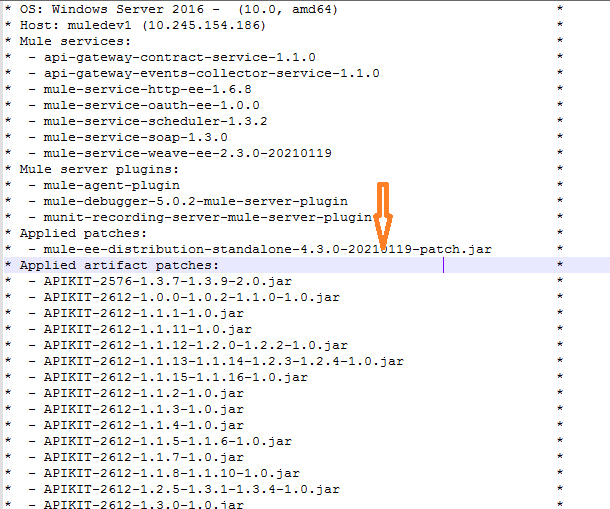
- When the Runtime starts, search in the mule_ee.log for the recently added service under 'Mule services.'
Patching a Mule Runtime in Anypoint Studio 7.x
For Mule Runtime 4.3.x
We can use the latest Mule Runtime cumulative patch version via Studio's update site: Mule Runtimes for Anypoint Studio — https://studio.mulesoft.org/s3/studio-runtimes/ (Use HTTP URL http://studio.mulesoft.org/s3/studio-runtimes/ if we are using older versions of Studio). From Studio, go to Help > Install New Software.. > Add to add this update site repository and install the latest runtime.
For Mule Runtime 4.3.x, 4.2.x, and 4.1.x:
- Identify the directory within the Studio installation where your runtime is installed. It will follow the pattern {STUDIO_HOME}/plugins/org.mule.tooling.server.{MULE_VERSION}.ee_n.n.n.nnnnnnnnnnnn , where {STUDIO_HOME} is where Studio is installed, {MULE_VERSION} is the Mule Runtime version (eg 4.1.1), n.n.n.nnnnnnnnnnnn is a release tag. If there are more than one directory with the same {MULE_VERSION} but different release tags, then select the one with the greatest release tag. Example: org.mule.tooling.server.4.1.1.ee_7.1.2.201803261303
- Copy the patch jar file to {STUDIO_HOME}/plugins/org.mule.tooling.server.{MULE_VERSION}.ee_n.n.n.nnnnnnnnnnnn/mule/lib/patches
- If it's a Mule service, then back up the existing mule service jar from {STUDIO_HOME}/plugins/org.mule.tooling.server.{MULE_VERSION}.ee_n.n.n.nnnnnnnnnnnn/mule/services and then replace it with the patched jar.
4. Restart Studio.
Verifying the Patch Has Been Applied
Latest runtimes, e.g. 4.x.x and newer report all patches loaded at startup time in MULE_HOME/logs/mule_ee.log file. For example:


