Kubernetes Operators in Go
An Operator is a software application written to run over Kubernetes, extending its functionalities to manage other applications and components also running on it. These applications might contain specific domain knowledge, that is, stuffs that you own and control to help your business.
 By allowing the extension of its API, the creation of Custom Resource Definitions (CRD) that works in conjunction with Controllers (“pieces” of code), we can build a Kubernetes Operator.
So… Let’s do it!
Controller
The Controller it is the core (the heart) of the Operator, it’s the developed code that runs in a “looping pattern” mode, checking frequently if some desired state (defined/represented by our CRD Resources), it is reached. The Controller works to reach and maintain the desired target state of some resources that you want to manage.
In Kubernetes itself, we have available examples of native resources that are also actually Controllers, such as Deployments, Statefulsets, ReplicaSet, and Daemonsets. They are responsible to maintain/manage certain object’s states. These native resources work well for containerized applications, all of them, deal with Pods objects.
Motivations - Reasons Why !?
But, if we need something more… if we want something more… more control. We might need a finer and more specific domain knowledge operation, to correctly manage the state of our applications and components. Also, (why not?!) we could simply want to make some repetitive development/running process easier and transparent, to our developers/users in Kubernetes environments. That’s where Kubernetes Operators can be handy.
In summary… a Kubernetes Operator enables users to create, configure and manage Kubernetes applications in the same way Kubernetes does with its built-in resources, consequently giving them (us) more “power“.
Alright, enough talking! Let’s go through the parts of how to build an Operator.
Building a Kubernetes Operator
In our case, the Controller is written in Go language and uses the client-go library to communicate with Kubernetes. But, we can also implement a Controller using any other language that can act as a client for the Kubernetes API, like for instance, Python.
In the process of developing a Kubernetes Operator, there are some boilerplate code and process that must be often performed, for this reason, we have in the community some open source frameworks and tools available already, like:
- Kubebuilder
- This framework, from kubernetes-SIGs (Special Interest Groups), is being around since July, 2018. It promises increases velocity and brings less complexity managed by developers.
- Operator SDK
- This one, by Red Hat, brings the ability to build operators not only using Go language but also with Ansible (playbooks/roles) and Helm Charts. It is associated with the CNCF Landscape Operator Framework.
- KUDO
- It states that “provides a declarative approach to building production-grade Kubernetes operators”. Honestly, I don’t know much about this one, I haven’t tried, I will try to take a look at it later :-)
Think of them as accelerators, as SpringBoot for Java, Ruby on Rails for Ruby, Django for Python, but made for Kubernetes Operator development. As you can realize, some of them provide a way to build Operators without writing low level-code, but of course, that comes with some sort of restrictions, and then less “power”.
In our case, we are not using any framework to develop Kubernetes Operators, we will develop it on our own, using Go language and with a little help of some bash scripts.
Getting Started
Environment: Kubernetes / Docker
Of course, we need a Kubernetes, if you don’t have one, I recommend Kind, a tool for running local Kubernetes clusters using Docker container “nodes”. It can be used for local development. Kind, that is also part of the CNCF Cerfified Kubernetes Platform Installer. Again, a project from SIGs group. Check its page, with some simple commands you’ll have a multi-node cluster Kubernetes running on your local computer.
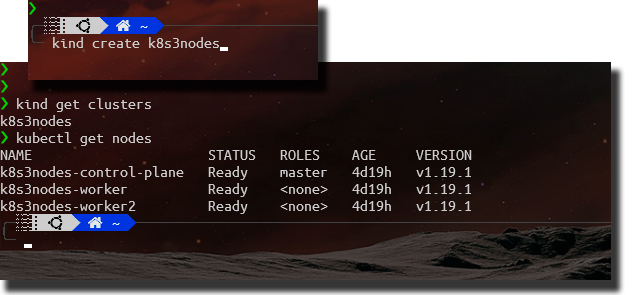
If you don’t have Linux O.S., don’t worry, it is also possible to come up with a development environment for Kubernetes using Windows 10 and its WSL2 (Windows Subsystem for Linux) feature.
The Operator Development
It’s called PodBuggerTool, its objective should be to help us to solve more easily some problems in our application’s Pods. Basically, this is how it should work:
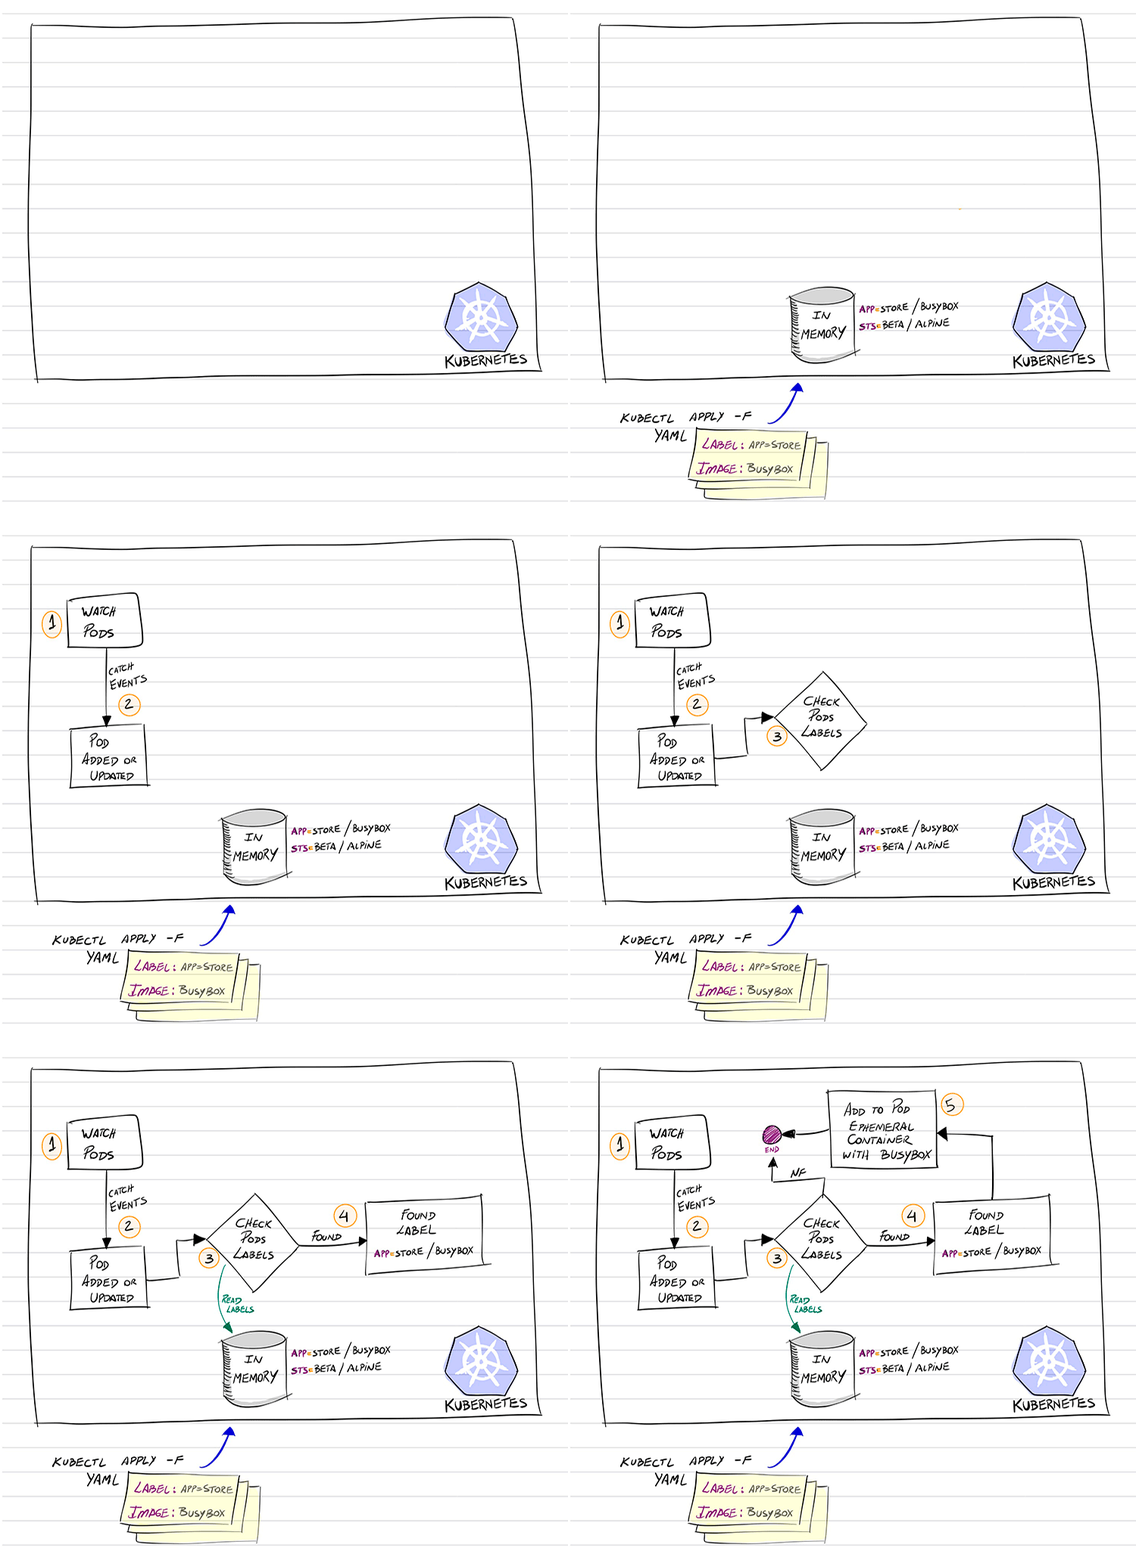
- Watching for Pod’s events;
- When some are created/updated, we catch this event to handle;
- Compare the Pod’s Labels with the Labels we have inserted using our PodBuggerTool (based on its CRD, more on this later on)
- If we realize the Pod’s contains any one of the Labels we are interested in, we then…
- Add into this Pod a new container (as an Ephemeral Container) using the Image specified also by our same PodBuggerTool (there, we can find in its definition the correlation of Label vs. Image)
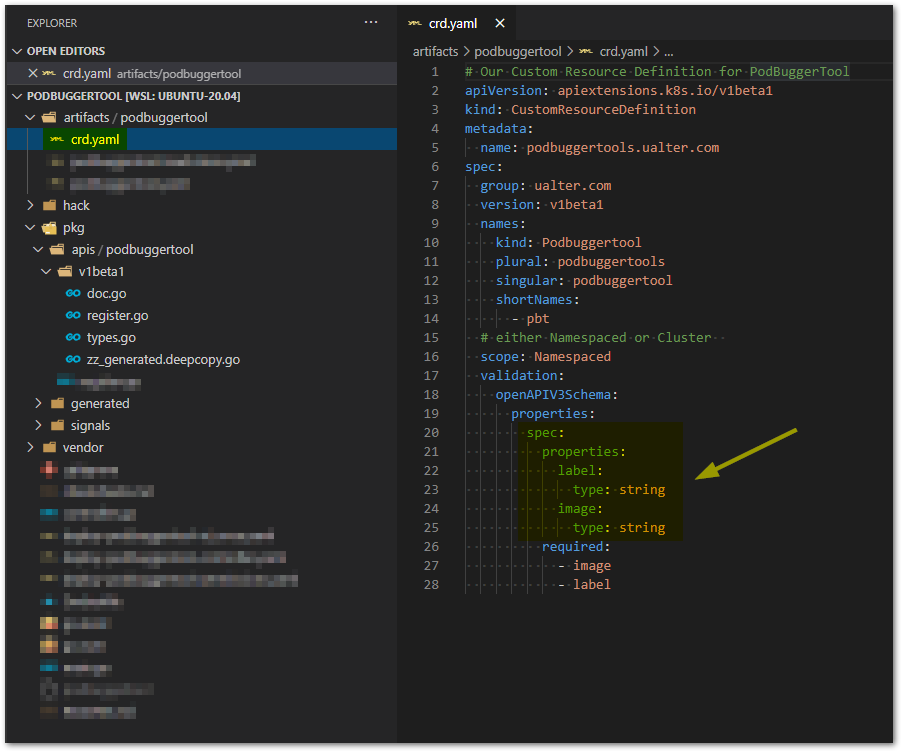
Let’s start with the CRD (Custom Resource Definition), here we write the API resources we want to expose to work with this operator. We define the YAML manifest file that will guide the types we have to create (objects) in Go. In this YAML, called crd.yaml we define our PodBuggerTool. Note in the spec section, we have the Label and Image fields:
Next, we create the folder /pkg/apis/podbuggertool/v1beta1/ with three files register.go, doc.go and types.go, that basically represents our API. In the file types.go we make the definition of our PodBuggerTool using Go structures. PodbuggertoolSpec structure, represents an instance of Podbuggertool object that we want to install in Kubernetes (watch for this Label, if found, install this Image). PodbuggertoolStatus is the state we expect to maintain, in this example is simply “be installed“.
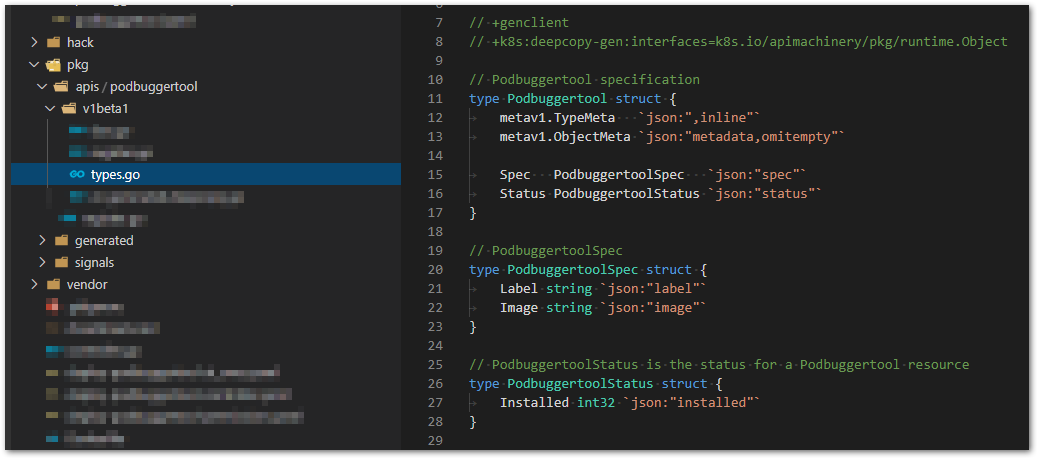
Pay attention in some annotations we have here (line 8), they are important for some tools (script) we use to generate the aforementioned boilerplate code, so it’s important to keep them there. Actually, we will now generate some of this code, using a bash script localized at the hack folder, called update-codegen.sh.
This script uses some code generator tools provided by the community, that we might have already downloaded together with our Go project dependencies (while running commands like: $go get / $go mod vendor).
We need to adapt our update-codegen.sh script (1), using the proper parameters accordingly with our newly created resource (PodBuggerTool):
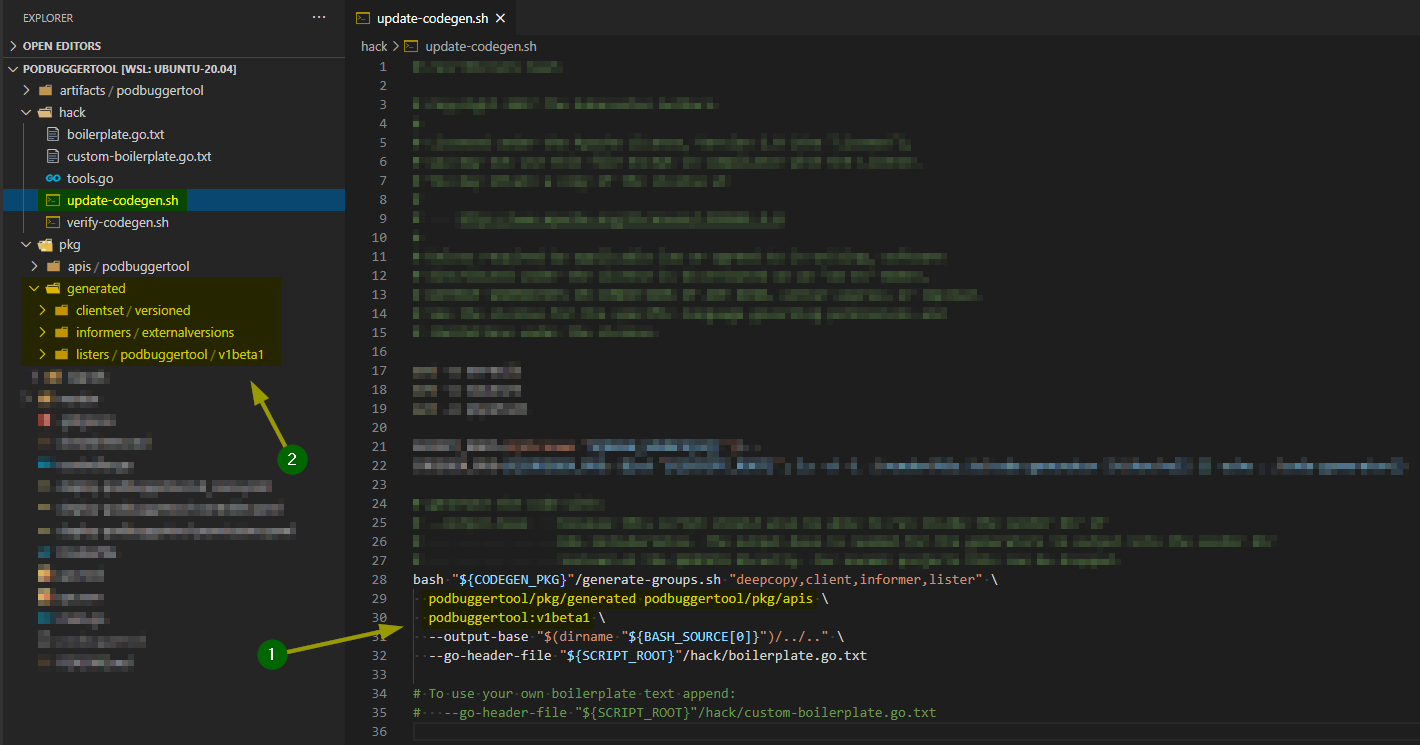
Then, we launch it: ./hack/update-codegen.sh.

This will generate all the code (2) that is necessary when connecting with our extented Kubernetes API. They are the informers, listers and the API client itself. Those are steps that when using a framework for operator development, everything will be more smooth and transparent (we hope so).
Now, the “heart” of our Operator. In an overview from the “33.000 feet” perspective, they go like this way: (you can check all code in details later at the source code provided):
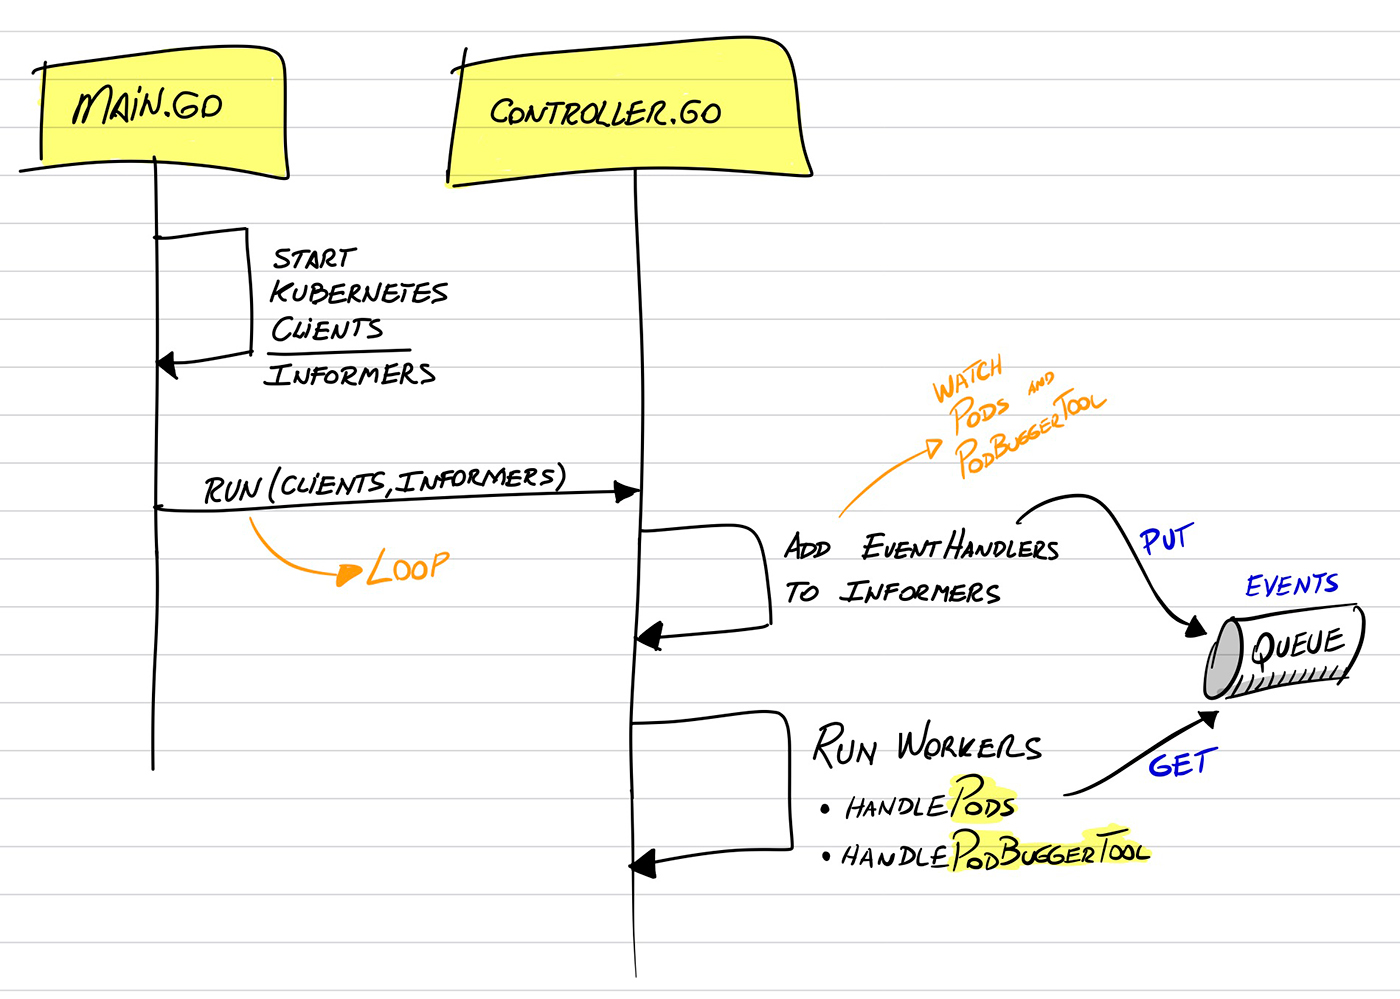
The majority of the code it is pretty much simple, nothing too much complex, but… just to highlight something interesting going on, the code below it is the moment we call the function (updatePod) to insert a new Container into the Pod (defined by the PodBuggerTool):
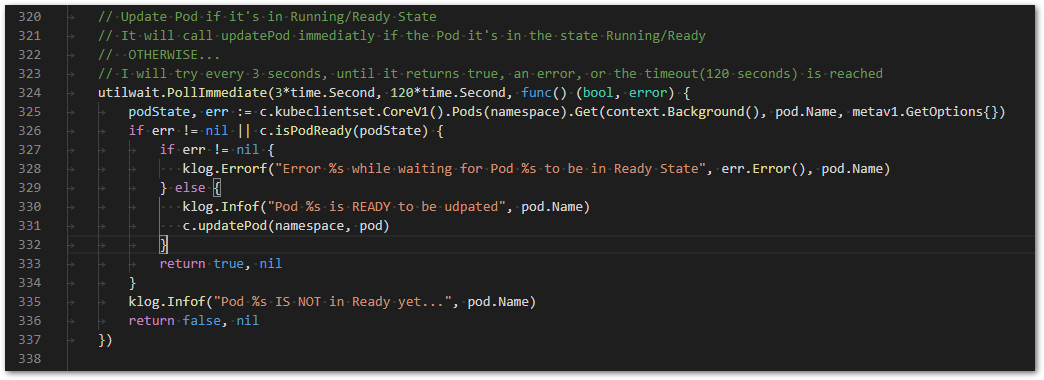
Observe that we are using a feature available in Go that polls our function. Here, it will run the function, every 3 seconds, until the function returns true, an error or the timeout of 120 seconds occurred (in case you are wondering, the word Immediate means that it will attempt to run at least once). And why’s that? Because we have to wait for the Pod be in Ready/Running state, otherwise we might get some errors (that’s our case, our need, our business!)
With all the code ready, we can test our Operator in our local Kubernetes as an executable file, before actually install it. First, build it:

And then, just run it…

Deploy The Operator To Kubernetes
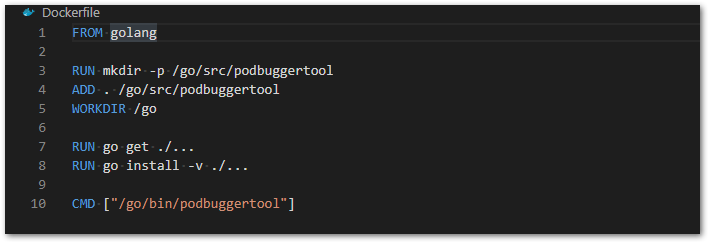
In order to deploy our Operator into a Kubernetes cluster, we need to “wrap” everything in a Docker Image and upload it to our registry. So, that’s our Dockerfile:
# Build and Push it...
$~ docker build . -t ualter/podbuggertool
$~ docker push ualter/podbuggertool
# Install the CRD of our PodBuggerTool in Kubernetes
$~ kubectl apply -f /artifacts/podbuggertool/crd.yaml
# After install the CRD,
# we are able already to use our API, as we usually do with the natives:
$~ kubectl get podbuggertool
$~ kubectl get podbuggertool -w
$~ kubectl describe podbuggertool {name}
# It is made avaible as part of API Resources in K8s
$~ kubectl api-resources | grep -C 5 podbuggertool
NAME SHORTNAMES APIGROUPS NAMESPACED KIND
podbuggertools pbt ualter.com true Podbuggertool
We also need to assign the necessary permissions to our Operator’s User in order to be able to handle (GET, LIST, WATCH…) certain resources (Pods, Deployments, PodBuggerTools), creating the ClusterRole and the ClusterRoleBinding, and submitting to K8s:
xxxxxxxxxx
kubectl apply -f deploy-podbuggertool-permissions.yaml
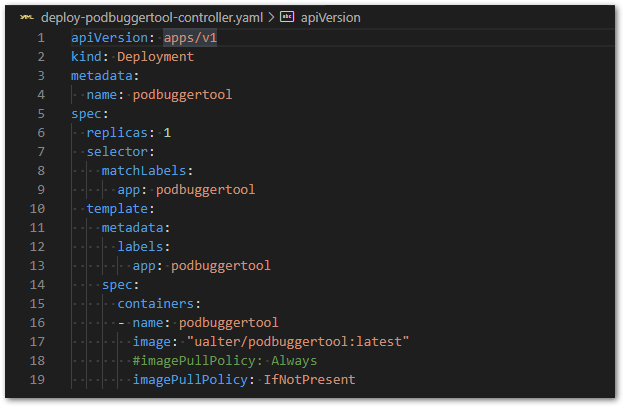
Finally, we install the Operator itself in our Kubernetes cluster, using the following YAML:
The Kubernetes Operator In Action!
After installing the CRD and the Controller, our Operator is ready to get into action. You can check if it is running listing the Pods, we should found our Podbuggertool’s Pod running in the Namespace we have installed it (1).

In the image above, observe that we have also another Pod listed, a Java Spring Boot application called Payment (2), with its Container built over a distroless image: gcr. io/distroless/java:8. Also, notice the label app=payment (3), that’s the one we are going to use to correlated this container with a Podbuggertool later on. As we are aware that our Payment’s Pod is using a distroless image, it doesn’t have available a shell for debugging. Wen can try and see the error:

Let’s use our Podbuggertool to add an Ephemeral Container with Busybox inside the Payment’s Pod. This is the YAML defined to install it:

xxxxxxxxxx
# Installing the Podbuggertool for Payments Application
$~ kubectl apply -f artifacts/podbuggertool/podbuggertool-payment.yaml
# Listing all Podbuggertools installed in our Kubernetes
$~ kubectl get pbt
NAME AGE
podbtool-payment 20s
podbtool-store 3m49s
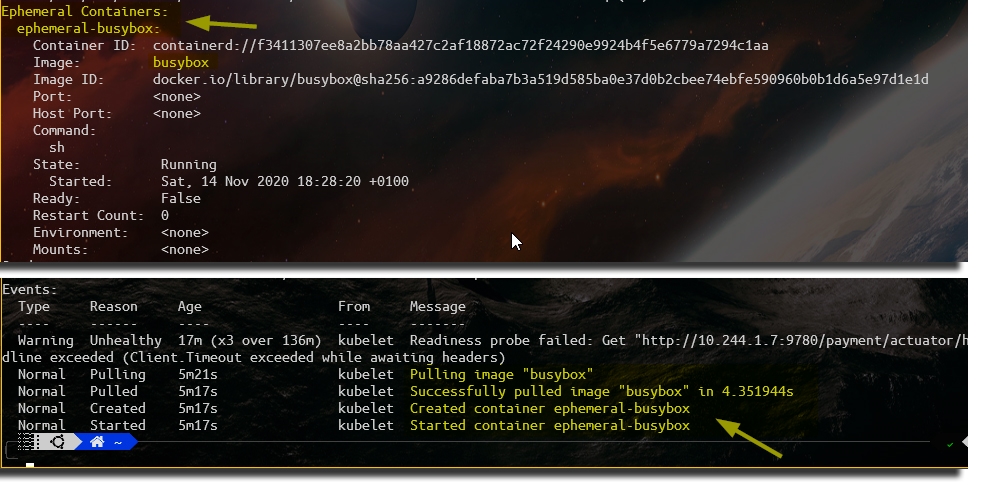
Right after installing the podbttol-payment, as the Payments’s Pod is in Running/Ready state already, we can describe it and check if we found another container installed inside of it, in this case, an Ephemeral Container running Busybox.
xxxxxxxxxx
# Checking Payment's Pod
$~ kubectl describe pod payment-1.0.0-cd94d9759-9smk7
Below, we have the result… as we can see in the section of Ephemeral Containers, and in the events described as well, our Podbuggertool has already done its job and inserted Busybox on this Pod:
Now, we can request a shell again over the same Payment’s Pod, but using the new inserted ephemeral container Busybox:
xxxxxxxxxx
# Get the shell on Payment's Pod
$~ kubectl exec -it payment-1.0.0-cd94d9759-9smk7 -c ephemeral-busybox -- /bin/sh
And then…
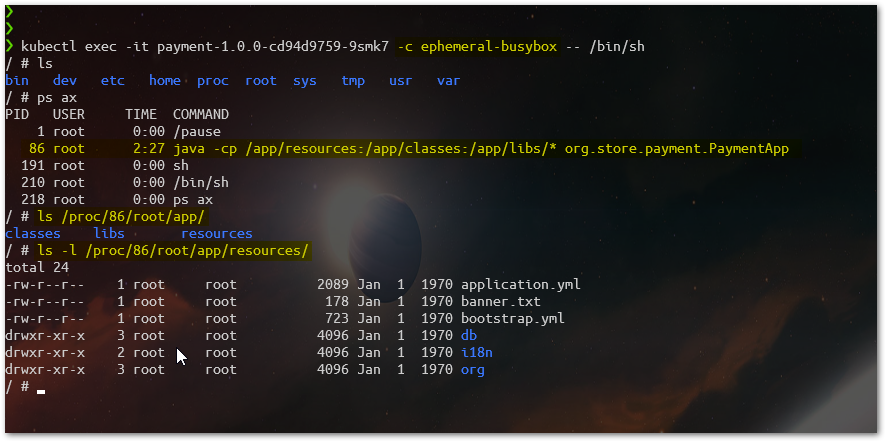
As we can confirm, we are now not only able to get access to a shell in the Payment’s Pod , but in addition to that (as they are sharing process), we can access the content of our Payment Container as well (container built from a distroless image). We are able to run every command available in busybox against Payment, useful for debugging.
Ephemeral Containers
Just a word about them… They are special type of containers, that runs temporarily in an existing Pod with the objective to help users in troubleshooting, they are thought as containers to inspect services, not to run application.
They don’t make part of a Deployment controller specification (for example), if a Pod was removed (as we know that they are disposable and replaceable objects), when replaced, there will be no more Ephemeral Container on it, you must insert it again. Also, you can add it using kubectl commands, there’s no need to use a Go application for that.
By the moment of this writing, this feature is available since Kubernetes 1.16, it is in Alpha stage, that’s why it’s not enabled by default. There are three stages for features: Alpha, Beta, and GA (General Availability), in which only Beta and GA are enabled by default. So, bear in mind that, you have to turn the EphemeralContainers feature gate on at Kubernetes, in order to work Ephemeral Containers. In our example, for the Kubernetes cluster created with Kind, this feature-gate was enabled.
The subject here is Kubernetes Operators, check this page for more information about ephemeral containers.
Conclusion
Using Kubernetes Operator we can extent the control and power we have over the applications running in our containerized environment, either to the end-user application, or tooling for your development process. Either way, it’s interesting to be aware of which resources the Kubernetes Operators can make available to us, because if nothing else available it is helping you be efficient and productive using Kubernetes, maybe it is time to think to try to extent its functionalities creating your own Kubernetes Operators.
Source Code:
https://github.com/ualter/podbuggertool


