Scaling in Azure App Service – Almost Everything You Need To Know
Introduction
In terms of web applications, underlying infrastructure plays a vital role in coping with application performance, traffic surges, complex logic, and long-running processor execution times. It is one of the most difficult jobs to calculate the specifications in terms of infrastructure for web applications, whether it is public-facing applications or for a particular company.
In many cases, there is a high chance that there will be a requirement to upgrade infrastructure specifications after a certain threshold, or maybe resources are not utilized properly. This is another hassle for developers, DevOps engineers, or even for management to upgrade those resources. It may result in application downtime, instability, or sometimes modifications in code level, as well as overall cost augmentation.
One of the key advantages of cloud computing is the capability to scale the solution based on demands and Azure App Service gives various flexible choices in terms of scaling.
Scaling in Azure App Services
Azure App Service is one of my favorite services in terms of hosting web applications because of numerous reasons, of which scaling is one of the favorites that I use frequently.
Azure provides several flexible options to easily scale your apps either horizontally by adding multiple instances of those solutions or vertically enabling to add memory, CPU disk to your existing instances.
Scaling Options
There are two primary workflows for scaling:
- Scale-up
- Scale-out
Scale-Out (Horizontal Scaling)
It is basically adding multiple instances of the application that runs in your app. In other words, it increases the number of VM instances up to 30 depending upon your pricing tier. However, in an Isolated tier, we can further scale up to 100 instances based on our requirements. Additionally, we can do a scale-out count manually or set it to auto-scaling based on some rules.
We can do scale-out from the Azure portal, as shown below:
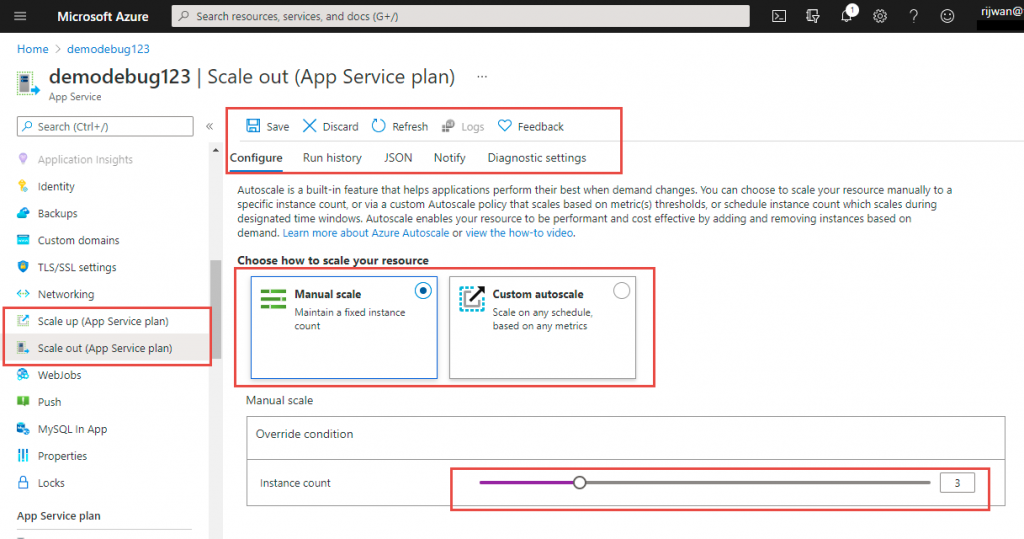
Autoscaling is a built-in feature that helps applications perform their best when demand changes. You can choose to scale your resource manually to a specific instance count, or via a custom Autoscaling policy that scales based on metric(s) thresholds, or schedule instance count which scales during designated time windows. Autoscaling enables your resource to be performant and cost-effective by adding and removing instances based on demand.
https://docs.microsoft.com/en-us/azure/architecture/best-practices/auto-scaling
Select Scale-out from the left navigation, then we can choose either manual and set instance number as per our requirements or auto-scale out based on some rules as shown below:
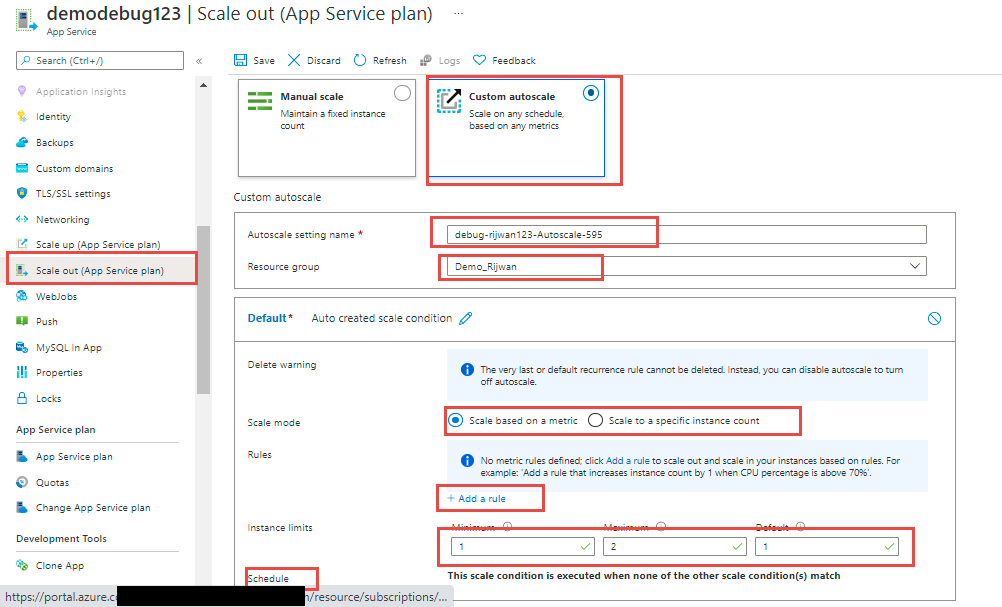
We have to auto-scale the setting name with the resource group name. We will have some more options like scale mode, rules, instance limit, and schedule. This is how we can do horizontal scaling (i.e., scale-out in Azure App Services.)
Scale-Up (Vertical Scaling)
In this scaling option, we can modify the instance power in terms of CPU, memory, disk space which directly impact the cost. This scale-up is done by changing the pricing tier of the app service plan. Additionally, based on the pricing tier, different useful features are available with the azure app service like custom domains and certificates, staging slots, autoscaling, instances, daily backups, and many more.
Scaling is quite easy to do in azure, I prefer the portal, portal.azure.com. Simply log in to the portal, open your app service then you will see the following options for scaling:
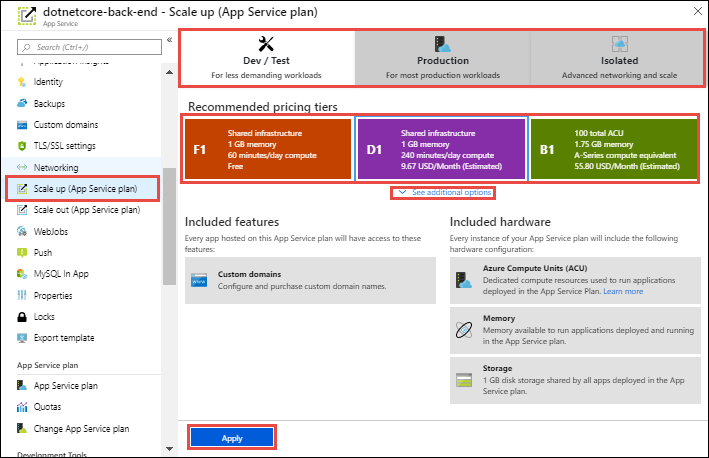
In the scale-up, we can see the distinct categories: Dev/Test, Production, and Isolated.
Dev/Test
As the name suggests, this category is used for the development and testing purposes of the applications with Azure App Service.
There are five separate pricing tiers in the Dev/Test category, as shown below:
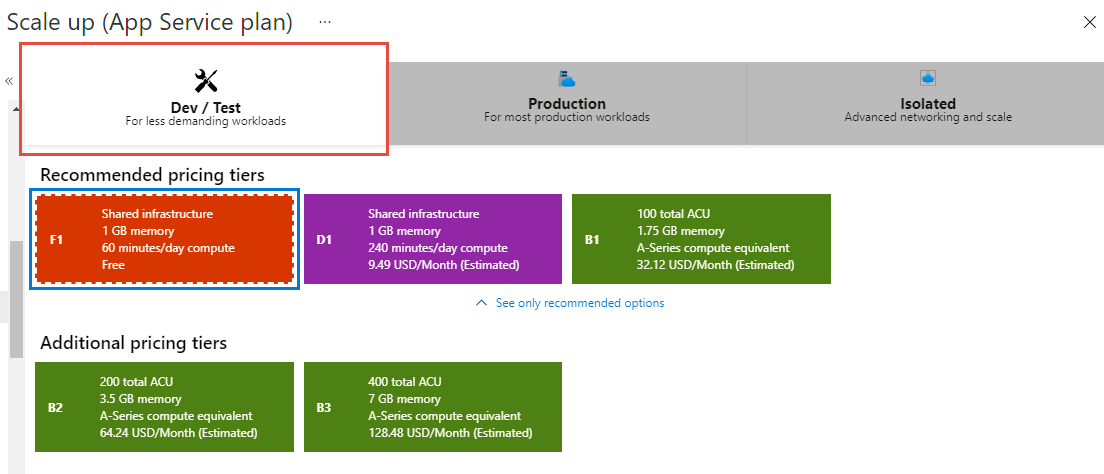
F1 (The Free One), D1, B1, B2, and B3
We can see from the above illustration that the resources, as well as tentative cost per month, are based on these pricing tiers. Another important point to notice is that we can see the included features and hardware after selecting each tier, as depicted below:
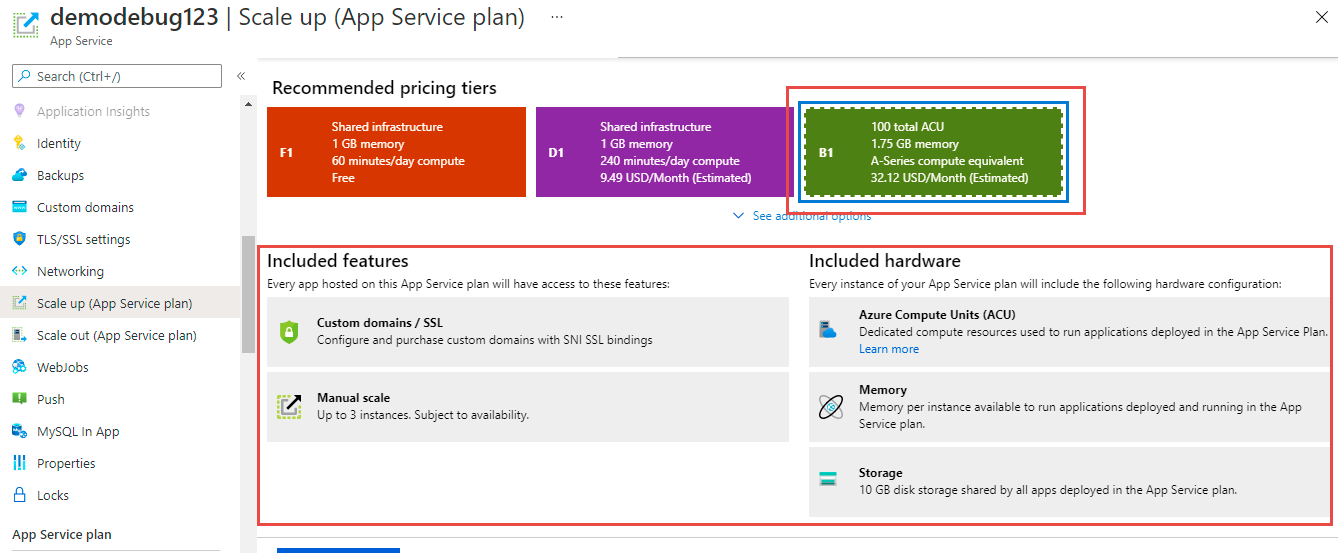
Note: I am not including cost, as cost and plan can modify.
F1 Pricing Tier (Free Tier)
- No feature
- Share Infrastructure 1GB Memory/1GB Storage
- 60 minutes/day compute
D1 Pricing Tier
- Custom domain feature
- Share Infrastructure 1GB Memory
- 240 minutes/day compute
These service plans are using the same Azure VMs as other apps, so some apps may belong to other customers. There is no SLA provided for this service plan and is metered on a per-app basis.
Basic Service Plan (B1, B3, and B3)
This plan is for low-traffic applications where we don’t need auto-scaling and traffic management features. Built-in network load balancing support automatically distributes traffic across instances.
B1 Pricing Tier
Included Features
- Custom domains/SSL
- Manual Scaling up to 3 instances
Hardware
- 100 total Azure computing units
- 1.75 GB Memory and 10 GB disk storage
- A-series computing equivalent
B2 and B3 have the same features as B1, however, hardware contents are different.
B2 Hardware
- 200 total Azure computing units
- 3.5 GB Memory and 10 GB disk storage
- A-series computing equivalent
B3 Hardware
- 400 total Azure computing units
- 7 GB Memory and 10 GB disk storage
- A-series computing equivalent
Production
By name, it is clear that we use this category for the production workloads of the applications. Again, there are two types under this category: standard and premium pricing tiers.
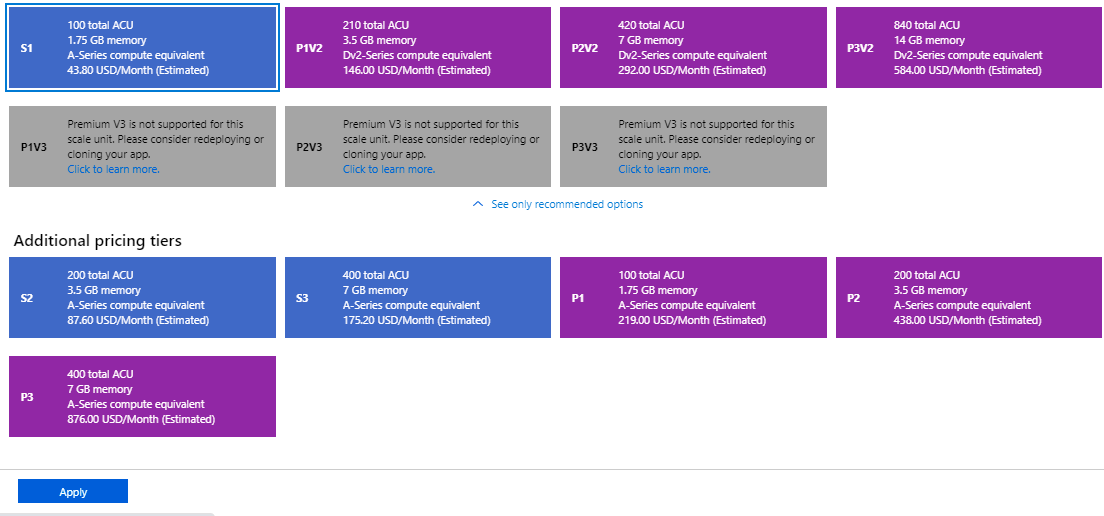
This category has a standard pricing tier, S1, S2, and S3, and premium tier P1V2, P2V2, P3V2, P1V3, P2V3, and P3V3. All these tiers have custom domains/SSL, Auto Scale, Staging Slots, Daily backups, and Traffic manager features.
Standard Service Plan
Pricing is based on the size and number of instances you run. Built-in network load balancing support automatically distributes traffic across instances.
S1, S2, and S3 are available pricing tiers in this with the following specifications:
- Auto Scale up to 10 instances
- 5 Staging Slots
- 10 times daily backup
- S1: 100 ACU, 1.75 GB memory, and 50 GB storage
- S2: 200 ACU, 3.5 GB memory, and 50 GB Storage
- S2: 400 ACU, 7 GB memory, and 50 GB Storage
- All these are A-series equivalent
Premium Service Plan
This service plan is intended for enhanced performance with a faster processor, SSD storage, and double memory-to-core ratio compared to standard.
- Premium V3
Faster processor, Hyper-V virtualization, and support for VNet connectivity P1, P2, P3, P1V2, P2V2, P3V2, P1V3, P2V3, and P3V3 are available pricing tiers for this option with the following specifications:
- Auto Scale up to 20 instances
- 20 Staging Slots
- 50 times daily backup
- P1: 100 ACU, 1.75 GB memory, and 250 GB storage
- P2: 200 ACU, 3.5 GB memory, and 250 GB storage
- P2: 400 ACU, 7 GB memory, and 250 GB storage
- P1V2: 210 ACU, 3.5 GB memory, and 250 GB storage
- P2V2: 420 ACU, 7 GB memory, and 250 GB storage
- P3V2: 840 ACU, 14 GB memory, and 250 GB storage
- P1V3: 195 minimum ACU/vCPU, 2vCPU, 8 GB memory, and 250 GB storage
- P2V3: 195 minimum ACU/vCPU, 4vCPU, 16 GB memory, and 250 GB storage
- P3V3: 195 minimum ACU/vCPU, 8vCPU, 32 GB memory, and 250 GB storage
The new PremiumV3 pricing tier provides us with quite faster processors, SSD storage, and quadruples the memory-to-core ratio of the existing pricing tiers (double the PremiumV2 tier). With the performance benefit, we could save money by running your apps on fewer instances
Note: If we don't see P1V3, P2V3, and P3V3 as options, or if the options are greyed out, then PremiumV3 likely isn't available in the underlying App Service deployment that contains the App Service plan. We might need to change region and resource group combinations.
Isolated Service Plan
This service plan is specifically considered for mission-critical workloads, that are required to operate in a virtual network. An ASE is a powerful feature offering of Azure App Service that gives network isolation and improved scale capabilities. This service plan enables consumers to run their applications in private, dedicated environments in the Azure datacenter using Dv2-series VMs, which is also called App Service Environment. The plan can scale to 100 instances with more available upon request.
- Isolated V2 plan
This service plan has been enhanced for workloads demanding resource isolation, maximum scalability, and advanced networking features. Isolated v2 allows customers to run their apps in a private, dedicated environment in an Azure datacenter with no public internet dependencies in the customer’s network.
Conclusion
In this article, we have learned about various scaling options available for Azure App Service for Dev/Test, Production workloads as well for isolated environments. The horizontal and vertical scaling with several extensive features is readily available based on service plans and can be implemented in a click.

