Easily Automate Your CI/CD Pipeline With Kubernetes, Helm, and Jenkins
Nowadays, it’s critical to get your releases out fast. Gone are the days when developers could afford to wait weeks for their code to be deployed to a testing environment. More than ever, there is great demand for rapid deployment cycles that seamlessly take code from development to production without any hiccups.
Yet, the reality is that developers often find themselves bogged down by the complexities of infrastructure management and the tediousness of manual deployment processes. They crave a solution that allows them to focus solely on their code, leaving the intricacies of deployment to automation.
That's where Continuous Integration and Continuous Deployment (CI/CD) pipelines come in. These automated workflows streamline the entire deployment process, from code compilation to testing to deployment, enabling developers to deliver updates at lightning speed. However, implementing a robust CI/CD pipeline has historically been challenging, particularly for organizations with legacy applications.
Why Kubernetes for Deployment?
This is where Kubernetes, the leading container orchestration platform, shines. Kubernetes has revolutionized the deployment landscape by providing a scalable and flexible infrastructure for managing containerized applications. When combined with Helm, the package manager for Kubernetes, developers gain a powerful toolkit for simplifying application deployment and management.
In this article, we delve into the intricacies of setting up a fully automated CI/CD pipeline for containerized applications using Jenkins, Helm, and Kubernetes. We'll walk you through the process of configuring your environment, optimizing your pipeline for efficiency, and provide a practical template for customizing your own deployment workflows. By the end of this guide, you'll be equipped with the knowledge and tools necessary to accelerate your software delivery cycles and stay ahead in today's competitive landscape. Let's dive in!
Automating CI/CD Pipeline Setup
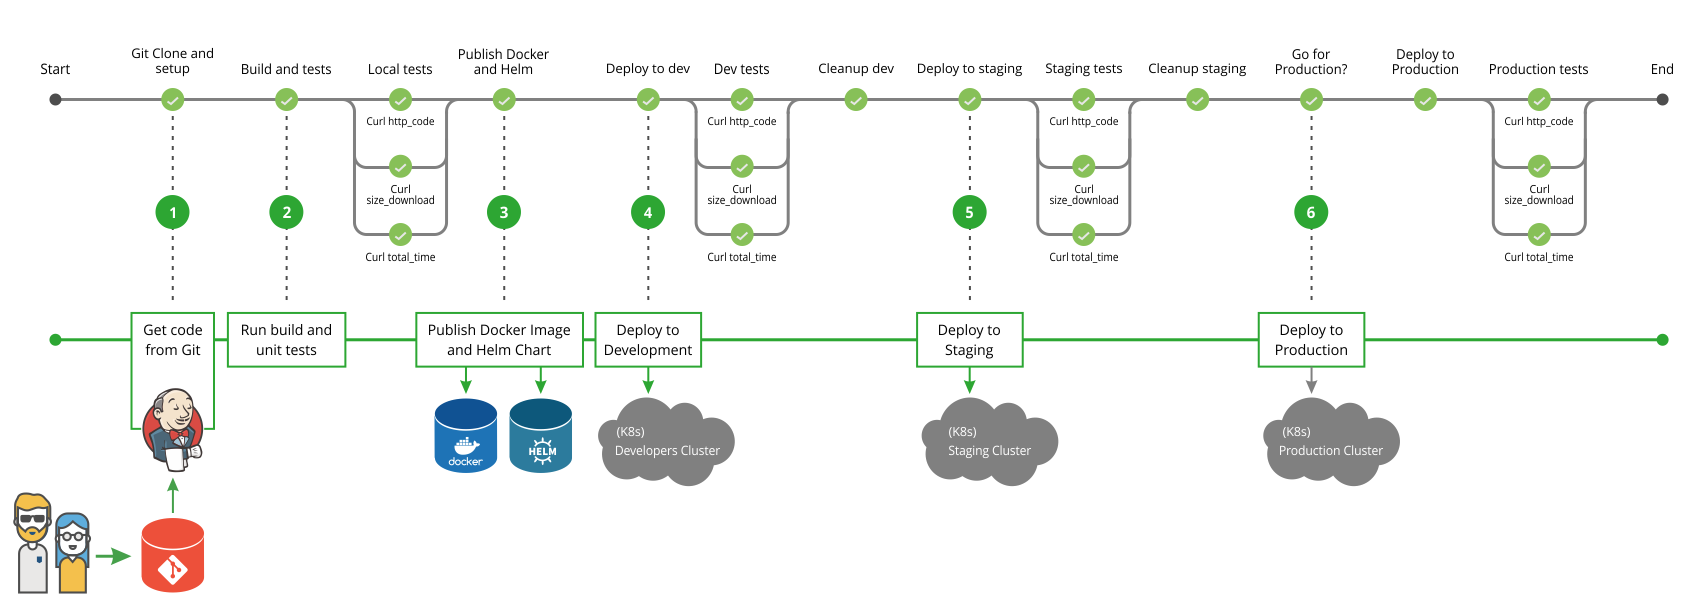
This 6-step workflow will easily automate your CI/CD pipeline for quick and easy deployments using Jenkins, Helm, and Kubernetes.
In order to get familiar with the Kubernetes environment, I have mapped the traditional Jenkins pipeline with the main steps of my solution.

Note: This workflow is also applicable when implementing other tools or for partial implementations.
Setting Up the Environment
Configure the Software Components
Before you create your automated pipeline, you need to set up and configure your software components according to the following configuration:
Software Components |
Recommended Configuration |
A Kubernetes Cluster |
|
A Docker Registry |
|
A Helm Repository |
|
Isolated Environments |
|
Jenkins Master |
|
Jenkins Slave(s) |
|
Prepare Your Applications
Follow these guidelines when preparing your applications:
- Package your applications in a Docker Image according to the Docker Best Practices.
- To run the same Docker container in any of these environments: Development, Staging or Production, separate the processes and the configurations as follows:
- For Development: Create a default configuration.
- For Staging and Production: Create a non-default configuration using one or more:
- Configuration files that can be mounted into the container during runtime.
- Environment variables that are passed to the Docker container.
The 6-Step Automated CI/CD Pipeline in Kubernetes in Action
General Assumptions and Guidelines
- These steps are aligned with the best practices when running Jenkins agent(s).
- Assign a dedicated agent for building the App, and an additional agent for the deployment tasks. This is up to your good judgment.
- Run the pipeline for every branch. To do so, use the Jenkins Multibranch pipeline job.
The Steps
- Get code from Git
- Developer pushes code to Git, which triggers a Jenkins build webhook.
- Jenkins pulls the latest code changes.
- Run build and unit tests
- Jenkins runs the build.
- Application’s Docker image is created during the build.- Tests run against a running Docker container.
- Publish Docker image and Helm Chart
- Application’s Docker image is pushed to the Docker registry.
- Helm chart is packed and uploaded to the Helm repository.
- Deploy to Development
- Application is deployed to the Kubernetes development cluster or namespace using the published Helm chart.
- Tests run against the deployed application in Kubernetes development environment.
- Deploy to Staging
- Application is deployed to Kubernetes staging cluster or namespace using the published Helm chart.
- Run tests against the deployed application in the Kubernetes staging environment.
- [Optional] Deploy to Production
- The application is deployed to the production cluster if the application meets the defined criteria. Please note that you can set up as a manual approval step.
- Sanity tests run against the deployed application.
- If required, you can perform a rollback.
Create Your Own Automated CI/CD Pipeline
Feel free to build a similar implementation using the following sample framework that I have put together just for this purpose:
- A Jenkins Docker image for running on Kubernetes.
- A 6-step CI/CD pipeline for a simple static website application based on of official nginx Docker image.
Conclusion
Automating your CI/CD pipeline with Jenkins, Helm, and Kubernetes is not just a trend but a necessity in today's fast-paced software development landscape. By leveraging these powerful tools, you can streamline your deployment process, reduce manual errors, and accelerate your time-to-market.
As you embark on your journey to implement a fully automated pipeline, remember that continuous improvement is key. Regularly evaluate and optimize your workflows to ensure maximum efficiency and reliability. With the right tools and practices in place, you'll be well-equipped to meet the demands of modern software development and stay ahead of the competition.

