5 Steps to Integrate Istio With OPA

Authentication and Authorization are big parts of the security puzzle that need to be solved by cloud architects and DevOps engineers. In this blog, we will specifically look at how to achieve authorization/access control; i.e., what actions the authenticated entity can perform in the Istio service mesh. It helps to secure the infrastructure by preventing actions with malicious intent.
Authorization in a service mesh can be defined using OPA policies. OPA is a mechanism that helps DevOps folks define and enforce authorization policies for Kubernetes workloads. In this piece, we will see:
- What OPA is
- Why you should integrate OPA with Istio service mesh
- How Istio and OPA authorize requests
- The exact steps you can follow to integrate OPA with Istio
What Is OPA?
OPA (short for “Open Policy Agent") is an open-source, general-purpose policy enforcement engine that lets DevOps define policy as code using a high-level declarative language called Rego. OPA helps centrally define and enforce policies across the stack while relieving developers from writing authorization policies into the application code. Here is how OPA works (refer to Figure 1):
- The application/service receives a request.
- The service sends a JSON authorization request to OPA.
- OPA checks the request against the defined authorization policies.
- OPA takes the decision and returns the authorization response (ALLOW/DENY) to the service in JSON format.
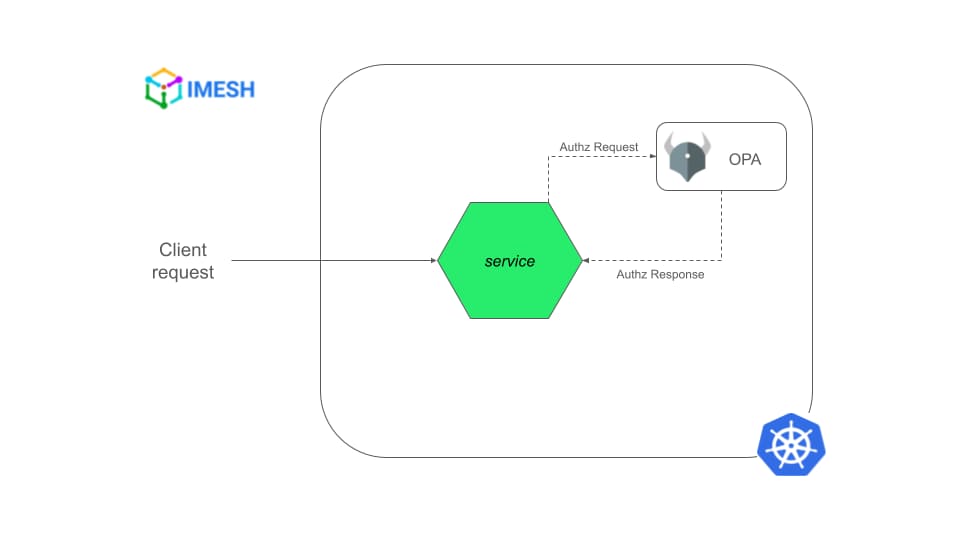
Figure 1: Authorization request flow with OPA
Note that it does not need to be an application written by a developer that is sending the authorization request: it can be Argo CD, Kubernetes Gateway API resource, Terraform, Prometheus, or anything else since OPA is general-purpose. (I have mentioned and drawn an application in a Kubernetes cluster here for the sake of convenience and better understanding.)
Why Integrate OPA With Istio?
Istio has a robust authorization mechanism. However, having a dedicated policy enforcement engine like OPA alongside Istio service mesh has its own benefits:
- Centralized management system to define and enforce policies: OPA makes it easier for DevOps to centrally manage authorization policies for the entire stack. This includes meshed workloads, non-meshed stack, and also authorization checks (a policy that prevents deployment on Fridays, for example).
- More flexibility and granularity in defining policies: If you look at the table below (Figure 2), it is clear that Istio authorization can do a lot and match a request based on a variety of fields from different data sources. However, Istio AuthorizationPolicy CRD can be limited in configuring the HTTP request body or any contextual data in the fields, for which OPA can be used. Unlike Istio, OPA can use any data for policy evaluation.
- Simplified AuthZ configuration: It can be tedious for DevOps to configure complex authorization rules in Istio. OPA is configured using Rego, which is closer to a programming language. It is comparatively easier to set basic to complex policy rules using Rego.
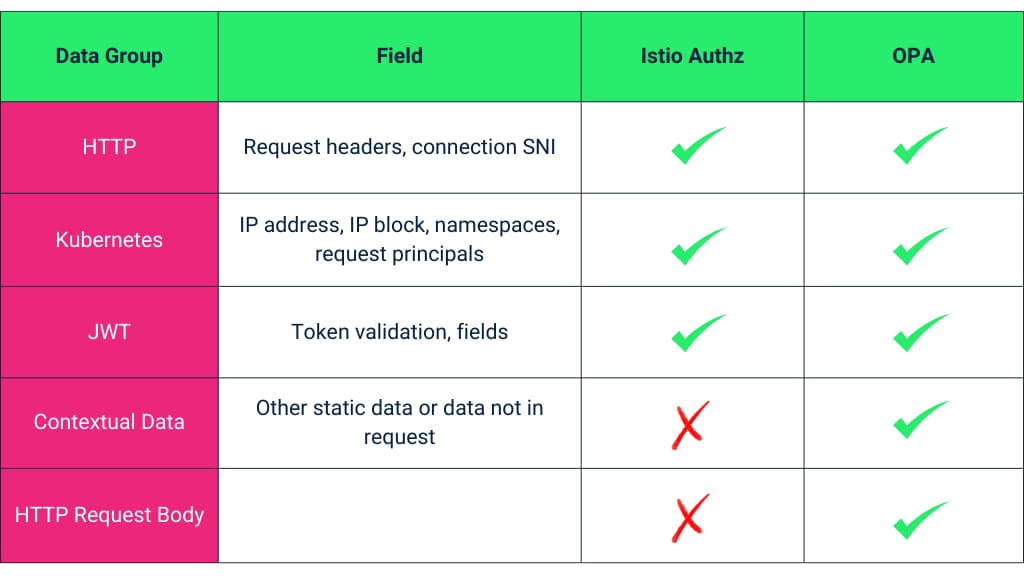
Figure 2: Tabular comparison between Istio and OPA authorization (source)
How Istio and OPA Authorize Requests
DevOps can deploy OPA as a separate service altogether or as a sidecar container alongside the Envoy proxy and the application container in a pod. The sidecar container approach is better to reduce latency.
OPA sidecar containers need to be injected into the application pod just like Istio’s Envoy proxy sidecar containers. We can set up the injected OPA containers to mount ConfigMaps that contain the authorization rules; every OPA sidecar container in the namespace will then mount the same configuration and AuthZ rules defined in the ConfigMap.
Once the OPA sidecar is injected, the Envoy proxy will send authorization requests to OPA to make authorization decisions when the service receives a request:
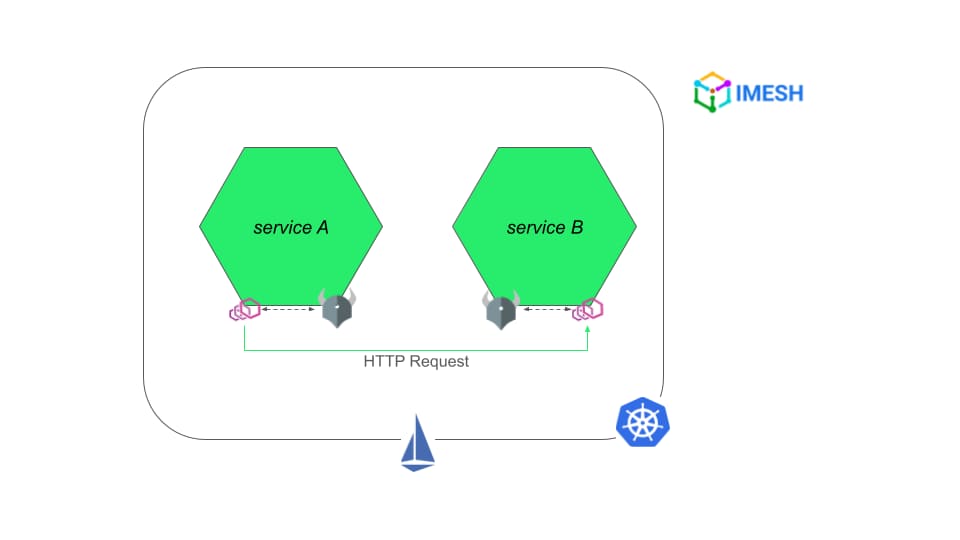
Figure 3: Istio-OPA authorization workflow
Suppose DevOps folks do not want every injected OPA container in the same namespace to follow the same configurations and want to enforce different rules. In that case, they will have to do any of the following:
- Remove hard coding which lets the current injection policy use a particular ConfigMap
- Configure mutating webhook and disable sidecar injection at the pod-level
- Serve up policy bundles from a remote HTTP server
- Deploy the application and the sidecars in a different namespace with different ConfigMap
Steps to Integrate Opa With Istio: Demo
The idea here is to make OPA the external authorizer instead of Envoy proxy sidecars — to make access control decisions.
I will use the classic Bookinfo application from Istio documentation for the demo. I will configure OPA with Istio for access control and check whether it is enforced by firing requests to bookinfo/productpage:

Figure 4: Istio-OPA integration tutorial diagram
Note that /productpage is the UI, which makes internal calls to other services, such as reviews and ratings services (diagram). I will inject OPA into every pod in the bookinfo namespace; all OPA containers mount the same ConfigMap and have the same authorization policies because of that. The default behavior of the Bookinfo application does not forward any HTTP authentication so the internal calls will fail authentication and thus authorization.
We will follow the given steps in order:
- Configure OPA sidecar injection
- Enable communication between Istio proxy and OPA
- Deploy OPA configuration
- Apply Istio configuration
- Deploy the application and test the Istio-OPA authorization setup
The prerequisite for the demo is to have Istio v1.19+ installed in your cluster. I’m using Istio v1.21.0 here.
OPA provides a quickstart.yaml for easy installation. I have split the yaml into three for easier understanding: IMESH GitHub repo.
Step 1: Configure OPA Sidecar Injection
Apply the opa_controller.yaml:
kubectl apply -f opa_controller.yamlThe opa_controller.yaml deploys everything — TLS certificates, ConfigMap containing injection policy, admission controller deployment, and mutating webhook configuration — into the opa-istio namespace (refer to Figure 5):
- The mutating webhook controller (
opa-istio-admission-controller) will then listen for a particular label (opa-istio-injection) with the value set to enabled. - The webhook controller calls the
admission-controller, which has the injection policy. - The injection policy tells the
admission-controllerhow to inject the OPA sidecar container into the pod.
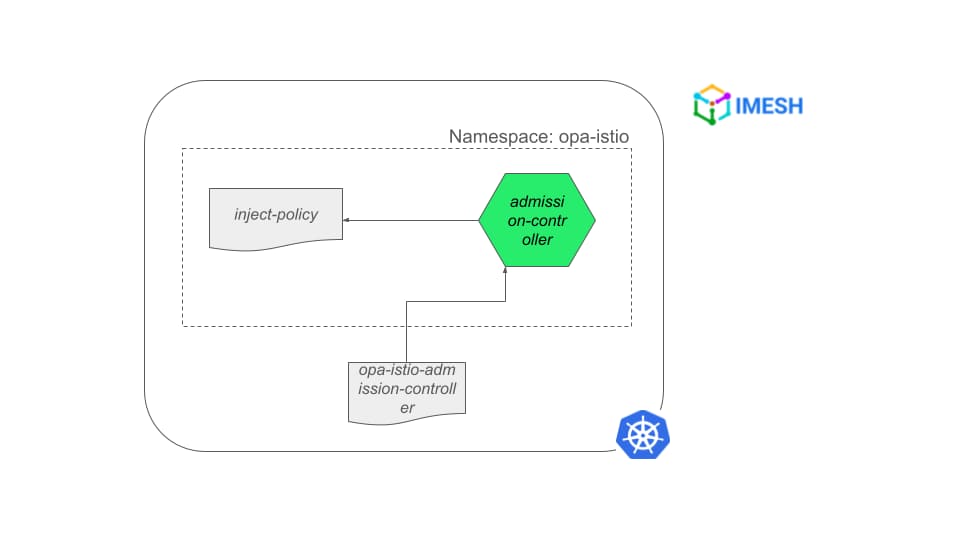
Figure 5: OPA sidecar injection configuration
Now, before deploying the Bookinfo application, we will create bookinfo namespace and follow the rest of the steps:
Create the bookinfo namespace by applying bookinfo-ns.yaml:
kubectl apply -f bookinfo-ns.yamlopa-istio-injection: enabled, to auto-inject OPA sidecars.
Step 2: Enable Communication Between Istio Proxy and OPA
Edit Istio ConfigMap in the istio-system namespace and add extensionProviders (opa-ext-authz-grpc), so that it enables external authorization in the mesh:
- Copy
extensionProvidersfrom the comment in opa_controller.yaml. - Edit Istio ConfigMap and add
extensionProvidersin the mesh field. - Ensure the indentation is correct.
- Save the config.
The step makes it possible for istio-proxy to talk to opa-istio container in the pod for authorization requests.
If you look at the extensionProviders, it is an ExtAuthzGrpc filter type in Envoy with a specified service entry and port:
...

extensionProviders:
- name: opa-ext-authz-grpc
envoyExtAuthzGrpc:
service: opa-ext-authz-grpc.local
       port: "9191"

...
The extensionProviders’ name, service address, and port should be the same in the opa_authz.yaml and opa_config.yaml.
Step 3: Deploy OPA Configuration
The opa_config.yaml defines open policy-related configurations. It has opa-istio-config and opa-policy ConfigMaps — which define the gRPC service implementation (envoy_ext_authz_grpc) and the actual authorization policies, respectively.
The authorization policies can be divided into two parts: the first part defines the conditions under which the authorization is allowed or denied; the second part defines the user roles and the permissions for each role.
The authorization policies might take some time to get used to, as Rego does not use many keywords here. Enable a newer version of Rego to get keywords (allow if condition keyword, for example).
Apply OPA configuration in the bookinfo namespace, as it goes along with the application:
kubectl apply -f opa_config.yaml -n bookinfoStep 4: Apply Istio Configuration
The opa_authz.yaml file contains Istio configurations. It has an AuthorizationPolicy and a ServiceEntry. Note that the Authorization Policy provider is opa-ext-authz-grpc, which is the extensionProvider we configured in the ConfigMap in step 2.
Similarly, the hostname defined in the ServiceEntry is the same as the service address given in the extensionProvider (opa-ext-authz-grpc.local). The gRPC service will run on port 9191 at localhost 127.0.0.1, which the ServiceEntry makes opa-istio sidecars accessible within the pod by the istio-proxy container.
Deploy the configuration:
kubectl apply -f opa_authz.yaml -n bookinfoStep 5: Deploy the Application and Test the Istio-OPA Authorization Setup
Deploy the Bookinfo application and the gateway:
kubectl apply -f /your_Istio_directory/samples/bookinfo/platform/kube/bookinfo.yaml -n bookinfo
kubectl apply -f /your_Istio_directory/samples/bookinfo/networking/bookinfo-gateway.yaml -n bookinfo
Check the pods in the bookinfo namespace:
kubectl get pods -n bookinfo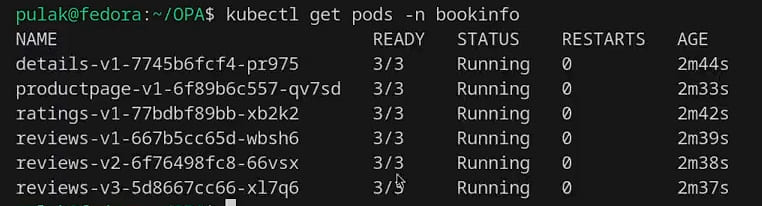
You can see that each pod has 3 containers running in them: the application, Envoy proxy (istio-proxy), and OPA (opa-istio) containers.
Get the IP of the Istio gateway to access the service:
kubectl get svc -n istio-system
Now everything is set, and we are ready to test the authorization policies. The policies we defined in opa_config.yaml are the following:
...

user_roles = {
"alice": ["guest"],
"bob": ["admin"]
}

role_perms = {
"guest": [
{"method": "GET", "path": "/productpage"},
],
"admin": [
{"method": "GET", "path": "/productpage"},
{"method": "GET", "path": "/api/v1/products"},
        ],

...
Alice is a guest user who can only access the /productpage; Bob is an admin who can access the paths /productpage and /api/v1/products. Let us verify the policies.
Trying to access /api/v1/products from Alice:
curl -vvv your_istio_gateway_ip/api/v1/products -u alice:password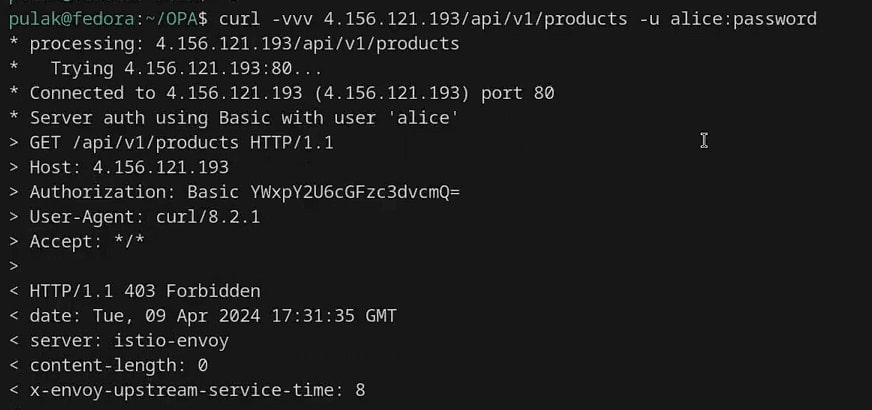
You can see that 403 Forbidden response since Alice does not have access to the path. Let us try the same path as Bob:
curl -vvv your_istio_gateway_ip/api/v1/products -u bob:password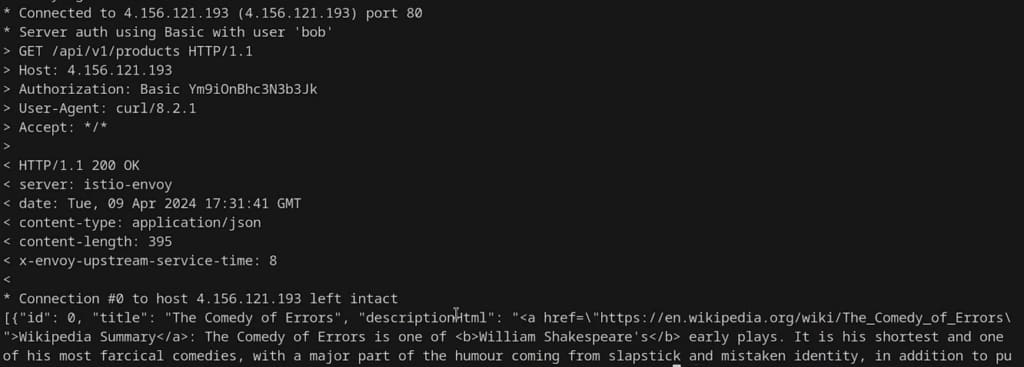
It shows the HTTP status 200 OK and the page content towards the end of the response.
Example Scenario for Access Control With OPA
You can use Istio’s AuthorizationPolicy CRD to enforce the policy shown in the demo above. You do not need OPA. However, there are instances where Istio authorization can be limited, as mentioned in the table at the beginning. Let me give a simple example.
Suppose there is a BookReviews application which is a GraphQL service, where reviewers submit reviews, editors edit and publish those reviews, and users read the published reviews.
When a reviewer adds a book review to the service, the request would include the reviewer’s JWT, containing the groups and roles (reviewer or editor) the reviewer belongs to. The request body would also contain a GraphQL mutation query with the newly created review data.
Let us say you want to ensure the following conditions:
- Only reviewers can submit reviews.
- An editor can only edit a review if it is written by a reviewer belonging to the same group managed by them.
- Only editors can mark a review as “ready to publish”.
Here is the diagram that includes the above policies:
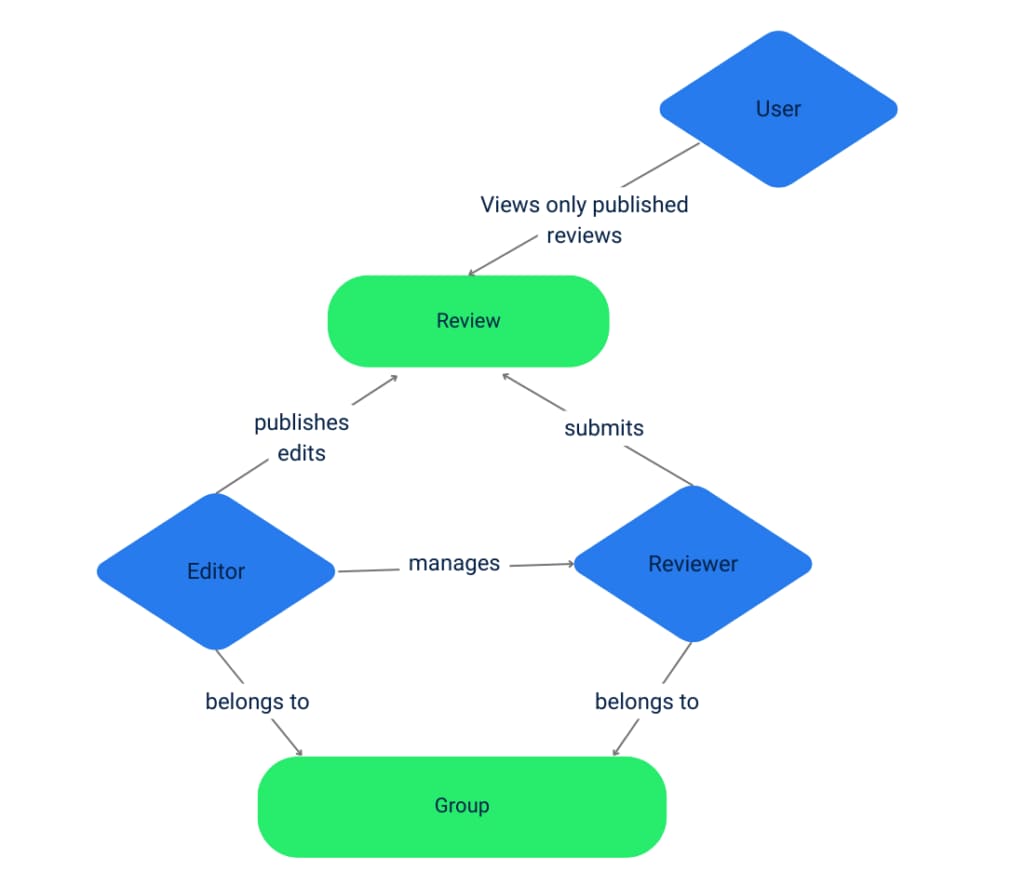
Istio’s AuthorizationPolicy will struggle to enforce the above conditions. The reason is that Istio cannot use the GraphQL request body for authorization checks, which is a JSON object alongside the JWT needed for policy evaluation.
OPA does not have such limitations. It can load any data for policy checks, and DevOps can write these rules in a more ergonomic way using Rego.
Video: Demo in Action
If you prefer to watch the demo in action, please check the video below:S
Enterprise Support for Integrating Istio
Most enterprises use OPA to define and enforce authorization policies for their entire stack. Having a central mechanism for access control improves the overall security and agility of IT teams. Otherwise, developers will waste time developing authorization policies into their application code written in a particular language, which impedes scalability and faster business logic rollout.
