Amazon Redshift Workload Management (WLM): A Step-by-Step Guide

As a database administrator or data engineer working with Amazon Redshift, it's crucial to manage resources effectively to handle different workloads. Amazon Redshift's Workload Management (WLM) feature lets you define how queries are prioritized and how resources like CPU and memory are allocated. This guide will walk you through setting up WLM step by step, making it easy for newbies to get started.
What Is Workload Management (WLM)?
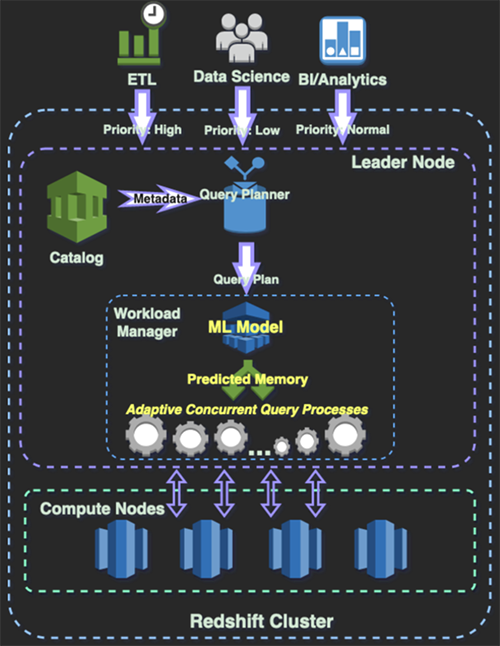
WLM allows Amazon Redshift to handle multiple concurrent queries by allocating resources to query queues. You can create custom queues, allocate memory, and set concurrency limits for specific workloads, ensuring that critical queries run efficiently even under heavy loads.
Step-by-Step Setup Guide to Implement WLM
Step 1: Access Amazon Redshift Console
- Log in to your AWS Management Console.
- In the search bar, type "Redshift" and click on Amazon Redshift.
- Navigate to your Redshift cluster. Choose the cluster for which you want to set up WLM.
Step 2: Navigate to Workload Management (WLM) Settings
- Once inside your cluster, go to the Properties tab.
- Scroll down to Workload Management (WLM) settings.
- You'll see the current queues and configurations here.
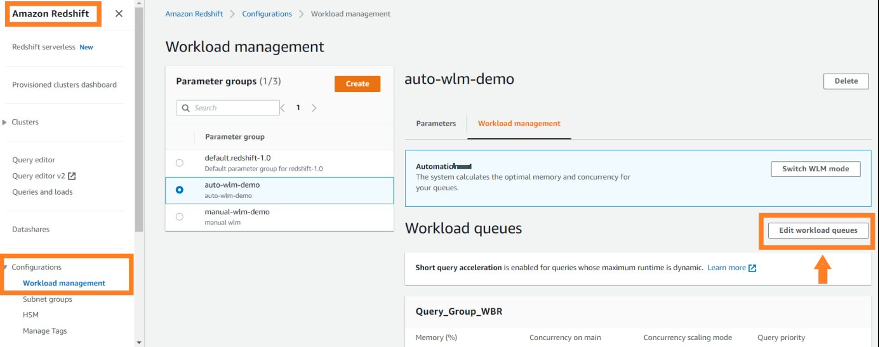
Redshift WLM Setup
Step 3: Switch to Manual WLM (If Necessary)
By default, Redshift uses Automatic WLM, whereas Amazon Redshift handles queue management automatically.
- For greater control, switch to Manual WLM.
- Click Modify.
- Disable Auto WLM and switch to Manual WLM to create custom queues.
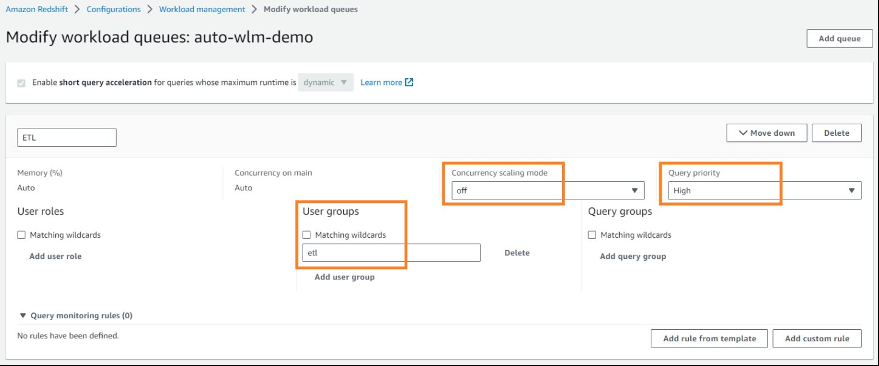
Step 4: Define WLM Queues
Now let’s set up custom queues.
Create a New Queue
Click Add Queue. For example, let’s create a queue for Arvind’s Critical Reports. Give it a name, e.g., arvind_critical_queue.
Set the Concurrency level (the number of queries that can run simultaneously in this queue). For critical queries, you might want fewer concurrent queries for better resource allocation. Set Concurrency to 3 for Arvind's queue.
Memory Allocation
Allocate memory for your queue. Amazon Redshift allocates memory as a percentage of the total available memory.
Let’s allocate 30% of the memory to arvind_critical_queue, ensuring that the queries in this queue have enough resources for optimal performance.
Timeout Settings (Optional)
To ensure that queries don’t hang, you can set a Query Timeout. Let’s give queries in arvind_critical_queue a 10-minute timeout (600 seconds).
Step 5: Create Additional Queues (Optional)
You may want to create multiple queues for different workloads. For example:
- Arvind’s Regular Reports Queue:
Concurrency: 5
Memory Allocation: 50%
Timeout: 15 minutes- Arvind’s Ad Hoc Queries Queue:
Concurrency: 10
Memory Allocation: 20%
  No Timeout
Step 6: Assign Query Groups to Queues
- You can assign specific queries or user groups to specific WLM queues.
- Go to the WLM Query Monitoring Rules tab.
- Click Add Rule.
For example, to assign all queries run by arvind_user to the arvind_critical_queue:
Set user_group = arvind_user
  Set queue_name = arvind_critical_queue
This ensures that all critical queries by Arvind are run through the appropriate queue, prioritizing them over less important workloads.
Step 7: Save Changes and Monitor
Once you've configured the queues, click Save.
Amazon Redshift will apply the new WLM configuration.
You can monitor the performance of these queues using CloudWatch to track query execution times, memory usage, and concurrency limits.
Example Scenario: How Arvind Manages Daily Reporting Workloads
Let’s say Arvind Toorpu runs several types of queries daily:
- Critical reports: These queries are run early in the morning to generate business-critical reports. They need top priority and should not be delayed by other workloads. Arvind allocates 30% of memory and limits concurrency to 3 for these.
- Regular reports: These queries generate regular, less urgent reports, so Arvind allocates 50% of memory and sets concurrency to 5 to allow multiple reports to run simultaneously.
- Ad hoc queries: These are run sporadically during the day and aren’t time-sensitive. Arvind allocates only 20% of the resources, allowing more queries to run concurrently but with lower priority.
By configuring WLM in this way, Arvind ensures that critical tasks receive the resources they need while allowing flexibility for other workloads.
Final Thoughts
Workload Management (WLM) is a powerful tool in Amazon Redshift that manages multiple types of workloads. By creating queues with appropriate resource allocations and concurrency limits, you can ensure that your system runs efficiently, even under heavy load. For beginners, it's important to start with basic queues and gradually refine them as you better understand your workloads.
With the right setup, you can give priority to the queries that matter most and keep everything running smoothly, just like Arvind does with his daily reports!
