Karpenter – Simplify Autoscaling for Amazon EKS

Kubernetes has become the de facto standard for container orchestration, enabling developers to manage and deploy containerized applications at scale. Amazon’s Elastic Kubernetes Service (EKS) is a fully managed Kubernetes service that makes it easy to run Kubernetes on AWS. However, as applications grow, managing resources effectively can become a challenge. That’s where Karpenter comes in.
What Is Karpenter?
Karpenter is a just-in-time capacity provisioner for any Kubernetes cluster, not just EKS. It is designed to simplify and optimize resource management in Kubernetes clusters by intelligently provisioning the right resources based on workload requirements. Although Karpenter can be used with any Kubernetes cluster, in this article, we will focus on its benefits and features within the context of AWS and EKS.
Advantages of Karpenter Over Cluster Autoscaler
EKS best practices recommend using Karpenter over Autoscaling Groups, Managed Node Groups, and Kubernetes Cluster Autoscaler in most cases. Here’s why Karpenter has the edge:
- No need for pre-defined node groups: Unlike Cluster Autoscaler, Karpenter eliminates the need to create dozens of node groups, decide on instance types, and plan efficient container packing before deploying workloads to EKS.
- Decoupled from AWS APIs and EKS versions: Karpenter is not tied to specific EKS versions, providing greater flexibility and easier upgrades.
- Adapts to changing workload requirements: With Karpenter, there’s no need to update node group specifications if workload requirements change, resulting in less operational overhead.
- Intelligent instance selection: Karpenter can be configured to control which EC2 instance types are provisioned. It then intelligently chooses the correct instance type based on the workload requirements and available compute capacity in the cluster.
Key Features of Karpenter Karpenter offers several powerful features that set it apart from traditional autoscaling solutions:
- Native support for Spot instances: Karpenter can handle provisioning and interruptions of Spot instances, maintaining application availability while reducing costs.
- Automatic node replacement with Time-to-live (TTL): Karpenter can automatically replace worker nodes by defining a TTL, ensuring cleaner nodes with fewer accumulated logs, temporary files, and caches.
- Advanced node provisioning logic: Karpenter allows for defining advanced node provisioning logic using simplified YAML definitions, making it easier to manage complex configurations.
The Cost Factor
Karpenter is a powerful tool that optimizes resource usage in Kubernetes clusters, resulting in significant cost savings for users. By assessing the resource requirements of pending pods, Karpenter intelligently selects the most suitable instance type for running them, ensuring efficient resource utilization. Furthermore, this smart solution can automatically scale in or terminate instances no longer in use, reducing waste and lowering costs.
In addition to these capabilities, Karpenter offers a unique consolidation feature that intelligently reorganizes pods and either deletes or replaces nodes with more cost-effective alternatives to further optimize cluster costs. This proactive approach to cost management ensures users get the most value from their Kubernetes clusters while minimizing waste and maximizing efficiency. With Karpenter, users can trust that their clusters are optimized for performance, scalability, and cost-effectiveness.
Get Started With Karpenter
With so many reasons too-obvious reasons to use Karpenter, let’s give it a try while you figure out your favorite use case.
Installing Karpenter on EKS
Karpenter deploys as any other component in a Kubernetes cluster. Helm charts are published by AWS to simplify the installation process. Here is a step-by-step guide to install Karpeneter on any running EKS Cluster and test it on a sample application workload.
As a pre-requisite, you need access to the cluster using kubectl and helm, along with access to AWS Account using AWS CLI ( to configure IAM roles and related settings )
First, create an IAM role that will be associated with the worker nodes provisioned by Karpenter. This Allows worker nodes to attach to the EKS cluster and add to Available capacity. All the required IAM policies for this role can be added with these steps.s
aws iam create-role --role-name eks-karpenter-node-role \
  --assume-role-policy-document '{"Version":"2012-10-17","Statement":[{"Effect":"Allow","Principal":{"Service":"ec2.amazonaws.com"},"Action":"sts:AssumeRole"}]}'

aws iam attach-role-policy --role-name eks-karpenter-node-role \
  --policy-arn arn:aws:iam::aws:policy/AmazonEKS_CNI_Policy
aws iam attach-role-policy --role-name eks-karpenter-node-role \
  --policy-arn arn:aws:iam::aws:policy/AmazonSSMManagedInstanceCore
aws iam attach-role-policy --role-name eks-karpenter-node-role \
  --policy-arn arn:aws:iam::aws:policy/AmazonEC2ContainerRegistryReadOnly
aws iam attach-role-policy --role-name eks-karpenter-node-role \
  --policy-arn arn:aws:iam::aws:policy/AmazonEKSWorkerNodePolicy

aws iam get-instance-profile-for-role --role-name eks-karpenter-node-role
Take note of the IAM instance profile ARN; this will be passed to the Karpenter helm config for installation. Create a custom value.yaml file, replace cluster_name, cluster_endpoint and node_iam_instance_profile_arn (from above step).
nodeSelector:
  kubernetes.io/os: linux
clusterName: cluster_name
clusterEndpoint: cluster_endpoint
aws:
  defaultInstanceProfile: node_iam_instance_profile_arn
Next, install Karpenter to your EKS cluster while passing the above values.yaml file as an argument to the helm install command.
helm repo add karpenter https://awslabs.github.io/karpenter/charts
helm install karpenter karpenter/karpenter --values values.yaml
Verify that Karpenter is deployed successfully.
kubectl get all -n karpenter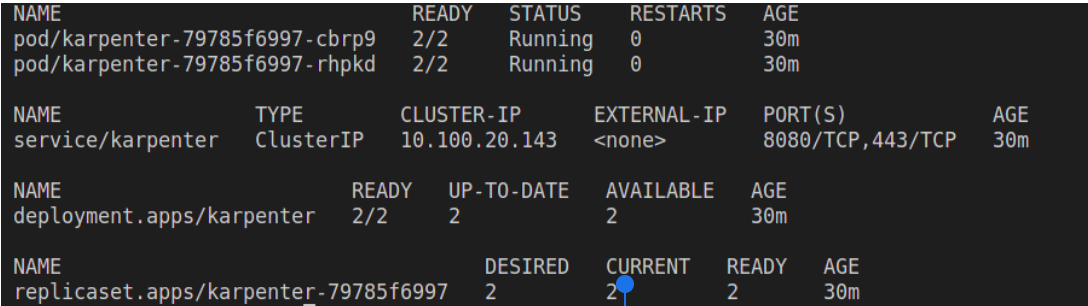
Configuring Karpenter as a Node Provisioner
Karpenter requires IAM permissions to launch EC2 instances. As per security best practices, we will only assign required and least IAM permissions to karpenter pods. So we create an IAM role and associate it to the Kubernetes Service Account attached to Karpenter pods. ( more about IRSA — Iam Roles for Service Accounts here — )
Get the OIDC Provider ARN for your EKS Cluster.
aws eks describe-cluster --name dev-skaf --query "cluster.identity.oidc.issuer" --output textGet the name of the Kubernetes service account created by Karpenter.
kubectl get serviceaccount -n karpenterReplace OIDC_PROVIDER_ARN and KARPENTER_SA_NAME with the values fetched in the above commands. Note the role ARN from the command output.
aws iam create-role \
  --role-name karpenter-irsa \
  --assume-role-policy-document '{
    "Version": "2012-10-17",
    "Statement": [
      {
        "Effect": "Allow",
        "Principal": {
          "Federated": "arn:aws:iam::accountid:oidc-provider/<OIDC_PROVIDER_ARN>"
        },
        "Action": "sts:AssumeRoleWithWebIdentity",
        "Condition": {
          "StringEquals": {
            "OIDC provider ARN:sub": "system:serviceaccount:karpenter:<KARPENTER_SA_NAME>"
          }
        }
      }
    ]
  }'
Create an IAM policy with required permissions and note policy ARN from the output.
# Create IAM Policy
aws iam create-policy \
  --policy-name karpenter-irsa-policy \
  --policy-document '{
    "Statement": [
      {
        "Action": [
          "ssm:GetParameter",
          "pricing:GetProducts",
          "iam:PassRole",
          "ec2:RunInstances",
          "ec2:DescribeSubnets",
          "ec2:DescribeSpotPriceHistory",
          "ec2:DescribeSecurityGroups",
          "ec2:DescribeLaunchTemplates",
          "ec2:DescribeInstances",
          "ec2:DescribeInstanceTypes",
          "ec2:DescribeInstanceTypeOfferings",
          "ec2:DescribeImages",
          "ec2:DescribeAvailabilityZones",
          "ec2:DeleteLaunchTemplate",
          "ec2:CreateTags",
          "ec2:CreateLaunchTemplate",
          "ec2:CreateFleet"
        ],
        "Effect": "Allow",
        "Resource": "*",
        "Sid": "Karpenter"
      },
      {
        "Action": "ec2:TerminateInstances",
        "Condition": {
          "StringLike": {
            "ec2:ResourceTag/Name": "*karpenter*"
          }
        },
        "Effect": "Allow",
        "Resource": "*",
        "Sid": "ConditionalEC2Termination"
      }
    ],
    "Version": "2012-10-17"
  }'
Attach the IAM policy to the role, and annotate the Karpenter service account with the ARN of the role. ( Replace arn_of_karpenter_irsa_policy and arn_of_karpenter_irsa_role with noted values. )
# Attach Policy to the role
aws iam attach-role-policy --role-name karpenter-irsa \
  --policy-arn <arn_of_karpenter_irsa_policy>

# Annotate service account with arn of role
kubectl annotate serviceaccount -n karpenter \
  karpenter-irsa eks.amazonaws.com/role-arn=<arn_of_karpenter_irsa_role>
Now Karpenter is ready with the required IAM permissions to create worker nodes, but it still needs the node provisioning login, and hence let’s define the Karpenter Provisioner configuration.
Here you again need to specify the EKS Cluster name and Subnet Selector for the Nodes. Replace cluster_name and private_subnet_name with correct values. Create a file and use kubectl apply -f <filename>command to apply this provisioner configuration.
apiVersion: karpenter.sh/v1alpha5
kind: Provisioner
metadata:
  name: karpenter-provisioner
spec:
  labels:
    Services: "app"
  requirements:
    - key: karpenter.sh/capacity-type
      operator: In
      values: ["on-demand"]
    - key: karpenter.k8s.aws/instance-size
      operator: NotIn
      values: ["nano", "micro", "small"]
    - key: "karpenter.k8s.aws/instance-category"
      operator: In
      values: ["c", "m", "r"]
    - key: "karpenter.k8s.aws/instance-cpu"
      operator: In
      values: ["4", "8", "16", "32"]
    - key: karpenter.k8s.aws/instance-hypervisor
      operator: In
      values: ["nitro"]
    - key: "topology.kubernetes.io/zone"
      operator: In
      values: ["us-west-2a", "us-west-2b"]
    - key: "kubernetes.io/arch"
      operator: In
      values: ["arm64", "amd64"]
    - key: "karpenter.sh/capacity-type" # If not included, the webhook for the AWS cloud provider will default to on-demand
      operator: In
      values: ["spot", "on-demand"]
  providerRef:
    name: karpenter-node-template
  ttlSecondsAfterEmpty: 300
---
apiVersion: karpenter.k8s.aws/v1alpha1
kind: AWSNodeTemplate
metadata:
  name: karpenter-node-template
spec:
  subnetSelector:
    Name: <private_subnet_name> # required
  securityGroupSelector:
    aws:eks:cluster-name: <cluster_name> # required
Using Karpenter to Create Worker Nodes
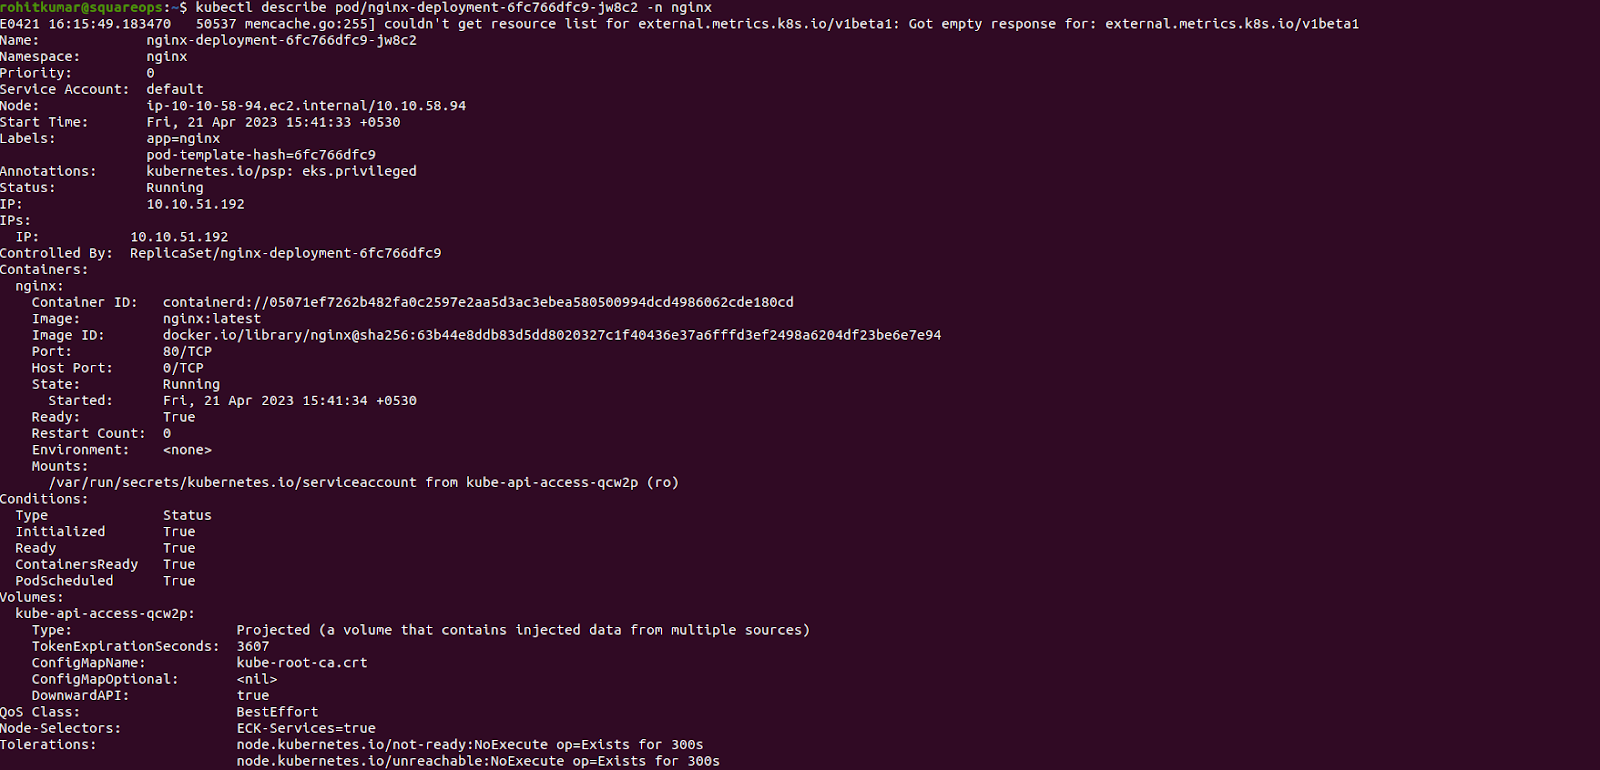
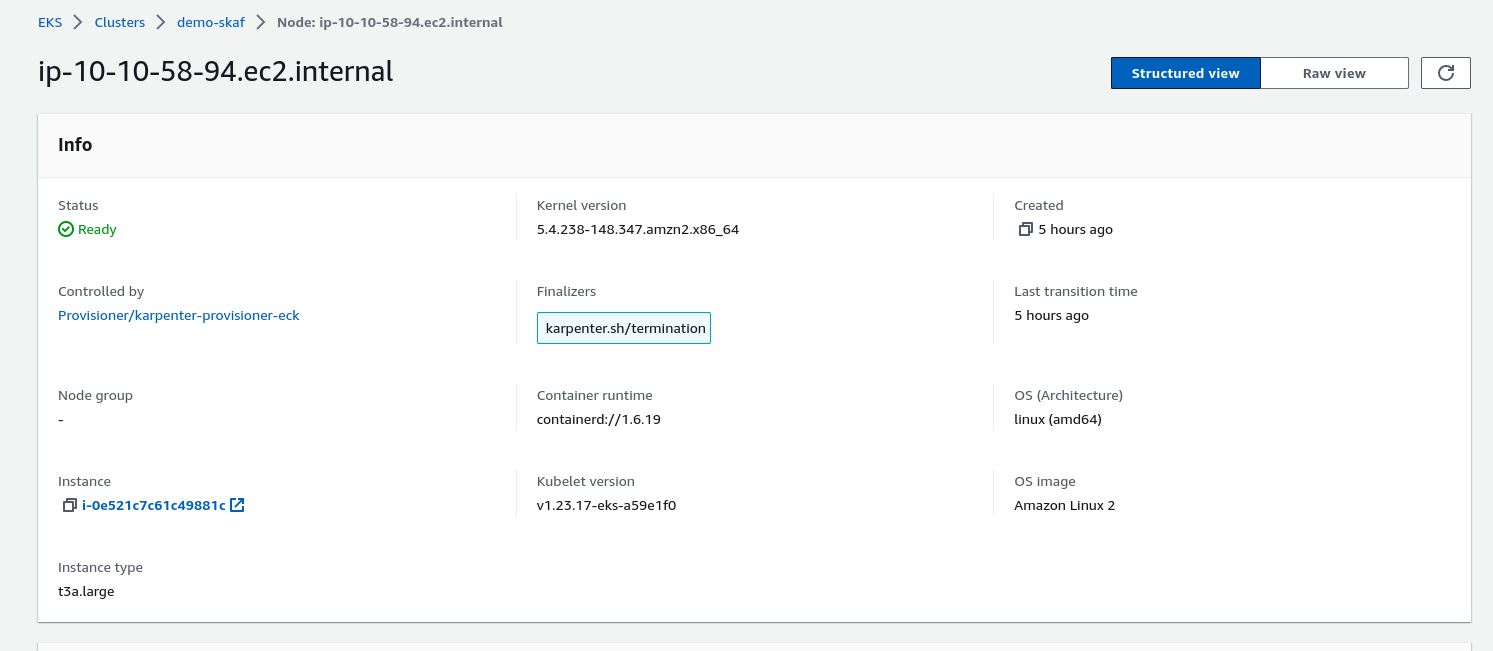
Now that Karpenter is all set for action let’s see how it can be harnessed to add capacity to the EKS cluster, on-demand and based on workload requirements. For this example, we create a simple nginx deployment, define the requirements and see how Karpenter chooses the right ec2 instance for the worker nod.e
kubectl apply -f - <<EOF
apiVersion: apps/v1
kind: Deployment
metadata:
  name: nginx-deployment
  labels:
    app: nginx
spec:
  replicas: 1
  selector:
    matchLabels:
      app: nginx
  template:
    metadata:
      labels:
        app: nginx
    spec:
      nodeSelector:
        "ECK-Services": "true"
      containers:
      - name: nginx
        image: nginx:latest
        ports:
        - containerPort: 80
EOF
Verify the deployment, and see that pod is running and a new node is provisioned.

Advanced Use Cases With Karpenter
Karpenter understands many available scheduling constraint definitions in Kubernetes by default, including.g
- Resource requests and node selection.
- Node affinity and pod affinity/anti-affinity.
- Topology spread
Karpenter can detect the availability zone of Kubernetes Persistent volumes backed by Amazon EBS and launch the worker nodes accordingly to avoid cross-AZ mounting issues with EBS storage class.
Conclusion
We just witnessed how Karpenter can create an optimized EC2 capacity on demand for your EKS clusters. Installing and configuring Karpeneter may seem like a task, but our terraform module for EKS Bootstrap adds such useful drivers to your EKS cluster seamlessly.
