Breaking Free From the Cloud With Kamal: Just Enough Orchestration for Your Apps

There is no doubt that the cloud has changed the way we run our software. Startups, for instance, can get started without buying expensive hardware and scale flexibly. Also, the cloud has enabled novel solutions such as serverless, managed Kubernetes and Docker, or edge functions. For a time, cloud-native applications seemed to be the way forward for most teams, big or small.
But in exchange for all this power, we pay a cost. And it can be a steep one. 37signals — the company behind HEY.com and Basecamp.com — has calculated that by buying a few servers and moving from the cloud to on-premise, they can save 7 million dollars over five years.
And it is not an isolated case. Recently, Amazon Prime — the poster child of serverless architectures — moved part of its infrastructure from serverless into a monolith and cut costs by 90%.
Does this mean that we should go back to bare metal servers like in the old days? Not quite. We can still enjoy many of the benefits of the cloud, like horizontal scalability and no-outage upgrades using containers in combination with an orchestration platform. On that note, 37signals recently released Kamal, a tool that allowed them to completely leave the cloud, saving them money and improving performance for their users.
What Is Kamal?
Kamal is a deployment tool for containerized applications. It uses Docker containers to run the software and Traefik, a reverse proxy and load manager, to perform rolling updates.
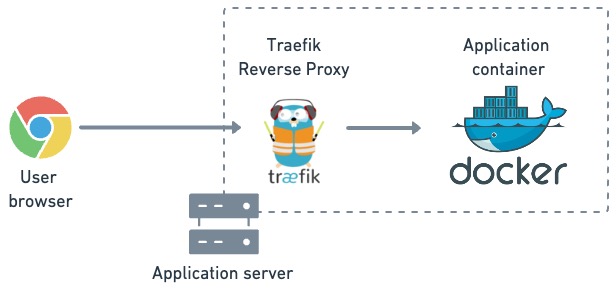
The application container runs behind an instance of Traefik running as a reverse proxy. User requests are routed to the active application container.
Kamal keeps things simple by:
- Using standard Docker images.
- Connecting to the servers via SSH.
- Giving each server a single role.
The last point gives us the first clue about how Kamal works. It assumes a multi-server setup, where every machine fulfills only one role. In other words, if your application requires a database, Kamal expects to have at least two servers: one for the application and one for the database.
Deploying the application and database with a single Kamal command.
Kamal cares about your servers and little else. Load balancing is limited to the server level. Kamal uses Traefik to forward HTTP traffic to every container running on a machine. If you want to do horizontal scaling, you'll need to put a separate load balancer in front of everything.
Kamal does not manage multi-server load balancing. You need to add your own.
Because Kamal doesn't care where the application runs, you can use a cloud server, on-premise machines, or even run VMs on your laptop to test drive the tool.
Getting Started With Kamal
You'll need the following to build and deploy an application with Kamal:
- Docker.
- A Docker Hub account or similar.
- A software project with its Dockerfile.
- Two servers with SSH access.
Note: We will need at least one server for each role. A deployment will typically need at least two machines: one for the application and one for the database. You cannot host the database on the same machine as the application.
Ensure You Have SSH Access
Before starting, ensure that you have SSH access to the deployment server. It can be any cloud, bare metal server, or even a VM on your laptop. What matters is that it already has your SSH key authorized for root access.
$ ssh root@SERVER_IP_ADDRESSIf that doesn't work, but you know the root's password, you can add your key with the following command:
$ ssh-copy-id root@SERVER_IP_ADDRESS
Installing Kamal
So, now that we have our server, we can install Kamal on your local machine. Either as a Ruby Gem:
$ gem install kamal -v 1.0.0
Or, you can try the ready-made official Docker image by aliasing the command in your shell like this:
$ alias kamal="docker run -it --rm -v '${PWD}:/workdir' -v '/run/host-services/ssh-auth.sock:/run/host-services/ssh-auth.sock' -e SSH_AUTH_SOCK='/run/host-services/ssh-auth.sock' -v /var/run/docker.sock:/var/run/docker.sock ghcr.io/basecamp/kamal:latest"Since Kamal is in active development and quite new, I suggest picking a version and sticking with it to prevent updates from breaking your deployments.
Configuring Kamal
For this next step, we will need a project to deploy. Kamal works with any codebase as long as it includes a Dockerfile. For this tutorial, I will be using the following demo project, which exposes an API-based address book with PostgreSQL for persistence:
TomFern/dockerizing-nodejs
In the project's root folder, run:
$ kamal initThis will create three files:
config/deploy.yml: the main configuration file. It declares how to deploy the application to all your servers..env: for sensitive environment variables, including passwords and tokens. It should be added.gitignoreso it's never checked in the repository..kamal/hooks: contains Git-like hooks. We won't be using any of these features in this tutorial.
The building block of Kamal deployments is called applications, which are containers running on one or more servers. They are connected to the Internet via Traefik, a reverse proxy.
Let's configure our deployment. To do that, open deploy.yml and edit the following values near the top of the file. Uncomment the lines as needed. You will, at the very least, need to define the following:
- A name for the application.
- The server IP address. This will be your application server.
- The Docker image name is without the tag.
- Your Docker Hub username (you can also use a different registry).
- In the registry. password add "DOCKER_PASSWORD." This is a reference to a variable defined in .env.
- Environment variables for the application. The values under clear are stored in plaintext. Passwords should be stored in .env, and their variable name should be listed under secret in the config file.
I'm configuring an "address book" application in the example below. Its image name is TomFern/address book (notice the lack of tags, which are handled by Kamal). My application uses a PostgreSQL database, for which I set DB_HOST to the IP address of the DB and reference the variable containing the password in .env.
service: addressbook
image: tomfern/addressbook

# Deploy to these servers.
servers:
 - 216.238.101.228

# Credentials for your image host.
registry:
 username: tomfern
 password:
 - DOCKER_PASSWORD

# Environment variables
env:
 clear:
 DB_HOST: 216.238.113.141
 secret:
 - DB_PASSWORD
Kamal can handle containerized dependencies like databases, caches, or search services. Kamal calls them accessories. If you need to define an accessory, scroll down the config file until you find the accessories section. Then, set the following values:
- The DB engine image name with its tag, e.g.
postgres:14. - The db server IP address and the database port.
- Any secrets or environment variables needed for database initialization.
- One or more volume mappings for data persistence — so data is not wiped out when the container stops.
- You can also define startup scripts to run during database initialization.
The following snippet shows how to configure a PostgreSQL database accessory for our demo app:
accessories:
 db:
 image: postgres:14
 host: 216.238.113.141
 port: 5432
 env:
 secret:
 - POSTGRES_PASSWORD
 volumes:
 - /var/lib/postgresql/data:/var/lib/postgresql/data
Now, open the .env file. Fill in the password of your Docker Hub account and for the "Postgres" user in your PostgreSQL server. The value of every secret environment variable defined in deploy.yml must be set here.
DOCKER_PASSWORD=YOUR_DOCKER_HUB_PASSWORD
POSTGRES_PASSWORD=THE_POSTGRES_ADMIN_PASSWORD
DB_PASSWORD=THE_ADDRESSBOOK_APP_PASSWORD
You may use the same password for POSTGRES_PASSWORD and DB_PASSWORD or create a dedicated user for the app in the database. If you do so, you'll also need to define DB_USER in the config file like this:
service: addressbook
image: tomfern/addressbook

# ...

env:
 clear:
 DB_HOST: 216.238.113.141
 DB_USER: my_app_username
 secret:
 - DB_PASSWORD
Add a Healthcheck Route
By default, Kamal checks that the application container is up by running curl on the /up route. You can change the health check endpoint in the config file.
Since the demo does not have a health check route, let's add one. In app.js, add the following lines:
// app.js

// ....

const healthRouter = require('./routes/health');
app.use('/up', healthRouter);

// ...
Create a new file called routes/health.js with the following content, which checks if the app can connect with the database:
// routes/health.js


const express = require('express');
const router = express.Router();
const db = require('../database');

router.get("/", function(req, res) {
 db.sequelize.authenticate()
 .then(() => res.status(200).send(JSON.stringify({ ok: true })))
 .catch( err => res.status(500).send(JSON.stringify(err)));
});

module.exports = router;
Kamal uses curl inside the container to perform the health check, so ensure that your Dockerfile installs the tool. For example:
FROM node:18.16.0-alpine3.17
RUN apk update && apk add curl

...
Prepare Servers and Deploy
We're set to begin with the deployment. Kamal can do everything with a single command:
$ kamal setup

Acquiring the deploy lock
Ensure curl and Docker are installed...
Log into image registry...
Build and push app image...
Ensure Traefik is running...
Start container with version c439617 using a 7s readiness delay (or reboot if already running)...
Releasing the deploy lock
This command does the following:
- Installs Docker on all machines.
- Starts Traefik in the app server.
- Starts the PostgreSQL container in the database server.
- Builds the Docker image for your application on your laptop and uploads it to Docker Hub.
- Pulls the image and starts the application on the server.
- Routes inbound traffic into the application container.
MRSK runs a health check to verify that the application is ready to work before being exposed to the Internet. Once the bill passes, Traefik routes traffic into the app's container.
By default, the health check is a GET request to the /up route (expecting status code 200), but you can change that in deploy.yml.
MRSK deployment mechanism. The image is built into the developer's machine, uploaded to Docker Hub, and pulled into the server. Then, a health check ensures it starts correctly. Once verified, Traefik routes traffic into the application container.
We can check what containers are running with the following:
$ mrsk details

Traefik Host: 216.238.101.228
CONTAINER ID IMAGE COMMAND CREATED STATUS PORTS NAMES
5d08d56b760b traefik:v2.9 "/entrypoint.sh --pr…" 2 minutes ago Up 2 minutes 0.0.0.0:80->80/tcp, :::80->80/tcp traefik

App Host: 216.238.101.228
CONTAINER ID IMAGE COMMAND CREATED STATUS PORTS NAMES
28acfd2cda02 tomfern/addressbook:3ecd87430ab7ab6cc30a1542784ddb75fbfd8e74 "docker-entrypoint.s…" 2 minutes ago Up 2 minutes 3000/tcp addressbook-web-3ecd87430ab7ab6cc30a1542784ddb75fbfd8e74


CONTAINER ID IMAGE COMMAND CREATED STATUS PORTS NAMES
a843852686b6 postgres:14 "docker-entrypoint.s…" 2 minutes ago Up 2 minutes 0.0.0.0:5432->5432/tcp, :::5432->5432/tcp addressbook-db
As you can see, MRSK tags every built image with a unique identifier, allowing us to track changes, rolling back and forwards as needed.
Before testing the application, we should run any database migration/setup scripts to initialize its contents. MRSK allows us to run commands in running containers with the following:
$ mrsk app exec "npm run migrate"Finally, we can test the application, which should be ready to receive user requests.
$ curl -X PUT http://216.238.101.228/persons -H 'Content-Type: application/json' -d '{
"id": 1,
"firstName": "David",
"lastName": "Bowie"
}'

$ curl 216.238.101.228/persons/all
{
 "firstName": "David",
 "lastName": "Bowie",
 "id": 1,
 "updatedAt": "2023-04-30T22:44:29.115Z",
 "createdAt": "2023-04-30T22:44:29.115Z"
}
Deploying Updates With MRSK
Let's make a change to the application so we can see how MRSK handles updates. In the demo code, we have a /persons API endpoint; it would be a good idea to version it. So, let's change this line in app.js:
app.use('/persons', personsRouter);
Change the line so the base endpoint route is /persons/v1/.
app.use('/persons/v1', personsRouter);The fastest way to update the container is with, which does away with a few tasks like checking whether Docker is installed in all servers.
$ mrsk redeploy

Acquiring the deploy lock
Running docker buildx build
Running docker image rm --force tomfern/addressbook:7db892 on 216.238.101.228
Running docker pull tomfern/addressbook:latest on 216.238.101.228
Health check against /up succeeded with 200 OK!
Finished all in 35.8 seconds
Releasing the deploy lock
The redeploy command will rebuild the image, upload it to Docker Hub, and start it on the application server. As soon as the health check passes, the traffic is routed to the new version, and the old container shuts down.
MRSK redeploy mechanism. A new instance of the application is built and deployed. Once its health check passes, traffic is routed to the new instance, and the old one is shut down.
After deployment, we can check that the new route is working:
$ curl 216.238.101.228/persons/v1/all

[
 {
 "id": 1,
 "firstName": "David",
 "lastName": "Bowie",
 "createdAt": "2023-05-07T17:41:45.580Z",
 "updatedAt": "2023-05-07T17:41:45.580Z"
 }
]
Rolling Back Updates With MRSK
MRSK gives us a safe path for rolling back updates. If the new version is causing trouble, we can return to the last working version with a single command.
To rollback, first, we need to find which images are available on the server with the following:
$ mrsk app containers

App Host: 216.238.101.228

CONTAINER ID   IMAGE                                                          COMMAND                  CREATED         STATUS                     PORTS      NAMES

f648fec5f604   tomfern/addressbook:66347a86f8a123e35492dd43463540c23f7db892   "docker-entrypoint.s…"   4 minutes ago   Up 4 minutes               3000/tcp   addressbook-web-66347a86f8a123e35492dd43463540c23f7db892

b3b1d13b8a1c   9500e07b6387                                                   "docker-entrypoint.s…"   9 minutes ago   Exited (1) 4 minutes ago              addressbook-web-66347a86f8a123e35492dd43463540c23f7db892_05d41f3ba39d2b1b

ce4a5c31e6fc   tomfern/addressbook:f043325e3984ec245a94b21bd236afcc537a9739   "docker-entrypoint.s…"   3 hours ago     Exited (1) 9 minutes ago              addressbook-web-f043325e3984ec245a94b21bd236afcc537a9739
We can see that the previous version was tagged as "f043325e3984ec245a94b21bd236afcc537a9739". We can run mrsk rollback to go back to it. For example:
$ mrsk rollback f043325e3984ec245a94b21bd236afcc537a9739
If the container does not exist on the server — MRSK routinely prunes older images — you can always look up the last good version in Docker Hub or by checking the logs in your CI/CD platform.
MRSK rollback mechanism. The old version is restarted and health-checked. Once working, traffic is switched over to the old version, and the new container stops.
Once you're done with your application, you can remove everything, including the database, with mrsk remove. This will destroy the database, remove Docker, and stop all applications.
MRSK’s Limitations
MRSK development is ongoing, so we may expect behavior changes and new breaking features in the future. But do not mistake its newness for immaturity; 37signals has reportedly begun using it to move away from the cloud with great success already.
That being said, there are a few things MRSK cannot do, and that makes it a bad fit for some use cases:
- The default behavior is to expose the application's HTTP port without SSL. You are supposed to set up an SSL terminator, a load balancer, or a CDN in front of the whole deployment.
- Containers cannot communicate between themselves within the same server. This is by design. You can always configure Docker networks server-side manually. But it's better to stick to one server per role, so putting the application and the database on the same machine is a bad idea.
- You must configure a firewall in front of your whole setup to ensure users can only access the web application.
- If you want to distribute the load among many servers, you should set up a load balancer in front of your servers. MRSK does not provide this feature.
MRSK is designed for each server to have one role and does not provide load balancing or SSL termination. It would help if you handled it by yourself.
At the end of the day, MRSK offers a simplified workflow — especially when compared with beasts like Kubernetes — by not trying to handle every aspect of the system.
Deploying Applications With MRSK and CI/CD
If you want to see an example of using MRSK in a CI/CD environment, check this tutorial.
You can find all the code needed at this repository:
TomFern/dockerizing-nodejs
Troubleshooting
If you experience issues with deployment, try the following:
- If the health check fails, ensure that curl is installed in the application container image.
- If it still fails after ensuring curl is installed, check that connectivity works between the application and the database. You may need to configure a VPS or set firewall rules.
- You can try starting the images manually by running the docker exec commands in the machines to see the output of the logs. These will help you find the root cause of the problem.
If you get an error message stating that there is a lock, run the MRSK lock release. This can happen when MRSK fails during deployment, and the admin lock is not released.
Conclusion
MRSK is minimalistic to the point of elegance. Combining traditional servers with the flexibility of containers allows us to run our containerized services with ease on any server.
MRSK presents a compelling solution if you're seeking to optimize your software deployments, reduce vendor lock-in, and maintain flexibility in choosing deployment environments while enjoying the benefits of cloud-native architectures.
