Introduction to Reactive APIs With Postgres, R2DBC, Spring Data JDBC and Spring WebFlux
I know — there are A LOT of technologies listed in the title of this article. Spring WebFlux has been introduced with Spring 5 and Spring Boot 2 as a project for building reactive-stack web applications. I have already described how to use it together with Spring Boot and Spring Cloud for building reactive microservices in that article: Reactive Microservices with Spring WebFlux and Spring Cloud. Spring 5 has also introduced projects that support reactive access to NoSQL databases, like Cassandra, MongoDB, or Couchbase. But, there was still a lack of support for reactive to provide access to relational databases. The change is coming together with the R2DBC (Reactive Relational Database Connectivity) project. That project is also being developed by Pivotal members. It seems to be a very interesting initiative, however, it is at the beginning of the road. Anyway, there is a module for integration with Postgres, and we will use it for our demo application.
R2DBC will not be the only one new interesting solution described in this article. I will also show you how to use Spring Data JDBC – another really interesting project that was released recently. It is worth mentioning the features of Spring Data JDBC. This project has already been released and is available under version 1.0. It is a part of bigger Spring Data framework. It offers a repository abstraction based on JDBC. The main reason of creating that library is to allow access to relational databases using Spring Data (through CrudRepository interfaces) without including the JPA library to the application dependencies. Of course, JPA is still certainly the main persistence API used for Java applications. Spring Data JDBC aims to be simpler conceptually than JPA by not implementing popular patterns like lazy loading, caching, dirty context, and sessions. It also provides very limited support for annotation-based mapping. Finally, it provides an implementation of reactive repositories that use R2DBC for accessing the relational database. Although that module is still under development (only a SNAPSHOT version is available), we will try to use it in our demo application. Let’s proceed to the implementation.
Including Dependencies
We use Kotlin for implementation. So first, we include some required Kotlin dependencies.
<dependency>
    <groupId>org.jetbrains.kotlin</groupId>
    <artifactId>kotlin-stdlib</artifactId>
    <version>${kotlin.version}</version>
</dependency>
<dependency>
    <groupId>com.fasterxml.jackson.module</groupId>
    <artifactId>jackson-module-kotlin</artifactId>
</dependency>
<dependency>
    <groupId>org.jetbrains.kotlin</groupId>
    <artifactId>kotlin-reflect</artifactId>
</dependency>
<dependency>
    <groupId>org.jetbrains.kotlin</groupId>
    <artifactId>kotlin-test-junit</artifactId>
    <version>${kotlin.version}</version>
    <scope>test</scope>
</dependency>
We should also add kotlin-maven-plugin with support for Spring.
<plugin>
    <groupId>org.jetbrains.kotlin</groupId>
    <artifactId>kotlin-maven-plugin</artifactId>
    <version>${kotlin.version}</version>
    <executions>
        <execution>
            <id>compile</id>
            <phase>compile</phase>
            <goals>
                <goal>compile</goal>
            </goals>
        </execution>
        <execution>
            <id>test-compile</id>
            <phase>test-compile</phase>
            <goals>
                <goal>test-compile</goal>
            </goals>
        </execution>
    </executions>
    <configuration>
        <args>
            <arg>-Xjsr305=strict</arg>
        </args>
        <compilerPlugins>
            <plugin>spring</plugin>
        </compilerPlugins>
    </configuration>
</plugin>
Then, we may proceed to include frameworks required for the demo implementation. We need to include the special SNAPSHOT version of Spring Data JDBC dedicated for accessing the database using R2DBC. We also have to add R2DBC libraries and Spring WebFlux. As you may see below, only Spring WebFlux is available in a stable version (as a part of Spring Boot RELEASE).
<dependency>
    <groupId>org.springframework.boot</groupId>
    <artifactId>spring-boot-starter-webflux</artifactId>
</dependency>
<dependency>
    <groupId>org.springframework.data</groupId>
    <artifactId>spring-data-jdbc</artifactId>
    <version>1.0.0.r2dbc-SNAPSHOT</version>
</dependency>
<dependency>
    <groupId>io.r2dbc</groupId>
    <artifactId>r2dbc-spi</artifactId>
    <version>1.0.0.M5</version>
</dependency>
<dependency>
    <groupId>io.r2dbc</groupId>
    <artifactId>r2dbc-postgresql</artifactId>
    <version>1.0.0.M5</version>
</dependency>
It is also important to set dependency management for the Spring Data project.
<dependencyManagement>
    <dependencies>
        <dependency>
            <groupId>org.springframework.data</groupId>
            <artifactId>spring-data-releasetrain</artifactId>
            <version>Lovelace-RELEASE</version>
            <scope>import</scope>
            <type>pom</type>
        </dependency>
    </dependencies>
</dependencyManagement>
Repositories
We are using the well-known Spring Data style of CRUD repository implementation. In that case, we need to create an interface that extends the ReactiveCrudRepository interface.
Here’s the implementation of the repository for managing Employee objects.
interface EmployeeRepository : ReactiveCrudRepository<Employee, Int< {
    @Query("select id, name, salary, organization_id from employee e where e.organization_id = $1")
    fun findByOrganizationId(organizationId: Int) : Flux<Employee>
}
Here’s another implementation of the repository — this time, we are using it for managing Organization objects.
interface OrganizationRepository : ReactiveCrudRepository<Organization, Int< {
}
Implementing Entities and DTOs
Kotlin provides a convenient way of creating an entity class by declaring it as a data class. When using Spring Data JDBC, we have to set a primary key for the entity by annotating the field with @Id. It assumes the key is automatically incremented by the database. If you are not using auto-increment columns, you have to use a BeforeSaveEvent listener, which sets the ID of the entity. However, I tried to set such a listener for my entity, but it just didn’t work with the reactive version of Spring Data JDBC.
Here’s an implementation of the Employee entity class. It is worth mentioning that Spring Data JDBC will automatically map the class field organizationId into the database column organization_id.
data class Employee(val name: String, val salary: Int, val organizationId: Int) {
    @Id
    var id: Int? = null
}
Here’s an implementation of Organization entity class.
data class Organization(var name: String) {
    @Id
    var id: Int? = null
}
R2DBC does not support any lists or sets. Because I’d like to return list with employees inside Organization object in one of the API endpoints, I have created a DTO containing such a list, as shown below.
data class OrganizationDTO(var id: Int?, var name: String) {
    var employees : MutableList = ArrayList()
    constructor(employees: MutableList) : this(null, "") {
        this.employees = employees
    }
}
The SQL scripts corresponding to the created entities are visible below. The field type serial will automatically create a sequence and attach it to the field id.
CREATE TABLE employee (
    name character varying NOT NULL,
    salary integer NOT NULL,
    id serial PRIMARY KEY,
    organization_id integer
);
CREATE TABLE organization (
    name character varying NOT NULL,
    id serial PRIMARY KEY
);
Building Sample Web Applications
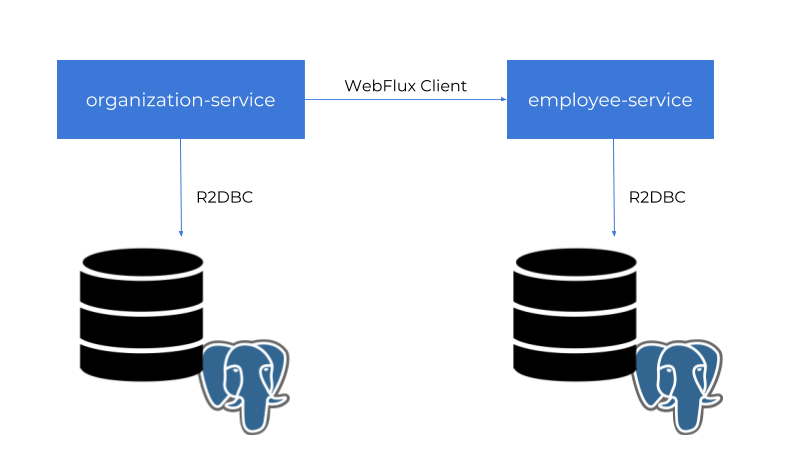
For demo purposes, we will build two independent applications: employee-service and organization-service. Application organization-service is communicating with employee-service using WebFlux WebClient. It gets the list of employees assigned to the organization and includes them to respond together with the Organization object. The sample applications source code is available on GitHub under the repository sample-spring-data-webflux.
Ok, let’s begin from declaring Spring Boot main class. We need to enable Spring Data JDBC repositories by annotating the main class with @EnableJdbcRepositories.
@SpringBootApplication
@EnableJdbcRepositories
class EmployeeApplication

fun main(args: Array<String>) {
    runApplication<EmployeeApplication>(*args)
}
Working with R2DBC and Postgres requires some configuration. Due to the early stages of progress in the development of Spring Data JDBC and R2DBC, there is no Spring Boot auto-configuration for Postgres. We need to declare a connection factory, client, and repository inside the @Configuration bean.
@Configuration
class EmployeeConfiguration {

    @Bean
    fun repository(factory: R2dbcRepositoryFactory): EmployeeRepository {
        return factory.getRepository(EmployeeRepository::class.java)
    }

    @Bean
    fun factory(client: DatabaseClient): R2dbcRepositoryFactory {
        val context = RelationalMappingContext()
        context.afterPropertiesSet()
        return R2dbcRepositoryFactory(client, context)
    }

    @Bean
    fun databaseClient(factory: ConnectionFactory): DatabaseClient {
        return DatabaseClient.builder().connectionFactory(factory).build()
    }

    @Bean
    fun connectionFactory(): PostgresqlConnectionFactory {
        val config = PostgresqlConnectionConfiguration.builder() //
                .host("192.168.99.100") //
                .port(5432) //
                .database("reactive") //
                .username("reactive") //
                .password("reactive123") //
                .build()

        return PostgresqlConnectionFactory(config)
    }

}
Finally, we can create REST controllers that contain the definition of our reactive API methods. With Kotlin, it does not take much space. The following controller definition contains three GET methods that allow us to find all employees, all employees assigned to a given organization, or a single employee by id.
@RestController
@RequestMapping("/employees")
class EmployeeController {

    @Autowired
    lateinit var repository : EmployeeRepository

    @GetMapping
    fun findAll() : Flux<Employee> = repository.findAll()

    @GetMapping("/{id}")
    fun findById(@PathVariable id : Int) : Mono<Employee> = repository.findById(id)

    @GetMapping("/organization/{organizationId}")
    fun findByorganizationId(@PathVariable organizationId : Int) : Flux<Employee> = repository.findByOrganizationId(organizationId)

    @PostMapping
    fun add(@RequestBody employee: Employee) : Mono<Employee> = repository.save(employee)

}
Inter-Service Communication
For the OrganizationController, the implementation is a little bit more complicated. Because organization-service is communicating with employee-service, we first need to declare reactive WebFlux WebClientbuilder.
@Bean
fun clientBuilder() : WebClient.Builder {
    return WebClient.builder()
}
Then, similar to the repository bean, the builder is being injected into the controller. It is used inside thefindByIdWithEmployees method for calling method GET /employees/organization/{organizationId} exposed by employee-service. As you can see on the code fragment below, it provides a reactive API and returns the Flux object containing a list of found employees. This list is injected into the OrganizationDTO object using zipWith Reactor method.
@RestController
@RequestMapping("/organizations")
class OrganizationController {

    @Autowired
    lateinit var repository : OrganizationRepository
    @Autowired
    lateinit var clientBuilder : WebClient.Builder

    @GetMapping
    fun findAll() : Flux<Organization> = repository.findAll()

    @GetMapping("/{id}")
    fun findById(@PathVariable id : Int) : Mono<Organization> = repository.findById(id)

    @GetMapping("/{id}/withEmployees")
    fun findByIdWithEmployees(@PathVariable id : Int) : Mono<OrganizationDTO> {
        val employees : Flux<Employee> = clientBuilder.build().get().uri("http://localhost:8090/employees/organization/$id")
                .retrieve().bodyToFlux(Employee::class.java)
        val org : Mono = repository.findById(id)
        return org.zipWith(employees.collectList())
                .map { tuple -> OrganizationDTO(tuple.t1.id as Int, tuple.t1.name, tuple.t2) }
    }

    @PostMapping
    fun add(@RequestBody employee: Organization) : Mono<Organization> = repository.save(employee)

}
How Does it Work?
Before running the tests we need to start Postgres database. Here’s the Docker command used for running Postgres container. It is creating user with password, and setting up default database.
$ docker run -d --name postgres -p 5432:5432 -e POSTGRES_USER=reactive -e POSTGRES_PASSWORD=reactive123 -e POSTGRES_DB=reactive postgresThen, we need to create some tests tables, so you have to run SQL script placed in the section Implementing Entities and DTOs. After that, you can start our test applications. If you do not override default settings provided inside application.yml files, employee-service is listening on port 8090 and organization-service on port 8095. The following picture illustrates the architecture of our sample system.
Now, let’s add some test data using reactive API exposed by the applications.
$ curl -d '{"name":"Test1"}' -H "Content-Type: application/json" -X POST http://localhost:8095/organizations
$ curl -d '{"name":"Name1", "balance":5000, "organizationId":1}' -H "Content-Type: application/json" -X POST http://localhost:8090/employees
$ curl -d '{"name":"Name2", "balance":10000, "organizationId":1}' -H "Content-Type: application/json" -X POST http://localhost:8090/employees
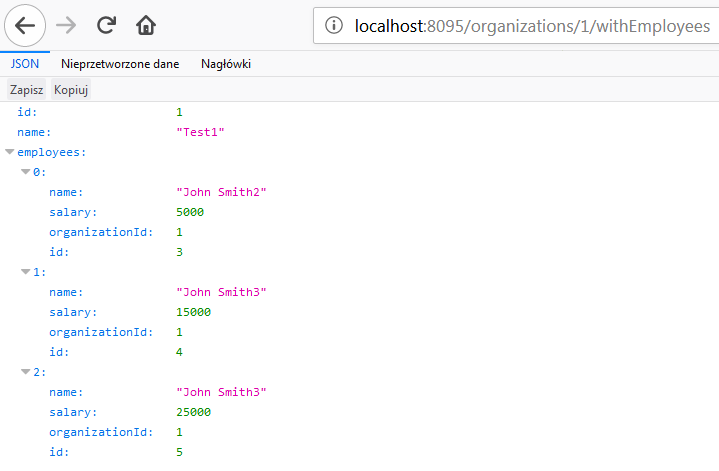
Finally, you can call the GET organizations/{id}/withEmployees method, for example, using your web browser. The result should be similar to the result visible in the following picture.


