How to Implement JDBC Authentication and Authorization in Mule 4 Using Spring Security
In Mule, we use Spring Security to achieve basic authentication and authorization functionality. So let's see how to achieve this with Spring Security and Mule 4.
First, create a simple Mule project.
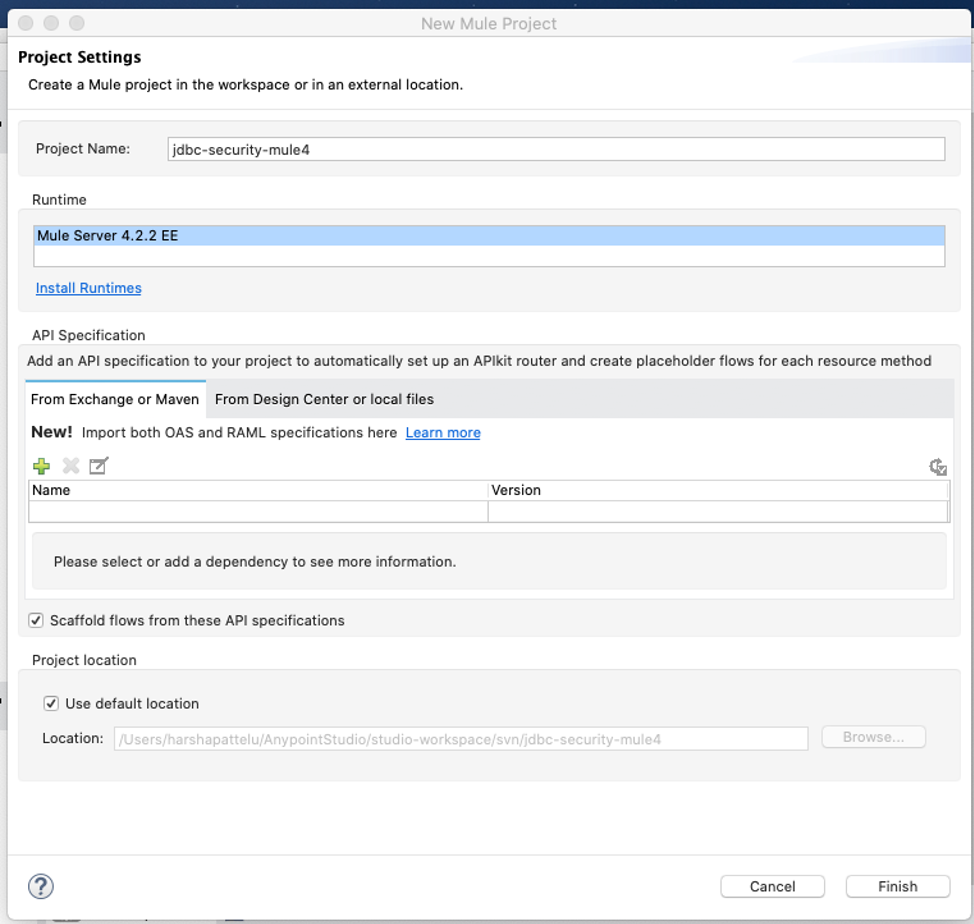
Add an HTTP listener, transform the message, and run it to make sure everything is working as expected before we start working on the security. It is always good to take things step-by-step and test them after each step.
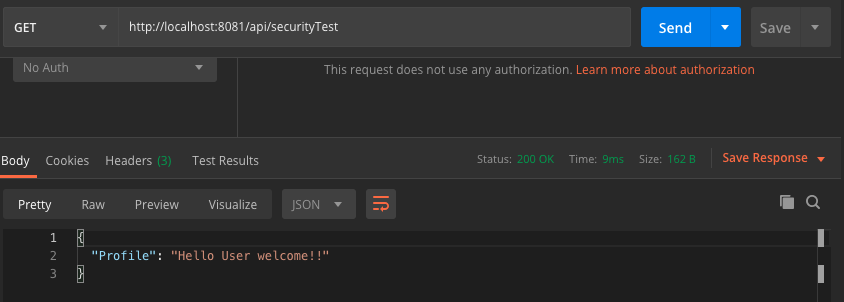
I used Postman to test the flow. This is a simple flow and there's nothing special about it. The HTTP connector and transform message are working as expected, so let's move on.
Now let's implement a basic authorization Spring Security where the user name and password are defined with in the application.
To implement Spring Security we need to define a Spring beans file with an authentication manager, for which we need to add Spring modules into our pom file first. I'm going to add the following dependencies to my pom file.
<dependency>
<groupId>org.springframework.security</groupId>
<artifactId>spring-security-core</artifactId>
<version>4.1.5.RELEASE</version>
</dependency>
<dependency>
<groupId>org.springframework.security</groupId>
<artifactId>spring-security-config</artifactId>
<version>4.1.5.RELEASE</version>
</dependency>
<dependency>
<groupId>org.springframework</groupId>
<artifactId>spring-context</artifactId>
<version>4.1.5.RELEASE</version>
</dependency>
<dependency>
<groupId>org.springframework</groupId>
<artifactId>spring-beans</artifactId>
<version>4.1.5.RELEASE</version>
</dependency>
<dependency>
<groupId>org.mule.modules</groupId>
<artifactId>mule-spring-module</artifactId>
<version>1.3.2</version>
<classifier>mule-plugin</classifier>
</dependency>
<dependency>
<groupId>org.springframework</groupId>
<artifactId>spring-core</artifactId>
<version>4.1.5.RELEASE</version>
</dependency>
Important Note: I have used the Spring version 4.1.5.RELEASE for all Spring Security-related dependencies. Spring Security is not working with later versions, I have tried with most of the 5.1 releases and security did not work as expected. After a lot of trial and error, I came to a conclusion this 4.1.5 release is stable and Security is working as expected in Mule 4. So you have to use the same version. If anyone can get it working with newer versions please update.
All the dependencies mentioned above should be added to your pom for Spring Security to work.
Now create a Bpring beans file and define the authentication manager as shown below:
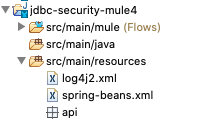
spring-beans file:
xxxxxxxxxx
<?xml version="1.0" encoding="UTF-8"?>
<beans xmlns="http://www.springframework.org/schema/beans"
xmlns:context="http://www.springframework.org/schema/context"
xmlns:xsi="http://www.w3.org/2001/XMLSchema-instance"
xmlns:ss="http://www.springframework.org/schema/security"
xsi:schemaLocation="http://www.springframework.org/schema/beans
http://www.springframework.org/schema/beans/spring-beans.xsd
http://www.springframework.org/schema/context
http://www.springframework.org/schema/context/spring-context.xsd
http://www.springframework.org/schema/security
http://www.springframework.org/schema/security/spring-security.xsd">
<ss:authentication-manager alias="authenticationManager" id="authenticationManager">
<ss:authentication-provider>
<ss:user-service id="userService">
<ss:user name="admin" password="admin" authorities="ROLE_ADMIN" />
<ss:user name="harsha" password="welcome" authorities="ROLE_USER" />
</ss:user-service>
</ss:authentication-provider>
</ss:authentication-manager>
</beans>
Now that we added Spring beans and the authentication manager, let's add this to our Mule flow. To do that, add the following code in the Mule flow we have created earlier.
xxxxxxxxxx
<spring:config name="springConfig" files="spring-beans.xml"/>
<spring:security-manager doc:name="Spring Security manager" doc:id="e5d7f618-823f-417d-a72b-b9c6bd81b291" >
<spring:delegate-security-provider name="mule-provider" delegate-ref="authenticationManager" />
</spring:security-manager>
Now our Mule flow can access the authentication manager defined in the Spring beans file. We are ready to use Spring Security.
Let's add an HTTP basic auth and Spring authorization filter between rgw HTTP listener and transform the message in the flow we created earlier. Also, we will allow only a user with the role "ROLE_ADMIN" to access our flow. After applying all the changes the flow looks something like this.
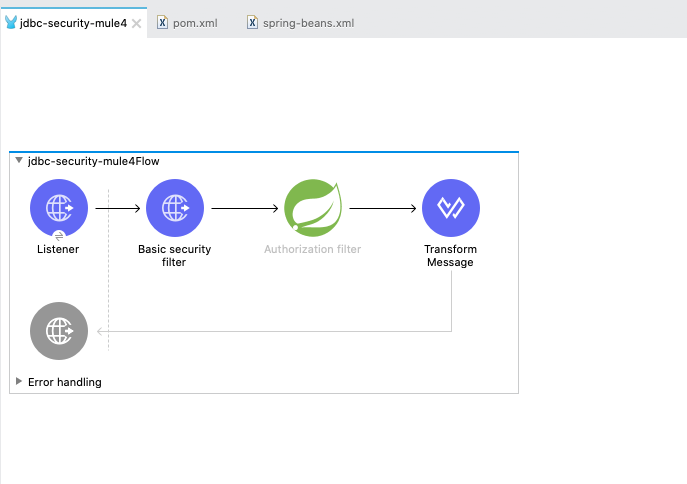
XML view of the Mule flow
xxxxxxxxxx
<?xml version="1.0" encoding="UTF-8"?>
<mule
xmlns:ee="http://www.mulesoft.org/schema/mule/ee/core"
xmlns:http="http://www.mulesoft.org/schema/mule/http"
xmlns:db="http://www.mulesoft.org/schema/mule/db"
xmlns:spring="http://www.mulesoft.org/schema/mule/spring"
xmlns="http://www.mulesoft.org/schema/mule/core"
xmlns:doc="http://www.mulesoft.org/schema/mule/documentation"
xmlns:xsi="http://www.w3.org/2001/XMLSchema-instance" xsi:schemaLocation="http://www.springframework.org/schema/beans
http://www.springframework.org/schema/beans/spring-beans-current.xsd
http://www.mulesoft.org/schema/mule/core
http://www.mulesoft.org/schema/mule/core/current/mule.xsd
http://www.mulesoft.org/schema/mule/spring
http://www.mulesoft.org/schema/mule/spring/current/mule-spring.xsd
http://www.mulesoft.org/schema/mule/db
http://www.mulesoft.org/schema/mule/db/current/mule-db.xsd
http://www.mulesoft.org/schema/mule/http
http://www.mulesoft.org/schema/mule/http/current/mule-http.xsd
http://www.mulesoft.org/schema/mule/ee/core http://www.mulesoft.org/schema/mule/ee/core/current/mule-ee.xsd">
<spring:config name="springConfig" files="spring-beans.xml"/>
<spring:security-manager doc:name="Spring Security manager" doc:id="e5d7f618-823f-417d-a72b-b9c6bd81b291" >
<spring:delegate-security-provider name="mule-provider" delegate-ref="authenticationManager" />
</spring:security-manager>
<http:listener-config name="HTTP_Listener_config" doc:name="HTTP Listener config" doc:id="49d5ebce-1968-4e3a-a885-7b6e6b84d822" basePath="/api" >
<http:listener-connection host="0.0.0.0" port="8081" />
</http:listener-config>
<flow name="jdbc-security-mule4Flow" doc:id="affb8bcd-a612-4524-b9d1-75c9abfa1f95" >
<http:listener doc:name="Listener" doc:id="48eef432-96d9-4f7c-a09b-21b1e5191e2e" config-ref="HTTP_Listener_config" path="/securityTest"/>
<http:basic-security-filter doc:name="Basic security filter" doc:id="848ee679-9322-4df5-bcc6-fa613b662472" realm="mule"/>
<spring:authorization-filter doc:id="afe1d779-2490-4331-bcd0-36ff9f252804" doc:name="" requiredAuthorities="ROLE_ADMIN"/>
<ee:transform doc:name="Transform Message" doc:id="194edaf8-5864-4367-b9b2-486283cab341" >
<ee:message >
<ee:set-payload ><![CDATA[%dw 2.0
output application/json
---
{
Message : "Hello World"
}]]></ee:set-payload>
</ee:message>
</ee:transform>
</flow>
</mule>
Now let's run the flow and test it.
First, let's test it with the user admin. This user has the role "ROLE_ADMIN," so this user should be able to access our flow.
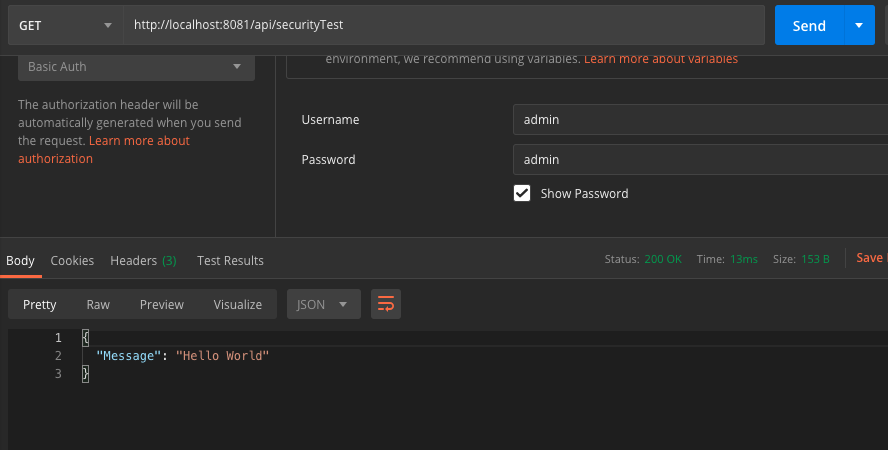
As expected, this user is able to access the flow successfully. Now let's test with user "harsha." This user has the role "ROLE_USER" so he should not be able to access the flow. Let's try:
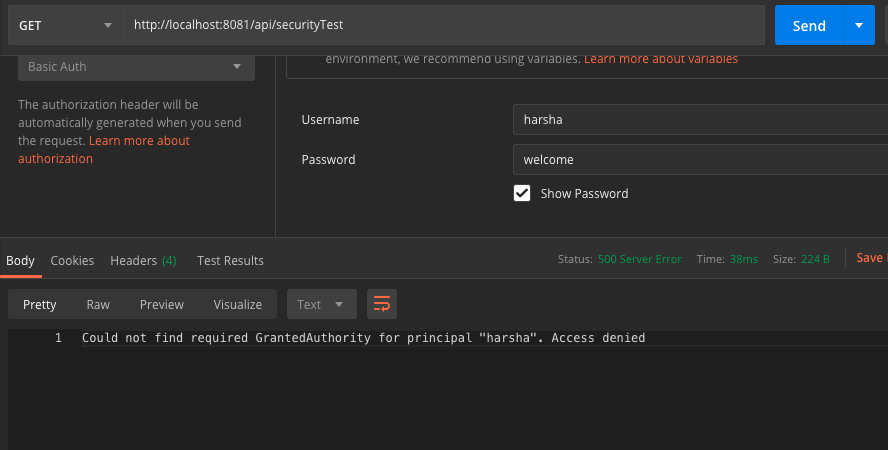
As expected, we see an error. User authentication was successful but the user was unable to access flow as only a user with ROLE_ADMIN can access this flow.
Ok, now we have applied basic security and were able to verify security is working as expected. Now it's time to get to the most interesting part: applying JDBC authentication and authorization.
We have already done most of the work. Now we simply need to define two tables with user and user role details in oracle database and create an authentication manager which communicates to those tables to authenticate and authorize user. So let's get started.
First things first. Let's create two tables in database with name USERS and USER_ROLES. You can create tables with any name you like. It doesn't have to be what I used.
Users Table
xxxxxxxxxx
CREATE TABLE "HARSHA"."USERS"
( "USER_ID" NUMBER NOT NULL ENABLE,
"USERNAME" VARCHAR2(50 BYTE),
"PASSWORD" VARCHAR2(50 BYTE),
"ENABLED" VARCHAR2(20 BYTE),
CONSTRAINT "USERS_PK" PRIMARY KEY ("USER_ID")
USING INDEX PCTFREE 10 INITRANS 2 MAXTRANS 255
STORAGE(INITIAL 65536 NEXT 1048576 MINEXTENTS 1 MAXEXTENTS 2147483645
PCTINCREASE 0 FREELISTS 1 FREELIST GROUPS 1
BUFFER_POOL DEFAULT FLASH_CACHE DEFAULT CELL_FLASH_CACHE DEFAULT)
TABLESPACE "USERS" ENABLE
) SEGMENT CREATION IMMEDIATE
PCTFREE 10 PCTUSED 40 INITRANS 1 MAXTRANS 255
NOCOMPRESS LOGGING
STORAGE(INITIAL 65536 NEXT 1048576 MINEXTENTS 1 MAXEXTENTS 2147483645
PCTINCREASE 0 FREELISTS 1 FREELIST GROUPS 1
BUFFER_POOL DEFAULT FLASH_CACHE DEFAULT CELL_FLASH_CACHE DEFAULT)
TABLESPACE "USERS" ;
User Roles
xxxxxxxxxx
CREATE TABLE "HARSHA"."USER_ROLES"
( "USER_ROLE_ID" NUMBER NOT NULL ENABLE,
"USERNAME" VARCHAR2(50 BYTE),
"AUTHORITY" VARCHAR2(50 BYTE),
CONSTRAINT "USER_ROLES_PK" PRIMARY KEY ("USER_ROLE_ID")
USING INDEX PCTFREE 10 INITRANS 2 MAXTRANS 255
STORAGE(INITIAL 65536 NEXT 1048576 MINEXTENTS 1 MAXEXTENTS 2147483645
PCTINCREASE 0 FREELISTS 1 FREELIST GROUPS 1
BUFFER_POOL DEFAULT FLASH_CACHE DEFAULT CELL_FLASH_CACHE DEFAULT)
TABLESPACE "USERS" ENABLE
) SEGMENT CREATION IMMEDIATE
PCTFREE 10 PCTUSED 40 INITRANS 1 MAXTRANS 255
NOCOMPRESS LOGGING
STORAGE(INITIAL 65536 NEXT 1048576 MINEXTENTS 1 MAXEXTENTS 2147483645
PCTINCREASE 0 FREELISTS 1 FREELIST GROUPS 1
BUFFER_POOL DEFAULT FLASH_CACHE DEFAULT CELL_FLASH_CACHE DEFAULT)
TABLESPACE "USERS" ;
Now create a couple of users in the Users table and add roles to those users in the user roles table. See an example screenshot below.
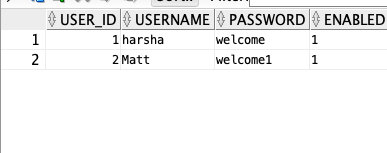
Important Note: If you are using Oracle DB, the enabled column value should be 0 or 1. You cannot put "true" or "false." Oracle only works with 1 or 0. If you are using MySQL you can go with "true" or "false" so just be aware of this.
Also direct passwords should never be saved into database. Always it's a best practice to hash the passwords before saving to database. But in this article to keep it simple i'm saving passwords directly in the database. You should not do the same for real time applications. Any hashing mechanism can be applied to store and read passwords and it is out of scope in this article.
User Roles table with roles added for the above two users.
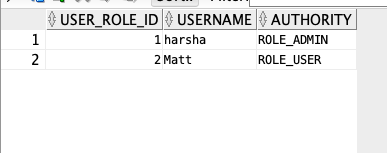
With this our work in database is completed. Now let's add JDBC driver and Spring JDBC dependencies into our application.
xxxxxxxxxx
<dependency>
<groupId>org.springframework</groupId>
<artifactId>spring-jdbc</artifactId>
<version>4.1.5.RELEASE</version>
</dependency>
<dependency>
<groupId>com.oracle</groupId>
<artifactId>ojdbc6</artifactId>
<version>11.2.0.3</version>
</dependency>
xxxxxxxxxx
<dependency>
<groupId>org.springframework</groupId>
<artifactId>spring-jdbc</artifactId>
<version>4.1.5.RELEASE</version>
</dependency>
<dependency>
<groupId>com.oracle</groupId>
<artifactId>ojdbc6</artifactId>
<version>11.2.0.3</version>
</dependency>
Also make sure shared libraries also added for the dependencies we added.
xxxxxxxxxx
<sharedLibraries>
<sharedLibrary>
<groupId>org.springframework.security</groupId>
<artifactId>spring-security-core</artifactId>
</sharedLibrary>
<sharedLibrary>
<groupId>org.springframework.security</groupId>
<artifactId>spring-security-config</artifactId>
</sharedLibrary>
<sharedLibrary>
<groupId>org.springframework</groupId>
<artifactId>spring-context</artifactId>
</sharedLibrary>
<sharedLibrary>
<groupId>org.springframework</groupId>
<artifactId>spring-beans</artifactId>
</sharedLibrary>
<sharedLibrary>
<groupId>org.springframework</groupId>
<artifactId>spring-core</artifactId>
</sharedLibrary>
<sharedLibrary>
<groupId>org.springframework</groupId>
<artifactId>spring-jdbc</artifactId>
</sharedLibrary>
<sharedLibrary>
<groupId>com.oracle</groupId>
<artifactId>ojdbc6</artifactId>
</sharedLibrary>
</sharedLibraries>
With this, we have everything we need to add the JDBC authentication manager. Let's go back to spring-beans.xml file and add the JDBC authentication manager. After adding our Spring beans file will look like below.
xxxxxxxxxx
<?xml version="1.0" encoding="UTF-8"?>
<beans xmlns="http://www.springframework.org/schema/beans"
xmlns:context="http://www.springframework.org/schema/context"
xmlns:xsi="http://www.w3.org/2001/XMLSchema-instance"
xmlns:jdbc="http://www.springframework.org/schema/jdbc"
xmlns:ss="http://www.springframework.org/schema/security"
xsi:schemaLocation="http://www.springframework.org/schema/beans
http://www.springframework.org/schema/beans/spring-beans.xsd
http://www.springframework.org/schema/jdbc
http://www.springframework.org/schema/jdbc/spring-jdbc.xsd
http://www.springframework.org/schema/context
http://www.springframework.org/schema/context/spring-context.xsd
http://www.springframework.org/schema/security
http://www.springframework.org/schema/security/spring-security.xsd">
<bean id="datasource" name="datasource" class="org.springframework.jdbc.datasource.DriverManagerDataSource">
<property name="driverClassName" value="oracle.jdbc.driver.OracleDriver"/>
<property name="url"
value="jdbc:oracle:thin:@harsha:1525:test" />
<property name="username" value="test" />
<property name="password" value="test01" />
</bean>
<ss:authentication-manager alias="authenticationManager" id="authenticationManager">
<ss:authentication-provider>
<ss:jdbc-user-service data-source-ref="datasource" id="jdbcService"
users-by-username-query="select username,password, enabled from users where username = ?"
authorities-by-username-query="select username,authority from user_roles where username= ?" />
</ss:authentication-provider>
</ss:authentication-manager>
<!--ss:authentication-manager alias="authenticationManager" id="authenticationManager">
<ss:authentication-provider>
<ss:user-service id="userService">
<ss:user name="admin" password="admin" authorities="ROLE_ADMIN" />
<ss:user name="harsha" password="welcome" authorities="ROLE_USER" />
</ss:user-service>
</ss:authentication-provider>
</ss:authentication-manager -->
</beans>
In the above code snippet, from line number 16 to 22, I have added my Oracle DB details. From line 24 to 30, I used the data source defined to create authentication provider which queries the database with user name and password provided by the user in the basic auth section when a call is made. If the username and password are correct, then roles will be retrieved from the user roles table and provided to the Spring authorization filter in our flow. Thats it. With this all our code changes are completed. Now we need to run the application and test our flow.
Important Note: I have added lot of Spring namespaces in the Spring beans file in order for security to work. I have taken those from official Mule documentation. Make sure you have all those namespaces added or else you might get some exceptions.
Now it's time to test our work.
First, let's try with the user "Matt." This user doesn't have ROLE_ADMIN role. so he should not be able to access the flow.
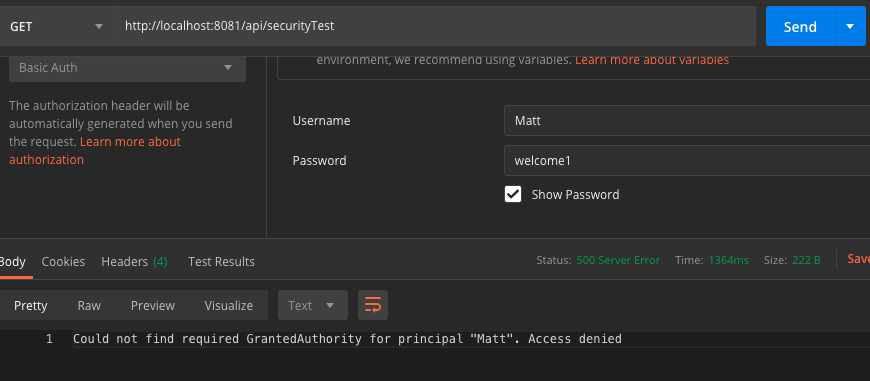
As you can see Matt was able to login successfully but he cannot access the flow as he needs role "ROLE_ADMIN" to access.
Now let's test with user "harsha." He should be able to access as he has required role.
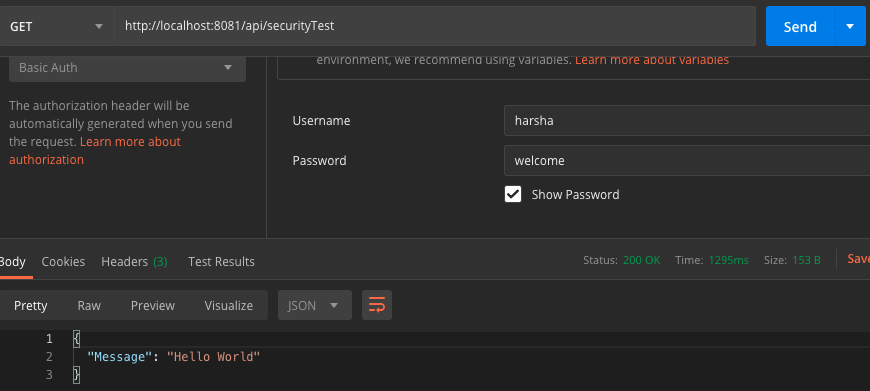 Running with user harsha
As expected user "harsha" can access the flow and we can see the "Hello World" response.
We can use any database we want with minor modifications to the spring-beans file. I have tested with Oracle and MySQL and I was able to get the security to work.
Please provide feedback through comments in case you see any issues with the article.
You can download code here.

