Strategies for Improving the Performance of Applications Using EF Core
The performance of data-centric applications has always been a concern. Applications that use Entity Framework in their data access layer have performance issues. Entity Framework Core offers significant performance improvements over its earlier counterpart, i.e., Entity Framework but you should adhere to the best practices for improving the performance even further.
There are several ways in which you can improve the performance of applications that use Entity Framework Core in their data access layers. This article presents a discussion on how we can improve the performance of data-centric applications that leverage EF Core and Entity Developer for data access.
Prerequisites
To be able to work with the code examples demonstrated in this article, you should have the following installed in your system:
- Visual Studio 2019 Community Edition
- SQL Server 2019 Developer Edition
- Entity Developer
You can download Visual Studio 2019 from here.
You can download SQL Server 2019 Developer Edition from here.
You can download a copy of Entity Developer (trial version) from here.
Entity Framework and Entity Framework Core
Entity Framework is an Object Relational Mapper (ORM) tool from Microsoft that has been an extremely popular from the time it was available. It enables developers to create data-centric applications by programming against a conceptual model rather than the relational model thereby solving the impedance mismatch between the way data is represented in the application and how it is actually stored in the database. While Entity Framework runs on .NET Framework, Entity Framework Core can run on .NET Core environment.
Entity Developer: A Visual ORM Designer Tool
We’ll take advantage of Entity Developer to generate the model and corresponding classes. Entity Developer from Devart is a modeling and code generation tool that lets you design your data access layer visually and helps you to become more productive as a developer. You can take advantage of Entity Developer to generate data access layer code automatically using one unified interface – as a result, chances of error creeping into your Data Access code are minimal.
Entity Developer is integrated nicely with Visual Studio upon installation and supports ADO.NET Entity Framework, Entity Framework Core, Hibernate, LinqConnect, Telerik Data Access, and LINQ to SQL. You can get started using Entity Developer after downloading a trial version from here.
Creating the Database
First off, we need to have a database against which the queries will be executed. For the sake of simplicity, we’ll take advantage of the Northwind database rather than creating our own database. If you don’t have the Northwind database available, you can get the script(s) from here.
Create a New ASP.NET Core Project
Assuming that the necessary software has been installed in your computer to be able to work with Entity Developer, follow the steps outlined below to create a new ASP.NET Core Web API project.
- First off, open the Visual Studio 2019 IDE
- Next, click "Create a new project" once the IDE has loaded
- Click "Create a new project"
- Next, select "ASP.NET Core Web Application"
- Click the "Next" button
- Specify the project name and location - where it should be stored in your system
- Optionally, click the "Place solution and project in the same directory" checkbox.
- Next, click the "Create" button
- In the "Create a new ASP.NET Core Web Application" dialog window that is shown next, select "API" as the project template.
- Select ASP.NET Core 3.1 or later as the version.
- You should disable the "Configure for HTTPS" and "Enable Docker Support" options by disabling the respective checkboxes.
- Since we'll not be using authentication in this example, specify authentication as "No Authentication".
- Finally, click on the "Create" button to finish the process.
Create an Entity Data Model
In this section, we’ll explore how to create an Entity Data Model using Entity Developer. We’ll use both the two approaches database first and model first. To create an Entity Data Model using Entity Developer in Visual Studio 2019, follow the steps outlined below.
- Right-click on the project in the Solution Explorer Window
- Select Add -> New Item as shown in Figure 1.
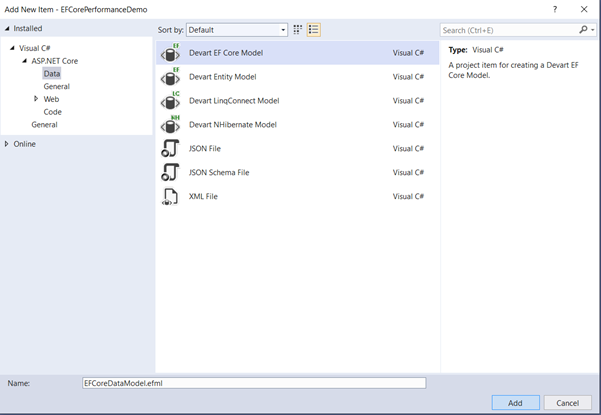
Figure 1
- In the "Entity Developer: Create Model Wizard" window you can specify how the model should be created. You’ll have two choices – Database First and Model First
- Select the Database First Approach and click on Next to continue.
- In the next screen, specify the connection properties and click on the “Next” button to continue.
- Specify how the model should be generated in the next screen. Note that the “Generate from Database" option is selected by default.
- Since we’ll need the model to be created from the database, click on the “Next” button to continue.
- In the next screen the database metadata is retrieved by the Entity Developer runtime. Here’s where you should specify the database objects that should be a part of your Entity Data Model. Select the Customers table only as shown in Figure 2.
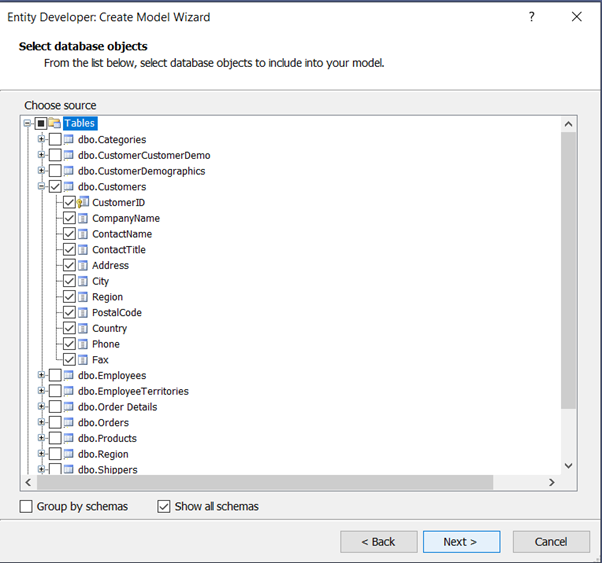
Figure 2
- In the "Set up naming rules" screen you can specify naming rules for your entities.
- Click on the "Next" button to continue.
- In the next screen, specify the Context Namespace as and click on the “Next” button to continue.
- Now you can specify what your model diagram should contain.
- Click on the "Next" button to continue.
- Now you can choose the code generation templates if you want to.
- Click on the "Next" button to continue.
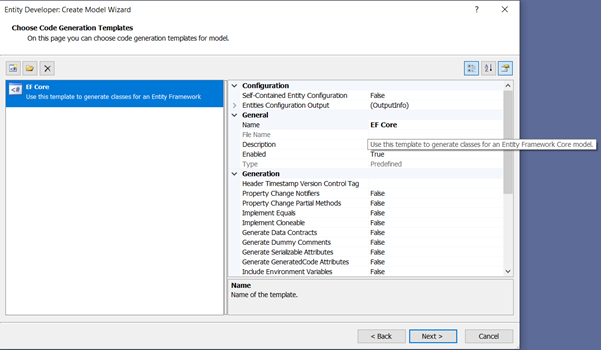
Figure 3
- Click on the “Next” button again to continue.
- Click “Finish” to complete the process.
Your Entity Data Model using Entity Developer has been created. Here’s how your Entity Data Model would look like.
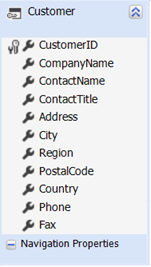
Figure 4
Improving Entity Framework Core Performance
We’ll examine the strategies that can be adopted for improving performance of applications that use EF Core. We’ll examine the following points:
- Object Tracking
- Execution Plans
- Using Eager Loading
- Disabling Lazy Loading
- Splitting a large db context into multiple db contexts
Object Tracking
Any ORM tool helps us to manage the changes between the in-memory objects and the database. This feature is known as object tracking. Entity tracking is enabled on all entities by default. It should be noted that queries that return instances of entity types have tracking enabled. As a result, you can make changes to those entities and then persist those changes in the database. The following code snippet illustrates how this can be accomplished.
var customer = dbContext.Customers.SingleOrDefault(c => c.CustomerId == 1);
customer.IsActive = false; dbContext.SaveChanges();
However, there is a performance cost associated with this. You should turn off object tracking unless it is needed. The following code snippet illustrates how you can take advantage of AsNoTracking method to reduce memory usage and improve performance.
var customer = dbContext.Customers.Where(c => c.City == "Los Angeles").AsNoTracking().ToList();
You can disable query tracking behavior at the db context level as well. This would ensure that change tracking is disabled for all entities pertaining to the db context. The following code snippet illustrates how this can be achieved.
xxxxxxxxxx
using (NorthwindModel dbContext = new NorthwindModel())
{
dbContext.ChangeTracker.QueryTrackingBehavior = QueryTrackingBehavior.NoTracking;
//Other code
}
You can also disable change tracking at the db context level by extending a class from your db context class and then setting the QueryTrackingBehavior property appropriately as shown in the code snippet given below.
ChangeTracker.QueryTrackingBehavior = QueryTrackingBehavior.NoTracking;
Here's the complete implementation of the new db context class for your reference:
xxxxxxxxxx
public sealed class NorthwindModelOptimized: NorthwindModel
{
public NorthwindModelOptimized()
{
ChangeTracker.QueryTrackingBehavior =
QueryTrackingBehavior.NoTracking;
}
protected override void OnModelCreating(ModelBuilder modelBuilder)
{
// Write your implementation here
}
}
Execution Plans
An execution plan contains a description of all the operations performed by a database to satisfy a database request. Such operations can be filtering, joins, sorting, etc. You should examine the examine the execution plans of your queries, the cost involved (i.e., resource usage such as CPU, elapsed time, etc.) before using them in your application. You should then be able to determine an optimal plan and change the query accordingly before using it in the application.
Update the Model to Include Additional Database Objects
In the sections that follow, we'll examine the different approaches to load related data. We'll need to use a couple of more tables, i.e., we'll add two more entities to our data model. We'll now update our model to include the Orders and Employees entities. To update the model we've created earlier, follow the steps outlined below:
- Right-click on the model diagram
- Select "Update Model From Database..." as shown in Figure 5
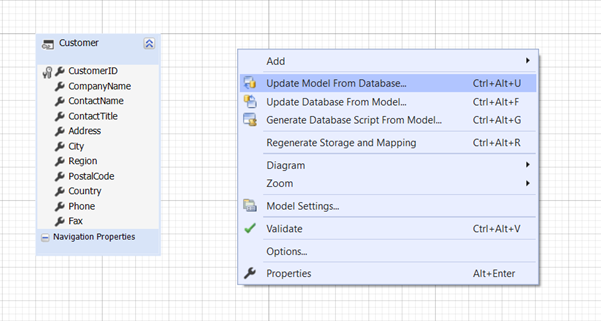
Figure 5
- Optionally check the "Recreate Model" checkbox
- Click Next to continue
- The database schema is dbo by default and no change is needed - click Next to continue
- In the Choose change actions" screen, select the database objects you would like to be added or updated in your model as shown in Figure 6
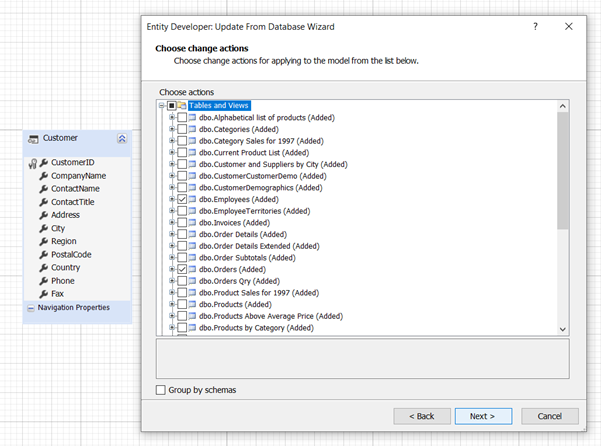
Figure 6
- Click Next
- Finally, click Finish to complete the process
Here’s how the updated model would look like:
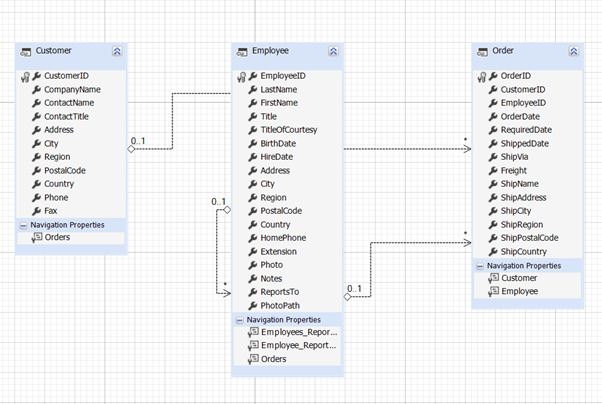
Figure 7
Eager Loading, Explicit Loading, and Lazy Loading
Entity Framework Core uses any of the following three approaches to load related entities in your application.
- Eager loading - in this case, related data is loaded at the time when the query is executed using the Include() method.
- Explicit loading - in this case related data is loaded explicitly at a later point of time using the Load() method.
- Lazy loading - this is the default phenomenon used meant for delayed loading of related entities.
Using Eager Loading
The following code snippet illustrates how you can use eager loading now.
xxxxxxxxxx
using (NorthwindModel dbContext = new NorthwindModel())
{
var result = (from c in dbContext.Customers.Include("Orders")
where c.City == "New Jersey"
select c).FirstOrDefault();
}
You can also use LINQ method syntax to implement eager loading as shown in the code snippet below.
xxxxxxxxxx
using (NorthwindModel dbContext = new NorthwindModel())
{
var result = dbContext.Customers.Include("Orders")
.Where(c=>c.City == "New Jersey")
.FirstOrDefault();
}
Disabling Lazy Loading
You can turn off lazy loading at the db context level by setting the LazyLoadingEnabled property to false as shown in the code snippet below:
ChangeTracker.LazyLoadingEnabled = false;
Here's the updated version of the NorthwindModelOptimized class with the above change incorporated.
xxxxxxxxxx
public sealed class NorthwindModelOptimized: NorthwindModel
{
public NorthwindModelOptimized()
{
ChangeTracker.QueryTrackingBehavior =
QueryTrackingBehavior.NoTracking;
this.ChangeTracker.LazyLoadingEnabled = false;
}
protected override void OnModelCreating(ModelBuilder modelBuilder)
{
// Write your implementation here
}
}
Splitting a Large DB Context Into Multiple DB Contexts
Since the DB context represents your database you might wonder if there should be one DB context in the application. No! This is not a recommended practice. The startup time of a large DB context is a performance bottleneck in Entity Framework Core. Hence, rather than using a large db context, you should split the db context into multiple db context. You can create one DB context per module or a particular unit of work.
Summary
Entity Framework Core, a light-weight cross platform version of Entity Framework, provides you a standard way to access data from several data sources. Albeit all the benefits that Entity Framework Core provides, there are certain downsides as well. One of the main drawbacks of Entity Framework Code is lazy loading.

