Less Code With Spring Data Rest
We programmers are constantly solving various problems and always looking for a way to make life easier for others. On the other hand, we make life difficult for ourselves, because sometimes our code contains a lot of boilerplate code and modules that are not needed.
For better understanding, consider a normal Spring Boot project that is only responsible for creating/reading/updating/deleting (CRUD) a client.
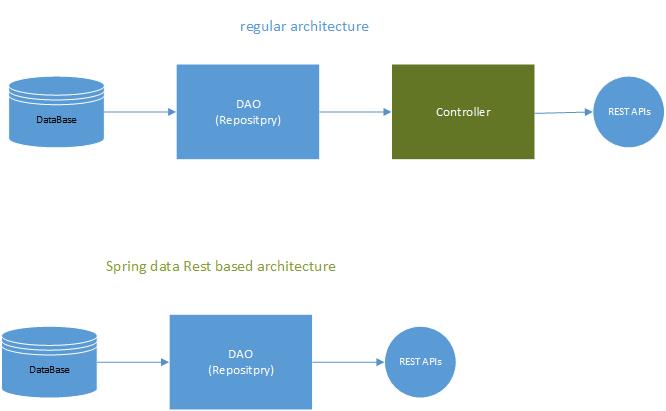
First of all, we should create an entity called "Customer" which should be mapped to the table in the database, next, we should create a repository and the controller to call this repository and expose the service to the outside, sometimes we go one step further and add another layer to the architecture. Is all this extra work really necessary to provide multiple simple services? The answer is no, we can use "spring data rest" which can help us to provide our services directly from the data layer.
Spring Data Rest
With Spring Data Rest, the BL and controller layers are removed from your project. In fact, all REST services are provided by your Spring Data layer, and all you need to do is create a simple repository for your project, and Spring will do the rest.

How Spring Data Rest Works
everything is very simple, Spring Data Rest searches your projects and any commodity that finds the repository creates REST services for the corresponding entities related to the repository, consider the following example:
public interface CustomerRepository extends CrudRepository<Customer,Long> {}If spring data rest finds this repository class, generates all REST APIs related to the client class.
Rest APIs And Standards
Spring Data Rest is based on a very simple and standard contract and creates REST APIs based on the entity type. In the example above, APIs were generated based on the entity type "customer", and the APIs followed a simple pluralized form, e.g. the first character of the entity is a lowercase letter and an "s" is simply added to the end of the entity. "/customers", you can see some generated REST for "customer" in the table below:
| HTTP Method | URL Pattern | Status Code | Description |
| GET | /customers | 200 | get all customers |
| GET | /customers{id} | 200 | get customer by id |
| POST | /customers | 201(created) | creates new customer |
| PUT | /customers{id} | 200 | existing customer by id |
| DELETE | /customers{id} | 200 | customer by id |
REST APIs exposes in HATAOS format
Spring Data Rest provides APIs in this format: Hypermedia as the Engine of application state(HATAOS), as you know hypermedia format can refer to any format or URL or even an image from the content, here is a simple HATAOS JSON from wiki :
HTTP/1.1 200 OK

{

    "account": {
        "account_number": 12345,
        "balance": {
            "currency": "usd",
            "value": 100.00
        },
        "links": {
            "deposits": "/accounts/12345/deposits",
            "withdrawals": "/accounts/12345/withdrawals",
            "transfers": "/accounts/12345/transfers",
            "close-requests": "/accounts/12345/close-requests"
        }
    }
}
Useful and practical information about HATAOS can be found here. Also, learn more about this format in the rest of the article.
Simple Case Study
For better understanding, I will try to continue with a very simple example. Again, this example is not very unusual, because we are trying to create a project around the entity "customer".
So let us get started. First of all, we need to add the required dependency to our pom:
<dependency>
            <groupId>org.springframework.boot</groupId>
            <artifactId>spring-boot-starter-data-rest</artifactId>
</dependency>
Now it is time to create the main entity of the project, "Customer". This is a very simple entity that contains only one property: id, name, phone, and address of the customer
package com.rgn.model;


import lombok.Data;

import javax.persistence.Column;
import javax.persistence.Entity;
import javax.persistence.Id;
import javax.persistence.Table;
import java.io.Serializable;

@Data
@Entity
@Table(name = "customer")
public class Customer implements Serializable {

    @Id
    @Column(name = "id")
    private  Long id;

    @Column(name = "customername")
    private  String customerName;

    @Column(name = "customerphonno")
    private  Long customerPhoneNo;

    @Column(name = "customraddress")
    private  String  customerAddress;

}
Using Lombok @Data annotation helps us to prevent additional, setter, and getter in our code.
the second most important part of our code is the creation of an appropriate repository for our entity customer:
package com.rgn.repository;

import com.rgn.model.Customer;
import org.springframework.data.repository.CrudRepository;
public interface CustomerRepository extends CrudRepository<Customer,Long> {

}
Also, we have a simple application class like every spring boot project:
import org.springframework.boot.CommandLineRunner;
import org.springframework.boot.SpringApplication;
import org.springframework.boot.autoconfigure.SpringBootApplication;
import org.springframework.context.ApplicationContext;
import org.springframework.context.annotation.Bean;

import java.util.Arrays;

@SpringBootApplication
public class MainApplication {

    public static void main(String[] args) {
        SpringApplication.run(MainApplication.class, args);
    }

    @Bean
    public CommandLineRunner commandLineRunner(ApplicationContext ctx) {
        return args -> {

            System.out.println("Let's inspect the beans provided by Spring Boot:");

            String[] beanNames = ctx.getBeanDefinitionNames();
            Arrays.sort(beanNames);
            for (String beanName : beanNames) {
                System.out.println(beanName);
            }

        };
    }
}
Here is the configuration (application. properties)file of our project, we created our customer table in the Oracle database so we need to set database URL, username, and password:
spring.datasource.url=jdbc:oracle:thin:@localhost:1521:ORA81
spring.datasource.username=scott
spring.datasource.password=tiger

spring.datasource.driver-class-name=oracle.jdbc.OracleDriver

# HikariCP settings
spring.datasource.hikari.minimumIdle=5
spring.datasource.hikari.maximumPoolSize=20
spring.datasource.hikari.idleTimeout=30000
spring.datasource.hikari.maxLifetime=2000000
spring.datasource.hikari.connectionTimeout=30000
spring.datasource.hikari.poolName=HikariPoolBooks

# JPA settings
spring.jpa.database-platform=org.hibernate.dialect.Oracle12cDialect
spring.jpa.hibernate.use-new-id-generator-mappings=false
Note: the default address of exposed APIs is "/", for example, if you run the above project you can see the APIs at address "http://localhost:8080", unless, you should add your own address to the application.properties file with the following code :
spring.data.rest.basePath=/myApi
By adding the above code you can see your rest in "http://localhost:8080/myApi"
HAL explorer
Spring also surprises developers and DevOps engineers with the capabilities it offers. There is a strong REST APIs explore that shows the APIs in HATAOS format, to use them you need to add the following dependency to your project:
<dependency>
    <groupId>org.springframework.data</groupId>
    <artifactId>spring-data-rest-hal-explorer</artifactId>
</dependency
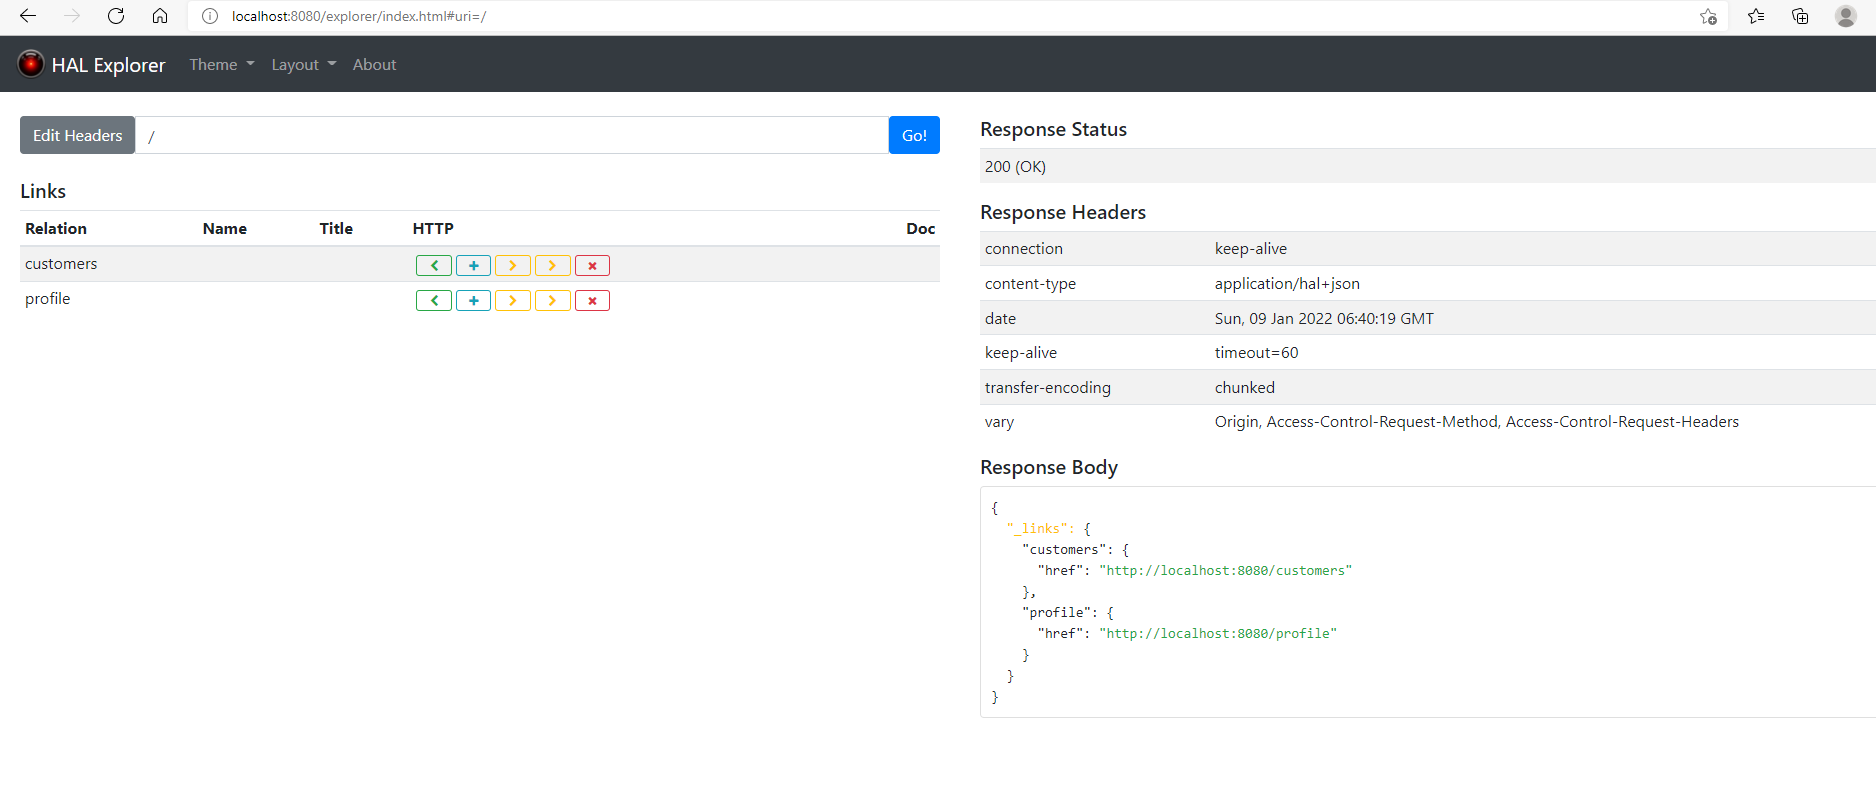
After the restart of your project if you run this address "http://localhost:8080" you can see this amazing explorer which browses you RESTs.

Spring Data Rest Security
Well, so far we have been able to remove a software layer and we no longer have boilerplate code at least in the control layer, but we have a serious problem: what happens to our security if we do not have a service layer? The good news is that spring data rest can be easily integrated with spring security as well as most spring umbrella projects. You just need to add the following dependency to your project:
<dependency>
            <groupId>org.springframework.boot</groupId>
            <artifactId>spring-boot-starter-security</artifactId>
 </dependency>
In order for us to use standard annotations at both the class and method levels, the following code represents the application of class-level security roles, which means that any caller wishing to invoke any service of this class should have the "ALL" role:
@PreAuthorize("hasRole('ALL')")
public interface CustomerRepository extends CrudRepository<customer,Long> {
}
If you want to create a method with different access roles, you should simply override the method and apply a different role. In the code below, "findAll()" has been overridden and applied to an "ADMIN" role:
import com.rgn.model.Customer;
import org.springframework.data.repository.CrudRepository;
import org.springframework.security.access.prepost.PreAuthorize;
@PreAuthorize("hasRole('ALL')")
public interface CustomerRepository extends CrudRepository<Customer,Long> {
    @Override
    @PreAuthorize("hasRole('ADMIN')")
    public  Iterable<Customer> findAll();
}
You can find detailed information about spring security and annotations and mechanism here.
Performance
When I decide to use new technology, after all the technical considerations and studies of that technology, before I use it, I try to compare its performance either with the older technology I am using now or with similar technologies that exist in the field. For this purpose, firstly, I search for reputable websites to know the experience of others with this technology in terms of its performance and benchmarks, and secondly, I try to make performance comparisons myself. in this part, let us compare the performance between Spring Data Rest and the regular architecture that includes the controller layer. So I have two test cases with and without spring data rest. For the performance tests, I used JMeter, with 1000000 threads and 1000 as a threshold for the graph and the regular PC. OK, here we go:
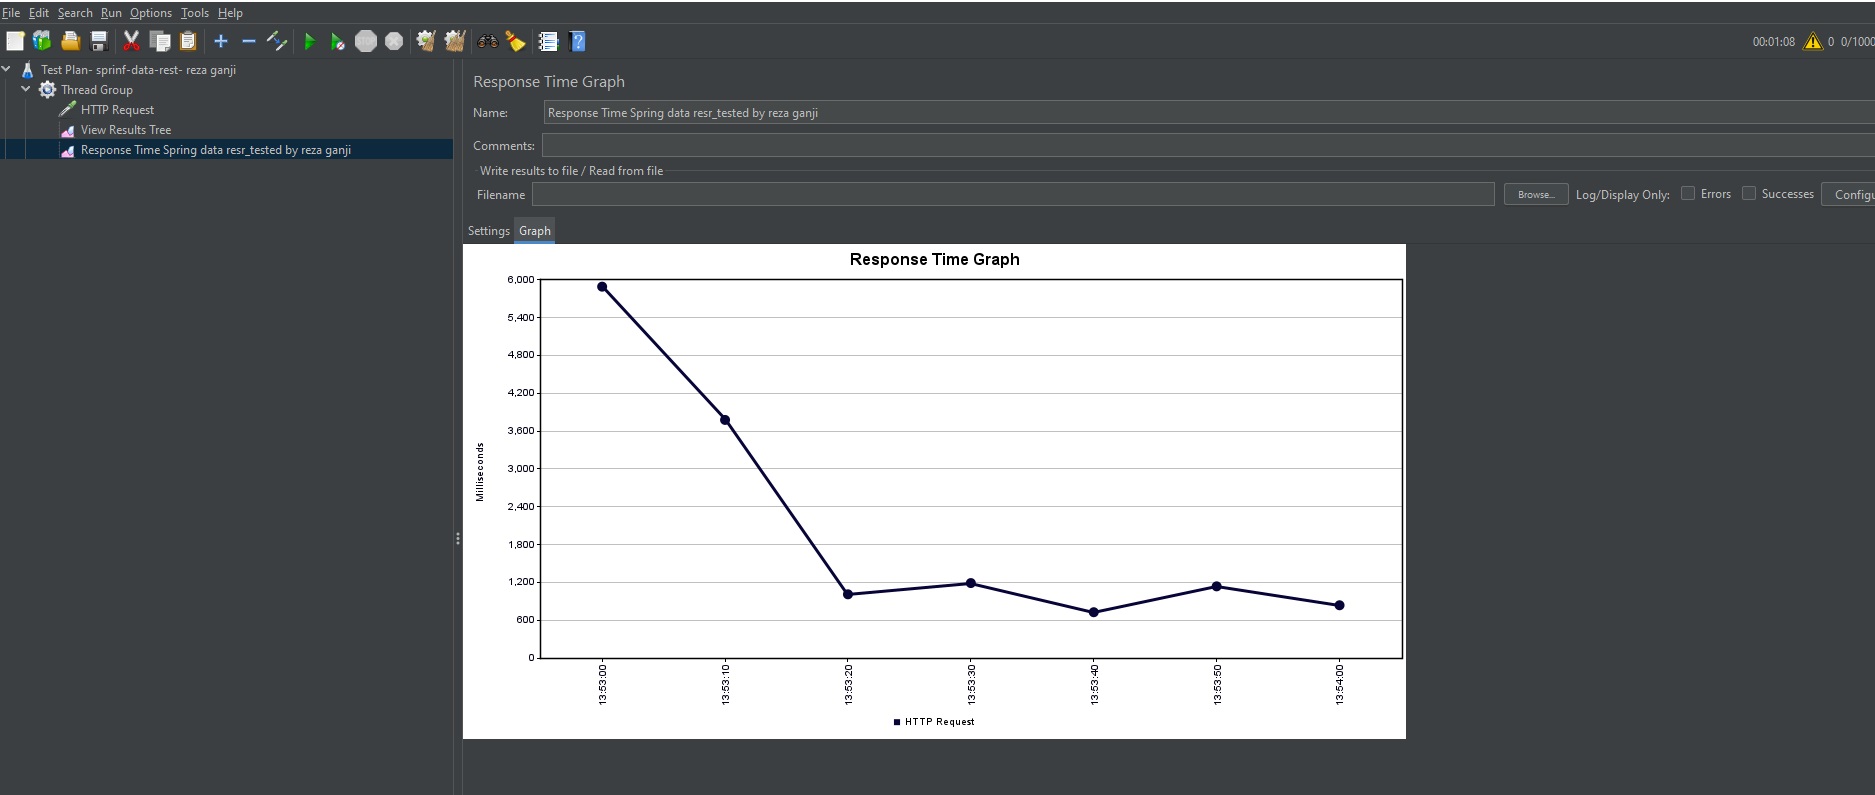
Test Result With Spring Data Rest
As you can see, the graph of response times has stabilized after slight fluctuations and we have a normal response time.

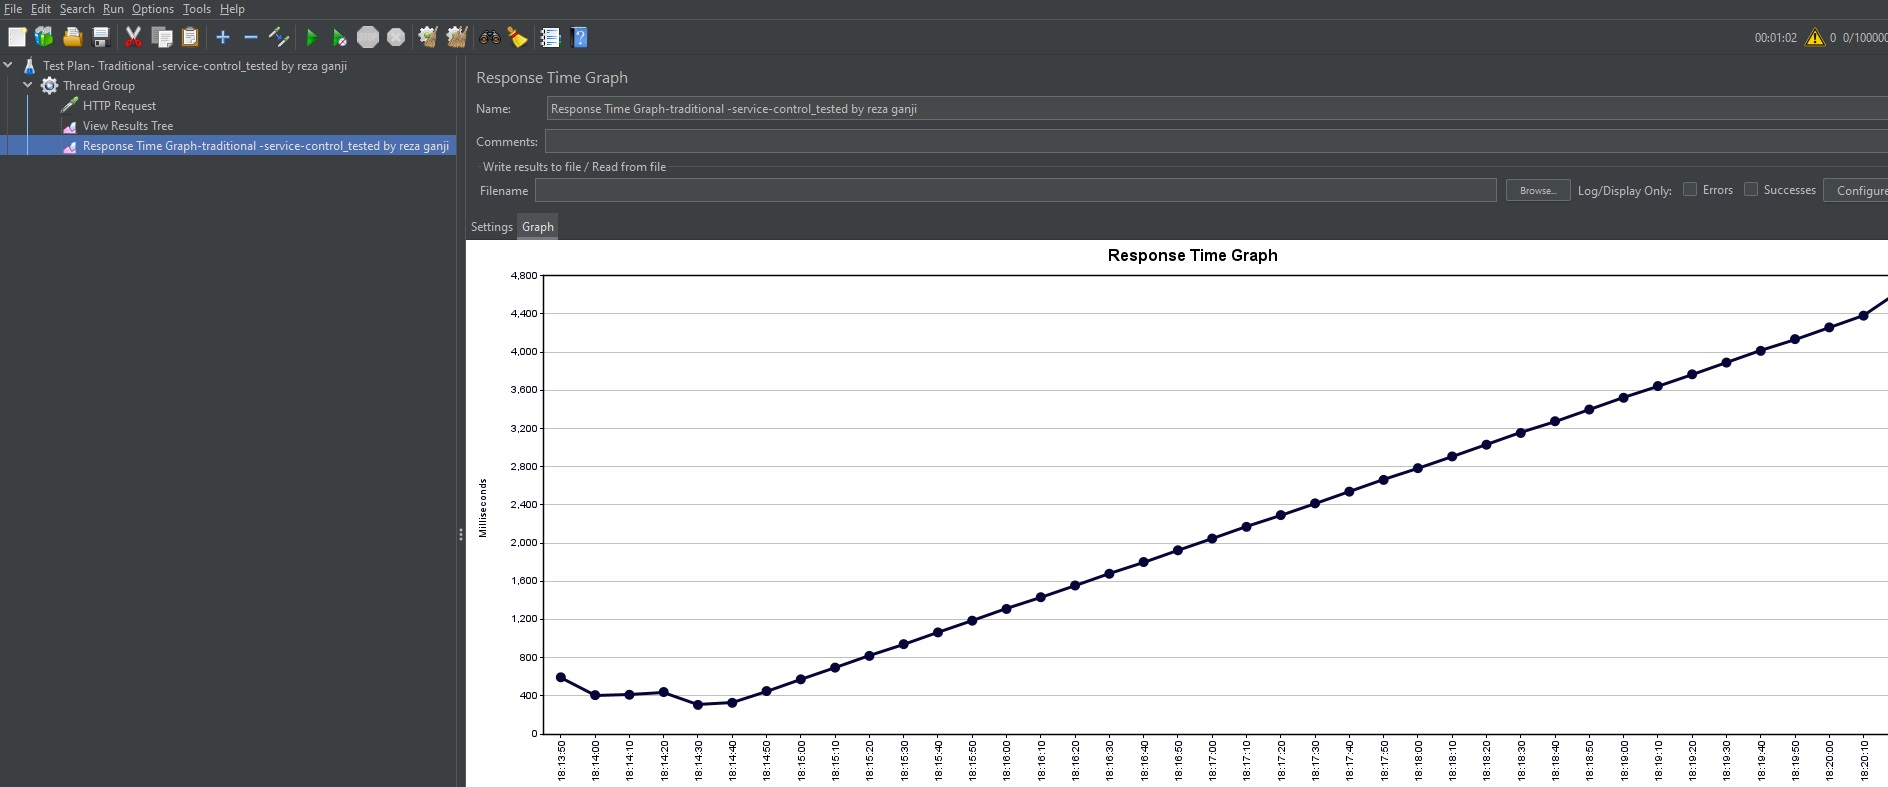
Test Result Without Spring Data Rest
Before we start this step, we should remove the dependency on spring data rest from our pom and add the following class as a controller layer to our project:
package com.rgn.model;

import com.rgn.repository.CustomerRepository;
import org.springframework.beans.factory.annotation.Autowired;

import org.springframework.web.bind.annotation.*;
@RestController
public class CustomerService {
    @Autowired
    CustomerRepository repository;
    @GetMapping("/customers")
    public  Customer getCustomer(@RequestParam(value = "id")  Long id){
       return repository.findById(id.longValue()).get();
    }
}
The result can be seen in the following figure. You can see that we get better performance when using spring data.


