Mastering AWS API Gateway: A Comprehensive Guide To Setting up Routes, Integrations, and Deployments
Amazon Web Services (AWS) API Gateway is a powerful service that enables you to create, deploy, and manage APIs at any scale. In this article, we will walk through the process of setting up AWS API Gateway with a Network Load Balancer (NLB), Target Group, Security Group, and Virtual Private Cloud (VPC). Additionally, we'll provide examples of setting up GET, POST, and DELETE requests to interact with the API Gateway.
Prerequisites
Before we begin, make sure you have the following prerequisites:
An AWS account with appropriate permissions to create and manage API Gateway, NLB, Target Group, Security Group, and VPC.
Basic knowledge of AWS services and concepts.
1. Create a Virtual Private Cloud (VPC)
A Virtual Private Cloud (VPC) in AWS provides a logically isolated section of the AWS Cloud where you can launch AWS resources in a defined virtual network. Here's how you can create a VPC:
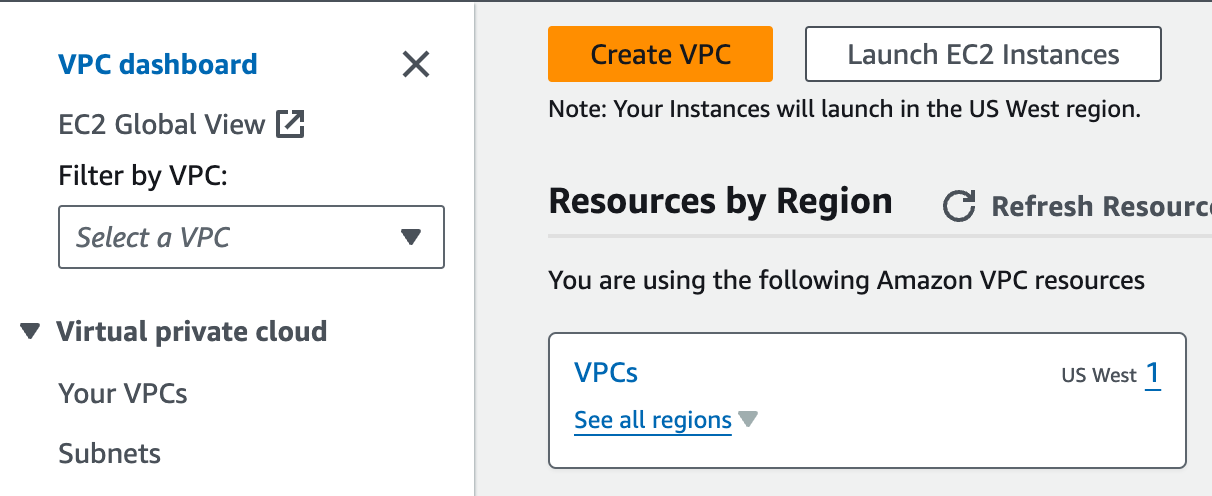
Navigate to the VPC Dashboard
Go to the AWS Management Console and select the "VPC" service from the list of available services.
Initiate VPC Creation
Click on the "Create VPC" button to start the VPC creation process.
Configure VPC Settings
- IPv4 CIDR block: Define the IPv4 CIDR block for your VPC. This CIDR block specifies the range of IP addresses that can be assigned to resources within the VPC. Choose a CIDR block that does not overlap with any other networks in your environment.
- IPv6 CIDR block (optional): If you want to enable IPv6 addressing for your VPC, you can specify an IPv6 CIDR block as well.
- Tenancy: Choose whether you want the instances launched in this VPC to be dedicated to a single tenant (Dedicated tenancy) or shared with other AWS accounts (Default tenancy).
Add Tags
You can add tags to your VPC to help identify it and organize it within your AWS environment. Tags consist of key-value pairs that you define.
Review and Create
Review the configuration settings you've chosen for your VPC. Once you're satisfied, click on the "Create VPC" button to create the VPC.
Confirmation
After a few moments, AWS will create your VPC. You'll see a confirmation message indicating that the VPC has been successfully created, along with details such as the VPC ID, IPv4 CIDR block, and other settings.
Additional Configuration (Optional)
Depending on your requirements, you may need to configure additional components within your VPC, such as subnets, route tables, internet gateways, NAT gateways, VPN connections, or VPC peering.
By following these steps, you'll have successfully created a Virtual Private Cloud (VPC) in AWS. This VPC will serve as the foundational network infrastructure for launching and managing your AWS resources in an isolated and secure environment.
2. Set up Network Load Balancer (NLB) and Target Group
A Network Load Balancer (NLB) in AWS distributes incoming network traffic across multiple targets, such as EC2 instances, containers, or IP addresses, within a single Availability Zone or across multiple Availability Zones. Here's how you can set up an NLB and a Target Group:
Navigate to the EC2 Dashboard
Go to the AWS Management Console and select the "EC2" service from the list of available services.
Create Network Load Balancer
- Click on "Load Balancers" in the navigation pane.
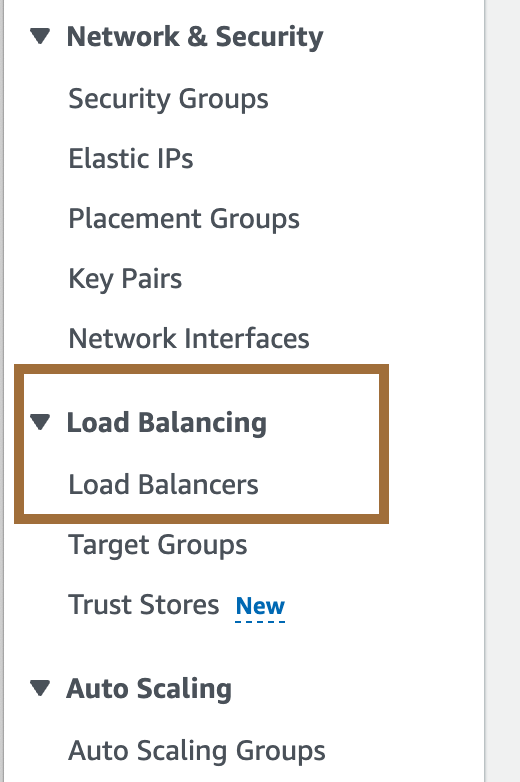
- Click on the "Create Load Balancer" button.
- Select "Network Load Balancer" as the load balancer type.
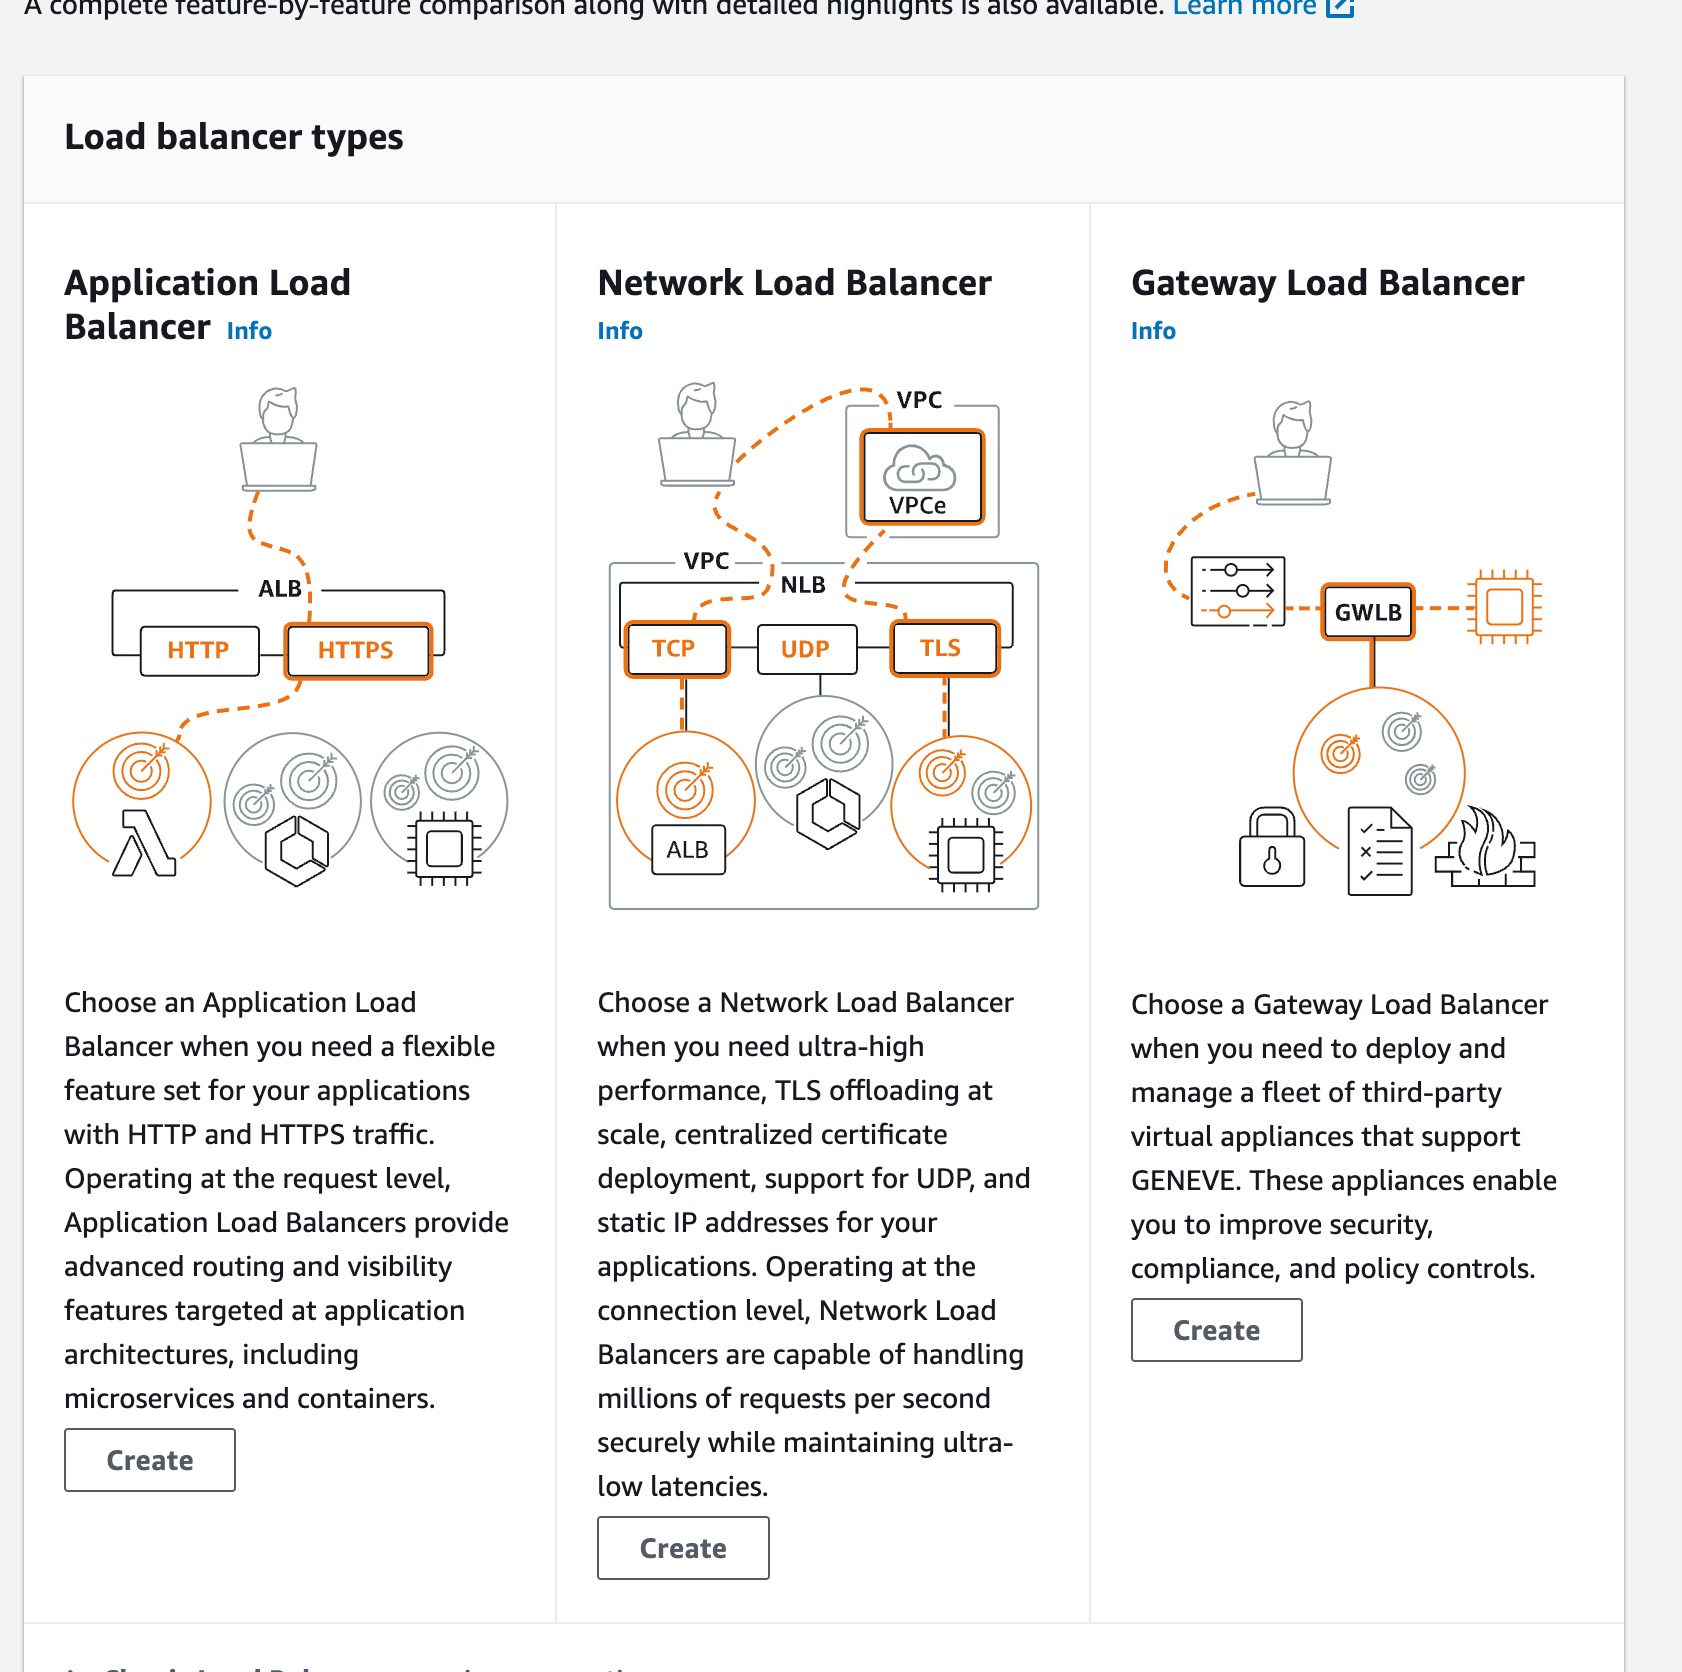
- Configure the NLB settings, including:
- Name: Provide a name for your NLB.
- Scheme: Choose whether the NLB should be internal (accessible only from within your VPC) or internet-facing.
- Listeners: Specify the protocols and ports on which the NLB will listen for incoming traffic.
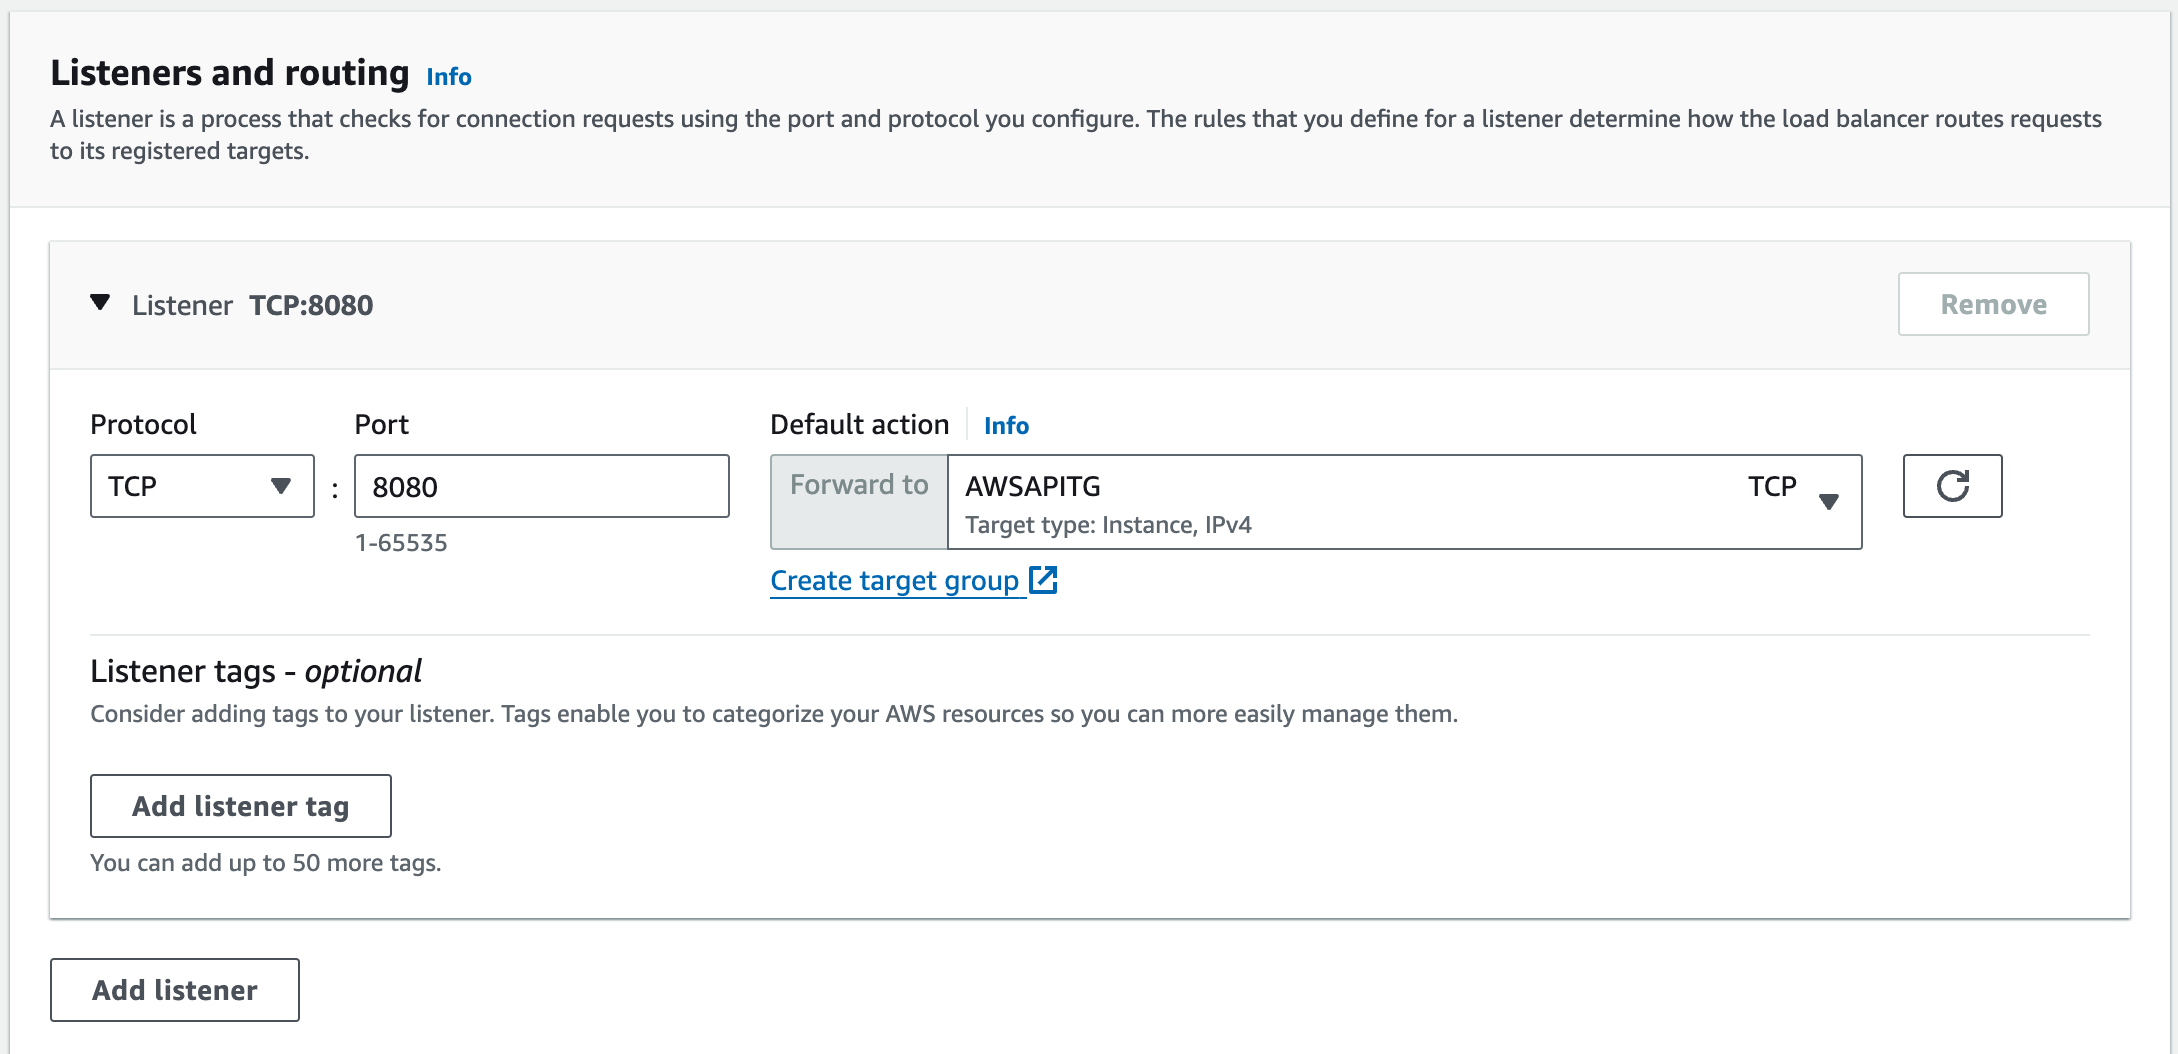
- Availability zones: Select the Availability Zones where you want the NLB to distribute traffic.
- Cross-zone load balancing: Choose whether to enable cross-zone load balancing for distributing traffic evenly across all registered targets in all selected Availability Zones.
- Click on the "Next: Configure Security Settings" button, and then follow the prompts to configure security settings, add tags, and review the NLB configuration.
- Finally, click on the "Create" button to create the NLB.
Create Target Group
- After creating the NLB, navigate to the "Target Groups" tab within the NLB configuration.
- Click on the "Create target group" button.
- Configure the target group settings, including:
- Name: Provide a name for your target group.
- Target type: Choose the type of targets that will be registered with this target group (e.g., instances, IP addresses, or Lambda functions).
- Protocol and port: Specify the protocol and port on which the targets will receive traffic.
- Health checks: Define health check settings to monitor the health of the targets and determine their availability.
- Target group attributes: Optionally, configure additional attributes such as stickiness, deregistration delay, or protocol version.
- Click on the "Create" button to create the target group.
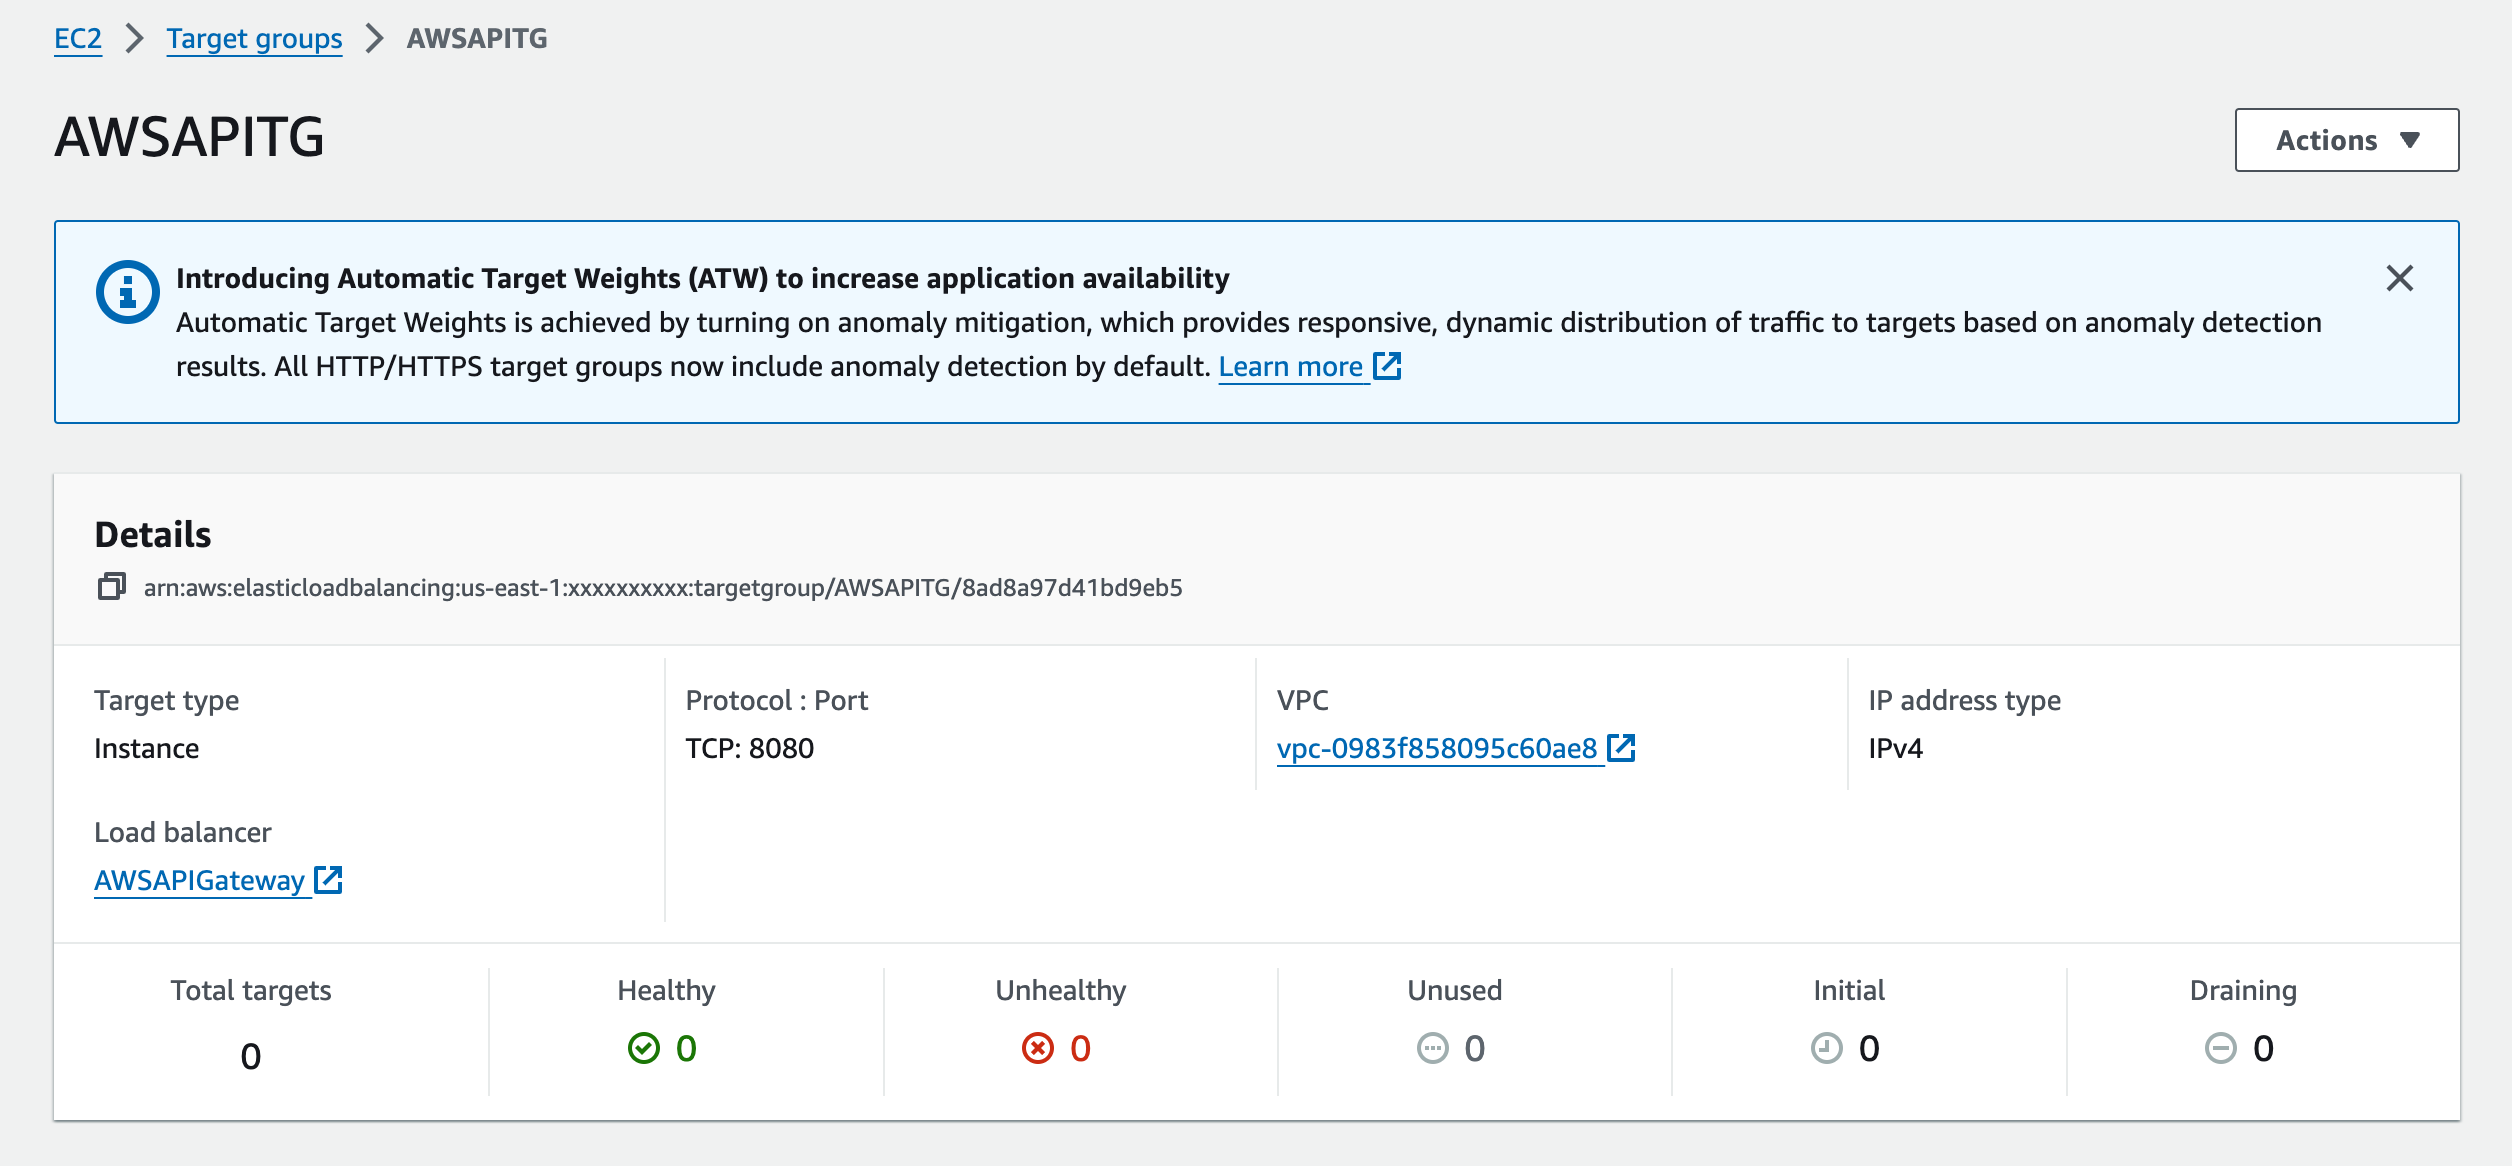
Register Targets
- After creating the target group, select it from the list of target groups.
- Click on the "Targets" tab within the target group configuration.
- Click on the "Edit" button to add targets to the target group.
- Select the targets (e.g., EC2 instances or IP addresses) that you want to register with the target group.
- Click on the "Save" button to register the targets.
Configure Routing
Once the NLB and target group are set up, you can configure routing to forward incoming traffic from the NLB to the registered targets in the target group.
This can be done by creating listeners and rules within the NLB configuration, specifying the conditions under which traffic should be routed to the target group.
By following these steps, you'll have successfully set up a Network Load Balancer (NLB) and a Target Group in AWS. The NLB will distribute incoming traffic across the registered targets within the target group, providing high availability and scalability for your applications.
3. Configure Security Group
A Security Group acts as a virtual firewall for your AWS resources, controlling inbound and outbound traffic. You can create and configure Security Groups to control access to your instances, including which protocols and ports are allowed. Here's how to configure a Security Group:
Navigate to the EC2 Dashboard
Go to the AWS Management Console and select the "EC2" service from the list of available services.
Create a Security Group
- Click on "Security Groups" in the navigation pane.
- Click on the "Create Security Group" button.
- Provide a name and description for your Security Group.
- Select the VPC in which you want to create the Security Group.
- Click on the "Create" button.
Configure Inbound Rules
- Select the newly created Security Group from the list.
- In the "Inbound Rules" tab, click on the "Edit" button to configure inbound rules.
- Click on the "Add Rule" button to add inbound rules.
- Specify the following parameters for each inbound rule:
- Type: The type of traffic to allow (e.g., HTTP, HTTPS, SSH).
- Protocol: The protocol to allow (e.g., TCP, UDP, ICMP).
- Port Range: The port or range of ports to allow traffic on.
- Source: The source of the traffic (e.g., an IP address, a CIDR block, or another Security Group). Click on the "Save rules" button to apply the changes.
Configure Outbound Rules
- In the "Outbound Rules" tab, click on the "Edit" button to configure outbound rules.
- Click on the "Add Rule" button to add outbound rules.
- Specify the following parameters for each outbound rule:
- Type: The type of traffic to allow (e.g., HTTP, HTTPS, SSH).
- Protocol: The protocol to allow (e.g., TCP, UDP, ICMP).
- Port Range: The port or range of ports to allow traffic on.
- Destination: The destination of the traffic (e.g., an IP address, a CIDR block, or another Security Group).
- Click on the "Save rules" button to apply the changes.
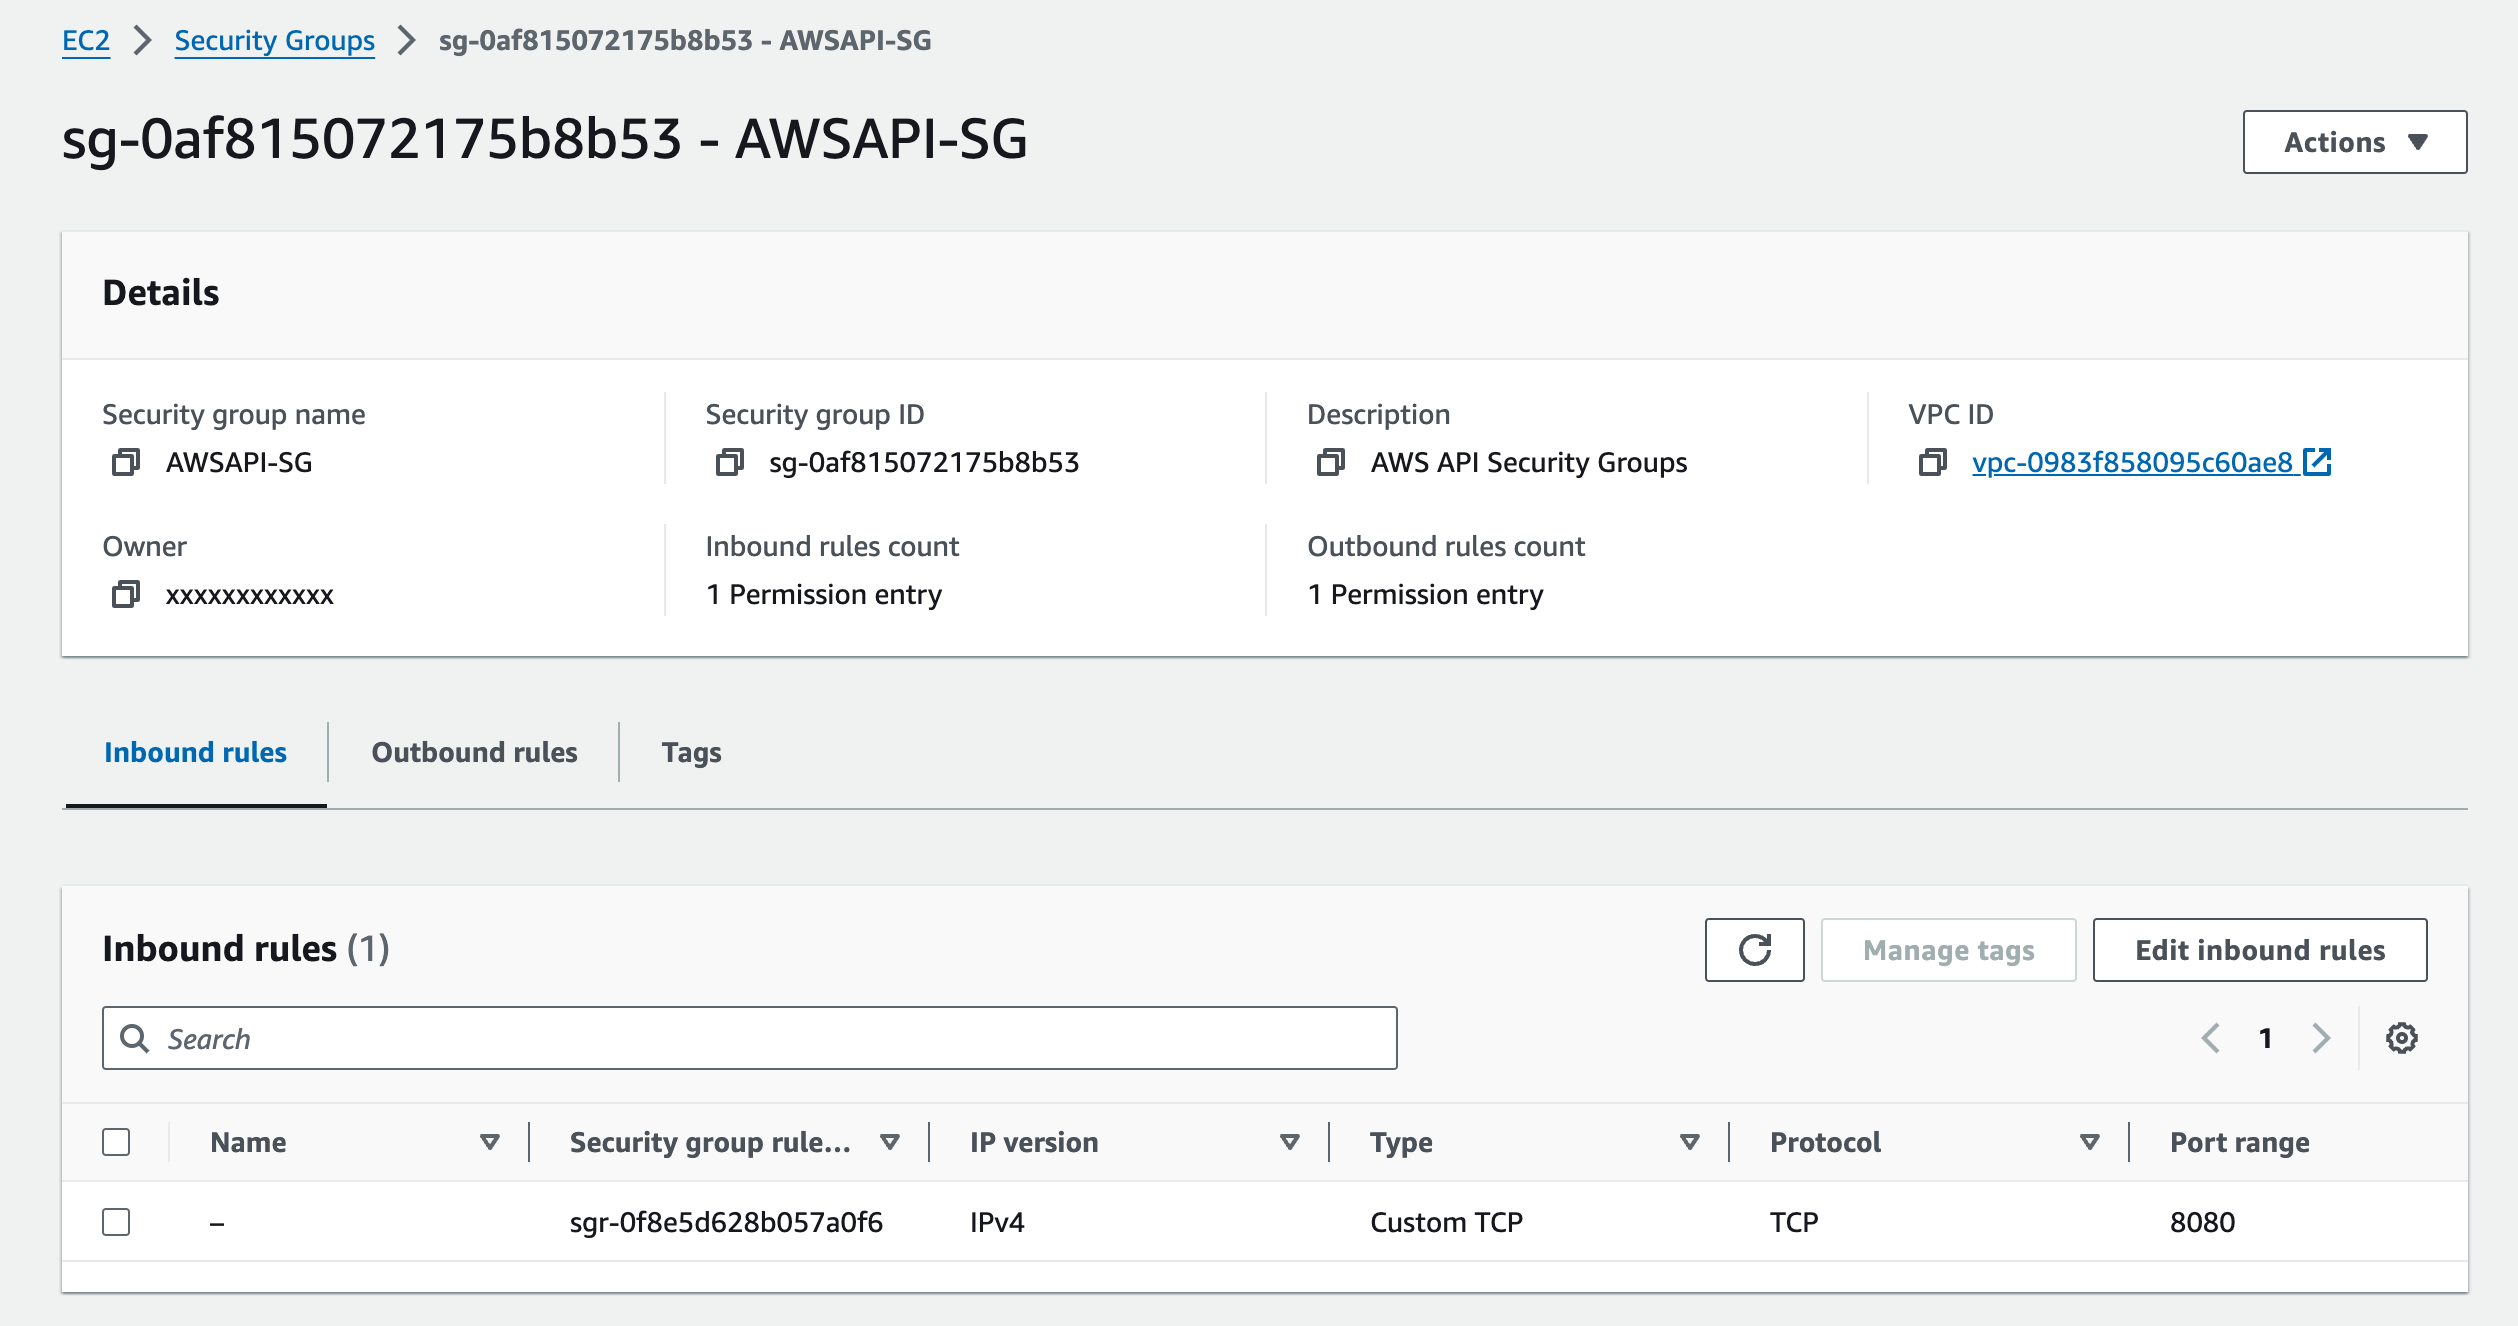
Security Group Inbound rules

Security Group Outbound rules
Review and Associate
- Review the configuration of your Security Group to ensure it meets your requirements.
- Once you're satisfied, you can associate the Security Group with your EC2 instances, NLB, or other AWS resources by modifying their settings and selecting the Security Group.
Update Rules as Needed
- As your requirements change or new services are added, you may need to update the rules of your Security Group accordingly.
- Regularly review and audit your Security Group rules to ensure they align with your security policies and best practices.
By following these steps, you'll have successfully configured a Security Group in AWS, providing granular control over inbound and outbound traffic to your resources within the specified VPC. This helps ensure the security and integrity of your AWS environment while allowing authorized traffic to reach your instances and services.
4. Create API Gateway
Amazon API Gateway is a fully managed service that makes it easy for developers to create, publish, maintain, monitor, and secure APIs at any scale. Here's how to create an API Gateway:
Navigate to the API Gateway Dashboard
Go to the AWS Management Console and select the "API Gateway" service from the list of available services.

Create a New API
- Click on the "Create API" button to start creating a new API.
- Choose between "HTTP API" or "REST API" based on your requirements. HTTP APIs are newer, faster, and simpler, while REST APIs offer more features and customization options.
- Enter a name for your API and, optionally, a description.
- Click on the "Create API" button to create the API.
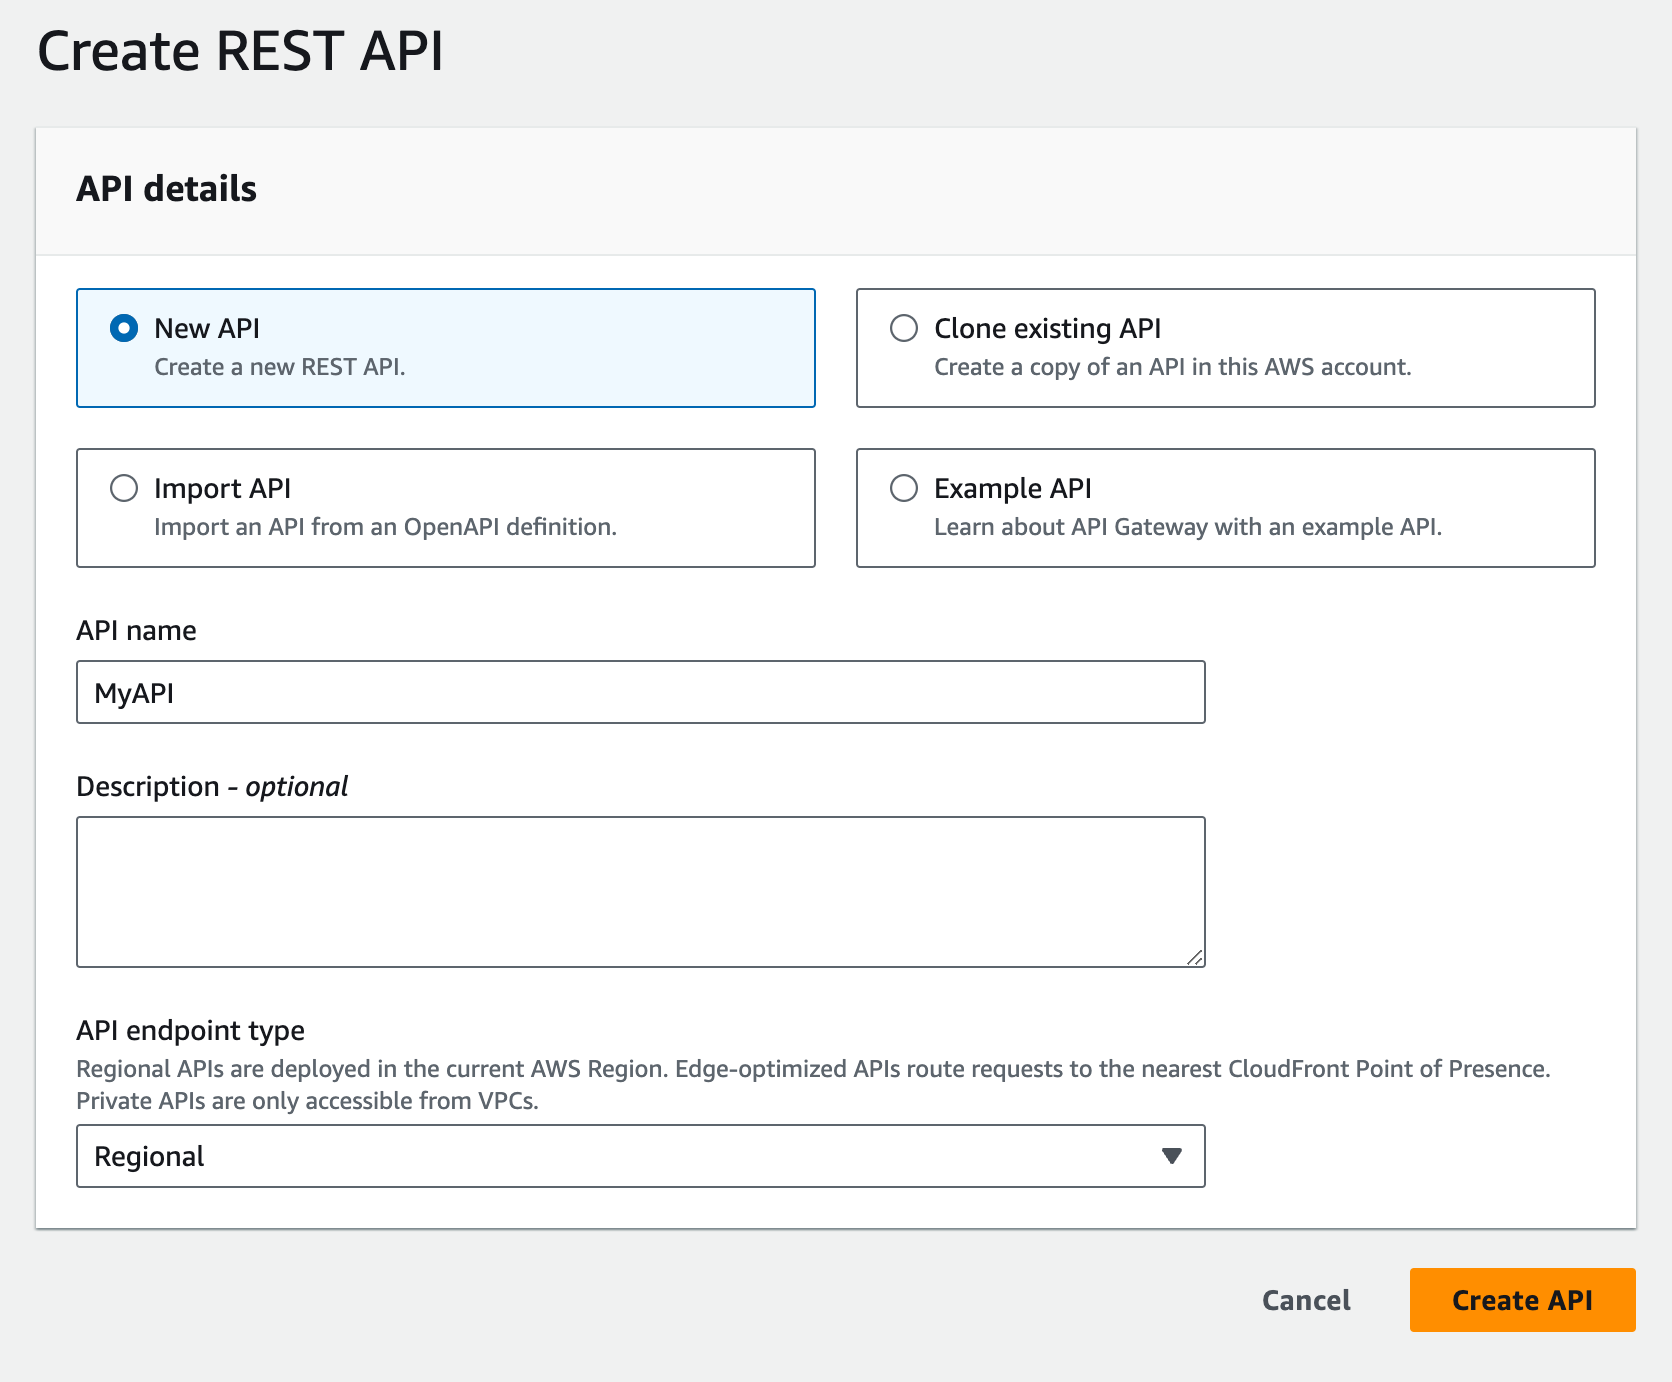
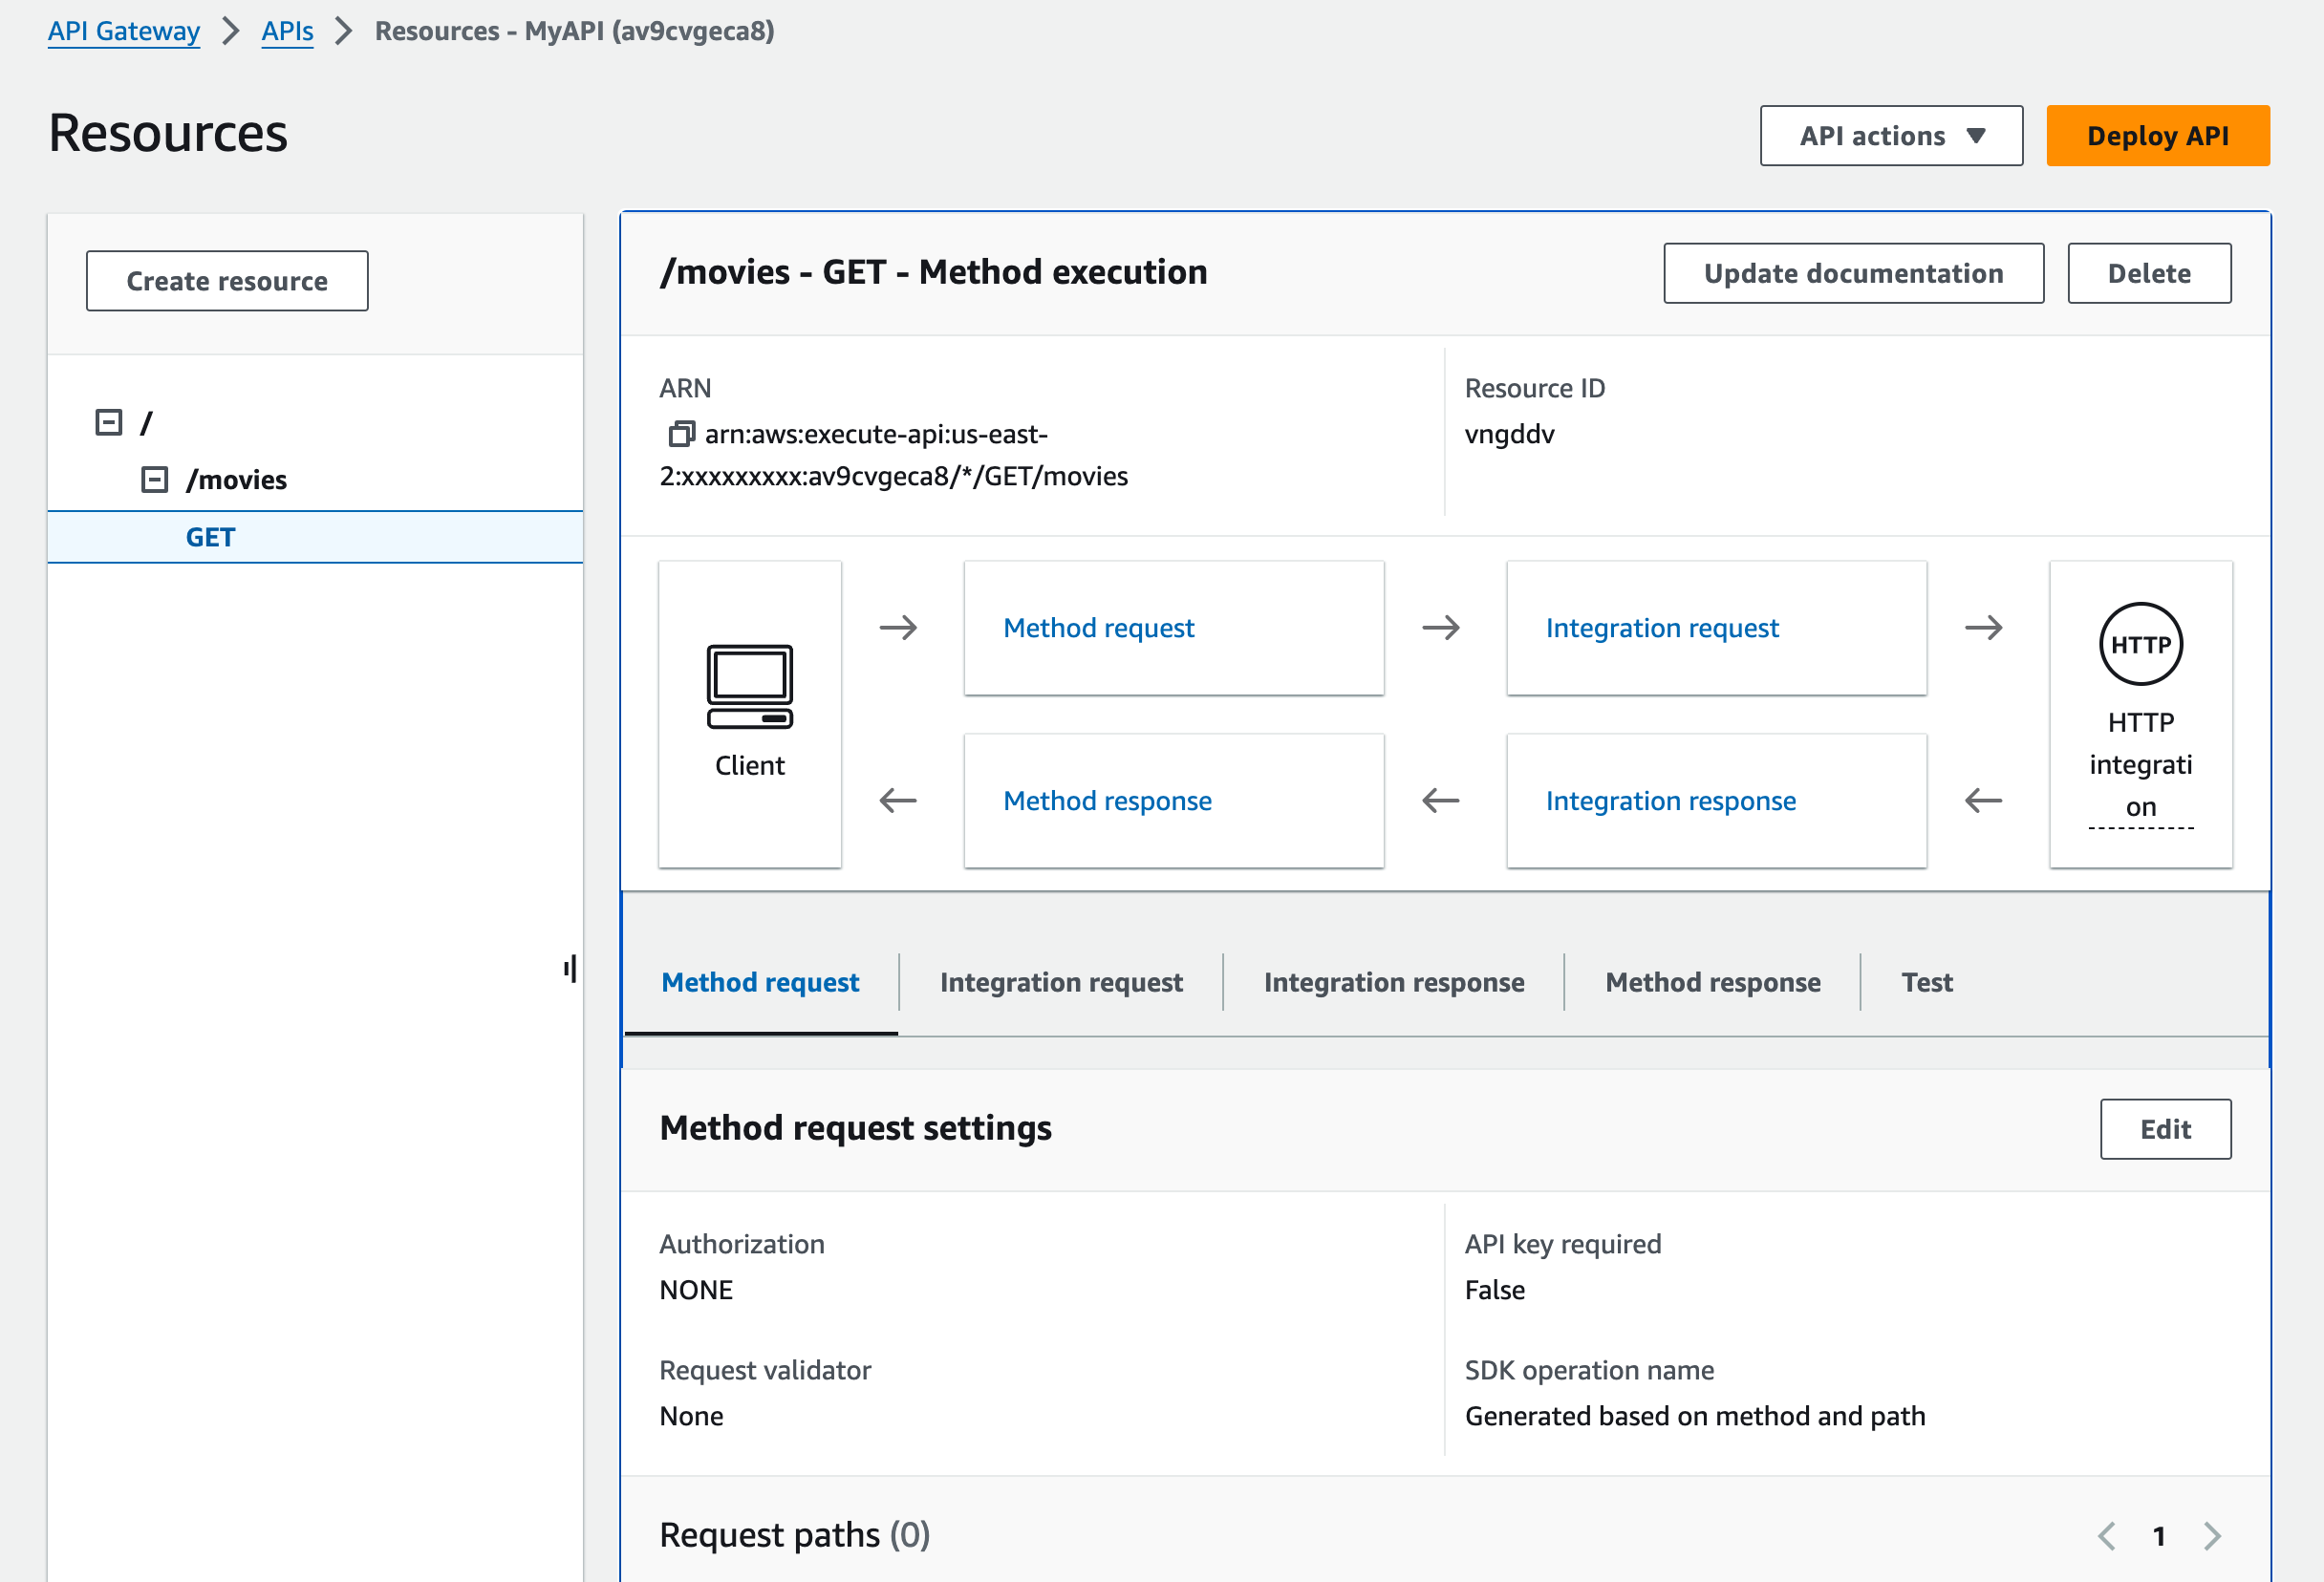
Define Resources and Methods
- Once the API is created, you'll be taken to the API Gateway console, where you can define resources and methods for your API.
- Resources represent the endpoints of your API, while methods define the HTTP verbs (e.g., GET, POST, PUT, DELETE) supported by each endpoint.
- Click on the "Create Resource" button to define a new resource, and then specify the path for the resource.
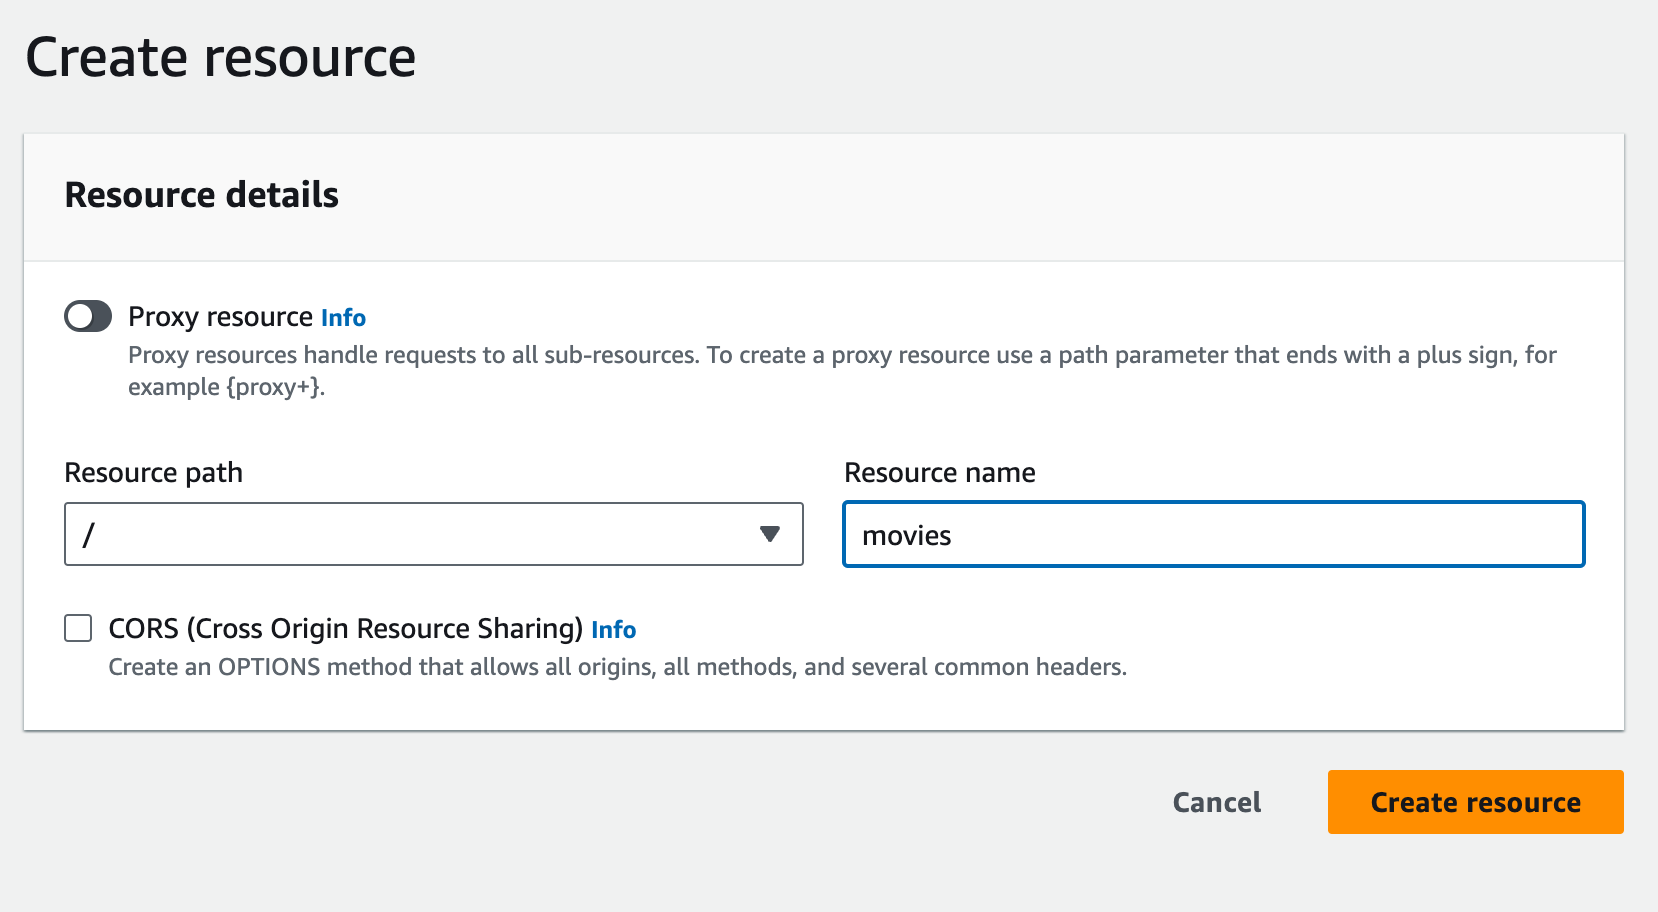
- For each resource, click on the "Create Method" button to define the HTTP methods (e.g., GET, POST) supported by that resource.
Configure Integration
- After defining the resources and methods, you'll need to configure integrations to connect your API to backend services.
- Select a method (e.g., GET) and click on the method name to configure the integration settings.
- Choose the integration type (e.g., Lambda function, HTTP endpoint, AWS service) and provide the necessary configuration details.
- Follow the prompts to set up request and response mappings, authentication, caching, and other integration settings as needed.
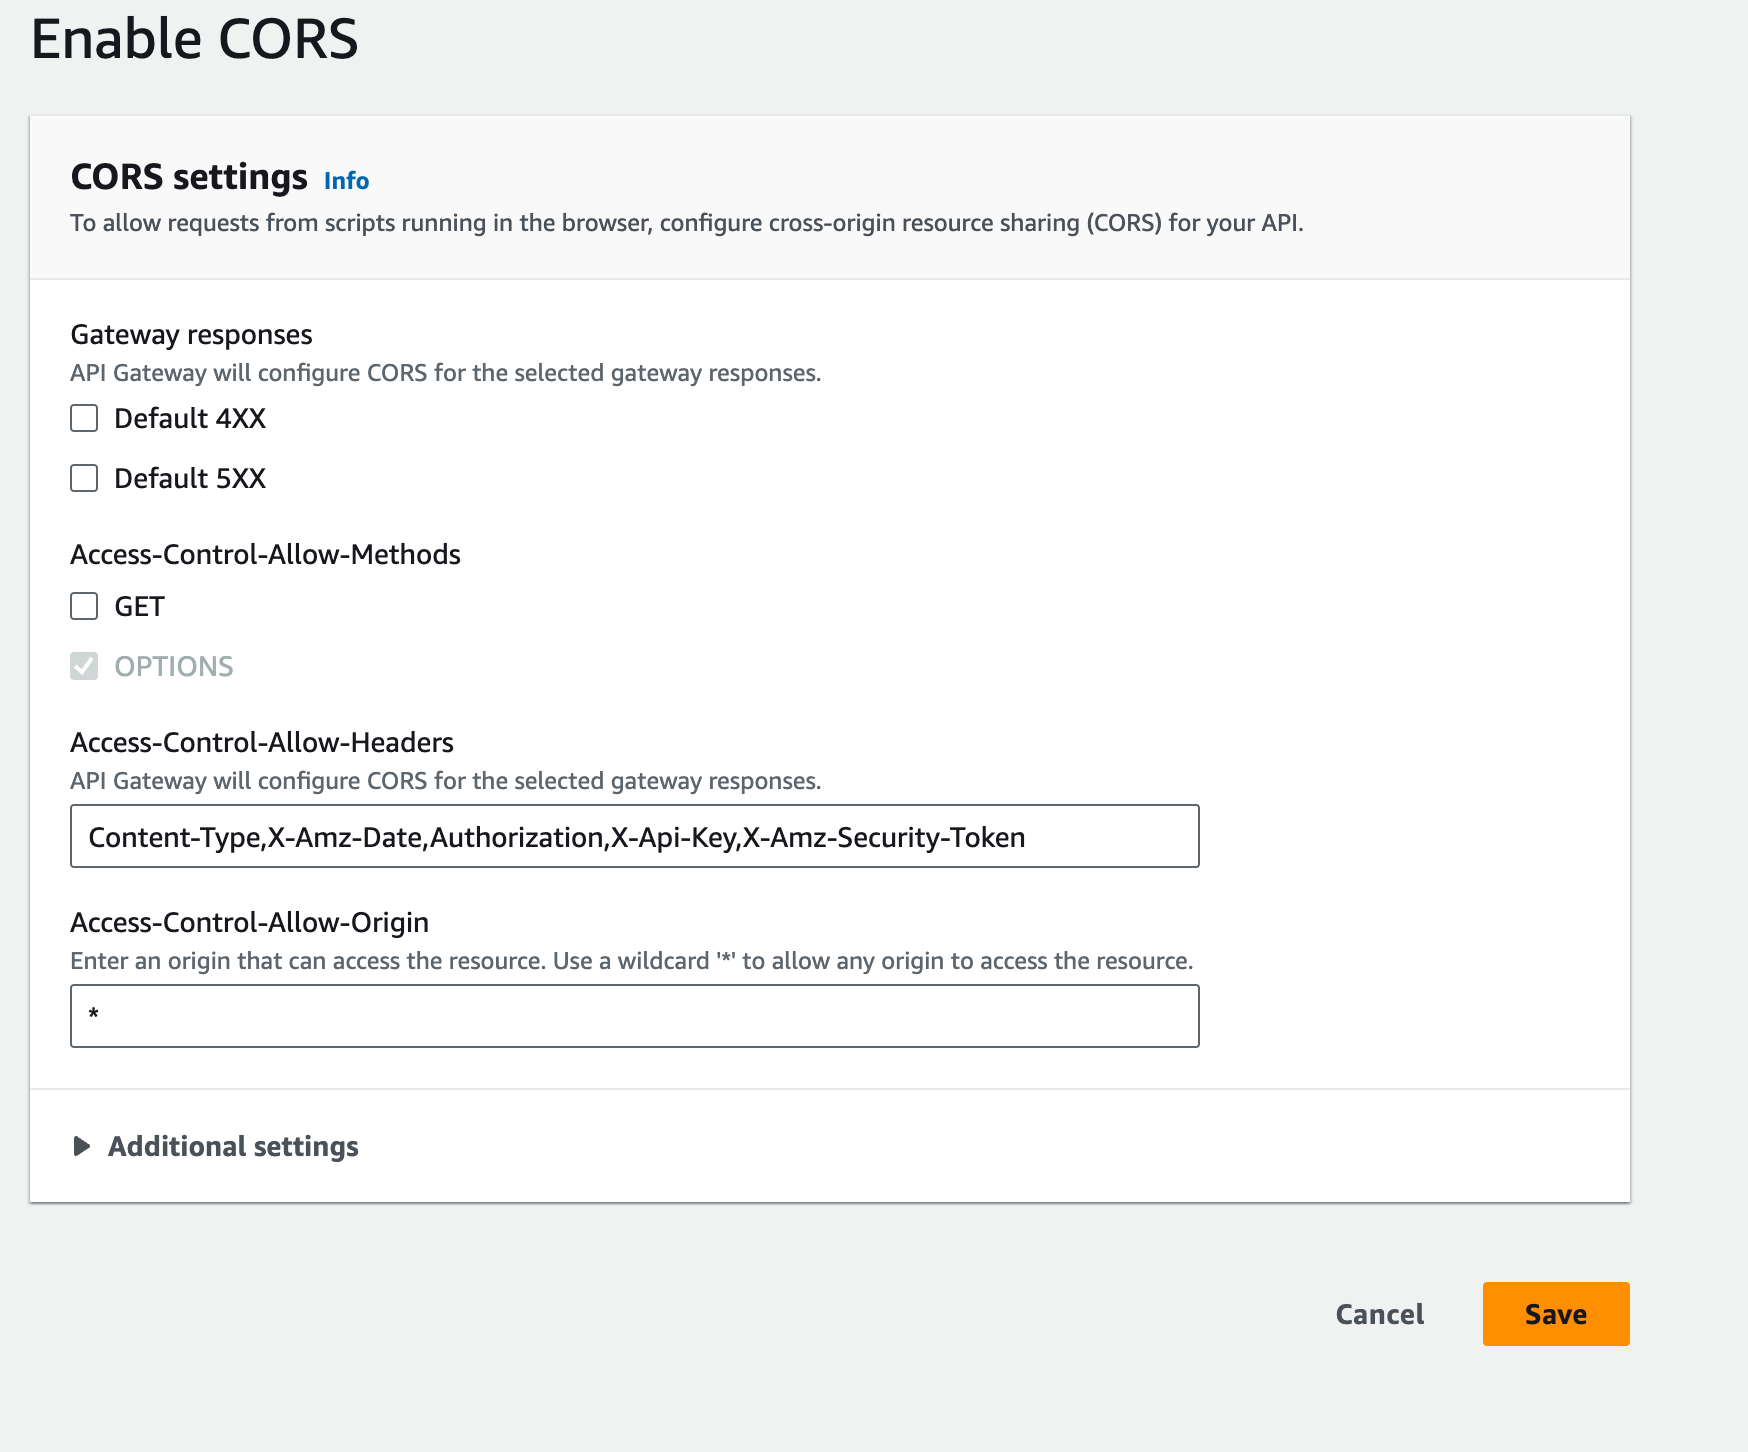
Set up CORS (Optional)
- If your API needs to support cross-origin resource sharing (CORS) requests from web browsers, you can configure CORS settings for your API.
- I suggest activating it as it will assist you in transitioning from HTTP to HTTPS.
- Go to the "CORS" tab in the API Gateway console, and specify the allowed origins, methods, headers, and other CORS-related settings.
Deploy the API
- After configuring your API and integrations, you'll need to deploy it to make it accessible to clients.
- Click on the "Actions" dropdown menu and select "Deploy API".
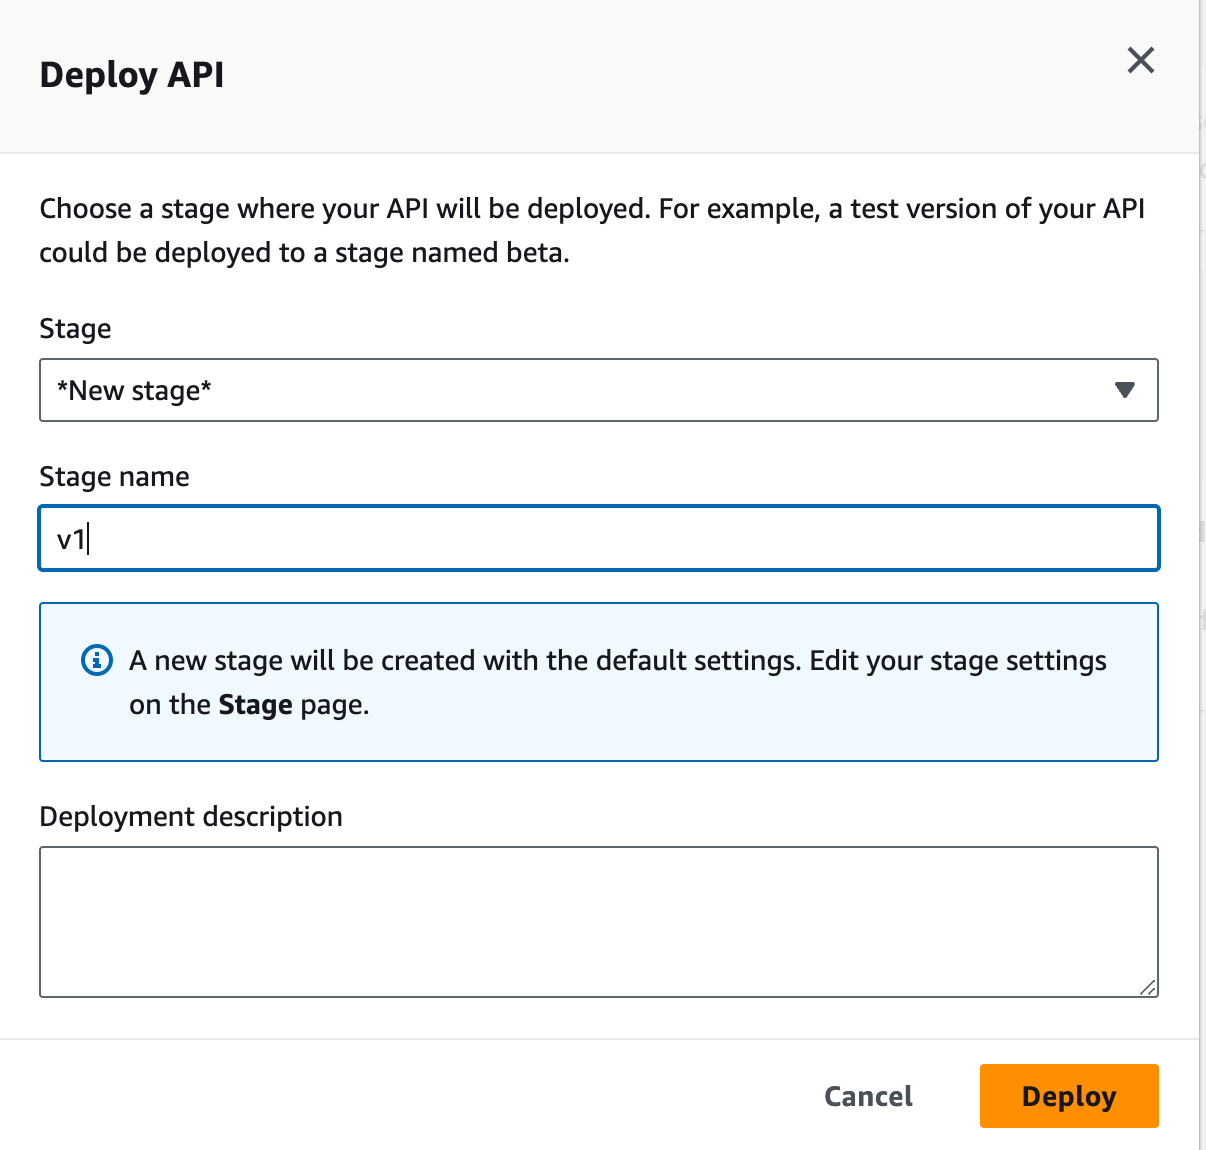
- Choose the deployment stage (e.g., "prod", "stage", "test") and click on the "Deploy" button.
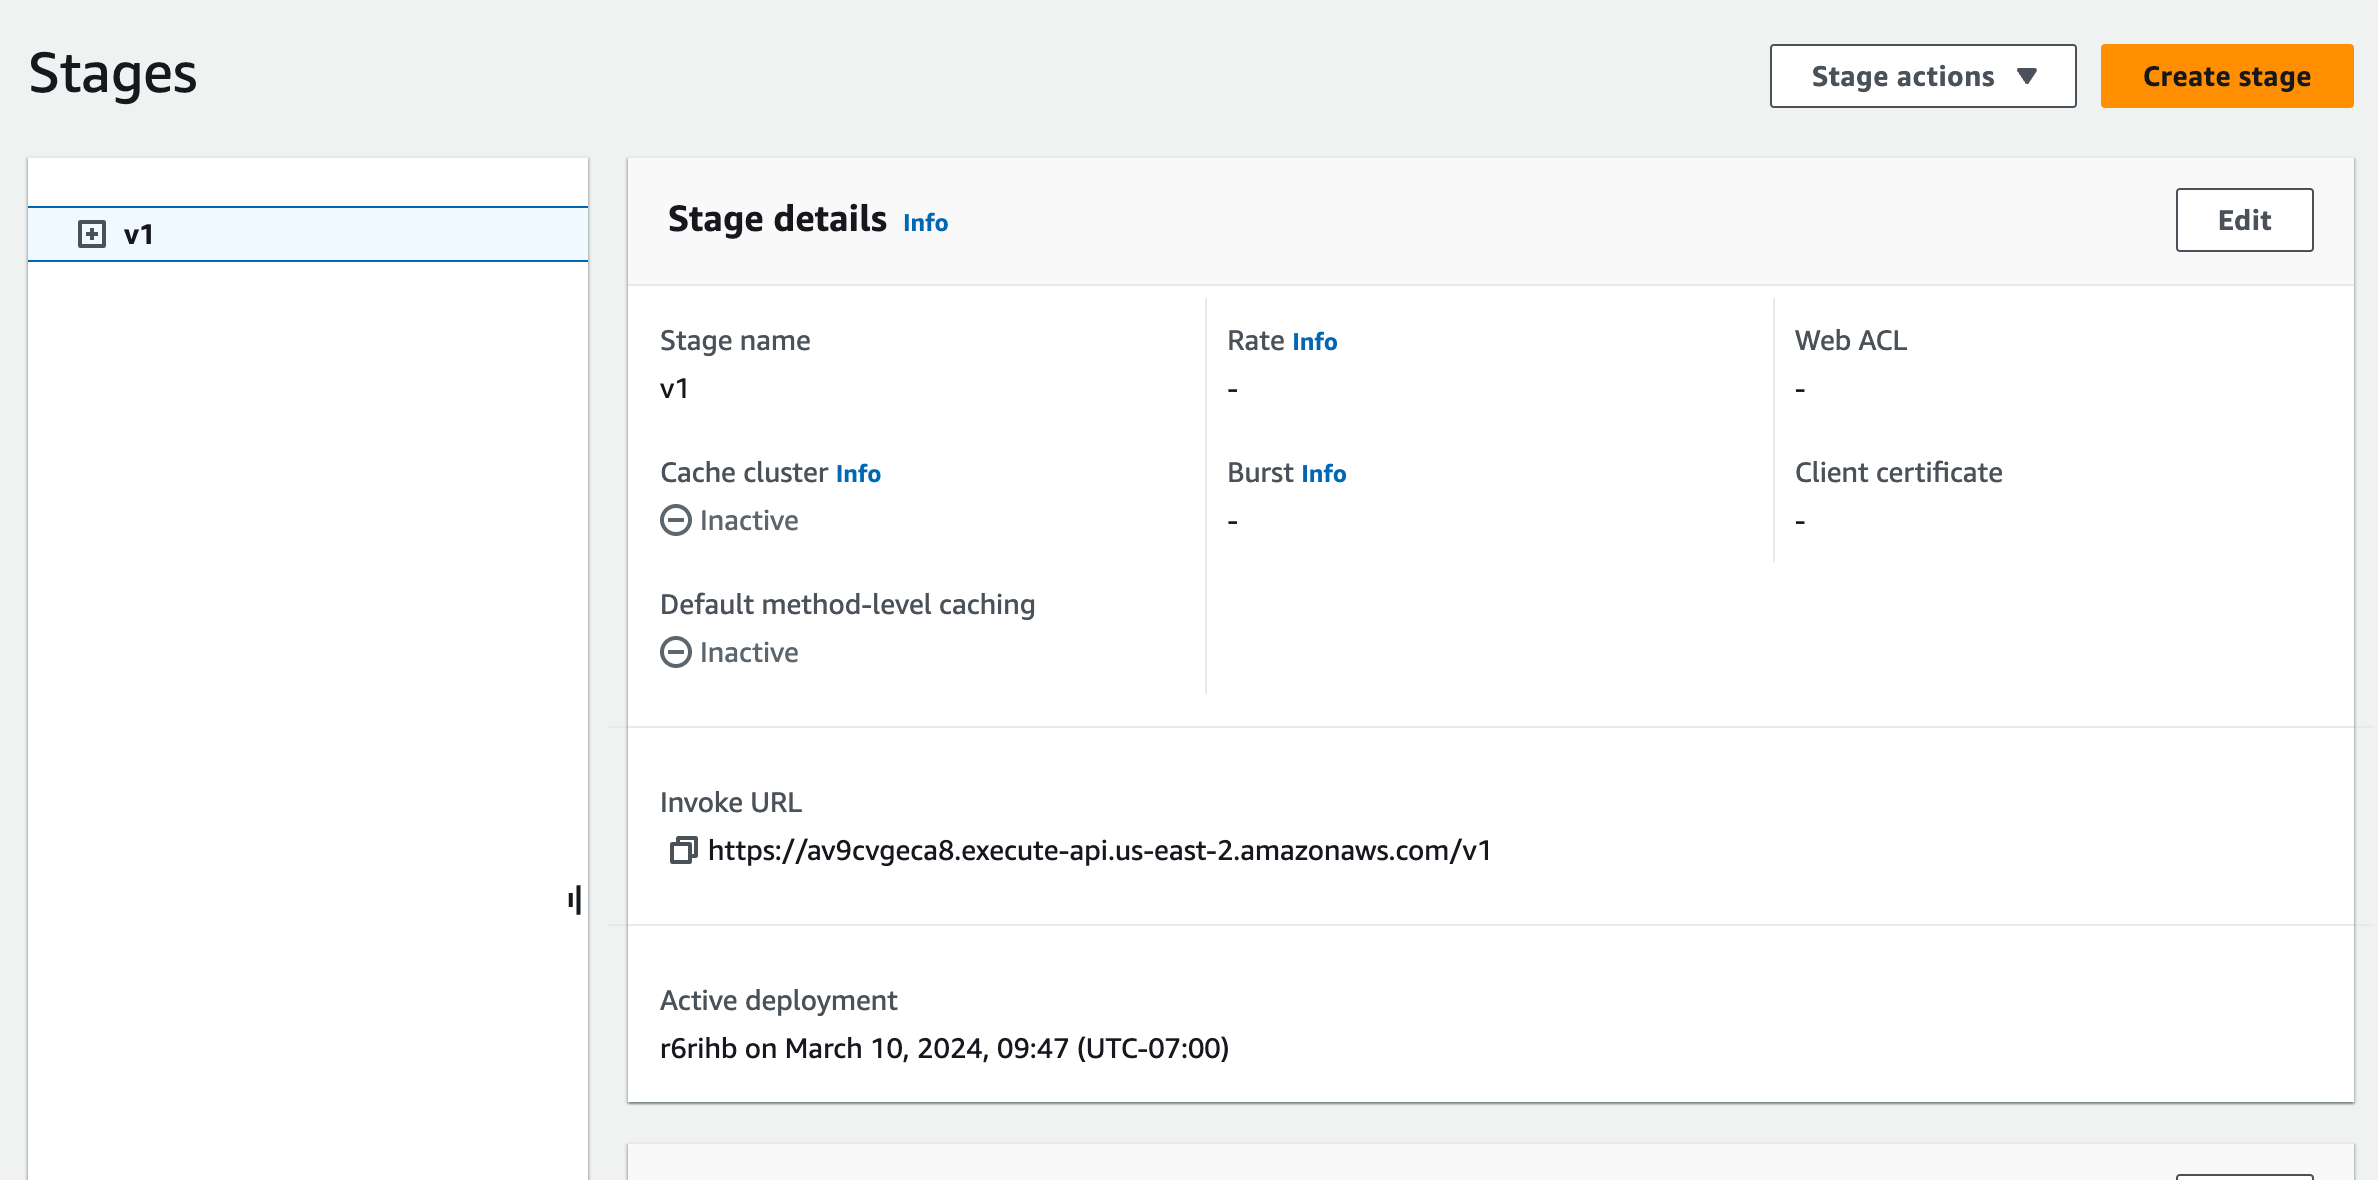
Access the API Endpoint
- Once the API is deployed, you'll be provided with an API endpoint URL that clients can use to access your API.
- Copy the API endpoint URL and share it with your clients or use it to make requests to your API.
Test the API
- Use tools like Postman, cURL, or the API Gateway console's built-in test tool to send requests to your API endpoints and verify the responses.
- Test various scenarios and edge cases to ensure that your API behaves as expected.

By following these steps, you'll have successfully created an API Gateway in AWS, allowing you to expose and manage APIs that connect to your backend services, Lambda functions, or other AWS resources.
5. Setup Custom Domain
Setting up a custom domain for your API Gateway allows you to use your own domain name instead of the default endpoint provided by AWS. This provides a more professional and branded experience for your users. Here's how to set up a custom domain for your API Gateway:
Purchase a Domain Name (If Needed)
If you don't already own a domain name, you'll need to purchase one from a domain registrar like GoDaddy, Namecheap, or Route 53.
Configure DNS Settings
- Log in to your domain registrar's dashboard and navigate to the DNS settings for your domain.
- Create a new CNAME record or A record to point your custom domain to the API Gateway endpoint. You'll need to provide the API Gateway endpoint URL as the target.
Request a Certificate
- Navigate to the AWS Certificate Manager (ACM) console.
- Request a new SSL/TLS certificate for your custom domain. You can choose to request either a public certificate (if your API is publicly accessible) or a private certificate (if your API is accessible only within your VPC).
Verify Domain Ownership
- Follow the instructions provided by ACM to verify that you own the domain. This usually involves adding a DNS record provided by ACM to your domain's DNS settings.
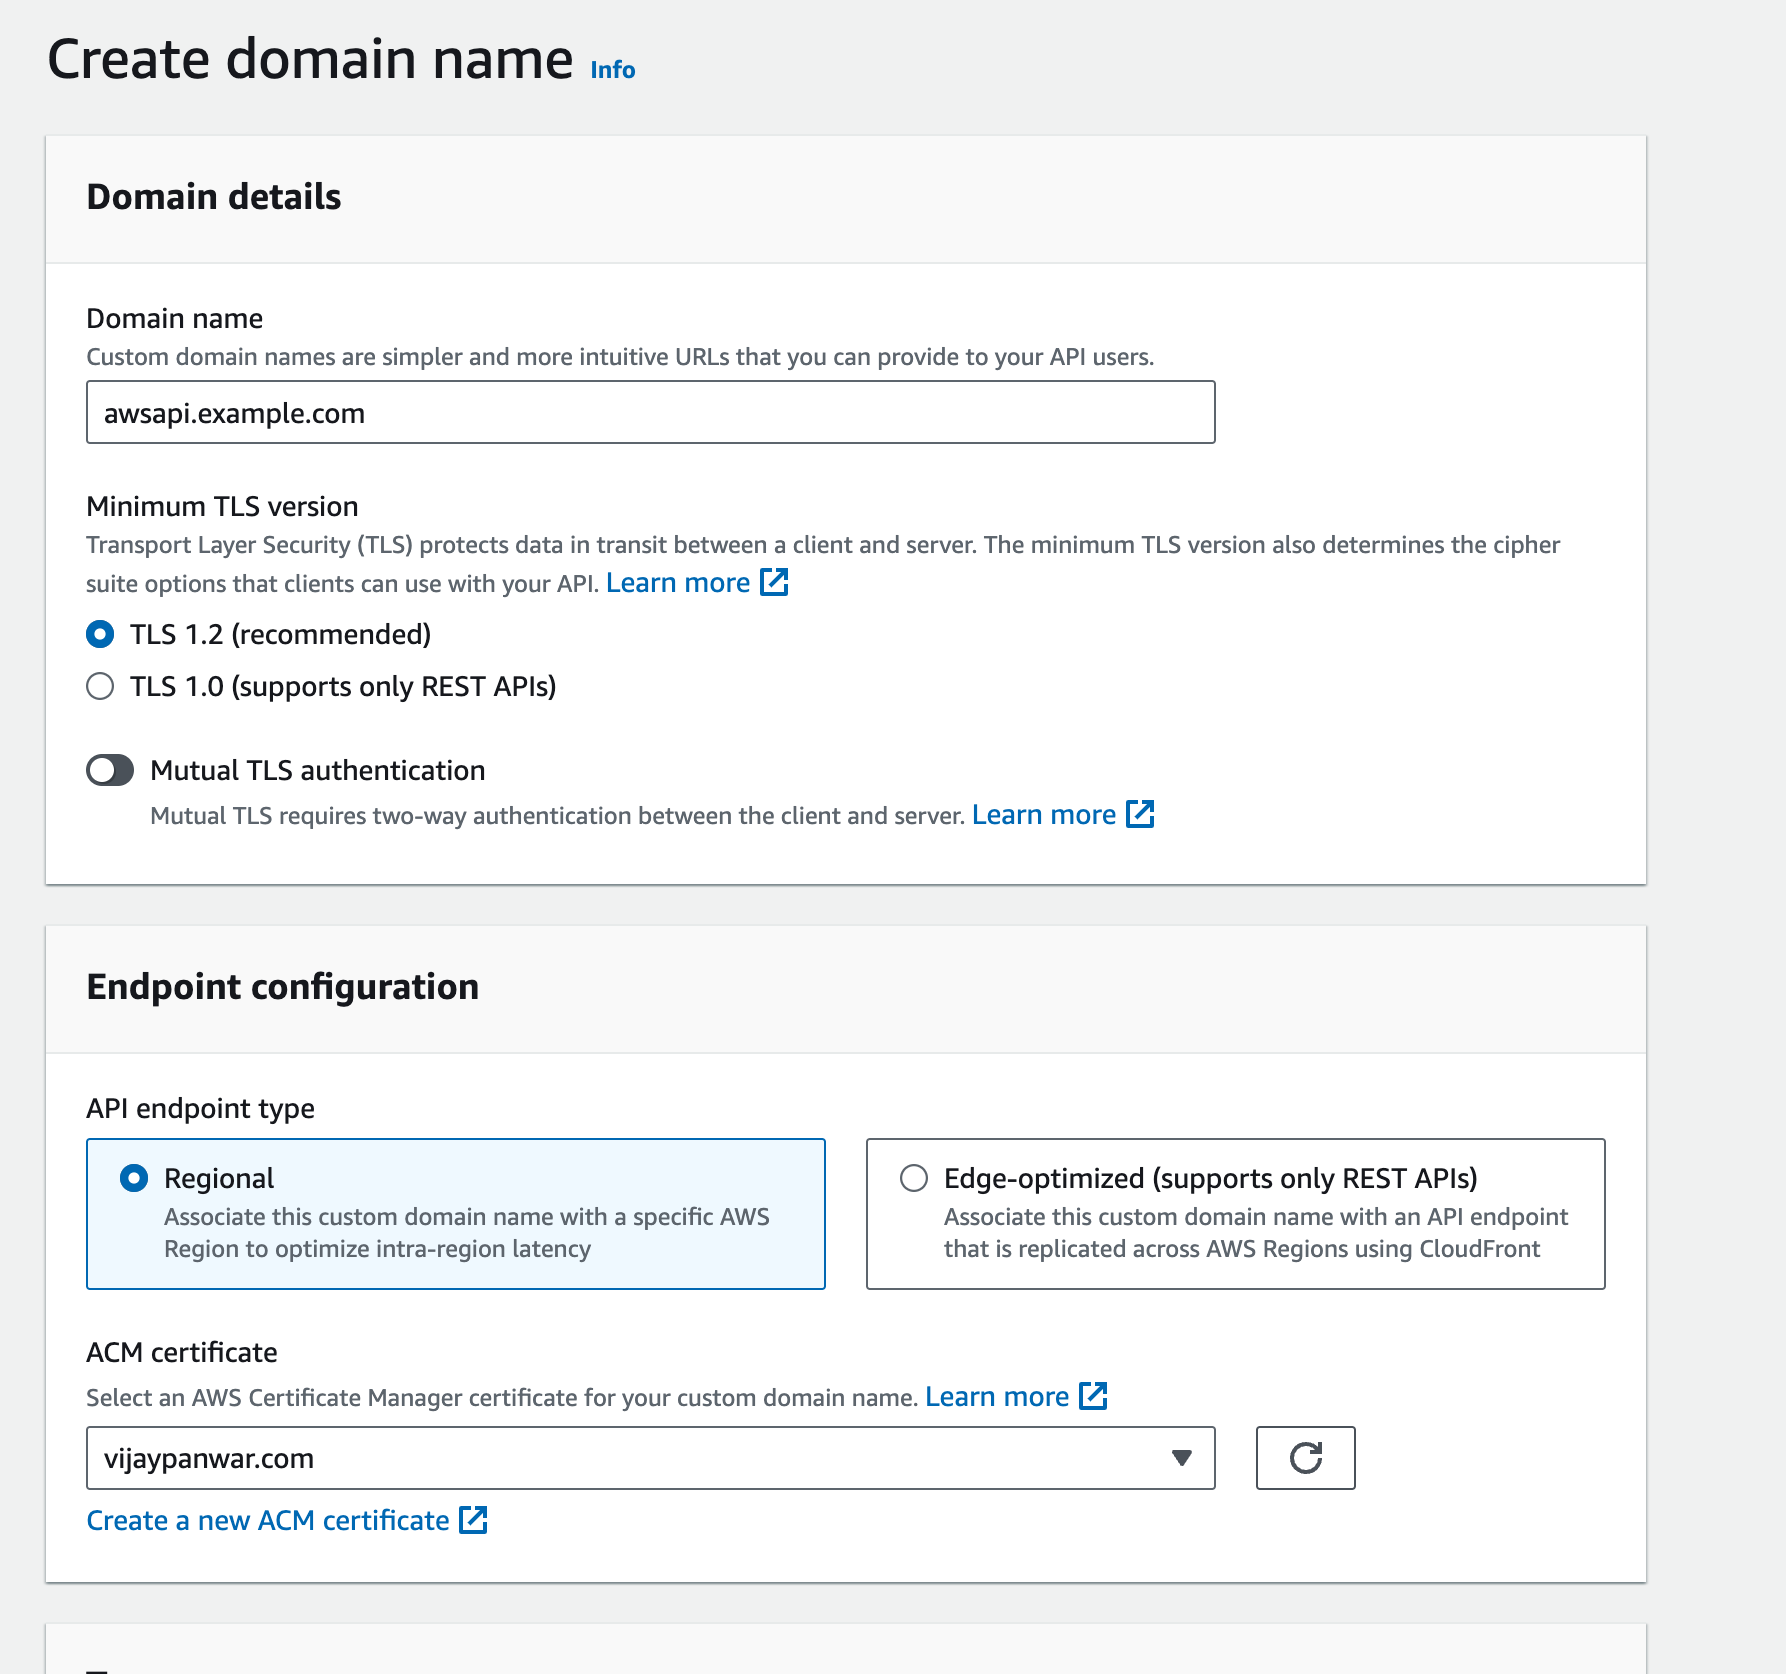
Create a Custom Domain Name in API Gateway
- Go to the API Gateway console and select the API for which you want to set up a custom domain.
- In the API Gateway navigation pane, choose "Custom Domain Names" and then click on the "Create" button.
- Enter your custom domain name, select the ACM certificate you created in step 3, and choose the base path mapping (if applicable).
Deploy API to the Custom Domain
- Once the custom domain is created, you'll need to deploy your API to the custom domain.
- In the API Gateway console, select the API you want to deploy and click on the "Deploy API" button.
- Choose the deployment stage (e.g., "prod") and select the custom domain you created in step 5.
Test the Custom Domain
- After deploying the API to the custom domain, test it by accessing your API using the custom domain name.
- Ensure that requests are being routed correctly to your API and that the SSL certificate is working as expected.
Update DNS Settings (If Needed)
- Once you've verified that the custom domain is working correctly, you may need to update any existing DNS records to point to the custom domain instead of the default API Gateway endpoint.
By following these steps, you'll have successfully set up a custom domain for your API Gateway, allowing you to use your own domain name to access your API. This enhances the branding and usability of your API for your users.
6. Example of GET Request
Send a GET request to retrieve data from your API endpoint:
GET https://your-api-gateway-url/resourceExample of POST Request
Send a POST request to create or update data:
POST https://your-api-gateway-url/resource

Content-Type: application/json


{

  "key": "value"

}
Example of DELETE Request:
Send a DELETE request to delete data:
DELETE https://your-api-gateway-url/resource/{id}Conclusion
Setting up AWS API Gateway with Network Load Balancer, Target Group, Security Group, and VPC provides a scalable and reliable solution for managing APIs in the AWS cloud environment. By following the steps outlined in this article and utilizing the provided examples, you can effectively create and deploy APIs that meet your application's requirements.

