Liquibase on Kubernetes
Context, Motivation, and Theory
We have a microservices environment with Kubernetes(k8s), in which we develop a service that requires a database. We decided to do the migration management of the database using Liquibase.
Eventually, we realized that some deploys left the database locked. After some research, we found the key. The k8s itself, if a deployment process takes longer than a certain time if the failureThreshold is exceeded combined with the initialDelaySeconds in the startupProbe, in our example, while applying migrations, it assumes that the Pod has been left in a corrupt and/or inconsistent state and kills the process.
Liquibase has a migration system in which it has a configuration file called changelog, in which the migration files are indicated and in the order in which they have been applied or have to be applied.
To avoid conflicts during the migration process, the first pod locks the LOCKED field of the DATABASECHANGELOGLOCK table in the DB. This is used to ensure that only one Liquibase process is running at a time. Once finished, it releases that field from the DB, and the next one locks it, and so on.
If k8s kills this process at deployment time either because it is taking longer than configured in its own deployment, or because the node CPU is very saturated at that time and it takes longer than expected, the DB is left with that field LOCKED to 1, and no other Pod can take over the migrations process.
Doing some research, we found that the official Liquibase documentation itself talks about the possibility of using Init Containers. In the link to the documentation, you can see in more detail what exactly are the Init Containers, but in short, they are containers that are raised within a Pod with two main particularities:
- These containers always run to completion. That is, Kubernetes will not kill them in the middle of the process.
- Each initialization container must complete successfully before the next one starts. In our case, this will prevent migration processes from trying to run concurrently in parallel.
Now that we are clear about the context and the possible solution to our problem, let’s take a step-by-step look at how we implement and carry this solution through to production.
Case Study
As the documentation itself says, Liquibase has its own images to use in Kubernetes, so it seems that using that image, and specifying which file you want to run, should be enough.
This case study would end here for most people, but our case is a bit peculiar. The communication with our DB is through secrets, therefore, we need to be able to install a series of dependencies that the base image of liquibase does not have, such as the AWS command line interface(AWS CLI). And this is where the problems start. The Liquibase image gives you very limited permissions, so we were not allowed to install awscli.
The next step was to decide to use an Ubuntu 20.04 base image and install everything we needed. Well, with this we could really achieve our purpose, but we realized that Liquibase needs Java to run, which implies having to manage more dependencies than expected.
So, we decided to use a JRE image, specifically jdk:11. This way we already had java with the necessary version, and we were able to install both liquibase and awscli without any difficulty.

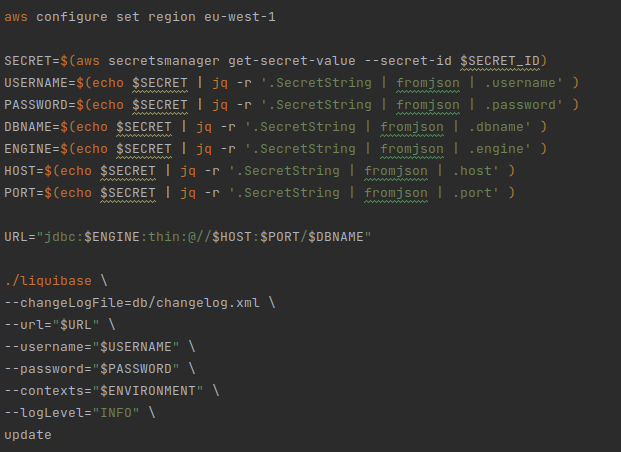
Once we have created our independent dockerfile for the init container, we need to create the file, bash in our case, that will be executed from start to finish in our Init Container.
In our example, in order to run the liquibase command that updates the bd, we need to extract all the necessary information using the secret arn.

Here is a very important point to make. If we already have our service in production and running, and what we are going to do is simply to change the migration system to be used by this method, we must take into account the following: the value of the changeLogFile parameter must be exactly the same that appears in the FILENAME field of the DATABASECHANGELOG table.
Otherwise, it would identify the changelog as a different one and proceed to apply it from the beginning, with all the problems that this entails (from a simple error in creating an existing table, to an overwriting of our data in production).
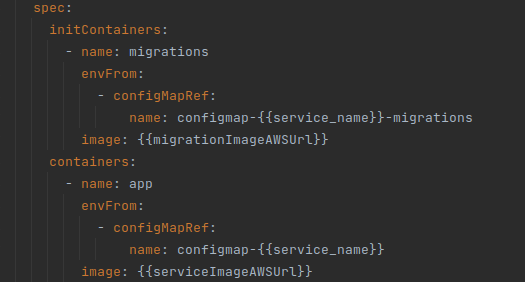
Now, we must configure the k8s YAML files to use our new dockerfile as Init Container. Assuming that we have our service configured with the name “app”. The name we have decided to put for our init container is “migrations”, and the configuration, would be the one that can be seen below:

With this, we should be able to deploy with Init Containers. In our case, we had to disable the migrations when starting the app in Spring, to avoid the “app” containers trying to launch the migrations again, after the init Container. In this example, it is as simple as indicating in the application.yml that liquibase is not activated:

And with this, we should have our init container running to launch the migrations before raising the containers with our application.
As a note, I would like to comment that to execute the e2e tests, we can configure our application.yml so that in the test profile it executes the liquibase migrations when starting the app for the database that we use in this environment, H2 in our case.
Conclusions
I have left some time since I wrote this article before writing the conclusions, to verify our hypothesis. After some time with this working, we have seen that sometimes the init container can also fail, for various reasons, unrelated to the deployment process itself. But it is true that this solution has minimized the database locking problems when applying migrations in a very significant way.
Therefore, despite not being a foolproof method, it is a huge improvement over the previous state of our microservice in Kubernetes. So if your microservice manages migrations with Liquibase, I recommend using Init Containers to perform them.
We are still working to find the solution to those exceptional cases where a database crash occurs when running migrations.
The nice thing about having abstracted migration management in a bash file running in the init container is that we have control over Liquibase. We have found some commands that allow us to list-locks and release-locks. So for the moment, we have created a rule that reads the locks and if it is more than 15 minutes since the last active lock, we assume that the last init container has been corrupted and we proceed to release the lock using the release-locks command.
At the moment, this is our approach, and it is working better than the initial situation. I hope you find this article helpful and feel free to leave feedback and/or alternative solutions to the same problem in the comments of this post.

