OWASP Kubernetes Top 10
One of the biggest concerns when using Kubernetes is whether we are complying with the security posture and taking into account all possible threats. For this reason, OWASP has created the OWASP Kubernetes Top 10, which helps identify the most likely risks.
OWASP's Top 10 projects are useful awareness and guidance resources for security practitioners and engineers. They can also map to other security frameworks that help incident response engineers understand Kubernetes threats. For example, MITRE ATT&CK techniques are also commonly used to register the attacker's techniques and help blue teams to understand the best ways to protect an environment. In addition, we can check the Kubernetes threat model to understand all the attack surfaces and main attack vectors.
The OWASP Kubernetes Top 10 puts all possible risks in an order of overall commonality or probability. In this research, we modify the order slightly. We group some of them within the same category, such as misconfigurations, monitoring, or vulnerabilities. And we recommend some tools or techniques to audit your configuration and ensure your security posture is the most appropriate.
What Is OWASP Kubernetes?
The Open Web Application Security Project (OWASP) is a nonprofit foundation that works to improve the security of software. OWASP is focused on web application security (thus its name), but over time, it has broadened its scope because of the nature of modern systems design.
As application development moves from monolithic architectures running traditionally on VMs hidden behind firewalls to modern-day microservice workloads running on cloud infrastructure, it's important to update the security requirements for each application environment.
That's why the OWASP Foundation has created the OWASP Kubernetes Top 10 – a list of the ten most common attack vectors specifically for the Kubernetes environment.
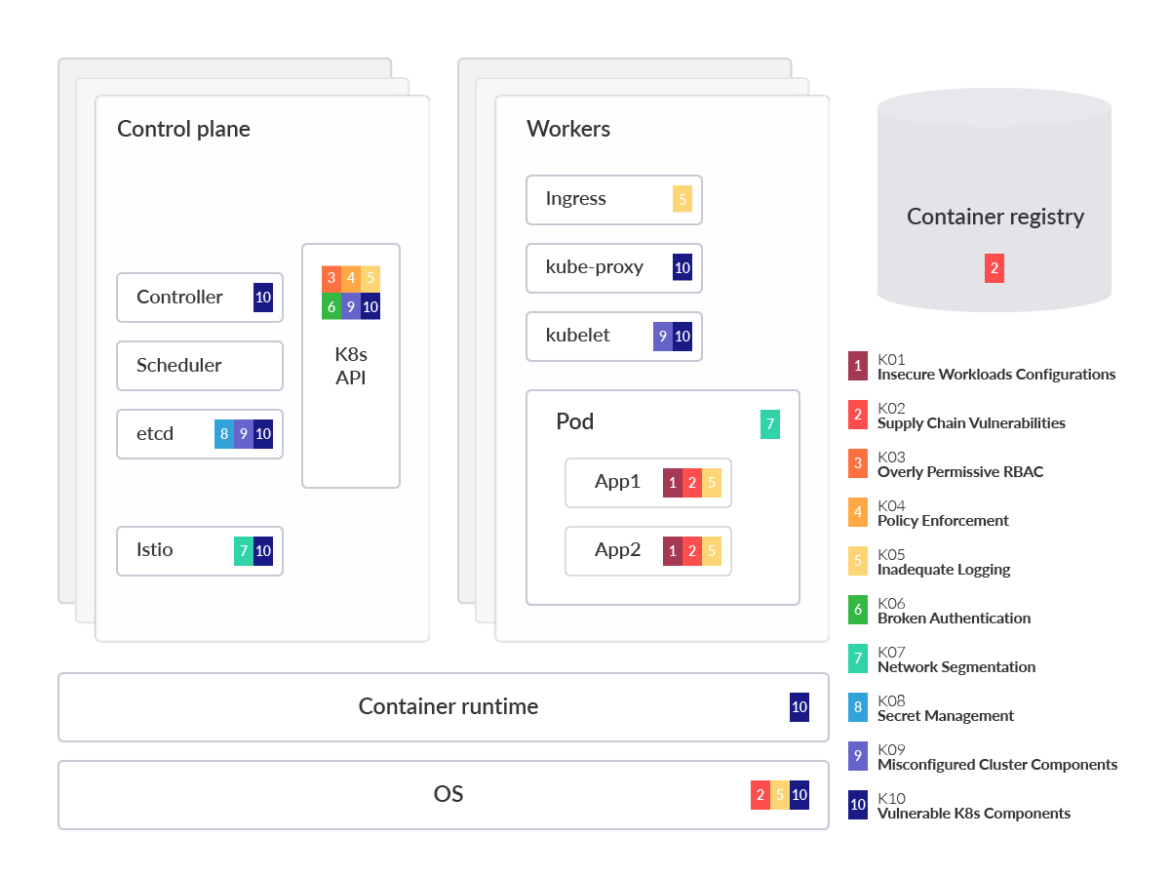
In the visual above, we spotlight which component or part is impacted by each of the risks that appear in OWASP Kubernetes mapped to a generalized Kubernetes threat model to aid in understanding. This analysis also dives into each OWASP risk, providing technical details on why the threat is prominent and common mitigations. It's also helpful to group the risks into three categories in order of likelihood. The risk categories are:
Misconfigurations
- K01:2022 Insecure Workload Configurations
- K09:2022 Misconfigured Cluster Components
- K03:2022 Overly Permissive RBAC Configurations
- K07:2022 Missing Network Segmentation Controls
Lack of visibility
- K05:2022 Inadequate Logging and Monitoring
- K04:2022 Lack of Centralized Policy Enforcement
- K08:2022 Secrets Management Failures
Vulnerability management
- K02:2022 Supply Chain Vulnerabilities
- K06:2022 Broken Authentication Mechanisms
- K10:2022 Outdated and Vulnerable Kubernetes Components
Misconfigurations
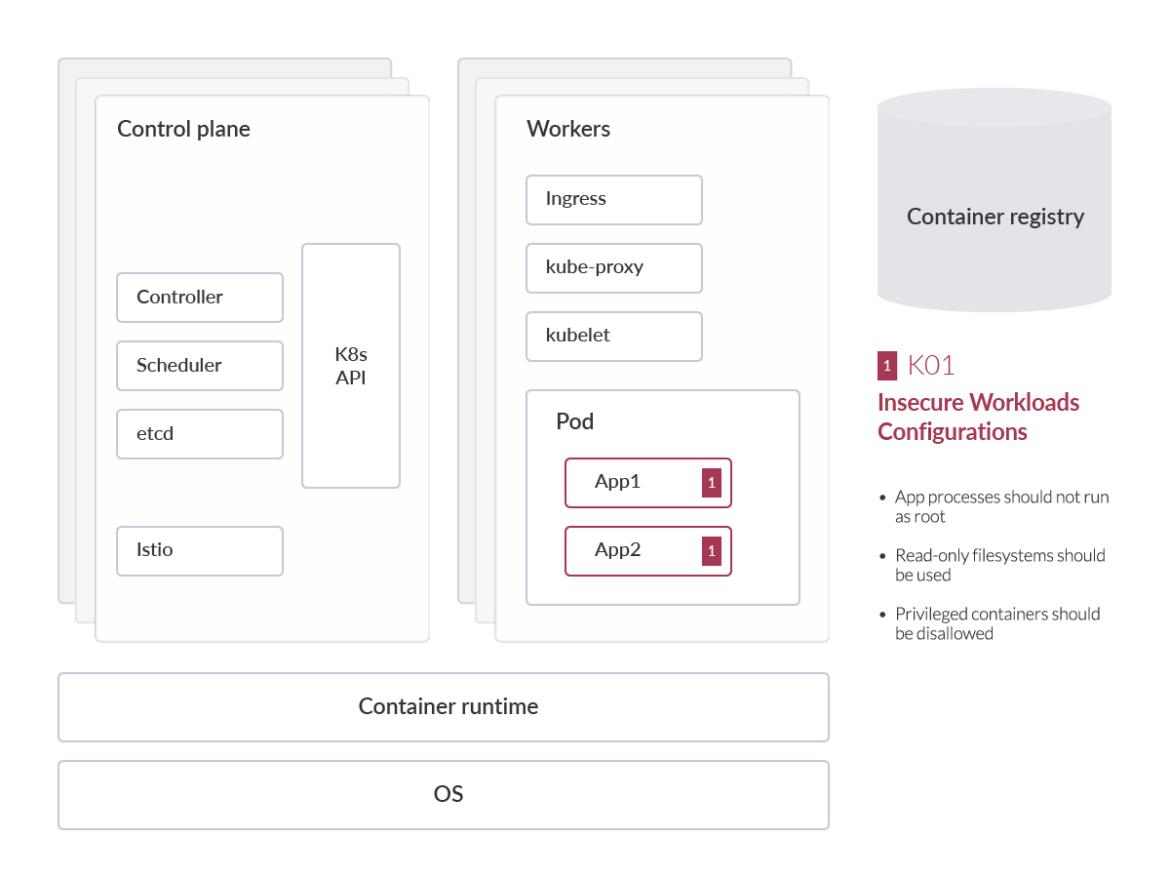
Insecure Workload Configurations
Security is at the forefront of all cloud provider offerings. Cloud service providers such as AWS, GCP, and Azure implement an array of sandboxing features, virtual firewall features, and automatic updates to underlying services to ensure your business stays secure whenever and wherever possible. These measures also alleviate some of the traditional security burdens of on-premises environments. However, the cloud environments apply what is known as a shared security model, which means part of the responsibility is on the cloud service consumer to implement these security guardrails in their response environment. Responsibilities also vary based on the cloud consumption model and type of offering.
Operating System
The nice thing about containerized workloads is that the images you choose often come preloaded with the dependencies necessary to function with your applications' base image that is built for a particular OS.
These images pre-package some general system libraries and other third-party components that are not exactly required for the workload. And in some cases, such as within microservices architecture (MSA), a given container image may be too bloated to facilitate a performant container that operates the microservice.
We recommend running minimal, streamlined images in your containerized workloads, such as Alpine Linux images, which are much smaller in file size. These lightweight images are ideal in most cases. Since there are fewer components packaged into it, there are also less possibilities for compromise. If you need additional packages or libraries, consider starting with the base Alpine image and gradually adding packages/libraries where needed to maintain the expected behavior/performance.
Audit Workloads
The CIS Benchmark for Kubernetes can be used as a starting point for discovering misconfigurations. The open-source project kube-bench, for instance, can check your cluster against the (CIS) Kubernetes Benchmark using YAML files to set up the tests.
Example CIS Benchmark Control
Minimize the admission of root containers (5.2.6)
Linux container workloads have the ability to be run by any Linux user. However, containers that run as the root user increase the possibility of container escape (privilege escalation and then lateral movement in the Linux host). The CIS benchmark recommends that all containers should run as a defined non-UID 0 user.
One example of a Kubernetes auditing tool that can help to minimize the admission of root containers is kube-admission-webhook. This is a Kubernetes admission controller webhook that allows you to validate and mutate incoming Kubernetes API requests. In addition, you can use it to enforce security policies, such as prohibiting the creation of root containers in your cluster.
How to Prevent Workload Misconfigurations With OPA
Tools such as Open Policy Agent (OPA) can be used as a policy engine to detect these common misconfigurations. The OPA admission controller gives you high-level declarative language to the author and enforces policies across your stack.
Let's say you want to build an admission controller for the previously mentioned alpine image. However, one of the users of Kubernetes wants to set the securityContext to privileged=true.
apiVersion: v1
kind: Pod
metadata:
  name: alpine
  namespace: default
spec:
  containers:
  - image: alpine:3.2
    command:
      - /bin/sh
      - "-c"
      - "sleep 60m"
    imagePullPolicy: IfNotPresent
    name: alpine
    securityContext:
      privileged: true
  restartPolicy: AlwaysCode language: YAML (yaml)
This is an example of a privileged pod in Kubernetes. Running a pod in a privileged mode means that the pod can access the host's resources and kernel capabilities. To prevent privileged pods, the .rego file from the OPA Gatekeeper admission controller should look something like this:
package kubernetes.admission
deny[msg] {
    c := input_containers[_]
    c.securityContext.privileged
    msg := sprintf("Privileged container is not allowed: %v, securityContext: %v",
[c.name, c.securityContext])
}Code language: CSS (css)
In this case, the output should look something like the below:
Error from server (Privileged container is not allowed: alpine, securityContext: {"privileged": true}): error when creating "STDIN": admission webhook "validating-webhook.openpolicyagent.org"Code language: Perl (perl)Misconfigured Cluster Components
Misconfigurations in core Kubernetes components are much more common than expected. To prevent this, continuous and automatic auditing of IaC and K8s (YAML) manifests instead of having to check them manually will reduce configuration errors. 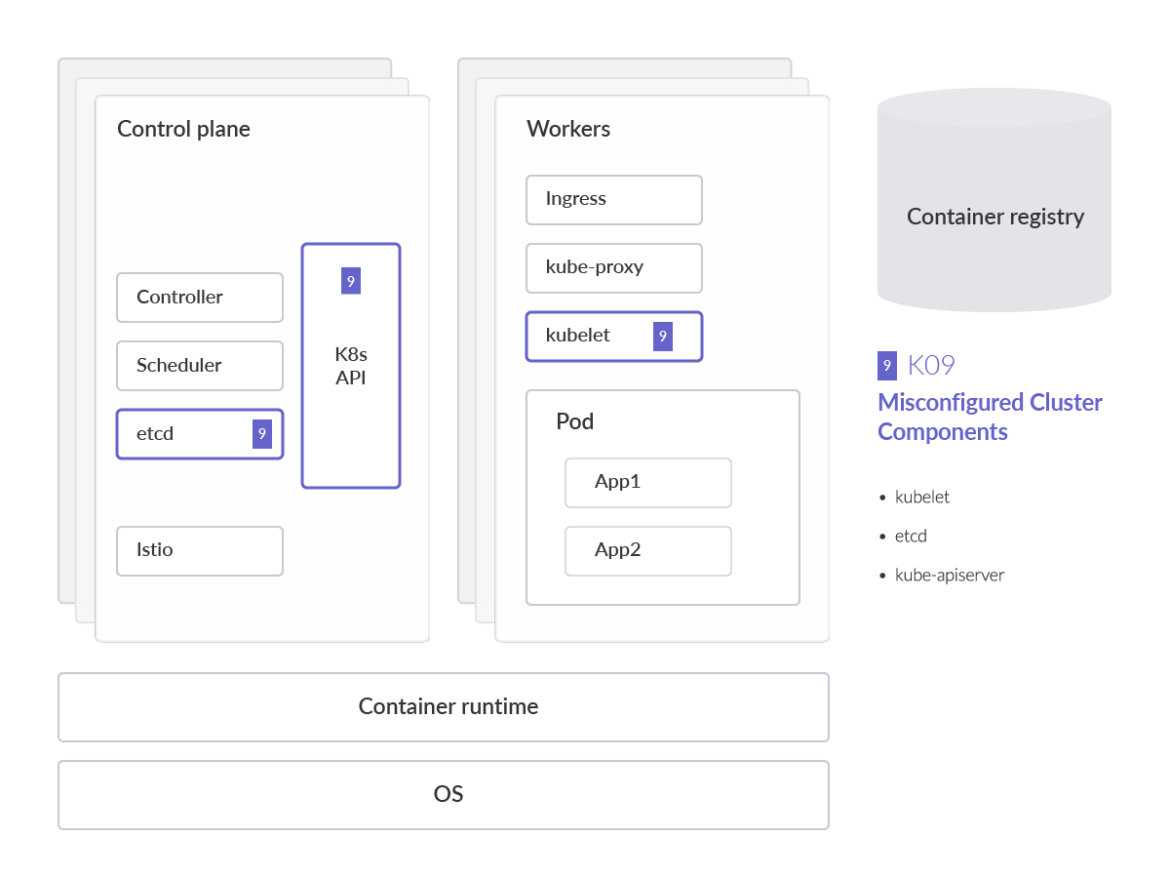
When auditing workloads, it's important to keep in mind that there are different ways in which to deploy an application. With the configuration file of the various cluster components, you can authorize specific read/write permissions on those components. In the case of Kubelet, by default, all requests to the kubelet's HTTPS endpoint that are not rejected by other configured authentication methods are treated as anonymous requests and given a username of system:anonymous and a group of system:unauthenticated.
To disable this anonymous access for these unauthenticated requests, simply start kubelet with the feature flag –anonymous-auth=false. When auditing cluster components like kubelet, we can see that kubelet authorizes API requests using the same request attributes approach as the API Server. As a result, we can define the permissions such as:
- POST
- GET
- PUT
- PATCH
- DELETE
However, there are many other cluster components to focus on, not just kubelet. For instance, kubectl plugins run with the same privileges as the kubectl command itself, so if a plugin is compromised, it could potentially be used to escalate privileges and gain access to sensitive resources in your cluster.
Based on the CIS Benchmark report for Kubernetes, we would recommend enabling the following settings for all cluster components.
Etcd
The etcd database offers a highly-available key/value store that Kubernetes uses to centrally house all cluster data. It is important to keep etcd safe, as it stores config data as well as K8s Secrets. We strongly recommend regularly backing up etcd data to avoid data loss.
Thankfully, etcd supports a built-in snapshot feature. The snapshot can be taken from an active cluster member with the etcdctl snapshot save command. Taking the snapshot will have no performance impact. Below is an example of taking a snapshot of the keyspace served by $ENDPOINT to the file snapshotdb:
ETCDCTL_API=3 etcdctl --endpoints $ENDPOINT snapshot save snapshotdbCode language: Perl (perl)Kube-apiserver
The Kubernetes API server validates and configures data for the API objects, which include pods, services, ReplicationControllers, and others. The API Server services REST operations and provide the front end to the cluster's shared state through which all other components interact. It's critical to cluster operation and has a high value, as an attack target can't be understated. From a security standpoint, all connections to the API server, communication made inside the Control Plane, and communication between the Control Plane and kubelet components should only be provisioned to be reachable using TLS connections.
By default, TLS is unconfigured for the kube-apiserver. If this is flagged within the Kube-bench results, simply enable TLS with the feature flags --tls-cert-file=[file] and --tls-private-key-file=[file] in the kube-apiserver. Since Kubernetes clusters tend to scale up and scale down regularly, we recommend using the TLS bootstrapping feature of Kubernetes. This allows automatic certificate signing and TLS configuration inside a Kubernetes cluster rather than following the above manual workflow.
It is also important to regularly rotate these certificates, especially for long-lived Kubernetes clusters.
Fortunately, there is automation to help rotate these certificates in Kubernetes v.1.8 or higher versions. API Server requests should also be authenticated, which we cover later in the section Broken Authentication Mechanisms.
CoreDNS
CoreDNS is a DNS server technology that can serve as the Kubernetes cluster DNS and is hosted by the CNCF. CoreDNS superseded kube-dns since version v.1.11 of Kubernetes. Name resolution within a cluster is critical for locating the orchestrated and ephemeral workloads and services inherent in K8s.
CoreDNS addressed a bunch of security vulnerabilities found in kube-dns, specifically in dnsmasq (the DNS resolver). This DNS resolver was responsible for caching responses from SkyDNS, the component responsible for performing the eventual DNS resolution services.
Aside from addressing security vulnerabilities in kube-dns's dnsmasq feature, CoreDNS addressed performance issues in SkyDNS. When using kube-dns, it also involves a sidecar proxy to monitor health and handle the metrics reporting for the DNS service.
CoreDNS addresses a lot of these security and performance-related issues by providing all the functions of kube-dns within a single container. However, it can still be compromised. As a result, it's important to again use kube-bench for compliance checks on CoreDNS.
Overly-Permissive RBAC Configurations
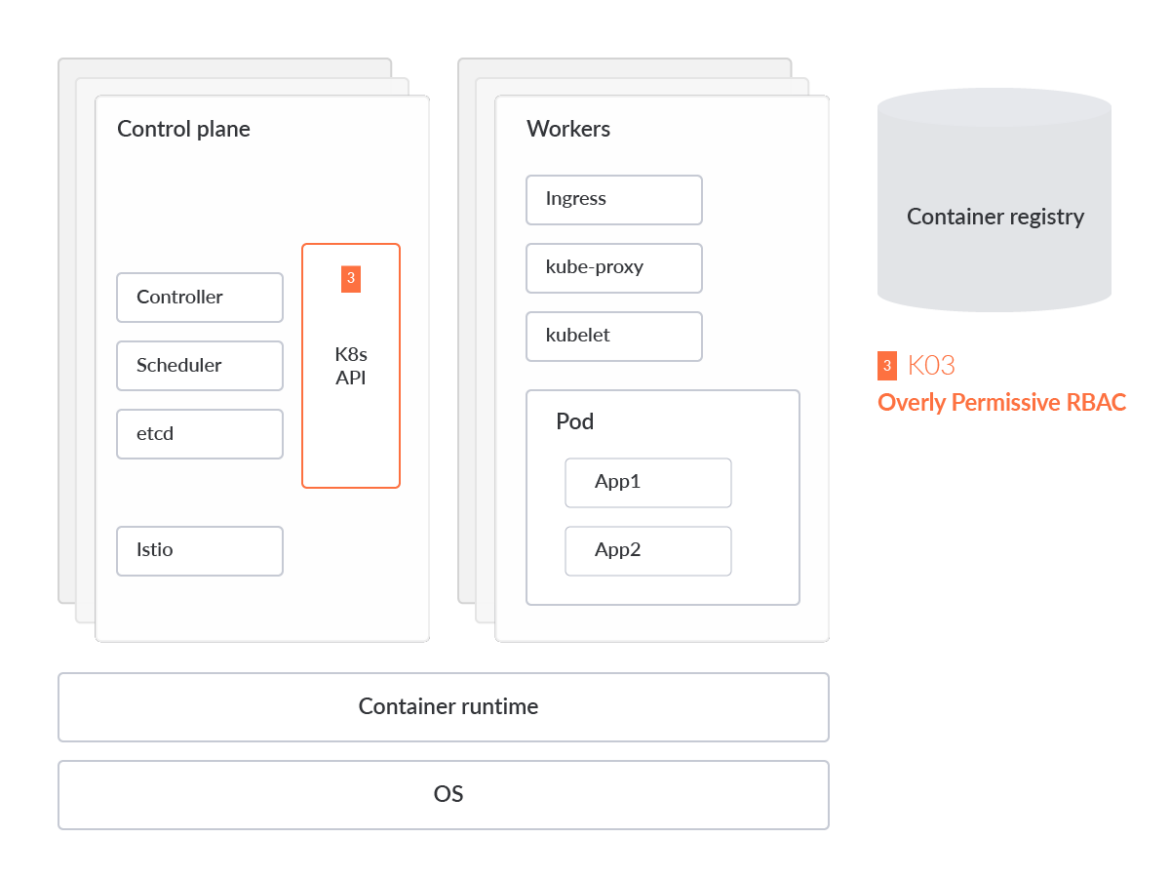
Role-based access control (RBAC) is a method of regulating access to computer or network resources based on the roles of individual users within your organization. An RBAC misconfiguration could allow an attacker to elevate privileges and gain full control of the entire cluster.
apiVersion: rbac.authorization.k8s.io/v1
kind: Role
Metadata:
  namespace: default
  name: pod-reader
Rules:
- apiGroups: [""] # "" indicates the core API group
  resources: ["pods"]
  verbs: ["get", "watch", "list"]Code language: YAML (yaml)
Issues arise when managing these RBAC rules in the long run. Admins will likely need to manage ClusterRole resources to avoid building individual roles on each network namespace, as seen above. ClusterRoles allow us to build cluster-scoped rules to grant access to those workloads.
RoleBindings can then be used to bind the above-mentioned roles to users.
Similar to other Identity and Access Management (IAM) practices, we need to ensure each user has the correct access to resources within Kubernetes without granting excessive permissions to individual resources. The below manifest should show how we recommend binding a role to a Service Account or user in Kubernetes.
apiVersion: rbac.authorization.k8s.io/v1
kind: RoleBinding
Metadata:
  name: read-pods
  namespace: default
Subjects:
- kind: User
  name: nigeldouglas
  apiGroup: rbac.authorization.k8s.io
roleRef:
  kind: Role
  name: pod-reader
  apiGroup: rbac.authorization.k8s.ioCode language: YAML (yaml)
By scanning for RBAC misconfigurations, we can proactively bolster the security posture of our cluster and simultaneously streamline the process of granting permissions. One of the major reasons cloud-native teams grant excessive permissions is due to the complexity of managing individual RBAC policies in production. In other words, there may be too many users and roles within a cluster to manage by manually reviewing manifest code. That's why there are tools specifically built to handle the management, auditing, and compliance checks of your RBAC.
Audit RBAC
RBAC Audit is a tool created by the team at CyberArk. This tool is designed to scan the Kubernetes cluster for risky roles within RBAC and requires python3. This python tool can be run via a single command:
ExtensiveRoleCheck.py --clusterRole clusterroles.json --role Roles.json --rolebindings rolebindings.json --cluseterolebindings clusterrolebindings.jsonCode language: Perl (perl)Kubiscan
Kubiscan is another tool built by the team at CyberArk. Unlike RBAC Audit, this tool is designed for scanning Kubernetes clusters for risky permissions in the Kubernetes' RBAC authorization model – not the RBAC roles. Again, Python v.3.6 or higher is required for this tool to work.
To see all the examples, run python3 KubiScan.py -e or, within the container, run kubiscan -e.
Krane
Krane is a static analysis tool for Kubernetes RBAC. Similar to Kubiscan, it identifies potential security risks in K8s RBAC design and makes suggestions on how to mitigate them.
The major difference between these tools is the way Krane provides a dashboard of the cluster's current RBAC security posture and lets you navigate through its definition.
krane report -k <kubectl-context>Code language: Perl (perl)If you'd like to view your RBAC design in the above tree design, with a network topology graph and the latest report findings, you need to start the dashboard server via the following command:
krane dashboard -c nigel-eks-clusterCode language: Perl (perl)The -c feature flag points to a cluster name in your environment. If you would like a dashboard of all clusters, simply drop the -c reference from the above command.
Missing Network Segmentation Controls
Kubernetes, by default, defines what is known as a "flat network" design.
This allows workloads to freely communicate with each other without any prior configuration. However, they can do this without any restrictions. If an attacker were able to exploit a running workload, they would essentially have access to perform data exfiltration against all other pods in the cluster. Cluster operators that are focused on zero trust architecture in their organization will want to take a closer look at Kubernetes Network Policy to ensure services are properly restricted.
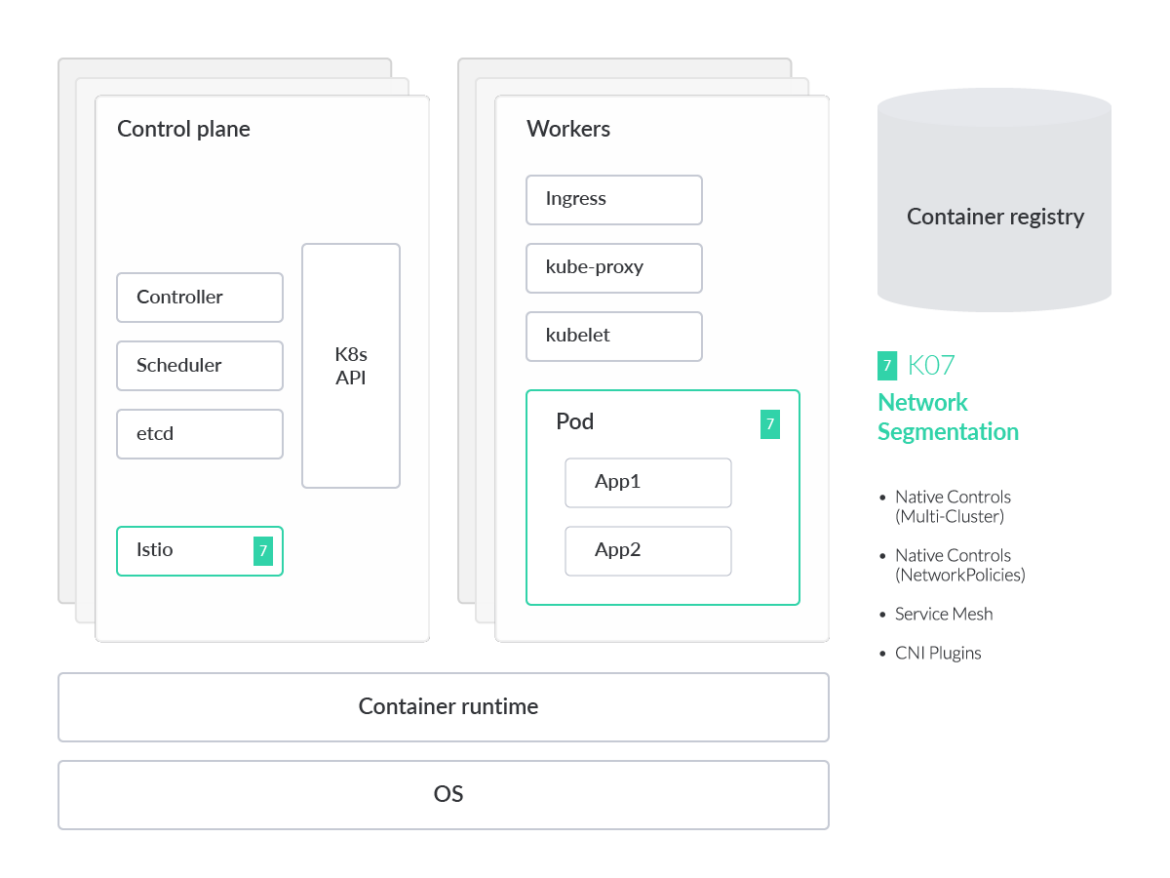
Kubernetes offers solutions to address the right configuration of network segmentation controls. Here, we show you two of them.
Service Mesh With Istio
Istio provides a service mesh solution. This allows security and network teams to manage traffic flow across microservices, enforce policies and aggregate telemetry data in order to enforce microsegmentation on the network traffic going in and out of our microservices.
At the time of writing, the service relies on implementing a set of sidecar proxies for each microservice in your cluster. However, the Istio project is looking to move to a sidecar-less approach sometime in the year.
The sidecar technology is called 'Envoy.' We rely on Envoy to handle ingress/egress traffic between services in the cluster and from a service to external services in the service mesh architecture. The clear advantage of using proxies is that they provide a secure microservice mesh, offering functions like traffic mirroring, discovery, rich layer-7 traffic routing, circuit breakers, policy enforcement, telemetry recording/reporting functions, and – most importantly – automatic mTLS for all communication with automatic certificate rotation!
apiVersion: security.istio.io/v1beta1
kind: AuthorizationPolicy
Metadata:
  name: httpbin
  namespace: default
Spec:
  action: DENY
  Rules:
  - from:
    - source:
        namespaces: ["prod"]
    To:
    - operation:
        methods: ["POST"]Code language: YAML (yaml)
The above Istio AuthorizationPolicy sets the action to "DENY" on all requests from the "prod" production namespace to the "POST" method on all workloads in the "default" namespace.
This policy is incredibly useful. Unlike Calico network policies that can only drop the traffic based on IP address and port at the L3/L4 (network layer), the authorization policy is denying the traffic based on HTTP/S verbs such as POST/GET at L7 (application layer). This is important when implementing a Web Application Firewall (WAF).
CNI
It's worth noting that although there are huge advantages to a service mesh, such as encryption of traffic between workloads via Mutual TLS (mTLS) as well as HTTP/s traffic controls, there are also some complexities to managing a service mesh. The use of sidecars beside each workload adds additional overhead in your cluster, as well as unwanted issues troubleshooting those sidecars when they experience issues in production.
Many organizations opt to only implement the Container Network Interface (CNI) by default. The CNI, as the name suggests, is the networking interface for the cluster. CNI's like Project Calico and Cilium come with their own policy enforcement. Whereas Istio enforces traffic controls on L7 traffic, the CNI tends to be focused more on network-layer traffic (L3/L4).
The following CiliumNetworkPolicy, as an example, limits all endpoints with the label app=frontend to only be able to emit packets using TCP on port 80 to any layer three destinations:
apiVersion: "cilium.io/v2"
kind: CiliumNetworkPolicy
Metadata:
  name: "l4-rule"
Spec:
  endpointSelector:
    matchLabels:
      app: frontend
  Egress:
    - toPorts:
      - ports:
        - port: "80"
          protocol: TCPCode language: YAML (yaml)
We mentioned using the Istio AuthorizationPolicy to provide WAF-like capabilities at the L7/application layer. However, a Distributed Denial-of-Service (DDoS) attack can still happen at the network layer if the adversary floods the pods/endpoint with excessive TCP/UDP traffic. Similarly, it can be used to prevent compromised workloads from speaking to known/malicious C2 servers based on fixed IPs and ports.
Lack of Visibility
Inadequate Logging and Monitoring
Kubernetes provides an audit logging feature by default. Audit logging shows a variety of security-related events in chronological order. These activities can be generated by users, by applications that use the Kubernetes API, or by the Control Plane itself.
However, there are other log sources to focus on – not limited to Kubernetes Audit Logs. They can include host-specific Operating System logs, Network Activity logs (such as DNS, which you can monitor the Kubernetes add-ons CoreDNS), and Cloud Providers that also work as the foundation for the Kubernetes Cloud.
Without a centralized tool for storing all of these sporadic log sources, we would have a hard time using them in the case of a breach. That's where tools like Prometheus, Grafana, and Falco are useful.
Prometheus
Prometheus is an open-source, community-driven project for monitoring modern cloud-native applications and Kubernetes. It is a graduated member of the CNCF and has an active developer and user community.
Grafana
Like Prometheus, Grafana is open-source tooling with a large community backing. Grafana allows you to query, visualize, alert, and understand your metrics no matter where they are stored. Users can create, explore, and share dashboards with their teams.
Falco (Runtime Detection)
Falco, the cloud-native runtime security project, is the de facto standard for Kubernetes threat detection. Falco detects threats at runtime by observing the behavior of your applications and containers. Falco extends threat detection across cloud environments with Falco Plugins.
Falco is the first runtime security project to join CNCF as an incubation-level project. Falco acts as a security camera, detecting unexpected behavior, intrusions, and data theft in real-time in all Kubernetes environments. Falco v.0.13 added Kubernetes Audit Events to the list of supported event sources. This is in addition to the existing support for system call events. Improved implementation of audit events was introduced in Kubernetes v1.11, and it provides a log of requests and responses to kube-apiserver.
Because almost all the cluster management tasks are performed through the API Server, the audit log can effectively track the changes made to your cluster.
Examples of this include:
- Creating and destroying pods, services, deployments, daemonsets, etc.
- Creating, updating, and removing ConfigMaps or secrets.
- Subscribing to the changes introduced to any endpoint.
Lack of Centralized Policy Enforcement
Enforcing security policies becomes a difficult task when we need to enforce rules across multi-cluster and multi-cloud environments. By default, security teams would need to manage risk across each of these heterogeneous environments separately.
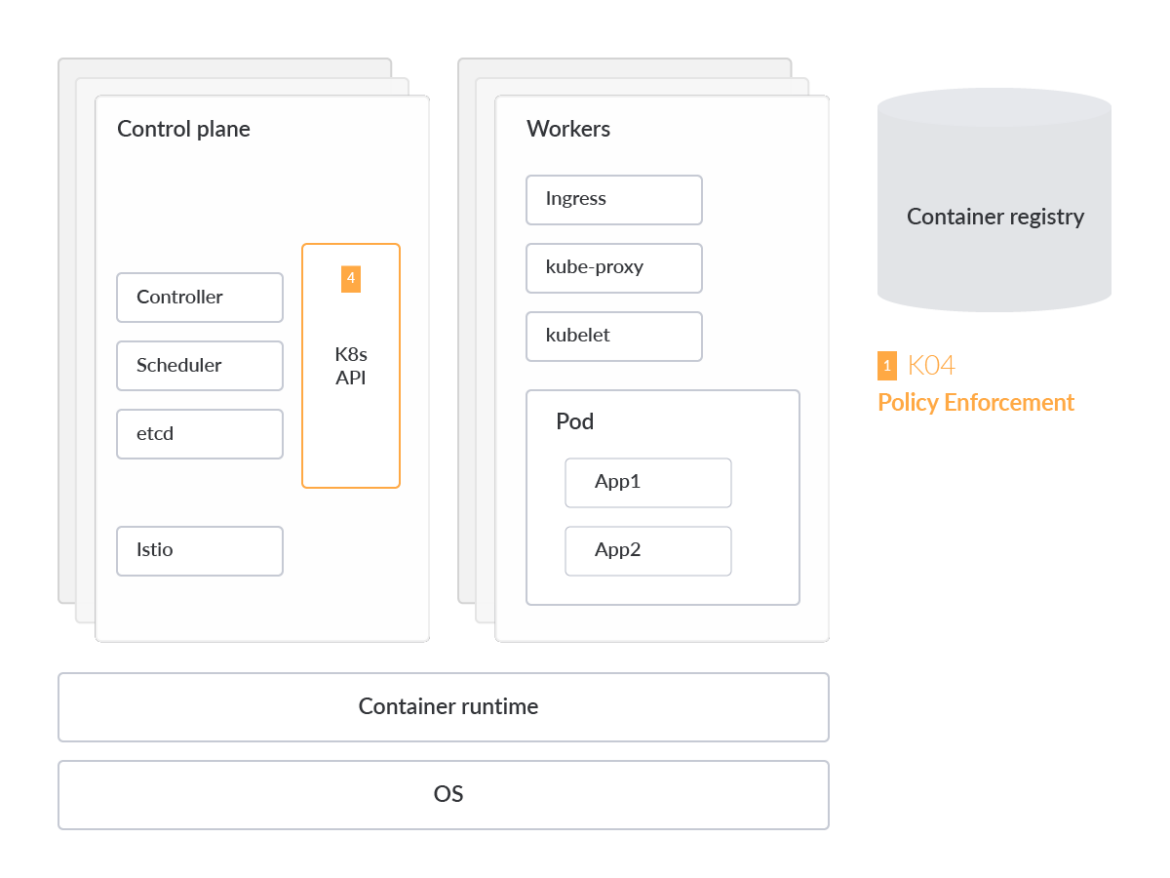
Admission Controller
An admission controller intercepts requests to the Kubernetes API Server prior to persistence. The request must first be authenticated and authorized, and then a decision is made on whether to allow the request to be performed. For example, you can create the following Admission controller configuration:
apiVersion: apiserver.config.k8s.io/v1
kind: AdmissionConfiguration
plugins:
  - name: ImagePolicyWebhook
    configuration:
      imagePolicy:
        kubeConfigFile: <path-to-kubeconfig-file>
        allowTTL: 50
        denyTTL: 50
        retryBackoff: 500
        defaultAllow: trueCode language: YAML (yaml)
The ImagePolicyWebhook configuration is referencing a kubeconfig formatted file which sets up the connection to the backend. The point of this admission controller is to ensure the backend communicates over TLS.
The allowTTL: 50 sets the amount of time in seconds to cache the approval, and similarly, the denyTTL: 50 sets the amount of time in seconds to cache the denial. Admission controllers can be used to limit requests to create, delete, modify objects, or connect to proxies.
Unfortunately, the AdmissionConfiguration resource still needs to be managed individually on each cluster. If we forget to apply this file on one of our clusters, it will lose this policy condition. Thankfully, projects like Open Policy Agent (OPA's) Kube-Mgmt tool help manage the policies and data of OPA instances within Kubernetes – instead of managing admission controllers individually.
The kube-mgmt tool automatically discovers policies and JSON data stored in ConfigMaps in Kubernetes and loads them into OPA. Policies can easily be disabled using the feature flag --enable-policy=false, or you could similarly disable data via a single flag: --enable-data=false.
Admission control is an important element of the container security strategy to enforce policies that need Kubernetes context and create a last line of defense for your cluster. We touch on image scanning later in this research but know that image scanning can also be enforced via a Kubernetes admission controller.
Runtime Detection
We need to standardize the deployment of security policy configurations to all clusters if they mirror the same configuration. In the case of radically different cluster configurations, they might require uniquely designed security policies. In either instance, how do we know which security policies are deployed in each cluster environment? That's where Falco comes into play.
Let's assume the cluster is not using kube-mgmt, and there's no centralized way of managing these admission controllers. A user accidentally creates a ConfigMap with private credentials exposed within the ConfigMap manifest. Unfortunately, no admission controller was configured in the newly-created cluster to prevent this behavior. In a single rule, Falco can alert administrators when this very behavior occurs:
- rule: Create/Modify Configmap With Private Credentials
  desc: >
    Detect creating/modifying a configmap containing a private credential
  condition: kevt and configmap and kmodify and contains_private_credentials
  output: >-
    K8s configmap with private credential (user=%ka.user.name verb=%ka.verb
    configmap=%ka.req.configmap.name namespace=%ka.target.namespace)
  priority: warning
  source: k8s_audit
  append: false
  exceptions:
  - name: configmaps
    fields:
    - ka.target.namespace
    - ka.req.configmap.nameCode language: Perl (perl)
In the above Falco rule, we are sourcing the Kubernetes audit logs to show examples of private credentials that might be exposed in ConfigMaps in any Namespace. The private credentials are defined as any of the below conditions
condition: (ka.req.configmap.obj contains "aws_access_key_id" or
ka.req.configmap.obj contains "aws-access-key-id" or
ka.req.configmap.obj contains "aws_s3_access_key_id" or
ka.req.configmap.obj contains "aws-s3-access-key-id" or
ka.req.configmap.obj contains "password" or
ka.req.configmap.obj contains "passphrase")Code language: Perl (perl)
Secrets Management Failures
In Kubernetes, a Secret is an object designed to hold sensitive data, like passwords or tokens. To avoid putting this type of sensitive data in your application code, we can simply reference the K8s secret within the pod specification. This enables engineers to avoid hardcoding credentials and sensitive data directly in the pod manifest or container image.
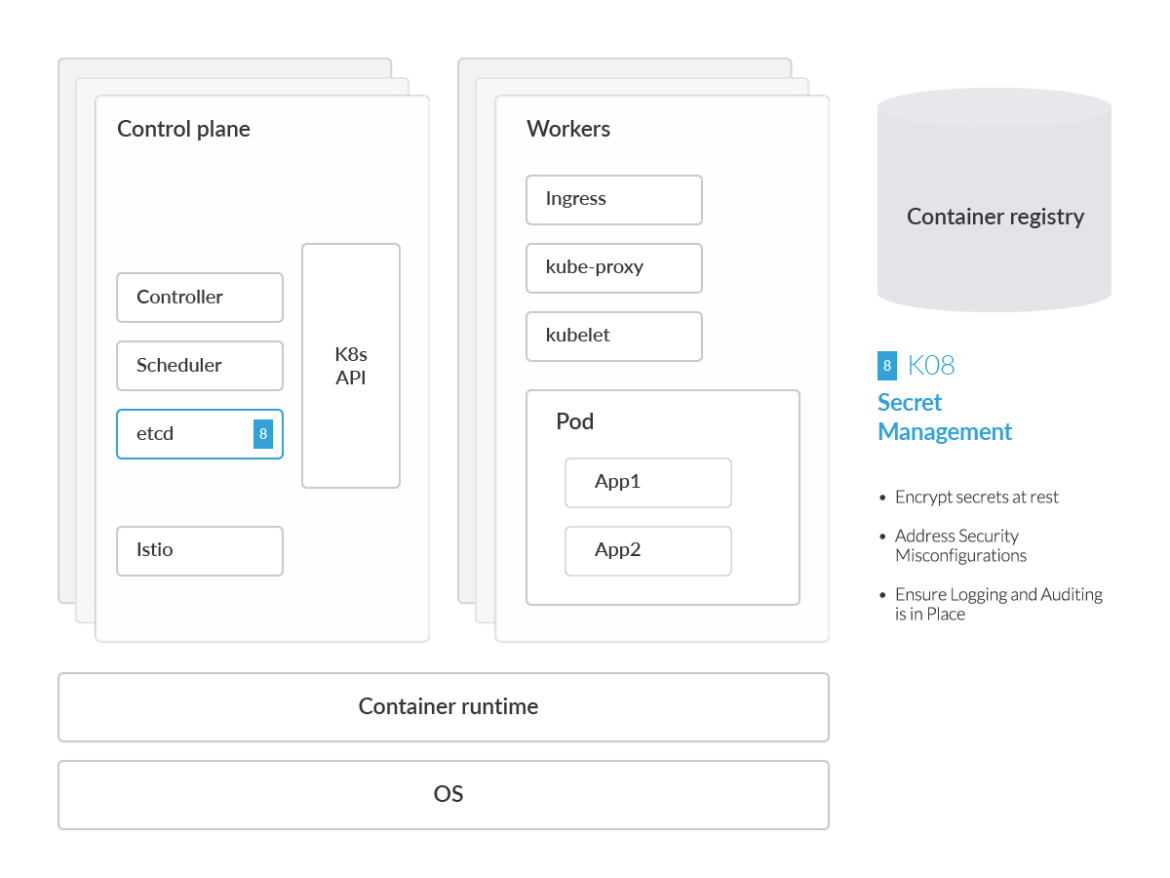
Encrypt Secrets at Rest
One major weakness with the etcd database used by Kubernetes is that it contains all data accessible via the Kubernetes API and, therefore, can allow an attacker extended visibility into secrets. That's why it's incredibly important to encrypt secrets at rest.
As of v.1.7, Kubernetes supports encryption at rest. This option will encrypt Secret resources in etcd, preventing parties that gain access to your etcd backups from viewing the content of those secrets. While this feature is currently in beta and not enabled by default, it offers an additional level of defense when backups are not encrypted, or an attacker gains read access, etc.
Here's an example of creating the EncryptionConfiguration custom resource:
apiVersion: apiserver.config.k8s.io/v1
kind: EncryptionConfiguration
resources:
  - resources:
      - secrets
    providers:
      - aescbc:
          Keys:
            - name: key1
              secret: <BASE 64 ENCODED SECRET>
      - identity: {}Code language: Perl (perl)
Address Security Misconfigurations
Aside from ensuring secrets are encrypted at rest, we need to prevent secrets from getting into the wrong hands. We discussed how vulnerability management, image scanning, and network policy enforcement are used to protect the applications from compromise. However, to prevent secrets (sensitive credentials) from being leaked, we should lock down RBAC wherever possible.
Keep all Service Accounts and user access to the least privilege. There should be no scenario where users are "credential sharing" – essentially using a Service Account like "admin" or "default." Each user should have clearly defined Service Account names such as 'Nigel,' 'William,' or 'Douglas.' In that scenario, if a Service Account is doing something that it shouldn't be, we can easily audit the account activity and/or audit the RBAC configuration of third-party plugins and software installed in the cluster to ensure access to Kubernetes secrets is not granted unnecessarily to a user like 'Nigel' who does not require full elevated administrative privileges.
In the following scenario, we will create a ClusterRole that is used to grant read access to secrets in the 'test' namespace. In this case, the user assigned to this cluster role will have no access to secrets outside of this oddly-specific namespace.
apiVersion: rbac.authorization.k8s.io/v1
kind: ClusterRole
Metadata:
  name: secret-reader
  namespace: test
Rules:
- apiGroups: [""]
  resources: ["secrets"]
  verbs: ["get", "watch", "list"]Code language: YAML (yaml)
Ensure Logging and Auditing Is in Place
Application logs help developers, and security teams better understand what is happening inside the application. The primary use case for developers is to assist with debugging problems that affect the performance of their applications. In many cases, logs are shipped to a monitoring solution, like Grafana or Prometheus, to improve the time to respond to cluster events such as availability or performance issues. Most modern applications, including container engines, have some kind of logging mechanism supported by default.
The easiest and most adopted logging method for containerized applications is writing to standard output (stdout) and standard error streams. In the below example for Falco, a line is printed for each alert.
stdout_output:
  enabled: trueCode language: Perl (perl)
For identification of potential security issues that arise from events, Kubernetes admins can simply stream event data like cloud audit logs or general host syscalls to the Falco threat detection engine.
By streaming the standard output (stdout) from the Falco security engine to Fluentd or Logstash, additional teams such as platform engineering or security operations can capture event data easily from cloud and container environments. Organizations can store more useful security signals as opposed to just raw event data in Elasticsearch or other SIEM solutions.
Dashboards can also be created to visualize security events and alert incident response teams:
10:20:22.408091526: File created below /dev by untrusted program (user=nigel.douglas command=%proc.cmdline file=%fd.name)Code language: Bash (bash)Vulnerability Management
Supply Chain Vulnerabilities
After the four risks arising from misconfigurations, we will now detail those related to vulnerabilities.
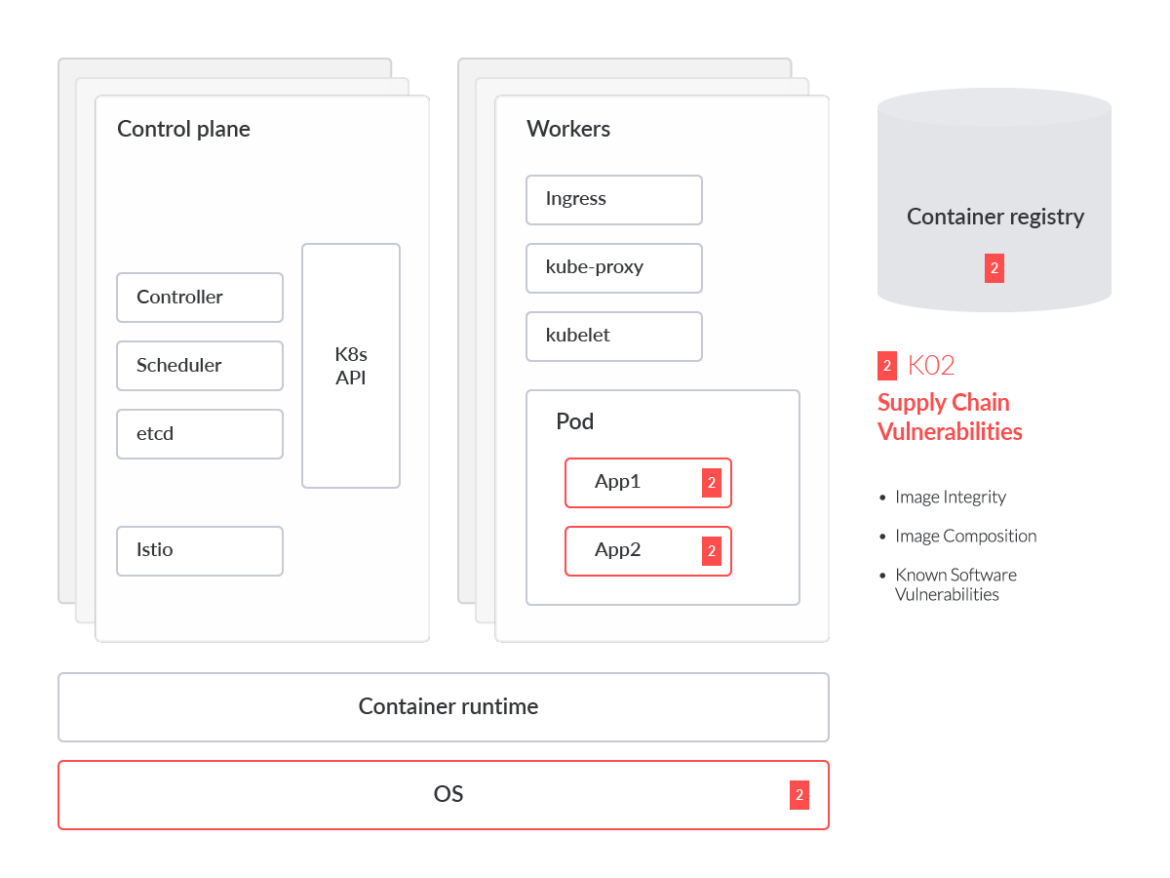
SolarWinds is just one example of a compromised solution within the enterprise security stack. In the case of Kubernetes, a single containerized workload alone can rely on hundreds of third-party components and dependencies, making trust of origin at each phase extremely difficult. These challenges include but are not limited to image integrity, image composition, and known software vulnerabilities.
Let's dig deeper into each of these.
Images
A container image represents binary data that encapsulates an application and all of its software dependencies. Container images are executable software bundles that can run standalone (once instantiated into a running container) and that make very well-defined assumptions about their runtime environment.
The Sysdig Threat Research Team performed an analysis of over 250,000 Linux images in order to understand what kind of malicious payloads are hiding in the container images on Docker Hub.
The Sysdig TRT collected malicious images based on several categories, as shown above. The analysis focused on two main categories: malicious IP addresses or domains and secrets. Both represent threats to people downloading and deploying images that are available in public registries, such as Docker Hub, exposing their environments to high risks.
Additional guidance on image scanning can be found in the research of 12 images scanning best practices. This advice is useful whether you're just starting to run containers and Kubernetes in production or you want to embed more security into your current DevOps workflows.
Dependencies
When you have a large number of resources in your cluster, you can easily lose track of all relationships between them. Even "small" clusters can have way more services than anticipated by virtue of containerization and orchestration. Keeping track of all services, resources, and dependencies is even more challenging when you're managing distributed teams over multi-cluster or multi-cloud environments.
Kubernetes doesn't provide a mechanism by default to visualize the dependencies between your Deployments, Services, Persistent Volume Claims (PVCs), etc. KubeView is a great open-source tool to view and audit intra-cluster dependencies. It maps out the API objects and how they are interconnected. Data is fetched in real-time from the Kubernetes API. The status of some objects (Pods, ReplicaSets, Deployments) is color-coded red/green to represent their status and health
Registry
The registry is a stateless, scalable server-side application that stores and lets you distribute container images.
Kubernetes resources, which implement images (such as pods, deployments, etc.), will use imagePull secrets to hold the credentials necessary to authenticate to the various image registries. Like many of the problems we have discussed in this section, there's no inherent way to scan images for vulnerabilities in standard Kubernetes deployments.
But even on a private, dedicated image registry, you should scan images for vulnerabilities. But Kubernetes doesn't provide a default, integrated way to do this out of the box. You should scan your images in the CI/CD pipelines used to build them as part of a shift-left security approach. See the research Shift-Left: Developer-Driven Security for more details.
Sysdig has authored detailed technical guidance with examples of how to do it for common CI/CD services, providing another layer of security to prevent vulnerabilities in your pipelines:
- GitHub actions
- Gitlab pipelines
- Azure pipelines
- Jenkins
Another layer of security we can add is a process of signing and verifying the images we send to our registries or repositories. This reduces supply chain attacks by ensuring authenticity and integrity. It protects our Kubernetes development and deployments and provides better control of the inventory of containers we are running at any given time.
Broken Authentication Mechanisms
How to securely access your Kubernetes cluster should be a priority, and proper authentication in Kubernetes is key to avoiding most threats in the initial attack phase. K8s administrators may interact with a cluster directly through K8s APIs or via the K8s dashboard. Technically speaking, the K8s dashboard, in turn, communicates to those APIs, such as the API server or Kubelet APIs. Enforcing authentication universally is a critical security best practice.
As seen with the Tesla crypto mining incident in 2019, the attacker infiltrated the Kubernetes dashboard, which was not protected by a password. Since Kubernetes is highly-configurable, many components end up not being enabled or using basic authentication so that they can work in a number of different environments. This presents challenges when it comes to cluster and cloud security posture.
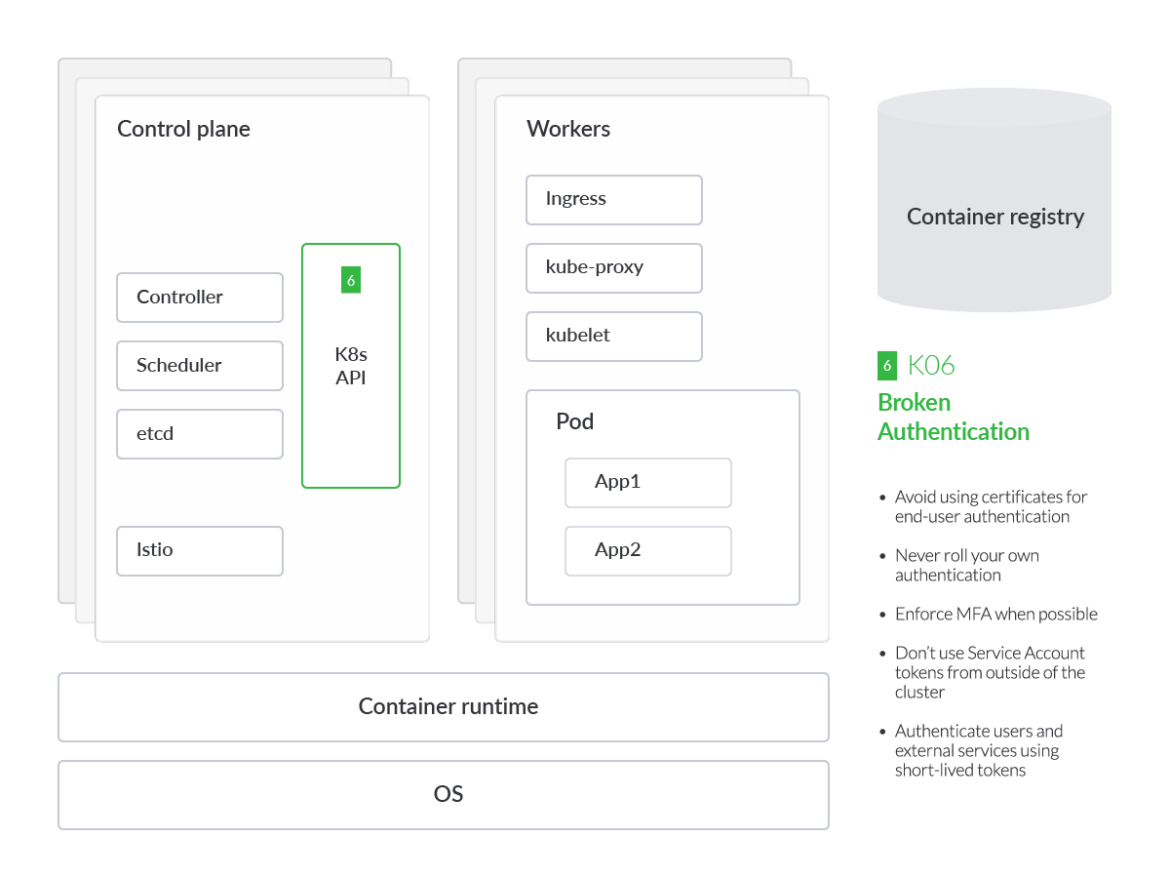
Inside your Kubernetes cluster, the authentication between services and machines is based on Service Accounts. It's important to avoid using certificates for end-user authentication or Service Account tokens from outside of the cluster because we would increase the risk. Therefore, it is recommended to continuously scan for secrets or certificates that may be exposed by mistake.
OWASP recommends that, no matter what authentication mechanism is chosen, we should force humans to provide a second method of authentication. If you use a cloud IAM capability and 2FA is not enabled, for instance, we should be able to detect it at runtime in your cloud or Kubernetes environment to speed up detection and response. For this purpose, we can use Falco, an open-source threat detection engine that triggers alerts at run-time according to a set of YAML formatted rules.
- rule: Console Login Without Multi Factor Authentication
  desc: Detects a console login without using MFA.
  condition: >-
    aws.eventName="ConsoleLogin" and not aws.errorCode exists and
    jevt.value[/userIdentity/type]!="AssumedRole" and
    jevt.value[/responseElements/ConsoleLogin]="Success" and
    jevt.value[/additionalEventData/MFAUsed]="No"
  output: >-
    Detected a console login without MFA (requesting user=%aws.user, requesting
    IP=%aws.sourceIP, AWS region=%aws.region)
  priority: critical
  source: aws_cloudtrail
  append: false
  exceptions: []Code language: YAML (yaml)
Falco helps us identify where insecure logins exist. In this case, it's a login to the AWS console without MFA. However, if an adversary were able to access the cloud console without additional authorization required, they would likely be able to then access Amazon's Elastic Kubernetes Service (EKS) via the CloudShell.
That's why it's important to have MFA for cluster access, as well as the managed services powering the cluster – GKE, EKS, AKS, IKS, etc.
But it is not only important to protect access to Kubernetes. If we use other tools on top of Kubernetes to, for example, monitor events, we must protect those as well. As we explained at KubeCon 2022, an attacker could exploit an exposed Prometheus instance and compromise your Kubernetes cluster.
Outdated and Vulnerable Kubernetes Components
Effective vulnerability management in Kubernetes is difficult. However, there are a set of best practices to follow.
Kubernetes admins must follow the latest up-to-date CVE databases, monitor vulnerability disclosures, and apply relevant patches where applicable. If not, Kubernetes clusters may be exposed to these known vulnerabilities that make it easier for an attacker to perform techniques to take full control of your infrastructure and potentially pivot to your cloud tenant, where you've deployed clusters.
The large number of open-source components in Kubernetes, as well as the project release cadence, makes CVE management particularly difficult. In version 1.25 of Kubernetes, a new security feed was released to Alpha that groups and updates the list of CVEs that affect Kubernetes components.
Here is a list of the most famous ones:
- CVE-2021-25735 – Kubernetes validating admission webhook bypass.
- CVE-2020-8554 – Unpatched Man-In-The-Middle (MITM) Attack in Kubernetes.
- CVE-2019-11246 – High-severity vulnerability affecting kubectl tool. If exploited, it could lead to a directory traversal.
- CVE-2018-18264 – Privilege escalation through Kubernetes dashboard.
To detect these vulnerable components, you should use tools that check or scan your Kubernetes cluster, such as kubescape or kubeclarity – or look to a commercial platform.
Today, the vulnerabilities released directly target the Linux Kernel, affecting the containers running on our cluster rather than the Kubernetes components themselves. Even so, we must keep an eye on each new vulnerability discovered and have the plan to mitigate the risk as soon as possible.
Conclusion
The OWASP Kubernetes Top 10 is aimed at helping security practitioners, system administrators, and software developers prioritize risks around the Kubernetes ecosystem. The Top 10 is a prioritized list of common risks backed by data collected from organizations varying in maturity and complexity.
We covered a large number of open-source projects that can help address the gaps outlined in the OWASP Kubernetes Top 10. However, the deployment and operation of these sporadic tools require a large amount of manpower and an extensive skill set to manage effectively.

