Change Data Captures CDC from MySQL Database to Kafka with Kafka Connect and Debezium

Introduction
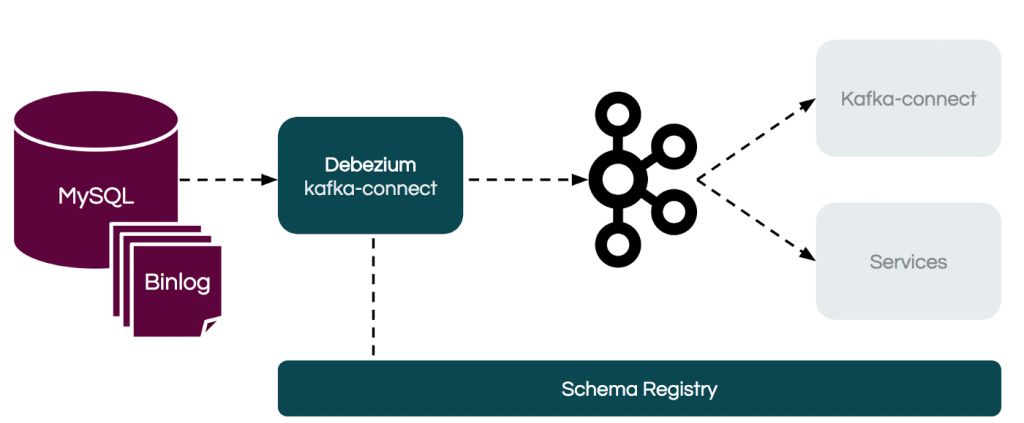
Debezium is an open-source project developed by Red Hat which aims to simplify this process by allowing you to extract changes from various database systems (e.g. MySQL, PostgreSQL, MongoDB) and push them to Kafka
Debezium Connectors
Debezium has a library of connectors that capture changes from a variety of databases and produce events with very similar structures, making it easier for the applications to consume and respond to the events regardless of where the changes originated. Debezium currently have the following connectors
- MySQL Connector
- MongoDB Connector
- PostgreSQL Connector
- SQL Server Connector
- Oracle Connector (Incubating)
- Db2(Incubating)
- Cassandra(Incubating)
In this article, we are going to capture the change events from MySQL database to the Kafka Topics.
The Debezium MySQL connector tracks the structure of the tables, performs snapshots, transforms bin log events into Debezium change events and records where those events are recorded in Kafka.
Prerequisites:
- Kafka installed on OpenShift
- Kafka connect installed on OpenShift
- MySQL Server installed and setup
I have Installed one node Kafka cluster with Kafka connect
[kkakarla amq-streams-1.4.0-ocp-install-examples]$ oc get pods
NAME READY STATUS RESTARTS AGE
my-cluster-entity-operator-759bfbc89d-s68wx 3/3 Running 0 9m
my-cluster-kafka-0 2/2 Running 2 9m55s
my-cluster-zookeeper-0 2/2 Running 0 11m
my-cluster-zookeeper-1 2/2 Running 0 11m
my-cluster-zookeeper-2 2/2 Running 0 11m
my-connect-cluster-connect-1-build 0/1 Completed 0 6m4s
my-connect-cluster-connect-1-deploy 0/1 Completed 0 5m27s
my-connect-cluster-connect-1-ltphz 1/1 Running 0 5m25s
strimzi-cluster-operator-64d9cf9bc7-wsf4q 1/1 Running 0 15m
Installing the MySQL Connector
Installing the Debezium MySQL connector is a simple process; just download the JAR, extract it to the Kafka Connect environment, and ensure the plugin’s parent directory is specified in your Kafka Connect environment.
- Download the Debezium MySQL connector.
- Extract the files into your Kafka Connect environment.
- Add the plugin’s parent directory to your Kafka Connect plugin path:
- Create a directory with Kafka Connect plug-ins
xxxxxxxxxx
[kkakarla upstream-plugins]$ tree
.
└── my-plugins
└── debezium-connector-mysql
├── antlr4-runtime-4.7.2.jar
├── CHANGELOG.md
├── CONTRIBUTE.md
├── COPYRIGHT.txt
├── debezium-api-1.1.2.Final.jar
├── debezium-connector-mysql-1.1.2.Final.jar
├── debezium-core-1.1.2.Final.jar
├── debezium-ddl-parser-1.1.2.Final.jar
├── LICENSE-3rd-PARTIES.txt
├── LICENSE.txt
├── mysql-binlog-connector-java-0.19.1.jar
├── mysql-connector-java-8.0.16.jar
└── README.md
2 directories, 13 files
The Kafka Connect S2I image takes your binaries (with plug-ins and connectors) and stores them in the /tmp/kafka-plugins/s2i directory. It creates a new Kafka Connect image from this directory, which can then be used with the Kafka Connect deployment. When started using the enhanced image, Kafka Connect loads any third-party plug-ins from the /tmp/kafka-plugins/s2i directory.
- Start a new build of the image
xxxxxxxxxx
[kkakarla upstream-plugins]$ oc start-build my-connect-cluster-connect --from-dir ./my-plugins/
Uploading directory "my-plugins" as binary input for the build ...
....................
Uploading finished
build.build.openshift.io/my-connect-cluster-connect-2 started
- Once the build has completed, the new image is used automatically by the Kafka Connect deployment
xxxxxxxxxx
[kkakarla upstream-plugins]$ oc get build
NAME TYPE FROM STATUS STARTED DURATION
my-connect-cluster-connect-1 Source Complete 59 minutes ago 36s
my-connect-cluster-connect-2 Source Binary Complete 6 minutes ago 2m7s
Installing MySQL
- Install MySQL using command
oc new-app --name=mysql debezium/example-mysql:1.0
[kkakarla@kkakarla upstream-plugins]$ oc new-app --name=mysql debezium/example-mysql:1.0
--> Found container image d8322b2 (3 days old) from Docker Hub for "debezium/example-mysql:1.0"
* An image stream tag will be created as "mysql:1.0" that will track this image
* This image will be deployed in deployment config "mysql"
* Ports 3306/tcp, 33060/tcp will be load balanced by service "mysql"
* Other containers can access this service through the hostname "mysql"
* This image declares volumes and will default to use non-persistent, host-local storage.
You can add persistent volumes later by running 'oc set volume dc/mysql --add ...'
* WARNING: Image "debezium/example-mysql:1.0" runs as the 'root' user which may not be permitted by your cluster administrator
--> Creating resources ...
imagestream.image.openshift.io "mysql" created
deploymentconfig.apps.openshift.io "mysql" created
service "mysql" created
--> Success
Application is not exposed. You can expose services to the outside world by executing one or more of the commands below:
'oc expose svc/mysql'
Run 'oc status' to view your app.
- Specify one of MYSQL_ROOT_PASSWORD, MYSQL_ALLOW_EMPTY_PASSWORD and MYSQL_RANDOM_ROOT_PASSWORD
xxxxxxxxxx
[kkakarla@kkakarla upstream-plugins]$ oc set env dc/mysql MYSQL_ROOT_PASSWORD=debezium MYSQL_USER=mysqluser MYSQL_PASSWORD=mysqlpw
deploymentconfig.apps.openshift.io/mysql updated
oc get pods -l app=mysql
NAME READY STATUS RESTARTS AGE
mysql-2-v2gbg 1/1 Running 0 64s
- Connect to MySQL database
xxxxxxxxxx
oc exec mysql-2-v2gbg -it -- mysql -u mysqluser -p mysqlpw inventory
mysql -u root -p
mysql> show databases;
+--------------------+
| Database |
+--------------------+
| information_schema |
| inventory |
| mysql |
| performance_schema |
| sys |
+--------------------+
5 rows in set (0.00 sec)
mysql> use inventory
Reading table information for completion of table and column names
You can turn off this feature to get a quicker startup with -A
Database changed
mysql> show tables;
+---------------------+
| Tables_in_inventory |
+---------------------+
| addresses |
| customers |
| geom |
| orders |
| products |
| products_on_hand |
+---------------------+
6 rows in set (0.00 sec)
mysql> select * from customers;
+------+------------+-----------+-----------------------+
| id | first_name | last_name | email |
+------+------------+-----------+-----------------------+
| 1001 | Sally | Thomas | sally.thomas@acme.com |
| 1002 | George | Bailey | gbailey@foobar.com |
| 1003 | Edward | Walker | ed@walker.com |
| 1004 | Anne | Kretchmar | annek@noanswer.org |
+------+------------+-----------+-----------------------+
4 rows in set (0.00 sec)
- Create a MySQL connector instance to monitor the inventory database
xxxxxxxxxx
apiVersionkafka.strimzi.io/v1beta1
kindKafkaConnector
metadata
nameinventory-connector
labels
strimzi.io/clustermy-connect-cluster
spec
classio.debezium.connector.mysql.MySqlConnector
tasksMax1
config
database.hostnamemysql
database.port3306
database.userdebezium
database.passworddbz
database.server.id184054
database.server.namedbserver1
database.whitelistinventory
database.history.kafka.bootstrap.serversmy-cluster-kafka-bootstrap9092
database.history.kafka.topicschema-changes.inventory
Inventory-connector.yaml
- Verify that inventory-connector was created and has started to monitor the inventory database.
xxxxxxxxxx
oc logs $(oc get pods -o name -l strimzi.io/name=my-connect-cluster-connect)
Capture Data Change Events
Insert
xxxxxxxxxx
INSERT INTO `inventory`.`customers`
(
`first_name`,
`last_name`,
`email`)
VALUES
(
'Ramu',
'kakarla',
'Ramu@gmail.com'
)
"payload":{
"before":null,
"after":{
"id":1005,
"first_name":"Ramu",
"last_name":"kakarla",
"email":"Ramu@gmail.com"
},
"source":{
"version":"1.1.2.Final",
"connector":"mysql",
"name":"dbserver1",
"ts_ms":1591593372000,
"snapshot":"false",
"db":"inventory",
"table":"customers",
"server_id":223344,
"gtid":null,
"file":"mysql-bin.000003",
"pos":364,
"row":0,
"thread":3,
"query":null
},
"op":"c",
"ts_ms":1591593372420,
"transaction":null
}
}
The before object is null while the after object shows the newly inserted value. Notice that the op attribute value is c, meaning it’s a CREATE event.
Update
xxxxxxxxxx
mysql> UPDATE customers SET email='ramu@123@msn.com' WHERE id=1005;
Query OK, 1 row affected (0.02 sec)
Rows matched: 1 Changed: 1 Warnings: 0
"payload":{
"before":{
"id":1005,
"first_name":"Ramu",
"last_name":"kakarla",
"email":"Ramu@gmail.com"
},
"after":{
"id":1005,
"first_name":"Ramu",
"last_name":"kakarla",
"email":"ramu@123@msn.com"
},
"source":{
"version":"1.1.2.Final",
"connector":"mysql",
"name":"dbserver1",
"ts_ms":1591594059000,
"snapshot":"false",
"db":"inventory",
"table":"customers",
"server_id":223344,
"gtid":null,
"file":"mysql-bin.000003",
"pos":673,
"row":0,
"thread":8,
"query":null
},
"op":"u",
"ts_ms":1591594059965,
"transaction":null
}
}
The before object shows the row state, while the after object shows the current state of the row. Notice that the op attribute value is u, meaning it’s a UPDATE event.
DELETE
xxxxxxxxxx
mysql> DELETE FROM `inventory`.`customers` WHERE id = 1005;
Query OK, 1 row affected (0.01 sec)
"payload":{
"before":{
"id":1005,
"first_name":"Ramu",
"last_name":"kakarla",
"email":"ramu@123@msn.com"
},
"after":null,
"source":{
"version":"1.1.2.Final",
"connector":"mysql",
"name":"dbserver1",
"ts_ms":1591594605000,
"snapshot":"false",
"db":"inventory",
"table":"customers",
"server_id":223344,
"gtid":null,
"file":"mysql-bin.000003",
"pos":1018,
"row":0,
"thread":8,
"query":null
},
"op":"d",
"ts_ms":1591594605296,
"transaction":null
}
}
The before object state is not null while the after object state is null. Notice that the op attribute value is d, meaning it’s a DELETE event.
Enjoy!
